Although the pot decorates the flower, the container where the plant is located is also an important element of the composition. Try decorating a flower pot for your interior or garden, surprising with the originality of the idea, as there are many master classes, including bead inlay, shell appliqué, brush painting, as well as fashionable knitting, which will certainly add charm to the item.
Decorating flower pots with your own hands - many ideas from improvised materials
Garden stores are overflowing with pots. There are many options:
- monochrome;
- brick red;
- with prints.
However, in every home you can easily find old pots that you should definitely try to give a new life to. Don't throw them away! This is a waste of money and deliberate pollution of the environment. Take advantage of some inspiring ideas on how to renew a flower pot in a simple and easy way using available materials.
Chalkboard paint
Sometimes repainting pots is enough to give you a completely new item. If you buy chalkboard paint and cover your pots with it, you can update your flower container to give it a completely different look. The paint can cover the entire pot or just part of it, for example in the form of a small square, stripes or circle.
Bark and wood
Just prepare some pieces of wood and a square jar. A little glue on each piece and you have a new flower pot. Instead of wooden elements, you can use bark. If the pot or jar is round, use smaller slices.
Sticks
Collect sticks during your spring walk. It is enough to align them all to the same height, tie them with linen thread and stick them to the pot. Rest assured that the effect will be amazing.
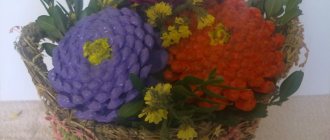
Sea shells
You can use shells instead of sticks. This is a great idea for memories of a pleasant vacation by the sea or ocean. Glue the shells together in your chosen pattern so that the pot is not visible.
Old dishes in the form of a flower pot
Do you want to create unusual pots from simple dishes? Why not place the plant in a cup or decorative teapot that is no longer being used for its intended purpose? An old bucket or bathtub makes a great addition to your patio.
Jars as pots for crafts
This is a very environmentally friendly solution. Every kitchen will have several jars. Instead of throwing them away, paint them with colorful acrylic paint. You can choose several pastel colors and create a romantic composition. An interesting idea is to use metal cans that can be hung.
Flower pot decor with nail polish
Pour a few drops of nail polish into a dish of warm water (two or three shades). The colors are a little mixed. Carefully insert the pot and rotate it so that the paint adheres to the surface. This is a great idea for decoration, as it is guaranteed to produce a wonderful effect.
Stitched covers
Pieces of fabric are also suitable for decorating flower pots. To do this, you simply need to wrap the selected scraps around the pot and secure them with a ribbon or a lush bow.
Such sewn covers look great from leftover curtains, beautifully completing the decoration of windows.
Decorating flower pots with twine, fabric, yarn
When it comes to choosing indoor pots, there are several criteria to consider: material, price, and individual tastes. After all, the product should please both owners and guests. An excellent choice for a room would be flower pots in a textile frame, adding coziness to the room. This handmade option is very affordable.
Lace
All you need is glue and a few types of lace you have lying around in your closet. A wonderful home solution for terraces and balconies. Decoration is very simple. You can choose colored lace to match the decor of your interior or terrace. If the flower pot is left standing at home, it does not need to be secured further. If you plan to place it on a balcony, terrace or in the garden, it is recommended to paint the fabric with a transparent varnish, which will protect the lace and the pot from exposure to adverse weather conditions.
Twine and burlap for decorating a pot
You can wrap a regular pot or jar with twine. This option looks very nice. You can purchase materials for the craft at any DIY store. An excellent decorative option would be burlap, which is even easier to work with than twine.
Flowerpot in a sweater
A sleeve of a sweater is enough to make a warm cover for a pot. This solution greatly warms the interior, bringing comfort.
Coloring clay pots
In addition to the fact that clay pots can be covered with various materials, they are also painted. The paint looks especially interesting if you choose an interesting stencil. So, for example, hearts or animals may appear on the pots.
Usually, the pot is first given a basic or basic shade, and later it can also be painted with a brush, applying various interesting patterns or even a real composition.
Decor of flower pots: creativity for the garden
Filled with colorful flowers, the garden is the perfect place to relax. Thanks to pots and accessories, you can easily create a spectacular composition that will catch the eye of all passersby. Metal flower boxes in bright, rich colors will be a wonderful decoration in a modern style, while hand-painted ceramic pots are ideal for a Provençal-style design. Are you interested in a large hanging box or individual flower pots attached to a balustrade? No matter what you choose, in each option the garden will bloom with a riot of colors. Mix different colors and materials, experiment freely and create unique decorations.
Hollow bricks and stone slabs
The first idea is to use regular building blocks. Fill the container with soil and plant flowers in it. The second idea is to use paving slabs. 5 pieces are enough to make a pot. You need to use a good construction adhesive.
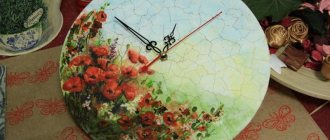
How to decorate a flower pot with mosaics
To create a mosaic, we will need colored pebbles, glass or pebbles, hot glue or regular PVA glue, tile grout, a small brush and varnish.
1. It is advisable that the pebbles or pieces of glass be at least two colors, then you can try to lay out some interesting design. Before starting to work with the pot, the invented drawing should be laid out on paper, if necessary, mark the pot and only then transfer the image to the surface of the pot.
2. First of all, glue the picture, and then take on the background. Using hot glue will significantly speed up the process.
3. When the pebbles are thoroughly glued, apply tile grout, thoroughly covering the entire pot. If at the same time some elements disappear, you should not be upset. They can be glued in a day, when the grout is completely dry.
4. 10-15 minutes after applying the grout, when it dries a little, we begin to wash it off the glass or pebbles with a wet cloth. After 24 hours, if the grout mixture dries out significantly, apply another layer, wipe it again and wait another day.
5. All we have to do is open the pot with varnish, “place” the plant in it and admire the creation of our hands!
If the surface is completely covered with pebbles, there is no need to use grout. An interesting mosaic is made from pieces of ceramic tiles, broken dishes, shells or seeds. The shells are glued using papier-mâché: we tear newspaper or toilet paper into small pieces and mix it with glue, fill the shells to the top with the resulting mass and leave them to dry for a day, after which we grease the shells with glue and plant them on the pot, pressing lightly.
Decor of flower pots in Provence style or how to quickly age a flowerpot
Compositions in the Provençal style have enjoyed constant popularity for many years. Furniture, floral patterns, lace, lavender and porcelain accessories became an integral part of the decor of many homes. There's nothing stopping you from bringing a little French charm to your balcony. Flower pots can be one of the leading elements of the composition. The best option here is an aged item that you can make yourself. Projects that imitate rough abrasions or cracks are welcome.
You will need:
- clay pot;
- paper towel;
- brush;
- various shades of green acrylic paint in natural colors;
- white acrylic paint.
Master Class:
- Apply white acrylic paint to the pot using a brush. Do this fairly quickly and casually so that it doesn't dry out.
- Using a paper towel or your finger, wipe the painted surface of the pot, making distinctive streaks.
Use paints in creams and various shades of natural greens. You can apply them using a regular or sponge brush. Greens should be applied in a minimal amount, as excess can destroy the effect.
A DIY flower pot is an excellent choice for original decoration of a green corner of your home or garden. It will be a wonderful addition to a designer interior. Terracotta pots, Greek or Roman jugs, and vases are excellent choices for classic arrangements. Colonial interiors will appreciate dark wood pots. However, you can make your flower pot unique by getting a little creative by decorating it yourself.
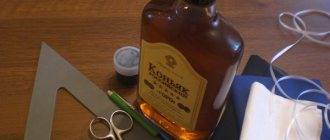
What materials and tools will be needed for the job?
Despite the simplicity of decoupage technology, a home craftsman will not need a large arsenal of tools and materials. The main ones include acrylic paint and varnish, a napkin and the container itself, but the most important thing remains the idea, the implementation of which will become the main creative and exciting process.
Flower pot
When replanting flowers with your own hands, you often lack beautiful and unusual containers, so even the simplest plastic pot can be decorated with your own hands:
- plastic pots;
- glass jars;
- clay pots.
In such containers, decorated using the chosen technology, the flower will grow well and delight all residents of the house or apartment for a long time. Choosing the right pot depends on the plant being grown, and this depends on the skills of home gardeners who grow their own domestic and exotic plants.
Napkins for decoupage
A napkin with any pattern can be used for work; most often, multi-layer napkins with beautiful patterns are chosen. It is important that the print on the paper product is combined with other decor or interior decorations, which will help maintain a unified design concept.
Specialized art supply stores sell decoupage kits, where you can choose napkins with different prints. Special cards for decoupage are especially popular; they depict thematic drawings printed on thin napkin paper.
Tools for work
A home craftsman can get by with a simple set of tools that are often used for handicrafts:
- sharp scissors or a stationery knife, you can use scissors with curly blades;
- wide brushes for applying varnish and glue and brushes for painting with acrylic paints;
- foam rollers for applying glue; they can be replaced with a cut dishwashing sponge.
All these tools are actively used by those who are already engaged in needlework, so you will not need to spend money on purchasing them.
Decoration materials
Decoupage cannot be done without the use of certain consumables; for the creative process, the master will need:
- PVA glue, if the adhesive composition is too thick, it can be diluted with a small amount of water;
- Water-based acrylic varnish, this coating dries quickly and does not leave an unpleasant odor.
Acrylic paints can be useful if you need to paint on the applied design or emphasize bright accents on it.
Crackle technique
Crackle is a pattern of fine cracks that is created on a clay or ceramic surface. To obtain such a pattern, special means are used for aging products. Most often, a special expensive varnish is used to obtain a crackle pattern. But at home, it can be replaced with eggshells, previously washed in warm water and defatted in a solution of baking soda.
To make the crackle pattern stand out, the surface of the flower pot should be painted with dark acrylic paint. If the flowerpot is initially dark in color, then there is no need to paint it.
It is recommended to start a master class on decorating a flowerpot by cleaning the surface of the flowerpot and applying PVA glue to it. Next, attach the eggshell to the glue-treated surface, pressing lightly on it. The result should be a shell pattern with small cracks. After the glue has dried, we treat the flowerpot with ink. Wipe off excess mascara and let the product dry. In order for the pot in the photo to last for a long time, we coat its surface with varnish.