Braiding bottles with satin ribbons. Will be a good gift for the New Year, wedding, anniversary, etc...
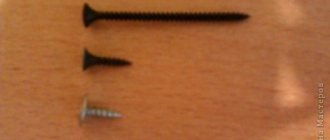
We will need a satin ribbon about 3.5 m; gold brocade ribbon 1.5m; "moment crystal" glue, scissors; a bottle of champagne. I specially selected champagne with gold foil without any inscriptions on the foil. The amount of tape consumed depends greatly on its width. I have a 2.5 cm wide ribbon here. If the tape is narrower, then its consumption is greater.
So, we take the bottle, the tape, and by simply applying it to the neck, we measure out how much is needed for the first layer.
Let's cut it off. We put glue dots. There is no need to apply too much glue, but too little is also bad.
There is too much glue in the photo if you use single sided tape rather than double sided tape.
Now we take our piece and wrap it around the bottle. It is important to glue it so that the wrapping paper does not peek out. We stretch the tape so that the edges do not puff up.
Then we again measure the piece of tape we need. Since the neck widens towards the bottom, the length will be different.
Glue and glue the second layer. A very important point: glue the ends of the tape in the same way as on the first layer. I have the right tip on top and the left one on the bottom. Then the “pigtail” will be even.
Also the third and fourth layers: measure, cut, glue and glue. And we move on to the brocade ribbon. It is very uncomfortable - hard. Doesn't stretch well. So we'll use it quite a bit. But the algorithm is the same. We measure, cut, glue.
There are only 2 layers of brocade tape and I'm almost at the edge. Or rather, at the transition line from the neck to the bottle. I'll also put gold on the bottom. I also measure, cut and glue. But I glue it so that the seam is exactly in the middle at the back. And oh joy! No more measuring! We cut 7-8 blue ribbons to the same length!
And glue them with tension.
I overlap the layers one on one until somewhere in the middle. That is, only half of the layer sticks out.
As a result, you should get a completely untidy seam at the back, and one empty space for 1-2 layers.
Let's seal this sloppy seam. Using a thin knife, we make room for the tape.
We glue the very edge of the ribbon and insert it into the slot.
Now we coat the tape with glue, especially at the edges, and press it tightly with both hands.
That's it, all that remains is to glue the last layers of tape.
The corners sticking out at the front can be trimmed. And that’s it, the base for decoration is ready! Add lace and beads for your unique bottle!
Champagne bottles, decorated with satin ribbons as “He” and “She”, become an integral attribute of the wedding celebration. Until recently, this was done by specialists, but today anyone with basic needlework skills can master decorating bottles with ribbons. This decor is made using different techniques, ranging from simple weaving with satin and brocade stripes to delightful execution using the labor-intensive kanzashi technique or to complement decoupage.
Bottle decor with ribbons
Decorating wedding bottles with your own hands begins with preparing the containers for work so that they look extremely neat.
Labels and foil seals should not show through under the ribbon decoration of the bottles, but it is assumed that the visible part will be in harmony with the textile decor.
Often, in addition to the decor of a wedding feast, several elements are carried out according to the general plan:
- glasses for the bride and groom;
- a basket of satin ribbons;
- boutonnieres;
- handbag for the bride;
- festive paraphernalia on the seats of the newlyweds.
Wedding bottle decor
Doing it all yourself on the eve of the celebration will save you a lot of money or make a pleasant surprise for your loved ones.
It is best to choose 2 different bottles of champagne, so that one bottle is taller and larger, the other is smaller. When sealed, they are immersed in warm water for a while to loosen the glue on the labels, making it easier to separate them.
A clean and dry bottle is additionally degreased with solvent or alcohol so that the glue adheres better.
Beautiful decor of glass bottles with ribbons
Bottle decor with ribbons
Decorating glass bottles with ribbons
Whether the foil will be closed at the top of the bottle depends on the general idea, there are options:
- completely cover with satin ribbons;
- leave the foil open;
- paint in several layers.
Decorating bottles with satin ribbons is considered the greatest chic when they in some way repeat the outfits of the bride and groom. For example, the color of the ribbon weave of a larger container duplicates the color of the groom’s suit, while on a smaller bottle the style of the bride’s dress is recognizable. The amount of decor depends on the skill and desire of the person who will decorate the bottle with ribbons. If there is a dominant color of the wedding ceremony, then it should be reflected in the table paraphernalia.
Decorating bottles with ribbons
Wedding bottle decor
Recently, there has been a trend that brides are abandoning white dresses. It happens that bridesmaids have to come to the wedding in purple, mint, gold or turquoise dresses. Then the “She” bottle, decorated with ribbons, should be the specified color or white, but complemented by decor of the recommended shade.
Decorated bottles are not drunk during the wedding; they are left as a souvenir. This champagne is printed for the wedding anniversary and on the day of the first discharge from the maternity hospital.
Beautiful decor of glass bottles with ribbons
Bottle decor with ribbons
Decorating glass bottles with ribbons
How is bottle ribbon decoration made?
For work you will need
Weaving starts from the neck; due to its expansion, it is the most difficult to arrange neatly. The ribbons are cut into small pieces, each subsequent fragment overlapping the top one. They should fit tightly, neatly, slightly stretched.
Decorating bottles with ribbons
Wedding bottle decor
Each underlying segment will be slightly longer than the previous one - due to the expansion of the neck of the container. It is most convenient to work with tape 2-2.5 centimeters. The next turn is measured directly on the bottle and carefully cut off with a small margin, which goes under the next fragment, as in the photo.
Attention: It is difficult to accurately indicate the length of tape that is used for bottle decor. The thinner the braid, the greater the consumption. Most often, with a standard width, at least 5 m of satin bobbin is required. But keep in mind that 2-3 colors are used.
Beautiful decor of glass bottles with ribbons
Bottle decor with ribbons
Decorating glass bottles with ribbons
The pieces of satin ribbon are fixed with dot marks of glue, which should not bleed through the fabric. It’s better to try it on a training sample first so as not to ruin all the work. If you have no skills in needlework, it is better to master the technique of braiding the neck on any empty bottle. The neat weaving resembles a braid. Then pasting proceeds in the usual way - in a circle. The color of satin ribbons is combined, depending on the design task of decorating bottles with ribbons.
At this stage, care is taken to ensure that the back seam is as even as possible so that the edges of the cuts completely coincide. But it’s unlikely to work out perfectly, so the back sections are covered with a strip of the same tape used for the weaving.
Decorating bottles with ribbons
Wedding bottle decor
There may be options in making a skirt. The more magnificent the accessory, the more luxurious the decoration of bottles with ribbons. You can sew it yourself by sewing lace gathers, or purchase elastic with a frill or ruffled edge. Such an addition with an elastic band is easiest to put on and fix on the bottle, but it is advisable to keep the tension minimal.
The skirt of the “Bride” bottle is decorated with lush bows using the same ribbons. An additional decoration for the “Groom” is a bow tie and buttons that imitate a tailcoat or suit. But the main thing is to decorate the shirtfront beautifully with white ribbons. Buttons can be replaced with small hearts or pearl beads.
When the main stage of weaving is completed, they move on to decorating the top of the bottles. “She” may have a tulle, muslin or guipure cape (veil), a wreath of flowers or a hat. It traditionally has a top hat or a small hat. They are made from a plastic bottle by fitting a hole under the “top” of the bottle.
Beautiful decor of glass bottles with ribbons
Bottle decor with ribbons
Decorating glass bottles with ribbons
Additional decor - swan's down, a piece of white fur or grass yarn. It looks good on a white base, if it is decided to make the champagne bottles white, and the ribbon decor is made using the kanzashi technique, as in the photo.
Any idea is good if everything is done carefully and tastefully, the seams are hidden, the decor is in moderation. Additionally, it is worth working on making such additions to champagne as rings, angels, flowers, doves and hearts. Sometimes they use photos of the bride and groom printed on thin paper (glossy).
We offer you to master one of the options for decorating bottles with ribbons with your own hands - an accessible master class.
Decorating bottles with ribbons
Wedding bottle decor
Sailor on land
It is difficult to choose a gift for an adult man, a colleague, a boss, or a loved one, but there is a universal gift that suits everyone - a bottle of good cognac. This is what we will decorate now. For example, you can make cognac in the shape of a sailor. The recipient will certainly appreciate this idea. The work ahead of us will be painstaking, but it will be worth it.
You will need three types of fabric - black, white and blue, a bottle of cognac, thread, black ribbons and fabric paint.
Let's start with the headgear - a visor. Cut out two circles, one slightly larger and one slightly smaller. In the smaller one, make a hole to fit the size of the neck.
Related article: Sofa embroidery machine (with lighting)
We sew everything together, turn it inside out. Now we prepare the ribbon for the headdress. Use paint to write on the black stripe.
Now draw black stripes on a piece of white paper.
The image of a sailor is not possible without a justa; it is very simple to make. Cut a piece of blue fabric and paint the edges with white stripes.
We sew two covers for the bottle, white and black. The black color will serve as bottle pants. Once you have everything ready, you can put everything together.
Here's how to decorate a bottle of cognac at absolutely no cost. As a result, you will get this beautiful sailor:
We decorate wedding glasses and other attributes
Decorating a wedding table is not limited to decorating bottles with your own hands with ribbons. Most often, they are decorated in the same way with other decor - boutonnieres, candles, etc.
It is better to buy glasses separately rather than take them from a set. Most often, they are stored for many years as a memory of the wedding, without washing away the decoration. Next, we decorate the glasses, like the bottles, with satin ribbons with our own hands so that they form a single set. Decorative elements may differ, but it is worth tying bows from the same ribbon that is woven around the champagne on the stem of the glass. Next, the small decor is attached with transparent glue.
In addition to wedding bottle decor with satin ribbons, we offer a master class on making a basket (based on soap and pins).
Ribbons
Required:
- satin ribbons
; - brocade ribbons (with the addition of shiny inclusions);
- glue "Moment"
; - additional decorative decorations.
To make the decoration successful and the bottle to become an excellent souvenir, it is advisable to take a product with gold foil without adding any inscriptions. The amount of tape used depends on the width of the material. To make bottle decoration easy and the result to be excellent, you need to decorate according to the following scheme:
- To implement each layer, you must first apply the tape to the required place without gluing, and then cut off the excess.
- Dots are placed on the surface of the bottle with glue. There is no need to use a lot of this substance.
- The tape is glued close to the surface and stretched
. Each subsequent layer is adjusted in length. - When gluing the tape, a kind of pigtail is formed at the joints. You should always cross the edges of the material in one direction to ensure an even pattern.
- When narrowing the tape towards the neck, make sure that it is absolutely even
. - After you have finished gluing the bottle with the base decorative layer, you can decorate it with any additional elements.
How to decorate a bottle using ribbons for a wedding:
The flat (wide) part of the bottle must be sealed with even strips. The result will be a sloppy seam. It is covered with a ribbon threaded across it.
Decorating wedding bottles with ribbons: master class
First, let's do the preparatory work and remove the label from both bottles:
Removing labels from bottles
Making a wedding bottle – “Bride”
We cover the neck of the bottle with light lace. We apply glue to the fabric itself, and then, with gentle movements, glue it to the bottle itself, pressing it with our hands.
Cover the top of the bottle with light lace
Then, having selected the beginning of the collar of the bottle, cut the satin ribbon to the required length and glue it on top of the lace. We also apply glue to the tape itself, and then glue it to the bottle. Having selected the middle of the bottle, we begin from the middle to cover it horizontally with tapes.
Cover the bottle with light tape
Having pasted the bottle to the bottom, we secure the tape to the bottom with transparent tape so that the tape holds better. We return to the collar and add the tapes to those already glued in the middle of the bottle. You need to make sure that all joints are located on the same side.
We begin to tape the top of the bottle
How to make a bow from a satin ribbon
We fold the satin ribbon in half, choosing the required size of our bow, then fasten it with a needle and thread in a zigzag, pull it together and secure it. Next, we take the lace that we used to tighten the neck of the bottle, using the same technology we also make a bow from it, but smaller than the first one
We make the middle bow from lace
Then we make another, the smallest one, from a narrow ribbon. We collect all the bows, tie them with thread, fasten them, and for beauty and to hide the seams and ties, we tie them together with a thin ribbon and tie them with two knots on the back side of the bow.
Assembling a bow from ribbons and lace
Using the same pattern, we make a second bow on the neck of the bottle, but the overall size is smaller. Glue the resulting large bow to the bottle, and glue the small bow to the neck. We decorate the bottom of the bottle with a light floral ribbon, thereby hiding the imperfections and joints of our work, and we also decorate the neck itself with these small flowers.
Decorate the neck with satin ribbons
We glue half beads from the top of the bottle to the bow; we also attach one large half bead and two small ones to the bow itself. Our “bride” bottle is ready. By the way, a good addition to these bottles would be one that can also be given to newlyweds.
Making a wedding bottle – “Groom”
We also select the place where the collar will be based on the height of the bottle and glue one strip of light satin ribbon. We glue the same dark strip to it:
Glue on a collar made of satin ribbons
We glue dark tapes horizontally from the middle to the bottom of the bottle, and secure them at the bottom with tape. We return to the collar, glue the dark ribbons to the middle.
Tape the base and neck
Then we cover the neck itself with a dark-colored satin ribbon. We glue a small light tape to the middle of the bottle vertically, thereby covering all the joints. We glue a narrow dark tape onto it.
We glue tapes vertically to the seams. We make a bow tie from tapes.
Our “groom” bottle is ready. You can get the job done by choosing any other color of satin ribbons you like. This decoration for wedding bottles
will preserve traditions and maintain a festive mood. Or you can watch a tutorial on decorating champagne for Valentine's Day. Do not limit your imagination, ideas for which you can take from the blog "". Better yet, subscribe to updates via RSS or email so you don’t miss interesting master classes. Good luck!
Decorating a wedding with fabric is inexpensive and beautiful. Not a single modern holiday is complete without such decor: ribbons, bows and draperies are used. We will tell you how to decorate wedding accessories and the room where the banquet will be held with fabric.
Let's start with theory and figure out what fabrics are used for wedding decorations.
Firstly, these are opaque fabrics of different densities, which are used to create basic decor - satin, gabari, brocade, artificial silk, taffeta, crepe-satin, velvet. They are suitable for creating tablecloths, table covers and skirts, decorating walls, ceilings and table backdrops for newlyweds; they are used to make chair covers and ribbons of different widths.
Secondly, these are lighter, translucent fabrics - organza, tulle, chiffon, voile, decorative mesh or lace fabric, which are ideal for creating bright accents and completing interior design. For example, they are suitable for bows on a table skirt or the back of a chair, as well as for airy decoration of walls and ceilings. Tulle and organza are used to create wedding accessories: for example, bonbonniere bags are sewn from them.
It is best to combine two or three types of fabrics so that the fabric decor creates a feeling of airy lightness and celebration. Fabric decoration should be made in the colors of the wedding. However, for basic heavy fabrics, the main color is usually used - usually a soft pastel shade, white or cream color. And to create “roses on the cake” - bright details in the design - light fabrics are used in bright and contrasting shades with respect to the base color.
You can buy fabrics for wedding decorations in wedding salons and online stores, as well as in specialized fabric and accessories stores. The average price per meter of high-quality fabric for hall decoration is 100-300 rubles. It is more profitable to buy in rolls: discounts are provided for this. One roll contains 20-25 meters.
Calculating the amount of fabric, of course, depends on the size and number of tables, area of the room, type of decor and many other factors. But for decorating a small table for the newlyweds (about three meters), the space behind it, as well as a certain number of guest tables and chairs, a roll of thick fabric of a basic color and a roll of airy bright fabric will be enough. You can buy inexpensive fabric for wedding decorations in the Peony-Decor online store: a meter of thick fabric costs only 95 rubles, a meter of veil costs 85 rubles.
Bottle decor
Surely there are interesting bottles in your kitchen bottle holder that can be decorated.
Internal and external finishing used:
- Decoration from the inside is carried out for bottles that have a completely transparent design and have a perfectly smooth or unusual shape. Expensive alcoholic drinks or even children's juices are often sold in bottles that are decorated with recesses, recesses, and even entire aesthetic or comical designs.
- Decorating the outside requires fewer features from the bottle. It is enough to use even the most ordinary water container. Of course, unusual shapes look much more interesting.
When performing external finishing, the master takes advantage. An empty bottle can be filled with water, then it will become elastic. When all elements are completed, the contents are poured out. This method of decoration is recommended for beginning needlewomen.
Design ideas:
- a combination of colors in the interior, such as gold, burgundy, sea green (suitable for a marine-style kitchen), bright yellow or green;
- vintage with noble and nostalgic contours, suitable for a moderate brown kitchen;
- shiny finish reminiscent of precious metals or stones;
- nautical motifs, detailed execution of all the attributes of a summer holiday, or even sticking on small souvenirs brought as keepsakes;
- heterogeneous openwork patterns based on the color of the lining or applied directly to the transparent structure.
Step-by-step instructions for decorating with twine
Using the technique of decorating a bottle with twine, you can create the likeness of many interior items: decorative panels, dishes, fabric products and various vessels. You can choose not only bottles, but also cans.
The only condition for decorating with twine is that it is made of glass. This will help preserve the structure for a long time, since plastic bases are less durable.
You can take not only a transparent frame, but also a painted one. All stickers that may fall off must first be removed. The color of the base is not important, since it is usually completely covered with decorative material. If you need a beautiful and unusual thing, you need to choose the most bizarre shape of the product as possible. Interesting kitchen design ideas can be found in this article.
Materials:
- selection of a quality basis;
- any fabric that is made through a rough and simple weave of threads. Beading or tapes are great;
- purchasing paper twine. You can do without store-bought material by using sisal or hemp rope;
- wire 2-4 mm. It should bend perfectly; it is advisable to purchase this element from aluminum;
- two different glues “PVA” and “Moment”;
- It is advisable to wear gloves so as not to be nervous about your hands sticking to the surface.
Step-by-step instruction:
- The work starts from the bottom of the bottle. You need to follow in a circular order. Apply a thick layer of Moment glue to the entire bottom part of the glass product.
- Glue the twine to the very edge and begin to wind it sequentially from the outermost line of the bottle.
- Place the strings of twine tightly against the previous layers, while adding a little glue. It should not be applied to the threads themselves or to the entire surface. It is enough to regularly add 2-4 drops to the base in the place where the thread is subsequently wrapped. There is no need to immediately pour glue over a long distance, as it dries quickly.
- When protrusions or depressions begin, as well as when moving to a tapering element of the base, it is necessary to coat the surface with a sufficiently thick layer and try to twist the thread in these places as quickly as possible. It is advisable not to damage the quality at the speed of work, since a non-uniform coating can spoil the appearance of the finished product. Absolutely all parts, even when overlapping each other, must be wrapped with this material. If you need to place threads inside large recesses, you need to carefully push the material into them using a stick or your hands.
- The neck or other particularly thin parts are wrapped a little more tightly than the rest of the bottle, as there is a risk of the fasteners delaminating.
- Separately, crochet a pigtail from twine. It is done using a basic technique by threading each new loop into the previous one. If the master does not know this knitting technique, you can simply divide the threads into three parts and tie a usual braid. When this line is produced, it is necessary to periodically place it against the edge of the bottle to see if it fits the exact size of the circle. It is necessary to make an exact part in size, since the stability of the entire structure depends on it.
- Glue the resulting braid to the bottom, slightly extending onto the base of the structure.
- The bottle is being decorated. You can use any available materials that have an aesthetic appearance and are suitable for twine. Most often, craftsmen make curls. To do this, take ordinary strands of twine, wrap them in several layers and twist them in a chaotic manner or form a circle.
- It is advisable to decorate the central part of the resulting elements with some kind of bead or decorative flower.
- If the resulting product seems too dull, it can be easily refreshed by choosing a bright color scheme, if you wisely use old jewelry or any transparent elements from clothing. You can look at children's and already unnecessary creativity kits. They also help create a great appearance for the product.
Such decorated bottles will fit perfectly into the Mediterranean or Scandinavian style.
Twine is not a bright material, so it is advisable to give it a brilliant and original appearance by adding something shiny or stylish. To finish it in a simple style, just add a coffee bean or a soft button inside. It is advisable to add exactly the same circle to the very top of the bottle so that it looks complete.
Decorating bottles with twine, watch the video master class:
Wedding decoration with ribbons: decorating accessories
Fabric is used not only to decorate the space, but also to decorate wedding accessories. Decorating glasses for a wedding with ribbons is one of the classic methods of decoration. Wedding champagne is usually decorated in the same style. Bows and flowers are created from ribbons, as well as various “costumes”. It is most convenient to use a glue gun when creating such decor - the work is more accurate. This useful tool costs only 345 rubles in the Peony-Decor store.
Large voluminous flowers are created from ribbons: they are used to form bouquets for decorating tables. Individual buds are also attached to the table skirt and backdrop at the newlyweds' table. How to create beautiful roses from ribbons, which can be used to decorate gifts for guests, table settings (if you stick them on the ribbon used to tie cutlery) and create topiary that will decorate the guest room, is shown in the video below.
How to make the topiary itself is shown here:
Most often, satin ribbons and organza ribbons are used for wedding decorations. The minimum width of the tape is usually 0.3 centimeters, the maximum is 15 centimeters. Narrow ribbons are convenient to use to decorate the stem and bottom of the glass; they are glued overlapping. This is a beautiful and very inexpensive material: a reel with 20 meters of tape costs no more than 100 rubles.
The original way of using ribbons and lace for wedding decorations is shown in the photographs: they are used to create curtains for a photo shoot or backdrops for the newlyweds’ table.
A fashionable novelty is a ribbon made of rhinestones. She looks incredibly impressive. At the same time, it’s easy to use: you don’t need to create bows or roses, just glue it on and your stylish accessory is ready! A 10-meter reel costs about 1,500 rubles, but this price is justified.
When decorating a room with fabric, there is no point in reinventing the wheel: new ideas for decorating with fabric turn out to be just well-forgotten old ideas. There are basic principles, you can show your imagination in the details. Below is a master class on how to create a classic fabric drapery for the newlyweds’ table:
The photo shows beautiful ideas for decorating a wedding with fabric.
1. The backdrop and table are designed in the same style, a bright light fabric covers a thick fabric of the base color. Creating such a decor is quite simple; there are no complex folds. And it looks impressive.
2. An unusual idea is to create a canopy from translucent fabric. Suitable not only for an outdoor wedding, but also for decorating a not very beautiful banquet hall.
3. Very simple decor that looks incredibly stylish: a combination of lace fabric and ribbons. Of course, it would only be appropriate for a themed vintage wedding or a wedding in a rustic style.
Lace decoration
This decor in the Shabby Chic style with your own hands will bring a special charm to the room; to complete the style, you can sew chair covers, potholders, napkins with lace and make boxes for storing vegetables.
It is advisable to paste over according to the algorithm below:
- the bottle is degreased;
- suitable places for sticking the material are outlined;
- lace elements are smeared with glue and applied to the surface;
- After all the elements have dried, you need to coat them and the rest of the bottle with a glossy varnish.
Decorative elements can be crocheted, cut from old clothes, tablecloths, or purchased as a set.
Video: master class on how to make a vase from a glass bottle using twine braiding
See how to make a stylish decor for an ordinary juice jar:
Wedding decoration with fabric and flowers
Fabric decor goes well with floral decor. The use of living plants and light translucent fabrics creates a magical effect as in the photo below.
True, floral decor is more expensive than fabric decor. Therefore, those who want to save money should combine fresh and artificial flowers - the latter are also made from fabric. You can decorate the presidium table and backdrop with fresh flowers, and place stylish topiaries on the guest tables.
A combination of balloons, fabrics and ribbons is the best option for decorating a budget wedding. The materials are inexpensive, but when combined correctly, you get a beautiful and festive decor for a holiday in any style. You can buy a helium cylinder for refilling balloons yourself at the Peony-Decor store for less than 2 thousand rubles, and the cost of the balloons themselves is minimal. To create figures from small round balls you will need a pump, but it is very cheap - only 180 rubles.
Figures and compositions made from balloons look great on the fabric drapery at the presidium table. The combination of fabrics and small balloons makes very beautiful wedding arches. Helium-filled balloons with colorful ribbons tied to them will create an unusual curtain.