If a certain style is chosen to decorate an apartment (house, apartment or one room), then decorating only the walls, ceiling and furniture is not enough. All the details are important. Furnishings must correspond to the intended direction. Let the lamps, clocks, flower pots and everything else match each other. A good solution for the appropriate overall design of the space would be decoupage.
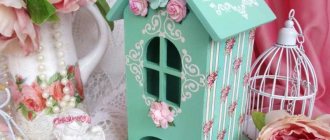
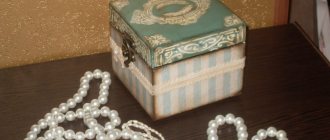
Decoupage a box in shabby chic style can be part of the overall plan. A box designed in the appropriate style will perfectly complement and highlight the character of the house and the tastes of its inhabitants. At the same time, she will be able to fulfill her traditional role as a guardian.
About style and technique
First, let's talk a little about the main terms. Decoupage is a French word and means to cut out. This is a technique of decorating various household items with cut out pictures. "Shabby" means shabby, and the word is English, and chic is luxury (in French). Now let’s try to figure out how a box in the shabby chic style differs from a box in the Provence style.
There are many similarities between these two genres. This is an antique look, a lot of white, pastel colors in the decoration. The differences are borderline foul. Provençal style uses pictures of nature. Her favorite flowers are lavender and sunflowers. Shabby chic uses small flowers, sometimes allows peonies and loves more elaborate shapes of objects that are close to Victorian. In short, Provence is a noble antique, and Shabby chic is a chic, but slightly shabby artifact.
Armed with this set of knowledge, you can begin to create with determination.
Restoration using decoupage technique
The widest range of applications of decoupage techniques in the shabby chic style, restoring furniture, improving the design of individual interior items, finishing the floor - all this gives the imagination of craftswomen complete freedom. The following handcrafted examples of Old English style will serve as inspiration for future decorating decisions.
Updating a chest of drawers, a table or a chair can radically transform the atmosphere of not only a separate room, but the entire home. We present to your attention a master class on decoupage furniture in the shabby chic style.
Chair decoupage (master class)
Let's start with the list of tools and materials necessary for restoring a chair:
- acrylic paint;
- burnt acrylic umber;
- naturally produced acrylic sienna;
- acrylic lacquer;
- brushes of various sizes;
- sandpaper;
- candle;
- paper napkins.
Related article: Wall decoration: making bright paper crafts with your own hands
Decorating a chair using the shabby chic decoupage technique has the following steps:
- Preparation . Before starting the process of direct decoration, it is necessary to carry out preliminary work to remove a layer of varnish or paint from the surface of the fittings. As a final result, the furniture area should take on a minimally rough and maximally smooth structure.
Preparing the surface for painting
- Creating abrasions . An optional item that you can safely skip if the idea you have in mind does not involve scuffs on the item being decorated. Painting the areas where supposed abrasions will be located with burnt acrylic umber helps create fake wear. These areas require waxing the candle and then removing the excess.
Painting a chair with burnt umber or other dark paint
- Painting . Mix white acrylic paint with natural sienna - this will give the paint material a milky-creamy hue. Divide the mass into several parts and add PVA glue. Paint all the elements of the chair using a brush. If necessary, the base layer can be secured with several thin layers of acrylic.
Painting a chair with white acrylic paint
- Grinding . Use sandpaper to remove the roughness of the dried paint.
Surface grinding
- Decoration . Having determined the area where the napkins will be placed, apply a layer of acrylic varnish to the painted area and secure the prepared napkins with PVA glue.
Glue the picture using PVA
- Conclusion. For complete readiness, it is necessary to treat the item with a silky matte varnish.
The finishing touch
On video: chair decor in shabby chic style
Box decor (master class)
Hand decoupage of a box in the shabby chic style turns the most inconspicuous box into a bright mini-chest for storing things for various purposes. A homemade box is the best option for a handmade gift.
When starting work, make sure that the following things are available in the work area:
- wooden box;
- acrylic white and umber paints;
- skins of varying coarseness;
- wax candle;
- PVA glue;
- synthetic bristle brush;
- water spray;
- water-soluble varnish coating.
Before starting to work with the product, it is recommended to remove it from fittings, screws and loops. Follow the prepared action plan:
Related article: Making stencils for a children's room (+40 photos)
1. Prepare a wooden box by removing all fasteners and handles from it.
Wooden box
2. Dilute a mixture of natural umber and water in a container. The density of the future primer-paint should be similar to the consistency of kefir. Apply a layer of the resulting mixture to those places on the box where you plan to make abrasions.
3. After the brown layer of paint has dried, the stage of rubbing the necessary areas with wax/wax candle begins. Brush off any excess with a brush.
Rub the product with a candle
4. Paint the product with white paint diluted with water.
Paint it white
5. After the coating has completely dried, use rough sandpaper to make abrasions until the primer appears.
Making abrasions
6. Cut out the pattern of the future decoration from a napkin and separate its layers, then attach the pattern to the box (on the decorated area previously greased with glue). Apply glue to the top of the image again.
Glue the design to the surface
7. Secure the result with acrylic varnish.
Final result
As you can see from the above MK, anyone can create a box in the shabby chic style with a little effort and patience. At the same time, the final work will pleasantly surprise you. World-famous designers use the shabby chic style to create interiors, because imbued with romance and a mood of lightness, it delights connoisseurs with its sophisticated and ancient atmosphere.
It is noteworthy that the decoupage technique is preserved regardless of the object, so you can safely use the given master classes to decorate literally every wooden object, be it a chest of drawers, a table, doors, walls or even a tray.
Decoupage of old furniture in shabby chic style (2 videos)
Decoupage ideas in shabby chic style (40 photos)
The best posts
- 9 stunning mirrors for your interior
- How to Make an Ottoman with Your Own Hands - Ideas for Inspiration
- Do-it-yourself toilet paper holder doll made from foamiran
- How to clean plastic windows and window sills?
- Metal siding under timber for all types of facades
- High-quality restoration of sofas with your own hands
- Airy openwork summer pullover - crocheted and knitted
- Forged gates: photos, models, varieties
Related article: Give me a heart: souvenirs and gifts in the form of hearts
Tools and materials for work
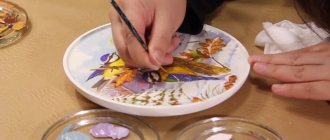
Knowing the style in which we will decorate, we choose pictures. You can take ready-made decoupage napkins or cards. They are three-layer. When working, the selected parts are cut out (or pulled out by hand), and the layer with the picture is separated.
But special napkins are not at all necessary. Drawings on ordinary (office) paper are quite sufficient. Photos or postcards will also work. True, you will have to prepare them in advance. They are a bit thick to handle. Let's start thinning them out. To do this, cover the picture with three layers of varnish (you can use hairspray). We are waiting for it to dry completely. Place the bottom side on a flat, wet surface. After about an hour, when it has softened, carefully remove (scrape off) the excess layer (with a paper knife). We received the main material for decoration.
Tools for working in the decoupage technique are: a sharp knife, scissors, sandpaper (fine). You will also need: PVA glue, light furniture varnish (alkyd or acrylic), acrylic paints (white and any you like), dark (for example brown) for primer, wax (you can use a candle), brushes (with medium-sized stiff bristles), foam sponge .
If you decide to decorate your craft with three-dimensional elements, you will need polymer clay. It is better to stock up on something that hardens without heat treatment. You can use ready-made antique or antique items for decoration.
You can buy a blank for the box at a craft store, or you can decorate a tin or wooden box with a lid
Of course, the most important thing is the box itself. Depending on her choice, we will use techniques for preparing for decoupage.
General points
When working on decorating an artifact with flat and three-dimensional images, there is some difference. However, the main stages are similar.
So, let's look at the process in detail.
- First of all, we isolate all the overhead parts (hinges, fasteners, etc.). You can remove them or carefully seal them (for example, with masking tape).
- Now you need to prepare the surfaces for painting. Degrease. Simply wash a plastic item with a soapy solution (dishwashing detergent, laundry gel). It would be a good idea to sand the metal one (with sandpaper) and paint it with a special compound for exterior use (it will prevent rust from reaching the metal). We process the wooden thing with sandpaper.
- Pre-dilute the paint and glue with water (approximately 1:1). This makes it easier to apply them to the object and they are applied in a more even layer.
- Now you need to prepare the bottom layer for painting. It will create a worn effect when finished. Choose a dark color of paint and apply it to the entire inner and outer surface of the box. We are waiting for it to dry completely.
- Let's move on to the next stage. We go over the perimeter of all edges of the box with wax. It will prevent the paint from lying flat and will create the appearance of a worn surface.
- Paint the outer surface (white or any pastel color). To get this color, add a drop of, for example, green to the white. Let's dry it.
- We go over the places where the wax is applied with sandpaper. Dark soil appeared. The box was “worn out” in the places where we wanted it.
- We arrange according to the planned plan. We place the prepared picture on the place intended for it. Wet with water and straighten. Blot off excess water. We apply glue (from the middle to the edges) so that it lies flat without forming bubbles. Let it dry.
- If you decide to limit yourself to a flat (two-dimensional) image, then cover the craft with varnish and wait for it to dry. We carry out this operation at least three times.
- We restore fittings (overhead parts).
That's all. The box is ready.
Master class with photos on decoupage boxes for beginners
To decoupage an old box (in Provence, shabby chic or vintage style - the only difference is in the designs) - we clean up all the rough edges with sandpaper and paint it brown. It is advisable to use only acrylic paints. After this, our workpiece should dry thoroughly.
Using an ordinary wax candle, carefully rub all the corners and edges with it. We clean off the excess candle with a toothbrush - the wax layer should be thin. Subsequently, this maneuver will give the box an “aging” effect.
Then we paint our box with white acrylic enamel (paint). There should be several such layers. But each layer must dry well.
Using any metal object, scrape off the paint in those places where we rubbed it with a candle. Now you will see what the “aging effect” is with your own eyes! It should look like in the photo.
Let's prepare the materials: rice paper and decoupage card. In parallel, dilute PVA with water in a ratio of 1:3. We do not grease the place where we will glue our motifs too much - this will ensure a good “adhesion”.
Carefully apply the rice paper or napkin motif to the surface of the box. From the top, from the center to the edges, we apply a lot of PVA glue, not forgetting to smooth out any wrinkles on the paper with a brush or hands. After this, the box should be completely dry.
Use oil paint and a sponge to rub the corners and edges.
Apply a neat layer of acrylic varnish to the box and leave until completely dry.
We glue thin double-sided tape to the bottom of the box. Cut out the fabric of the desired color according to the size of the bottom. Then soak it in PVA glue diluted 1:3 with water. When the fabric is dry, we must glue it with tape to the very bottom of the box.
For decoration, we take suitable buttons, lace, postcards and other vintage little things. We glue the entire decor using transparent Moment glue.
This is what our box looks like inside and out:
This completes our step-by-step MK. See you again!
Volumetric decor
Creating a three-dimensional or raised image will require a lot of effort. You can use a ready-made element (for example, a cameo). This can be an item of similar design made from any raw material. You can make such a part yourself from polymer clay using suitable stamps (templates). In this case, you can use clay that hardens during firing. Having prepared such an item, stick it in the right place. Let's dry it. We re-paint the places where it is required. We coat with varnish three times. (Each time we wait for it to dry).
We finish with fittings. She must return to her place.
You can apply bas-reliefs to the finished product. In this case, you will need polymer clay, which does not require firing. With its help it is easy to decorate an item with a three-dimensional image. This is done as follows:
- Let's prepare two identical pictures.
- We glue one of them according to all the rules of decoupage in the right place.
- Let's sculpt the middle part of the picture from polymer clay. This could be several details or one episode. At the same time, we try to make a cast with rounded edges, without jagged edges.
- Glue the clay craft to the place in the picture that is intended for it. We are waiting for it to dry.
- From the second drawing, identical to the first, we cut out the part that is covered with clay.
- Place it on top of the clay and carefully glue it. Can be tinted along the contour.
Let it dry.
- Cover with several layers of varnish. We get a three-dimensional image. Of course, such a thing looks very elegant and original.