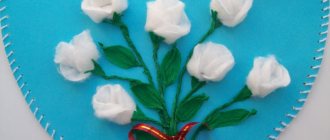
Option 1. Volumetric heart
DIY crafts made from old CDs are easy to make. And you don’t need to look for material, everything you need is at home and at hand.
Materials required for work:
- There are a lot of disks;
- Hard cardboard;
- Scissors;
- Pencil or marker;
- PVC glue.
Stages of work:
- We cut out a large heart from thick cardboard - this is the basis.
- Take the glue and start gluing the disks onto the cardboard. Try to fill all the empty space to make the picture complete. With each new layer of disks there should be fewer. The last row is one disc and it should be placed in the middle of the heart.
Crafts for the kitchen from CDs
Every housewife will love handmade coasters made from CDs, dishes for cereals and pots for indoor plants, decorated with beautiful shiny mosaics, coasters for napkins made from CDs, as well as all kinds of wall paintings and panels. All these items together will help create a bright, original interior design.
Related article: Wallpaper for the living room
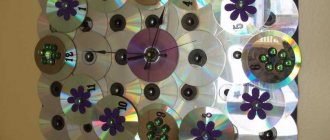
Option 2. Mirror frame
DIY computer disk crafts are a great way to spend time productively and create a beautiful decoration.
Every home has a mirror and the frame is not always beautiful. It may be the most ordinary and not fit into the main interior of the room. A frame made of disks will look very attractive.
Take old discs and a hammer. Break the discs, but not into small pieces. The fragments should be large and different in size.
We recommend reading:
Crafts from isolon - a manufacturing master class, nuances of working with the material and step-by-step instructions on how to make a craft (85 photos)- Crafts from saw cuts: stylish and beautiful options for decorating the garden and interior with your own hands (130 photos)
- Crafts from toothpicks - interesting ideas, manufacturing examples and the best crafts for children (120 photos)
Cover the mirror with tape and newspaper. Leave some free space around the edge for decorations. Using Moment glue, stick the discs in a chaotic order.
The voids can be filled with beads or large beads. You can find beautiful shells and fit them harmoniously into the interior.
Scarecrow for the garden
Garden or vegetable garden owners know the damage birds can cause. Most often, homes are disturbed by corvids, which, having a more intelligent mind, are able to obtain food in the most incredible way.
A DIY craft made from CDs will help scare away uninvited guests. The principle of its operation is extremely simple, as is the production itself.
To achieve a beautiful result, buy a shovel handle at a hardware store, stick the tip into the ground, and attach a small stick or a plastic lid from any bucket to the round part using a self-tapping screw.
Tie a strong rope to each disk and hang it on the prepared mechanism at different heights. In fact, you can simplify the task if the object of attack is a tree - an apple or pear tree, then you can attach disks directly to the branches. Maintain proportionality so that everything looks harmonious.
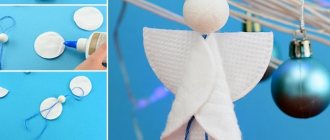
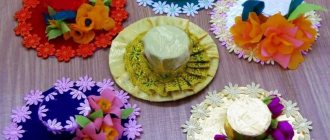
Option 3. Napkin stand
This craft will quickly find its place in the kitchen and become a table decoration.
Materials you will need:
- 3 disks;
- Stickers;
- Beads;
- Animal figurine;
- Glue "Moment";
- Knife or scissors.
DIY CD crafts step by step:
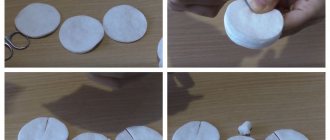
- We take two disks and cut off the rounded part, but not much. They must stand firmly on the surface. Try to cut so that they are the same.
- The base of the stand is a disk; we leave it unchanged.
- Now we take glue and glue two sides to the base, but not at a great distance.
- Once it's dry, take your decorations and place them however you like.
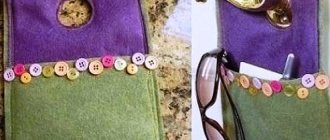
Storage organizer
You may have seen that DIY CD crafts in the photo are turned into unique pockets for storing things. Making them is quite simple, just follow the instructions.
Take thick cardboard and trace on it as many disks as you need in your household, then carefully cut them out.
On old fabric or other material, also circle disks, the number of which will be half as many as the cardboard blanks. Use a ruler to divide each circle in half and cut out the halves.
Next, to make crafts from disks with your own hands, we need to carefully sew the fabric to the cardboard. For decoration, you can use a thick thread; it will add a slight carelessness to our work, which will look very appropriate.
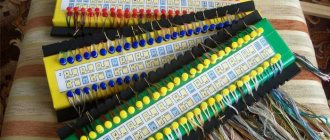
Cut out strips of cardboard one and a half centimeters wide, our pockets will be located on them.
Take a small stick or even a thick, straight branch and tie a rope to the edges.
Glue the strip to the cardboard circles that already have pockets. Remember that the edge should be long enough to wrap around the stick and adhere to the back of the strip.
Next, glue the disks to the cardboard round bases and secure the resulting result on a stick - your work is ready.
Option 5. Lamp
A lamp will never be superfluous, especially if you have small children and constantly need to turn on the light. But at the dacha this craft will look better than in an apartment.
We recommend reading:
Crafts from natural materials - a step-by-step master class on creating original crafts for children and adults (100 photos)Wood crafts - the best craft options, instructions for beginners and ideas for making wooden crafts (85 photos)
- Fabric crafts - the best ideas and the most practical crafts and toys made from various types of fabrics
Making a lamp is very simple. You will need old CDs, Moment glue, and a garland.
You need to try to assemble a cube from the disks, and place a garland inside. Don't forget about the stand. The cube needs to be placed on a regular disk and attached with glue so that it holds tightly.
If possible, you can fasten the disks with plastic staples.
But you need to decorate such an unusual lamp in a wide variety of ways.
Decorative stones, shells, and the most ordinary rhinestones are suitable for this. The main thing is that it shines and looks unusual.
Coffee table made of discs
What craftsmen don’t use to make tabletops for tables! And we suggest not only decorating the table, but also trying to make a full-fledged frame from old disks and remnants of chipboard or other wood materials. To bring the tabletop decor option to life, we will need the same tools as for decorating flowerpots. And the technology will be identical. Fragments of disks or blanks in their entirety, as you like, are glued onto the prepared surface, and then the gaps are filled with grout and varnished.
a more complex method in more detail. For work we will need:
- A large number of disks;
- Something that can serve as a tabletop - wooden boards, durable plastic, remnants of chipboard, etc.
- Round wooden rods – 4 pcs.
- Hacksaw.
The last point is necessary for the legs of the future table, so it is better that the pieces of wood are smooth and tall, and their diameter does not exaggerate the diameter of the central hole of the disks. Let's start with the legs. Remember, there was a children's toy in the form of a pyramid of multi-colored plastic bagels of different colors and diameters, which were put on a stick on a stand? This is the kind of stand that needs to be built.
- You need to cut 4 circles according to the size of the disks and nail a wooden pin to them, or better yet, screw them with a self-tapping screw, having first made a small hole in the center of the circles. This is necessary so that the head of the screw sinks flush with the surface and the table does not wobble.
- You need to put so many disks on the resulting structure so that they cover the entire length, not reaching the end of the thickness of the tabletop material.
- When the legs are assembled, check their stability, everything should be fine.
- Now you need to drill four holes in the tabletop along the edges of a slightly smaller diameter than the stem of the legs.
- Using some force, you need to drive the legs into the holes. The tension, which will be provided by the smaller diameter of the seat, will perform the function of fastening without the use of nails.
For greater functionality, you can make an additional shelf at some distance under the tabletop. Then half of the disks are strung on the rod, then the shelf, then the remaining half. The diameter of the hole in the shelf should correspond as closely as possible to the diameter of the rod so that it does not “walk” or move. This design will also be more rigid and spacious. decorate the tabletop in a variety of ways. You can lay out a mosaic as we suggested above, or you can cut out a part in the middle, fasten plywood or transparent plexiglass from below, place a couple of beautiful disks in a niche and cover everything with plexiglass on top.
DIY CD crafts for children
From this consumable material you can make beautiful toys that will not go unnoticed by kids.
Ladybug
Necessary materials:
- Disk;
- Colored paper;
- Cardboard;
- Pencil;
- Marker;
- Scissors;
- Beads 2 pieces;
- Glue.
Progress:
- Cut out a medium-sized heart from colorless cardboard;
- You also need to cut out a circle from gray cardboard - this is the head;
- Let's start working with colored paper. You will need black and yellow paper. From the yellow one we cut out a triangle and a small line. From black paper you need to cut out a line and horns with a cap;
- The blanks are ready, you can start assembling the toy. Take a heart and glue a disc onto it. Glue the ladybug's head on top of the disk;
- We form the head and finish drawing the eyes and mouth;
- Glue the yellow tail and two lines in the middle of the disk.
Ladybug is ready!
Fish
Even from ordinary disks you can make a beautiful application. To create a fish you need to prepare:
- The basis is the field where the fish will live;
- Several disks;
- Sheets of colored paper for tails and fins;
- Rhinestones and sparkles;
- Ready eyes.
Photos of DIY CD crafts will help you make this applique. Be sure to do it with your child, he will definitely like this process.
So, take colored paper of any bright color and cut out a large tail, an upper fin and voluminous lips.
We glue the disk onto the base and glue blanks of colored paper. Glue the eyes and rhinestones. It is better to place rhinestones on the tail and fins in the form of some kind of simple pattern.
You should also cut out sand and seaweed from colored paper to create the illusion of an underwater world.
The last step will be glitter. Spray from a can over the entire area of the sheet. Shake off any remaining residue.
Photos of DIY CD crafts
1+