Toy furniture
Bed
Toy furniture made without outside help will delight kids not only with the result, but also with the manufacturing process. With just 2 dozen popsicle sticks you can make a doll bed without much effort. Such a craft does not take a very long amount of time and easily fits into a doll’s interior.
Easel
You can use popsicle sticks to make a mini easel for photographs. To make it you need 9 sticks of the same size, one even stick and a toothpick. Each easel leg consists of three glued sticks, they are fastened together with a toothpick; the role of a stand is played by a stick attached across.
Desk
To make it, you will need to put a lot of effort, and in addition to sticks and glue, you will need cardboard for flexibility and durability. If you add a bouquet and a wish to the finished craft, you will get a spectacular gift for a first grader.
Bench
To produce a mini-bench, you need to take cardboard blanks as a basis, fasten them together and paste them with wood sticks. Afterwards the bench can be coated with paint and varnish.
Bookmarks (crafts made from wooden popsicle sticks)
Wooden ice cream sticks are a waste material that can be used to make many different original crafts.
For example, here are these and several other similar bookmarks for books with cats
or bookmarks in the form of pencils, colored or plain.
Weapon
Crossbow
Using 2 popsicle sticks, a rubber band, a binder and a paper tube you can build an unusual working mini crossbow that can shoot pen rods. You just need to glue the sticks together in the shape of the letter “T”, fix the binder with superglue, it will act as a trigger, thread and tighten the elastic band. A paper tube is needed to fix the “arrow”.
Catapult
A catapult made from ice cream sticks will be a fun activity for kids. You can shoot soft paper balls from the same weapon. For the base you only need to take 7 sticks, and for the trigger, 2 sticks and an iron bottle cap or plastic spoon are enough. All parts are attached to each other with rubber bands, and the lid is fixed with double-sided tape.
Gun
A small pocket gun is quite easy to make using Popsicle sticks. Like real weapons, it has a movable trigger, and instead of bullets there are rubber bands. Such a craft will not leave any boy indifferent.
Slingshot
Similar powerful and compact weapons can also be made from wood sticks. In this craft, the main thing is to fix all the parts well with glue, and then with insulation tape. You can shoot paper clips from such a slingshot, but you cannot aim and shoot at people under any circumstances. It can be scary.
Crafts from ice cream sticks with children: job description
What can you make from wooden ice cream sticks? It’s harder to think of what they won’t be good for! Crafts can be interesting, creative and even practical!
Crafts for kids using ice cream sticks
We suggest that you do not collect sticks all summer, but purchase a package right away. This amount is enough to create small masterpieces with your child for the whole summer.
Popsicle Stick Jewelry Stand
Decorative items
Vase
Wooden ice cream sticks can be used to create an unusual decorative element from an ordinary glass vase. The sticks must be soaked in boiling water or left in cold water for a day. Then use tweezers to lower the soaked sticks into the vase so that they take its shape. At the same time, it is better to lay them with a slight shift.
Decorative pendants
A similar suspension is very easy to do. You need to glue the sticks together into the shape you want, cover them with paint and apply a pattern in the style of decoupage.
Jewelry holder
To ensure that your earrings are regularly visible and not lost, make a comfortable holder for them.
Flower pot
By decorating traditional plastic pots with wooden ice cream sticks, you can get unusual flower pots growing in the room. To decorate them aesthetically, you can use paints, appliqués, beads, ropes or ordinary wire.
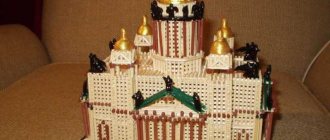
Well
A decorative well can become an element of a very complex composition. For its base, you need to choose a jar or box of the required size, for cladding work - ice cream sticks. In fact, making this craft has quite a few options and depends on the imagination and hard work of the master.
Hot stand
A comfortable and necessary thing is a hot stand, which can be made using ice cream sticks and wood beads of 2 sizes. You need to make 3 holes in all sticks and assemble the stand using thread, alternating beads with sticks.
Shelves
Ice cream sticks are the material from which you can build a complete shelf on the wall. A similar shelf made to look like a honeycomb of bees, made without outside help, will become a unique interior component and will look very cute and stylish.
Framework
Using wood sticks, even a child can create a fashionable photo frame without any help. First you need to paint the sticks in the desired color. Then fold them into a square shape and glue them together. Sequins, appliqués and stickers are good decor for such a product.
Lighting device
The best use of wood sticks is to make a lighting fixture. You just need to make 4 equal pieces with right angles from thin slats and ice cream sticks, which will need to be combined with each other. By placing an ordinary light bulb in the middle of the workpiece, you will get a spectacular lighting device.
Dishes
You can use ice cream sticks to make a plate for fruit or candy. To do this, you need to lay out the sticks in the shape of a hexagon and glue them together. Having determined the height of the plate, make the required number of similar layers.
Casket
Older girls will love a box made of wood sticks. You can make it yourself and store jewelry and other valuables in it. A box with a removable lid can be beautifully decorated with flowers made using the quilling technique or decoupaged.
Video: Photo frame made from popsicle sticks
If you like decor made in a marine style, then the finished frame can be decorated with shells from the sea, pebbles, and additional elements. And if you prefer panels made from natural materials, then here you can show your imagination and make a sophisticated, cute craft that adds a cozy touch to the environment.
Look at our selection of photos and choose the best option for your interior. A panel of ice cream sticks can decorate a wall or shelf in the kitchen. This craft will look very original.
Popsicle stick crafts with kids Popsicle stick house
Popsicle stick crafts with kids:
Owl made from popsicle sticks Penguin made from popsicle sticks
Bear made from popsicle sticks How to make an airplane from popsicle sticks
Airplane made from popsicle sticks
How to make a wooden bridge craft?
1. So, the necessary materials for the craft are listed, but in addition to it, we will need glue for joining the parts, a ruler (to measure the parts), a pencil and a stationery knife. Please note that before you start cutting parts, you should have a conversation with your child about safety precautions when working with a cutting tool (and if the child does not yet know how to use such a tool, a parent can help with cutting).
2. Prepare bamboo skewers and roll sticks in the amount of 4-5 pieces.
3. Don't forget the popsicle sticks. You will need more than 20 of them.
4. Now prepare 8 popsicle sticks. Divide them into pairs. Connect each pair with glue to form a corner. This will be the frame for the wooden bridge. In the end there will be 4 such corners.
5. Connect the two corners together as shown in the photo.
6. Now we “build” the base of the wooden bridge. To do this, glue the ice cream sticks to the prepared corners.
7. When the glued parts are secured and dry, you can begin making wooden railings from skewers.
8. Cut out columns about 5 cm high from roll sticks and glue them to the base of the bridge at the same distance from each other.
9. We “make” railings from bamboo skewers.
10. The wooden bridge is ready. If desired, it can be painted with gouache or coated with clear varnish.
When playing, such a bridge can be placed on supports (for example, when playing railroad) and made descents. In addition, using wooden sticks (by the way, regular matches are also useful), the railing for the bridge can be made more “curvy.”
So, it literally took us 1 hour of work to make a toy wooden bridge. During this time, you can tell your child about the benefits of such a structure as a bridge; that bridges can connect not only the banks of a river, but also cities that are located on different banks of a large river. During an educational conversation, it is also useful to tell the child about the longest bridge, or the oldest one, to tell how bridges were built in ancient times, what else bridges are built from besides wood, what equipment is used in the construction of bridges, etc.
Decorative New Year's decorations
DIY popsicle stick crafts can be a great decoration for the New Year. It's very easy to make snowflakes and stars from sticks - and if you decorate them with buttons, glitter, decorate and varnish, they will look simply luxurious.
Another version of the New Year's wooden star.
Photos of crafts made from sticks
Summer is approaching. And this means that we will all eat ice cream! And we, mothers, are also interested in the issue of early and not only early development of children with the most minimal budget). Therefore, I propose to see how you can create crafts from ice cream sticks with your children.
You can come up with anything! I never thought that something could be made from these wooden sticks. Of course, you can spend a long time collecting such sticks or purchasing a package for activities during the summer holidays.
Fence made of sticks: job description
First, let's determine the desired height of our fence. I have a critter fence this size, so half the height of a popsicle stick is plenty.
On a mat or using a ruler, measure the center of the stick and make a mark with a pencil.
We cut the sticks with a stationery knife on a cutting mat, holding the knife blade strictly perpendicular to the stick. In this way we cut several sticks.
The rug is very conveniently laid out. On it you can lay out the base sticks for the future fence the way you like.
We attach the halves of the sticks to the base to understand what our fence will be like.
Found the right position? Place 2 dots on the base lines with superglue and apply cut fence sticks. We press and wait the required time for the glue to set (read the instructions for the glue, each brand has its own gluing rules).
It turned out to be such a fence.
How else can you arrange the sticks - vertical and horizontal?
Now we take the stand on which the fence will stand. It can be done in two ways. The first is more reliable, but also more labor-intensive. Draw a rectangle on the stick, the narrow side of which is equal to the thickness of the ice cream stick.
Now go along the long sides of this rectangle with a stationery knife, tilting the blade at an angle to the surface, the angle directed towards the inside of the stick. Be careful - the stick must not break! It is important not to cut through it.
We try on the already glued fence to the recess - it should stick well in the gap. If everything turned out as planned, coat the hole with superglue and insert the fence into it.
The second method is much simpler. We simply coat the center line on the stick with superglue and install the fence on it, pressing it to the surface of the base until it is completely glued.
The ice cream stick fence is ready. A pen for knitted monkeys or sheep will come in handy.
Eva Casio specially for the site Handicraft Master Classes