Tools
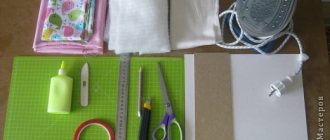
First, prepare the necessary tools for weaving paper baskets. You will need:
- Newspaper or magazine binder or even advertising flyers.
- Good scissors and paper cutter.
- PVA. Please note that coated paper (such as is used for printing magazines and leaflets) does not adhere well. Moment Crystal and similar adhesives will help here.
- Set of brushes.
- Water stain. Oil and alkyd will not work!
- Thick cardboard to make the bottom. Container is best suited.
- Scotch.
- Any clamps.
- Any container to dilute the paint.
- Ruler.
- Soft pencil.
These materials are enough to make any wicker basket from newspaper tubes. And when you have prepared everything, you can start.
How to make straws step by step
First you need to wind a bunch of flagella from newspaper. This is a crucial moment and you need to ensure evenness. All tubes should be approximately the same so as not to get knocked out.
To wind the tubes, use the following instructions:
- To begin, cut a lot of strips measuring 8x30 centimeters.
- Place the strip vertically and twist it diagonally using a cocktail tube or knitting needle. When you reach the end, glue the corner.
- The base needs to be pulled out and the tube left to dry for about 25 minutes. Regular PVA dries completely during this time and the tubes will not unwind. To prevent them from unfolding while drying, it is better to secure them with a clamp. It’s better not to use adhesive tape - you won’t be able to tear it off.
To make a box of newspaper tubes easier to braid, make one end slightly wider than the other.
Time of year for harvesting and processing rods
Rods for willow weaving are harvested all year round, but preferably in early spring and late autumn. The bark of spring shoots can be removed very easily without additional processing. Twigs collected in another season need to be soaked or evaporated.
To soak, the shoots are dipped into running water - a river or stream, after having been secured to the shore with a rope so that they do not get carried away by the current. You can use it in a trough or barrel, but in this case a daily change of water is required. Tied bunches with shoots are immersed to the bottom, and a load is placed on top (a stone or any other heavy object, except iron) and left for 1–2 weeks .
To reduce processing time from several weeks to several hours, instead of soaking, the rods are evaporated in any of two ways:
- The shoots are placed in a tank, rolled up around the perimeter, filled with water and put on fire. After boiling, cook for 1–2 hours. Then take it out, let it cool and begin removing the bark.
- The vine is no longer poured with cold water, but with boiling water, brought to a boil and boiled for 20–30 minutes. Take it out, cool it and remove the bark.
It is better to clean the rods raw, starting from the butt (root part). During cleaning, to prevent the material from drying out, it is better to leave it in water and remove it in small bunches. After the willow has been debarked, to finish the job, it must be laid out in the sun until completely dry. For ease of use, the rods are sorted and folded into bundles of equal size.
Barked rods are divided into two types - those prepared in the spring and those obtained by digestion. Boiled during use, they acquire a bright, glossy appearance, are easy to clean, and become better each time. Uncooked ones, on the contrary, darken over time, acquiring a nondescript appearance.
Master class on weaving
So, the tubes are screwed in, the instruments are prepared. Now you can start weaving. Below are the main types of baskets made from newspaper tubes, which you can easily repeat with your own hands.
Punnet
Here the so-called will be used. rope weaving of baskets from newspaper tubes. The method is simple, but very effective. To do this, follow the instructions:
- Take 6 tubes and stack them with each other. To keep them from falling apart, use a clothespin to create a seamless work area.
- Repeat step 1 to make a cross. This will be the base for the newspaper tube basket.
- Now the base needs to be bent in half, and the ends should be placed at the intersection of the cross.
- Afterwards you need to weave the bottom. The pipe must be bent after each turn to form a right angle. You will get a ring that needs to be repeated 4 times.
- The sides must be woven in pairs. The longitudinal vine must be placed under the bottom. Secure the ends of the paired tubes to the basket.
The result was a simple paper basket. For a beginner, this is the best start, as the instructions are simple.
Oval basket
An oval basket made from newspaper tubes is much more difficult to weave with your own hands. This will require perseverance and control.
So, let's get to work:
- First, the bottom is created. The so-called simple weaving, that is, the tube is passed under and then over the tube.
- To secure them, tie them as in the photo.
- When you reach the required diameter, the edges of the tubes must be bent upward.
- Now secure them with clothespins and continue weaving in the same way.
- You can finish the weaving with a regular garter.
The result is a simple oval basket made of newspaper tubes for fruit or cookies.
Square basket
Weaving a square basket is considered the most difficult. Here you will need a rigid cardboard base. If you make it large, you will get a chic laundry basket made from newspaper tubes, in which clothes will not get stuck.
Here is a master class on weaving paper baskets:
- First you need to form the bottom. Take a strip of cardboard and fold it in half. And you need to pierce holes in it at intervals of 2 centimeters. You need to insert the main tube into them.
- Weave a long tube next to the cardboard. Get to the edge and screw it up. Then you need to weave in the opposite direction. To extend the working tube, simply re-glue it.
- Now it's time to form the sides. Bend a newspaper flagellum in half and thread both ends into the bottom. Bend the tails that appear under the bottom upward and secure.
- To fix the sides, place any object of a similar shape in the center. Then connect the frame tubes with an elastic band.
- Start weaving from the bottom. To do this, weave a long tube into the side, alternating with vertical flagella.
Required materials and tools
To make baskets, boxes and other small products, it is necessary to choose long and straight shoots so that they do not have knots or other notches. It is advisable to select branches whose thickness is about 1 cm or slightly less, and they should bend well and not break. Good products are made from willow with orange or red bark.
Specialists collect the material themselves. It is best to harvest in winter or early spring, when buds have not yet formed on the branches. Before weaving willow vines, the branches are soaked in water and then dried . Two types of willow are used in the work:
- Peeled - more suitable for making decorative items such as trays, flowerpots, baskets. After some time, this material turns from light yellow to a beautiful golden color, and the products become especially attractive.
- Unrefined - large products are woven from such rods - fences, gazebos.
Large structures, fences or gazebos are woven from unpeeled vines.
In addition to the main material, you will need special tools that will be needed during work. Before you start weaving, you need to prepare:
- garden pruner;
- tailor's awl;
- sharp knife;
- pinch;
- columns.
You will also need a large basin or barrel of water where the material will be soaked. Experienced craftsmen use a spray bottle when weaving willow twigs; for beginners, this process will be difficult, so it is better to process the branches in advance.
This video shows how to weave a basket from a wicker:
How to make a pen
You need to make a handle for the basket from newspaper tubes if you are going to carry it. For example, if it is intended for a picnic. The handle for the basket is made from them like this:
- Take 4 tubes and spray with water from a spray bottle. This is necessary to increase elasticity.
- Use clamps to mark the place where the handle will be tied.
- Thread the tubes through the rows so that they are the same length.
- When 4 flagella make 2 rows, you need to cross them. The result will be an even braid.
- Continue making the spiral until it is the required length.
Decor options for the finished basket
You already know how to make a basket from newspaper tubes with your own hands. Why not try decorating it? There are several ways to deal with this.
Repainting
Any moisture-resistant paint will do. For example, you can take acrylic ones, which will be a win-win option. If you use coated paper, then only acrylic can fit properly on it - gouache and watercolor are not suitable.
You can't restrain yourself. If you want a plain basket, no problem, but you can apply entire designs or make a mosaic.
Satin ribbons
Before weaving, it is better to think through the design in advance. You can use a satin ribbon to make a border or highlight the bottom - use your discretion.
Pasta
Decorating with pasta is very common in the West, but in Russia it is almost never used. They can be spray painted and glued to the frame. The result is an interesting design that can be made with children.
Basket making method
To understand how to weave a willow basket for beginners, you first need to delve into and study the lessons, patterns and techniques for making them. After preparing the tools and materials, when the rods are soaked or evaporated, debarked and dried, the most interesting stage begins - weaving. The bottom is woven first, then the sides, and lastly the handle.
Formation of the bottom
To properly weave the bottom with your own hands, you need to prepare 8 twigs (knitting needles) of medium thickness (Fig. 1). They are divided in half - four are left untouched, and in the other four a gap is made in the middle of each (Fig. 2). Then rods are inserted into the cracks in the form of a cross (Fig. 3). Next, two more thin rods are inserted into the same slots and wrapped around the base in two rows (Fig. 4 and 5). Then the knitting needles are spread apart and wrapped around each one separately (Fig. 6).
Every time a rod comes to an end, it needs to be extended by another. You should not extend both rods at once; it is better to do it one at a time. To do this, the end of the rod is sharpened and inserted into the hole between the last two rows, it is bent and weaving continues, and the end of the old rod is cut off.
Weaving is continued in two more rows (Fig. 7). This is where the twisted weaving method ends and continues with the usual one - bypassing the knitting needle inside and outside (Fig. 8). In this case, an odd number of knitting needles is needed; for this, an additional rod must be inserted into the weaving.
Manufacturing of walls
Having reached the desired diameter of the bottom, you finish the first stage, the next one begins - the transition to the walls. To do this, you will need medium-diameter willow shoots, which are called racks. Each of them must be pointed at the end and inserted between the knitting needles (Fig. 9). Old rods are cut with a knife at the base. Now they take one stand and hook it behind the other two, after which they bend it upward (Fig. 10). Do the same with all the other racks (Fig. 11). The racks are braided in several rows, then in the usual way (Fig. 12 and 13).
When the height of the basket has reached the desired size, you need to take one stand and bend it down, placing it behind the other two (Fig. 14). The same must be done with the following racks, removing the ends inward and pushing them outward (Fig. 15). Then the protruding ends are cut with scissors at the base (Fig. 16).
Handle weaving
The last step left is to make the handle. To do this you will need a thick willow shoot , which is cut to size. The ends are sharpened and stuck into opposite sides of the product (Fig. 17 and 18). Next, take 4-5 rods and stick them into the weaving at the end of the handle (Fig. 19). They are braided several times and threaded into the weave from the other end. Then they take a few more shoots and do the same thing (Fig. 20 and 21). Another rod is stuck nearby and braided around the handle at the base, tightening it with a knot (Fig. 22 and 23). The end is cut with a knife (Fig. 24). The cart is ready!
Over time, you can learn to braid braids and ropes in two or three rows with more complex weaving, for example, openwork. Sometimes, for the convenience of making wickerwork, wooden templates of round or square shape are made, which greatly facilitate the work.
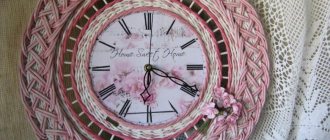
Photo ideas for baskets made from newspaper tubes
If you want to weave a basket in an unusual format, study the photos below. There are original works of handicraftsmen presented there, which can be taken as a basis.