Beaded hibiscus according to the pattern in photo and video master classes
Continuing the theme of weaving flowers from beads, we would like to offer you another incredibly beautiful flower that you can make with your own hands in two versions - this is hibiscus. Its buds are bright and fragrant; you can capture this flowering forever. You will consider several ways of weaving in different techniques with photos and diagrams.
Beading a hibiscus flower according to a pattern with a description
This beading option uses a parallel technique. First, prepare all the necessary options:
- beads of any color you like for the petals;
- for the stamens and pistil you need to take yellow and orange beads;
- for foliage beads in green shades;
- floristry tape, wire, scissors and wire cutters.
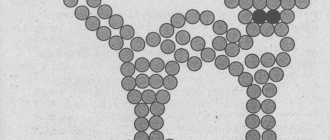
According to scheme number 1, you need to weave 6 petals. This should be done from the outside of the workpiece, moving towards the inside. Then the pestle is woven according to diagram number 2, which you can see in this article. Weaving will occur from top to bottom. First, create five orange stamens, and then move on to a pistil made of yellow glass.
When the pistils are completely ready, you need to wrap 6 petals around them and twist them with a sufficient piece of wire. The last third scheme remains, on the basis of which green foliage is made. These leaves look heart-shaped with lacy edges.
And the last thing to do is to weave the sepals. Collect ten beads and make a small leaf in a simple way. Next one more, so 5 times. These blanks need to be placed near the base of the hibiscus and tied to the stem, and then wrapped around the entire stem with floral tape.
Step-by-step photo master class on weaving hibiscus from beads
To weave this version of hibiscus, you will, of course, need beads, only those colors that you want, the choice is yours. Or use the shades that will be shown in the photo in the article. Transparent nylon thread, scissors, pliers. That is, almost the entire set of materials that was before.
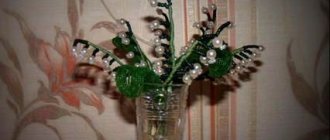
Fixation in a pot
In order for your flowers to shimmer beautifully in the sun, they need to be placed on the windowsill and always in the most visible place.
There are several simple rules for fixing artificial flowers in a pot, basket or flowerpot.
Method one:
- if your handicraft turned out to be easy, you don’t have to bother with different solutions;
- Styrofoam is suitable for this purpose;
- insert the bouquet into the fixed material;
- plant flowers together with polystyrene foam in a pot;
- Decorate the top with decorative stones or beads.
Master class – Hibiscus from beads
Watch the master class and you will learn how to weave hibiscus from beads.
Order a set of composition materials on this page.
Beaded hibiscus
For work we will need:
- Beads for flower and leaves;
- Round beads 8 mm - 21 pcs.;
- Winding thread - 1 pc.;
- Floral ribbon - 1 pc.;
- Wire 0.3mm in the color of beads - 1 pc.;
- Wire 0.5 mm in the color of beads - 1 pc.;
- Gerbera wire 0.7 and 1.2 mm;
- Sisal;
- Pot.
Flowers
Wire: central axis – 10 cm, working – 100 cm + 130 cm. We collect 14 beads on the central axis and make 3 circular rows (round top, sharp bottom).
Then we weave symmetrical steps. We make the first hook under the 13th bead from the top, 3 steps on each side, placing them from bottom to top. The distance between the hooks is 2 beads.
We make another circular row. We fasten the wire and cut it.
Let's start the frill: on the last arc, retreating 12 - 15 beads, fasten a new wire and weave loops of 11 beads in a circle with a distance of 2 beads. We finish the row of loops on the other side, symmetrically.
We collect 7 more beads. We pass the wire into the upper bead of the nearest loop and begin to connect the loops by the upper beads, picking up 4 beads between them. Having connected all the loops, we collect 7 beads, fasten the wire to the last arc and cut it. We stitch the petal and give it shape. A total of 6 petals need to be woven.
Spikelets
They weave in the same way. The difference is in the color of the frill.
- Stamens
Wire 0.4 mm - 15 cm, bead and 2 beads, winding 5 - 6 cm. You need to make 6 pieces. for flower and 14 pcs. for spikelets, 20 pcs. in total.
Sepal for a flower
Wire 60 cm. We make 10 loops of 18 beads each, then we collect 12 beads and pass the wire into the top bead of the nearest loop. We connect all the loops, picking up 3 beads between them, picking up 3 more beads and passing through 9 beads of the first loop. We twist the ends of the wire - we get a cup.
- Sepal for spikelet
Need 2 pcs. The central axis is a wire of 8 cm, the working wire is 50 cm. We collect 10 beads on the central axis, make 2 circular rows (sharp top and bottom). On both sides we make 2 pairs of symmetrical steps. We make 1 loop of beads on each side and 1 loop in the middle - from the wrong side.
- Flower assembly
We wrap a bead onto a gerbera wire with a diameter of 1.2 mm and a length of 10 cm, with 6 stamens at a distance of 1 cm. Then we fix 6 flower petals in a circle. We put on the sepals, continue wrapping 6 cm. We give shape to the stamens, straighten the petals.
- Assembling a small and large spikelet
On a gerbera wire with a diameter of 1.2 mm and a length of 30 cm, we sequentially wrap 3 stamens and a petal without a frill, after 1.5 cm - 2 stamens and a petal with a frill, after 1.5 cm another 2 stamens and a petal with a frill. We put on the sepal and continue the winding for another 14 cm. We assemble the large spikelet in the same way, but it requires gerbera wire 35 cm long, all petals with a frill and a winding length of 21 cm.
LiveInternetLiveInternet
Source
Good afternoon. Today we will make - hibiscus.
For work we will need: 1. beads (pink, white, yellow and green); 2. 0.3mm wire and thick wire for stem stability; 3. green florist; 4. pot; 5. isohypsum.
Let's get started! We take a wire about 50 cm long (it’s not convenient for me to work with a long wire; if it’s not enough, then I take a new piece and screw it on. Of course, this is done not in the middle of the petal, but at the base) and weave it with French weave. We collect 5 beads on the base and make 3 arcs on both sides.
Further, before reaching the end of the 4th row, we pass the wire under the 3rd arc and go back.
We do the same on the other side.
Then again we don’t reach the end by 5 beads and go back.
Again we don’t reach the end by 3 beads, we pass the wire under the 3rd arc (you can see this in the photo),
collect 3 beads and twist the wire around the axis.
We repeat everything on the other side.
We again do not finish the next row, not reaching 18-19 beads to the end.
We pass the wire under the previous row and collect 7 white beads. We make a loop from these 7 beads, again passing the wire under the bottom through 2 beads.
This is how we make 18 loops. If it turns out a little more or less, that's okay.
Next, we collect beads again so that they evenly reach the 1st white loop and pass the wire through the 4th (middle) bead of this loop, and collect 3 beads. Pass the wire through the next loop, again collect 3 beads, and so on until the end.
This is the petal we will get.
Let's make the middle. To do this, we weave 5 loops of 19-21 beads. After the 5th loop, we collect about 20 beads and pass the wire through the middle bead of the loop. Then again a few beads and again pass the wire through the middle bead of the next loop, etc. to end. We connect them together and make several loops of yellow beads in the middle.
I got one flower with five petals and two with 3 petals.
We make leaves like this for the flower. For one flower you will need 3 of them.
And we screw them on. To prevent the flower from falling apart, after putting everything together, I stitched it from the bottom with wire.
Next we make the buds. We will have 4 of them. For one bud we will need these leaves (French weaving), which need to be twisted together:
Now we make the leaves. We collect 22 beads on the axis and make one arc on both sides. Then we weave the same way as in the petals, without reaching the end of the row.
We make several leaves for 5 waves and several for 4. I have 15 of them all together. Then we twist them 3 together.
Then we screw thicker wire to the flowers, leaves and buds and wrap everything with floral tape.
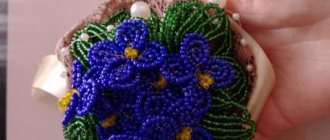
We put flowers, buds and leaves into a bouquet. We dilute the plaster with water (so that it is thick), pour our mixture into a pot and plant a bouquet there. And wait until it dries. If desired, the white plaster can be either painted over or covered with beads. Or you can leave it like that (which is what I did). And this is what I got!
Patience and creative success to everyone!
Author: Irina Shestovskikh
Flowers made of beads. "Hibiscus and Callas." Master class with step-by-step photos
- Master class “Hibiscus and Kali” To make Hibiscus we will need: Wire,
- cream, red, light green, yellow, green beads
- Thick wire (2.5mm) for stem, Alabaster, Decorative pebbles, Pot.
- Making Hibiscus Flowers
French weaving is used to make the hibiscus flower. You need to weave 6 petals. Take a 0.3 mm wire, 70 cm long. Make a large loop on the wire, 2 tails should come from the loop, 1 7 cm long, the other (additional) - 60. On the short tail (main) collect 9 cream-colored beads, and for the long one there are 12 beads. Attach it to the main tail by screwing the wire as shown in the photo
For sharp petals, loop an additional wire around the main one, so that the wire goes up 45 degrees. Cast on another 15 beads and repeat the action, but on the opposite side. Next, weave 3 more rows in a circle, not forgetting to wrap it with wire so that you get a sharp tip.
In order to get a beautiful openwork petal, we now weave it like this: we collect enough beads to cover the previous row not completely, and pass the wire through the bead of the previous row, about the ninth one from the top, and tighten
Now, we also collect cream beads to circle this incomplete row back to the base of the petal. We draw the wire around the base, and on the other side we do the same, trying to keep the rows symmetrical and identical
Assembling cream beads onto the wire to draw the row down, create a red spot on the petal - that is, at the base of the petal we collect red beads
For the next row, you need to collect enough beads to cover the previous row and pass the wire through the seventh bead from the top. Tighten
and lower the row down to the base. On the other side, we do the same, not forgetting to insert red beads at the base, gradually increasing the red beads by one bead with each row
Next, once again we collect enough beads to cover the previous row only halfway, pass the wire through the bead, tighten and move the row with cream (red at the base) beads down, draw the wire around the base and do the same on the other side
Here the petal is ready. Middle For the middle you need to weave “stamens”, three loops and a “green stigma”.
- For the stamens, take a wire 25 cm long, put on 12 yellow beads, pass one end of the wire through 11 beads back and tighten
- Making 8 stamens
- Then make 3 loops of 8 yellow beads
- For the “green stigma” we measure 30 cm of wire, put on 20 light green beads, bend it in half and twist it
- We also put on 20 beads, twist them, and so on 5 times
- Then bend the ends outward, you get a “stigma” with curved edges
- Flower assembly
- So, we have 6 petals, three loops, stamens, “stigma”
- First we insert three loops into the “stigma”, fasten (wrap) at the bottom with ordinary thin threads
- Then we insert the “stigma” into the stamens
- Now we wrap three flower petals
- In the last row we wrap three more petals as shown in the photo