Home » Animals and insects » How to weave a cute spider from beads?
Animals and insects
Irina Vyshivaikina 07/08/2019
0
Beaded figurines are versatile due to the fact that they can be used as a cute gift, decoration, or simply to brighten up the interior of your home. It has long been believed that meeting an insect is good luck, so you can make a cute beaded spider with your own hands, even if you have arachnophobia.
Popular varieties
There are many different types of spiders that differ in appearance, size and even patterns, so you can weave any of them with a little imagination and patience.
Tarantulas
Tarantulas are considered one of the most famous and popular types of beaded spiders.
Some tips for making such an insect:
- the upper part of the body consists of a large number of columns, which are created on the basis of wire and beads;
- to form the paws, take three threads onto which three columns of white beads are placed in both directions;
- the body is created using the parallel weaving technique;
- The craft is completed by creating antennae - the wire ends are twisted in the form of rings.
By following the recommendations, you can make a tarantula spider without much effort.
Karakurt
It is a representative of the genus of black widows, which can pose a danger to both animals and people. The insect has thirteen red-orange spots on its black abdomen. In beadwork, such a spider is most often created from black and red beads, with a heart-shaped spot in the center. That is why such crafts are popular as accessories - brooches, keychains and pendants.
Color combinations
Using a beading pattern for your beaded spider, you can easily improvise with the color scheme. If you do not plan to exactly repeat the colors of any type of arachnid, then feel free to choose the shades at your own discretion, especially if you are going to use the figurine as decoration.
How to make a beaded spider bright and eye-catching? The most common colors used to make spiders are black, red, yellow, blue, white, and orange. Products complemented with stones or beads of different colors look beautiful.
What is it used for?
A beaded spider can be a wonderful decoration, adding an unusual and stylish detail to your look. The options for using this craft are very different.
Suspension
To use a spider as a pendant, you need to attach a special loop to its head using pliers. Choose a color scheme in accordance with your clothing style, then the accessory will become a unique decoration created with your own hands.
Pendant
A beaded spider will also look great as a pendant, provided the appropriate size is selected so that it is not too provocative, since the insect is already quite unusual.
Brooch
For a brooch, it is best to use a cabochon trimmed with beads in the shape of a spider. Use thick fabric or leather as a base so that the brooch holds well. After the insect figure is embroidered, cut it along the contour, glue a cardboard pattern on the back side, cover with another layer of leather, stitching everything with beads. The figurine, whose legs are made separately, looks very beautiful.
Use a pin or a special brooch base for fastening.
Bracelet
To create a bracelet, you must first draw a diagram that will repeat the image of the spider. The accessory is woven in the form of a canvas, like a bauble. To make a bracelet, weave a pair of circular straps.
Hat decor
As a decoration for the hat, you can use a spider, the body of which is woven around several pebbles. They will be a bright detail on your hat, playing in the sun.
You can also make this element using different materials, artificial or natural fur, and the use of stones allows you to create a truly exquisite decoration.
Spider
In order to make a master class for beginners on the topic of bead weaving, we will need:
- beads of three colors (red, yellow, black);
- round nose pliers;
- wire;
- thread;
- one large and one small bead;
- transitional metal ring between beads (possible without it).
Master Class
- Prepare the necessary material and tools.
- Pass a piece of wire 10-15 cm long into the red bead and leave it in the middle. This will be the spout and the beginning of the weaving.
- Thread both ends of the wire through the smaller bead, then through the metal ring, through the larger bead, and back into the red bead.
- Cut the wire leaving 10mm. Now you need to use round pliers to make a narrow, neat ring out of this tip. The body is ready.
- We start weaving the paws from the point where the two beads join. Cut 4 pieces of wire 15-18 cm long, find the middle and twist it at this point 2 times.
- Separate the paws.
- To weave the legs, use red beads, alternating them on the knees with two yellow and one black beads, ending with a black and the same wire ring, twisted using pliers.
INTERESTING: How to make a crocodile from beads
- When you finish weaving one side, move on to the second. The weaving pattern is exactly the same.
- The result is a charming little spider that brings good luck.
Materials and tools
If you plan to do beadwork, you will need approximately the same set of materials and tools, with which you can create wonderful crafts, including from spider beads.
To make an interesting small spider, the following materials are used:
- beads of black, red, brown and beige colors No. 9;
- beads No. 4 brown;
- two meters of copper wire;
- wire cutters – for cutting off parts of wire;
- round nose pliers - will help when creating bracelets, pendants, etc.;
- scissors - any kind.
You can change the colors and sizes of beads to create an original figurine.
In some products, translucent glass beads look very beautiful; they can be used to make spider legs.
If you use multi-colored beads of different sizes, purchase special caps for beads, then the products can be used as decoration.
Flat figures are mainly made on the basis of fishing line or monofilament; needles are used of different sizes depending on the caliber of beads.
Step-by-step weaving of a spider from beads for beginners
To weave such a not at all scary insect, you will need to prepare the following materials:
- thin wire for this craft;
- beads of different sizes and shapes, as well as beads and glass beads;
- pliers with wire cutters.
We begin this master class by unwinding four pieces of wire, each thirty centimeters long. These pieces will be used to weave the spider's legs. Using pliers, you need to align the places where the base material was cut. This will make it much easier to string the beads.
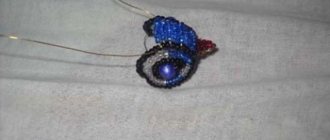
Carefully fold the cut pieces of wire in half, without squeezing them. Take two pieces of beads and move them to the very center. These will be the insect's eyes, so take the shade of beads that will differ from the main color of the spider's body. Pass one side of the wire through two pieces of glass, and then tighten the workpiece so that the main material fits securely to the beads. As a result, it will turn out that two ends of the wire will extend from the two elements, sticking out in different directions.
Now let's start weaving the legs, of which there should be six pieces. For each paw, take six large beads, then two smaller ones and three pieces of bugles. Place the elements on one edge in the following order, as shown in the picture, and then pull them to the glass pieces that were secured earlier.
Take the remaining wire and pass the last yellow bead, as in the photo, through the collected glass, all the way to the spider’s eyes. To make it as convenient as possible for you to do this, thread everything gradually and slowly, but under no circumstances do it all at once, otherwise you may tear the thin base. Pull the workpiece well and you will have the first leg for this insect.
Repeat the previous steps and form a second similar foot with your own hands, as shown in the photo.
Now we will weave the body of the spider. First, take two small pieces of beads, and then put them on one edge of the wire, and pull the second tip completely in the opposite direction, that is, in the opposite direction. Pull them up so that they are located right next to the eyes. After this, repeat exactly the same manipulations described and weave the third and fourth legs of the insect with your own hands, as shown in the photo.
Take the rest of the beads that you have left and weave these blanks two more times.
Read
Ideas for creating original bead pendants
To complete the manufacture of the spider body, you will need to prepare 1 small bead and thread two ends of the main material into it in two opposite directions. Next, take the largest bead, which was intended specifically for the tummy, and also thread the two ends into it together. Take the element again and thread two ends into it from different sides. Cut off the excess, and twist the small tip and hide it between other nearby elements.
Bend the spider's legs so that it can stand on its own and not fall, as in the photo. Now the craft is completely ready. Look, he’s not scary at all, but quite the opposite, he even turned out very cute. Thus, you were able to make sure that it is very simple to make such a craft with your own hands from a very small number of beads. Children will especially enjoy this simple tutorial on how to weave a beaded spider, as will beginners.
Weaving pattern
A beaded spider is created based on a weaving pattern for beginners; it clearly shows where the legs will be attached, how the wire passes, and how the rows of the belly and back alternate.
Body and head
How to make a body and head for a spider from beads? The face of a volumetric beaded spider will consist of 4 black beads; they need to be placed on one wire end and passed to the middle. Next, a loop is formed by threading one wire end through two beads from the other end, it turns out that the wire goes towards each other twice.
We tighten the wire, getting the first two rows.
We continue weaving the spider from beads, creating one tendril on each of the wire ends, collecting the amount of beads indicated in the schematic image.
We use wire to go back through all the beads, except for the beige bead, which is the last one.
The second mustache is woven in a similar way.
We create eyes for a spider from beads according to the master class. To do this, we weave in another row, passing the ends of the wire towards each other through all the beads. Larger brown beads will become eyes.
To form the insect's head, we weave in successive rows, bending them up and down in turn. The top rows will be black and the bottom rows will be brown.
Paws
We begin to weave the spider legs in the process of weaving the body, taking turns taking red and black beads in the amount of 21 pieces.
We pass the wire through all the beads, except the last one, which is black. We tighten the wire so that the foot is close to the row of beads.
On the other side, add a paw in the same way, add one more top and one bottom row of the body, create two paws on both sides.
We make the top row of nine red beads. In the diagram, the central bead is shown in a darker color to make it more convenient. Add another pair of paws.
Back and abdomen
The back will consist of two parts - upper and lower, each of which is attached to the central bead of the previous row. Five red beads are strung on the right wire end, we pull it through the middle bead located in the top row. We follow the direction of weaving.
We tighten the wire, string a bead of a darker color, pull it through the red beads, we get one half of the next row.
For the second half we use the remaining end of the wire, creating it in the same way, without adding the middle bead. We create the belly, which will consist of brown beads, by analogy with the head of an insect. Remember to alternate rows of belly and back according to the pattern.
The fourth pair of legs is attached in the same way as the others. Further, the body will narrow, because the number of beads in each row decreases. The last row of the body consists of four beads that are not woven into the central one.
Photo source: https://biser.life/111-pauk-iz-bisera.html
Carefully straighten the craft, obtaining a rounded brown belly.
The beaded spider is ready, it can be used as a brooch by adding a special fastener.
Volumetric spider
One of the most common is the model of a fat spider-mascot. Weaving is quite simple and straightforward, suitable for beginners. The following materials will be required:
- a coil of wire with a diameter of 0.2 mm (approximately 130 cm);
- about 1 meter of thin fishing line;
- 5 grams of beads of different colors;
- needle.
But the main thing is to be patient and attentive. For clarity, a training video is provided at the end of the article. In the example, red and black beads No. 11 are used.
Weaving in stages
Three red beads are strung on a wire and placed exactly in the middle.
One end of the working thread (wire) is passed through two beads. The loop is carefully tightened.
The second end of the wire turned out to be a little longer. Four red beads are put on it. The loop is tightened again from the end of the same half of the wire. It is threaded through 2 middle beads.
Lightly tighten the resulting workpiece and bend it in the middle. The antennae of the future spider are ready!
To make the head, parallel weaving technology is used. Three red beads are strung on one of the wires, the second end is pulled through them in the opposite direction. The large loop is tightened. The next row is by bead color: black, red, black. These are the eyes of your masterpiece.
When tightening the wire, it is worth bending it a little and raising the arc to the top to add volume to the head.
By the way, the eyes can be made from larger beads, then the figure will turn out more interesting.
Article on the topic: Knitted booties for beginners: knitting patterns with descriptions, video of a step-by-step master class on booties on two knitting needles
The next stage is similar to the previous one. Four red beads are strung on a wire, the other end is threaded and carefully tightened. But now the loop should go under the previous row. The spider's head is ready.
We move on to weaving insect legs using the needle technique. We string beads onto the end of the wire in the following sequence: 5H, 2K, 2H, 2K, 5H. I learned a row of 16 beads. We pass the end of the wire through 15 of them, leaving the first black one.
At the other end of the wire we perform the same operations. The “antennae” of the working thread remains near the head. We are switching to volumetric weaving again. Top row – 5 red, bottom row – 4 red.
We repeat all manipulations, starting from the first paw and ending with the bottom row. Half of our product is almost ready!
The third row of spider limbs is assembled in the following order: 3H, 2K, 2H, 2K, 3H for both legs.
Torso: top row -7K, bottom row - 5H.
We move on to the last longest row of paws. The sequence is: 5H, 2K, 2H, 2K, 2H, 2K, 2H, 5K.
All that remains is to finish the body of our spider. Using volumetric weaving technology, we continue to bend the rows, dividing them into the upper part (back) and lower part (abdomen). You must proceed according to the following scheme:
- Top row: 9H. Lower: 6H.
- Top row: 1H, 3K, 1H, 1K, 1H, 3K, 1H. Lower: 7H.
- Top row: 12H. Lower: 8H.
- Top row: 1H, 9K, 1H. Lower: 6H.
- Top row: 9H. Lower: 4H. Next we go to narrowing.
- Top row: 3K, 1H, 3K. Lower: 2H.
Last row: 3 black beads, which must be centered between the top and bottom beads.
We secure our structure and cut off the excess wire. The spider is ready!
But it turned out soft and doesn’t hold its shape at all. This can be corrected using prepared fishing line. We thread it through the coal eye and make 2 strong knots at the end. We push it under the last three beads and sew the beads in two rows in the center of the product.
Related article: Crochet New Year's napkins with patterns and description of work
First we go through the lower part, and then along the upper. We tighten the line well, make a knot, hiding it inside the spider. Your creation is now finished!
Fixing and tightening the ends of the craft
To secure the wire, it is best to use larger beads for the last rows. Each end of the wire should be threaded through the penultimate row, doing this in the direction opposite to the main weave. To fix the wire even more securely, thread it through the entire craft and trim off the excess.
[Total votes: 0 Average: 0/5]
Irina Vyshivaikina
Professional skills: Clothing designer; Artist
Brief biography and personal achievements: “I am inspired by the things that are around us.” Since childhood, I was interested in art and crafts, so I decided to devote my life to it. She received a higher education in design and released a collection of designer jewelry made from simple materials that can be found at home from any needlewoman. Afterwards, I decided to conduct master classes on creating similar accessories for everyone. She became a blogger and the author of the website domigolki.ru.