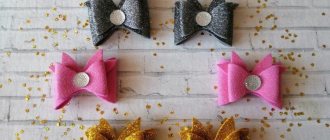
The simplicity and conciseness of the tilde-style snail touches anyone. Children will enjoy playing with it, and for an adult it will serve as a wonderful interior decoration. Sewing a tilde snail is so simple that every novice craftswoman and even a child with basic sewing skills can handle it. In this article you will find detailed master classes on how to create such toys with various decorations.
What materials are suitable
Before starting work, you must prepare all materials. And the first thing you need to decide on is the fabric for the base. Natural options are best: cotton or linen. But you can use chintz, cambric, and sometimes felt. If the fabric is a little thin, and in general, so that the toy holds its shape better, it is advisable to glue doublerhide (or non-woven fabric) to the wrong side with an iron.
This thin material is a lining, making the fabric stronger and preventing it from stretching. But keep in mind that if the body or other elements of the snail are light, then the dublerin is only needed in a white or milky shade (the dark one will show through).
The tilde snail can be in any color scheme, depending on the style in which it is sewn. If you want to make a toy in natural colors, then choose a flesh-colored base. It can be tinted with coffee or tea to give it a warmer tone. In this case, the sink should be made of soft pink, blue or green fabric, decorated with a flower, heart or other element.
There are also bright houses: with polka dots, checkered patterns, stripes, flowers, etc. They are decorated with lace, ribbons, buttons, beads, or whatever is found in grandma’s chests, if, for example, a vintage style is chosen. Get creative and come up with your own unique toy. The master class will tell you how to sew a tilde snail below.
Patterns
Snail with a heart
This sweet guest will bring love and joy to your interior on her sink. And all because it is symbolically decorated with a decorative heart made of fabric.
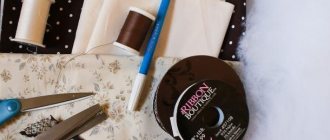
What you will need for work:
- any cotton fabric of different colors for the body and shell;
- stuffing material - synthetic winterizer or holofiber;
- matching threads, scissors, needles;
- sewing pins;
- a bamboo stick for stuffing (you can use a pencil);
- beads, pearls, buttons;
- ribbons, braid, lace;
- blush or pencil to draw the cheeks (they are typical for tildes).
Progress
First you need to print out a life-size tilde snail pattern. If you want a smaller or, conversely, larger size, you can change the printing scale in the printer settings. But if there is nowhere to print, then simply attach a sheet of paper to the monitor and trace the pattern. Again, if you need a different size, play with the scale by typing the “Ctrl” and “+” key combination.
- Cut out the blanks and place them on the fabric folded in half. Trace the pattern, then cut out the parts, taking into account a seam allowance of 0.5-1 cm. Fasten each part with sewing pins to each other (or baste), and then sew along the contour on a sewing machine (step 1.6-1.8). If this is not possible, then simply sew everything by hand using a back stitch. Don't forget to leave a hole for stuffing.
- Trim the excess fabric of the blanks, leaving 0.3-0.4 cm from the seam contour. In places of rounding or bends, you should always make small cuts so that after turning the fabric does not puff up. After this, the workpieces should be turned out and ironed thoroughly.
- Stuff the snail's body and shell with stuffing. Do this gradually, moving the padding polyester with a stick, but so as not to tear the fabric. Next, you need to close the hole in the body with a hidden seam, and sew the shell on top (also in a hidden way). So that the attachment point is not noticeable, it is better to decorate it with ribbon or lace. All that remains is to draw the snail’s eyes and blush on the cheeks.
INTERESTING: What is a tilde - the history of the doll
But she brings love to the house! Therefore, you need to sew a heart. You can take fabric in the color of the body or another, but in harmony with the toy. Then make a pattern. To do this, fold a sheet of paper in half and draw half a heart. Cut out and attach to the material folded in half.
Machine stitch, leaving a hole at the top of about 3 cm for stuffing. Cut along the contour, departing 0.3-0.4 cm from the seam. Turn the part inside out and iron. Then fill it with filler and, before sewing up the hole, insert a loop of lace or narrow ribbon at the top. Sew and hang on the snail, secure the decoration with two or three stitches.
Instead of a heart, you can make a flower:
Video master class
The video offers an option for sewing a snail with a large rosette on the shell. Such a thing can be a gift for March 8th.
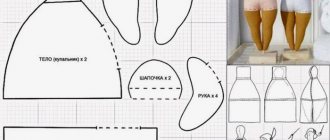
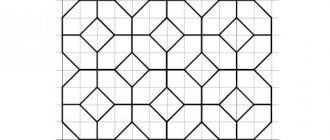
Constructing a pattern
As a rule, all toys in the tilde style are small in size. Therefore, a couple of A4 sheets of paper will be enough for you to understand how the pattern is made. A full-size tilde snail, sewn according to this design, will meet all the necessary proportions.
On one sheet the body with the horns of the future toy is drawn, and on the second - the shell-house. It must be immediately depicted in a spiral shape. At the same time, try to “layer” (see the image of the pattern above). The junction of the shell is schematically depicted on the body. These are usually simple two lines.
You can also make sure that the pattern fits on one sheet. A life-size tilde snail can be made this way. Just draw the body and the “house” on top of each other, like in the picture below.
It is best when the pattern is drawn on thick cardboard or oilcloth. Then it will last longer, and you can sew more toys.
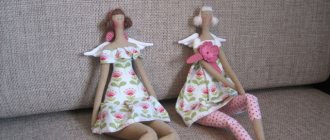
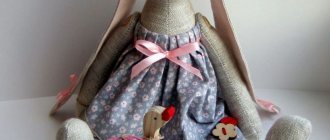
Shabby chic style snail
A little more painstaking in tailoring is the option of making a snail tilde in a unique shabby chic style. This trend combines simplicity and sophistication, antiquity and modernity, reminiscent of the Victorian era and literally translates as “shabby chic.”
The character of this style will be given to the toy by woven lace, ruffles, wooden decor, pastel shades, and discreet, calm patterns on the fabric. Let's sew a couple of unusual snails in a cap and a nightcap with a mountain of pillows on a shell.
Materials that will be needed:
- cotton fabric with various patterns - 4 cuts;
- satin ribbons, braid;
- tatting;
- organza ruffle;
- wooden beads, buttons;
- sequins, pearls, flowers;
- threads, scissors, sewing pins;
- filler - synthetic winterizer;
- blush, black acrylic paints.
General progress of work
- The pattern of the very basis of the snails (body and shell) is the same for any toy. Therefore, you can take it from the previous master class. Sewing blanks happens the same way. The only difference is in the decor and choice of colors. The shell is decorated at the junction with the body with ruffles, and in other places with woven lace.
- After the snails themselves are ready, you can start sewing hats. For one you need to cut out a cap, and for the other - a cap (this is an ordinary circle). The cap requires two pieces that are sewn together, but the cap will be a single layer.
- Each headdress must be hand-sewn along the edge with an organza ruffle. And baste the cap near the seam, pull the thread a little and gather the cap. Secure with an invisible knot.
- To give the shape, both headdresses must be lightly stuffed with padding polyester, and then sewn with a hidden seam onto the head of each snail. The cap can be decorated with a thin satin ribbon, tying it in a bow. For another snail, you can tie a bow and sew it on its ear, and only then put on a cap. It will be more fun this way.
- Each toy carries several pillows on its shell. To sew these bedding items, you need to prepare white and colored fabrics. From white material, folded in half, you need to cut out four pads measuring approximately 65 by 45 mm and another four 45 by 35 mm.
- From colored fabric you will get four pillows 45 by 55 mm. A total of six pillows for each snail. Then you should sew all the parts together so that there is room for turning them inside out. Next, iron and stuff the pads with synthetic padding.
- Close all holes with a blind stitch. Cover the perimeter with a ribbon of thin lace. Sew braid on top of some pillows. In descending order, stack three pillows on top of each other and sew them together, and then secretly attach them to the snail shell in two places.
- If you wish, you can sew a small heart onto one of the snails in the same way as indicated in the previous master class, only in a small size. Decorate it with a bow made of decorative cord or thin ribbon.
- All that remains is to sew on beads and buttons, as if the toys were on wheels. And draw traditional eyes and blush on the cheeks.
INTERESTING: Sleepy angel in tilde style
And the shabby chic style snails are ready! Do you think they just woke up or are going to have a good sleep?
Video tutorial on sewing toys
We sew cats from the cartoon "Simon's Cat"
For work we will need the following tools and materials:
- a piece of felt or fleece (any fabric will do, even knitwear);
- beads or beads for eyes;
- sewing threads;
- needle;
- pin;
- scissors;
- filler to your taste;
- pattern.
How to sew a funny pincushion cat: master class
As usual, we start with the pattern. You can print what we offer or redraw it by hand. We transfer it first to paper and then to fabric.
We need two cat blanks, two eyes and two tails. Do not forget to retreat 3-5 mm for seams!
We sew the main part (directly, the front and back pattern of the cat) with a blanket stitch, leaving a little space.
We do the same with the tail.
We set aside the two cut out circles for now - these will be the cat’s eyes, we will sew them on a little later.
Now we’ll make small cuts in places where there will be bends or sharp corners.
We turn the tail and the cat right side out through the holes that we left earlier, stuff them with holofiber, then sew up the holes with hidden stitches.
Next you need to sew on the eyes, not forgetting to fill them very tightly with filler.
All that remains is to sew on the pupil beads and embroider the nose, eye contour and mouth with contrasting thread.
Now we sew the tail into its proper place using the same hidden seam.
That's it, the funny pincushion is ready!
Our master class on sewing pincushions has come to an end. We will be glad if it turns out to be useful for you! We wish you creative inspiration and see you again!