How to make a face for a doll. How to make a face for a doll: step-by-step instructions
You ask, how to “sculpt” a doll’s face? Not easy, but possible. For our master class you will need:
- Threads. They must be reliable so as not to tear. Otherwise, if the thread breaks, the doll’s face will be distorted and the work will have to be redone.
- A special long needle that can easily pass through the doll head blank and not get lost in the stuffing.
- Directly preparing a doll's head, using nylon tights.
For one of the methods of making a textile doll's head, ordinary tights are used, which are filled with stuffing.
- After the blank of nylon tights is stuffed, sewn and covered with the main material, markings are made.
- It is necessary to carefully mark the places where the nostrils will be, as well as the inner and outer corners of the eyes.
- We thread the needle. It is important to use a new piece of thread for each new operation.
- Let's move on to the crucial moment of the master class. We insert the needle into the left nostril and remove it from the inner corner of the right eye.
- We return in the opposite direction. The distance between the entry and exit points of the thread must be at least 2 mm so that the fabric does not tear.
- Each time we tighten the thread a little, but make sure that it does not break.
- We repeat the action symmetrically. And we see that a nose appears on our face from tights, padding and fabric.
- This may be enough, especially if you are sewing a baby doll. Children's faces are quite plump and a few manipulations with a needle and thread will be enough for expressive facial expressions.
Do you want to continue the master class? Use a smaller needle.
- Outline the bridge of the nose. Make sure the lines are symmetrical.
- Start working from the top, from the forehead along the intended nose. Move the needle from right to left and return it back, slightly tensioning the thread.
- The corners of the lips should be marked. Using a thread and a long needle, connect it diagonally to the outer corners of the eyes.
- We tighten the oval of the face so that the cheeks are formed.
This method is especially convenient when working with dolls made from tights, since you can adjust the thread tension and correctly form facial features. They will turn out more convex or vice versa.
How to make a textured face for a textile doll
Sketch of a face
The first thing to do is to sketch a three-dimensional doll's face, for example, with a simple pencil. It’s good if a person imagines the final image and facial expression of the product. In any case, you can always find and print out a sample of facial features on the Internet. If you wish, you can use a stencil, sketching a characteristic sketch on paper, and only then move on to the face on the fabric. For beginners, it is difficult to maintain symmetry on a fabric face. Therefore, you can feel free to use a ruler, a measuring tape, a paper template for drawing a face and other auxiliary devices. After this, you need to put your head down for 5-10 minutes, then look with fresh eyes and check the symmetry again.
Face tightening
When doing this work, you need to remember about thick winter quilts. As a rule, they have a stitched pattern on them that forms certain protrusions. The head needs to be flashed all the way through. It is better to fix the tightening from the back side, so it will be easier to cover the seam with hair. During the steps, you can use strong or regular thread.
You might be interested in How to knit a Christmas tree toy for the New Year with your own hands
Toning and drawing
The most difficult part of the job is painting the face of a textile doll. This mainly concerns working with facial features, especially eyes. The character of the toy and its mood depend on them. Dolls that look more realistic are becoming increasingly popular. Some craftswomen use their artistic talent and draw faces that captivate even those who are completely indifferent to toys.
To tint a doll's face, you can use both acrylic paints and pastels. The second option makes the work much easier, since the shading happens quite well. Pastels must be used dry. Under no circumstances should you use oil.
Using several halftones allows you to make the doll's face more natural. To tint your cheeks, you can use pink or light pink shades. Light brown, beige, dark beige tones are suitable for tinting other features.
Important! You can paint eyes and thin dark lines using acrylic fabric paint. The upper part of the eyes is painted with transparent acrylic varnish.
Basic rules for tightening
Recommendations for tightening a doll's face
To perform the mk you will need:
- Threads. They must be reliable so as not to tear. If the thread breaks, the doll will end up with a distorted face, and eventually the voluminous work will have to be redone.
- A special long needle that can easily pass through the doll head blank and not get lost in the stuffing.
- Directly preparing a doll's head, using nylon tights.
Taking into account the basic rules for tightening a doll's face, you can create a real masterpiece with your own hands. One way to make a textile doll's head is to use a regular stocking, which is filled with stuffing. Tightening the face of a textile doll in detail master class:
- After the nylon blank is completely stuffed, sewn and covered with the main material, markings are made.
- It is necessary to carefully mark the places where the nostrils will be, as well as the inner and outer corners of the eyes.
- The thread is threaded into the needle. It is important to use a new piece of thread for each new operation.
- It's time to move on to the crucial moment of the master class. The needle is inserted into the left nostril and removed from the inner corner of the right eye.
- It needs to be returned in the opposite direction. The distance between the thread entry and exit points must be at least 2 mm to prevent the fabric from tearing.
- Each time the thread is stretched a little, but you need to make sure that it does not break.
- The action must be repeated symmetrically.
Important! Children's faces are quite plump. Therefore, a few manipulations with a needle and thread will be enough for expressive facial expressions.
How to make a beautiful face for a nylon doll. Tights dolls: main varieties
Since master classes describing how to make a doll from nylon tights appeared relatively recently, there is no clear classification of toys for this type of creativity.
However, soft dolls made of nylon and padding polyester can be divided into several types, depending on their appearance and manufacturing methods.
Tumbler dolls
To create a doll, not only nylon tights are used - stockings and socks are also great for this. At the end of the work process, the master receives small soft toys of a round or oval shape with conventionally designated limbs.
Simple master classes on creating this type of doll are great for teaching novice handicrafts.
DIY butts
Another simple way to create a doll from nylon tights. From the name you can understand the peculiarity of the doll - the face and butt are especially prominent in the work process. Masters jokingly call this toy a fortuneteller - which side it turns to you in the morning, such a day awaits you.
The doll needs to be made in parts: first make all parts of the body (head, hands, feet, butt), and then sew them to the clothes.
Frame doll
Frame toys take longer to make than previous types; they become taller and take on an appearance close to human.
The main material for the frame is considered to be rigid wire wrapped with filler, but in addition to it, plastic bottles can also be used.
The varieties of toys made of nylon and padding polyester do not end there, since the masters of this creativity are constantly coming up with new patterns, creating dolls of different types in a short time. Find out how to quickly sew a doll with your own hands.
How to make a head for a textile doll. MK: three-dimensional face for a doll
Every novice dollmaker has a lot of questions about making a doll’s face. So we'll pull back the curtain a little and show some of the workflow. This is necessary so that the beginning craftswoman understands which direction she should move, what materials to use, how much knowledge and time she will need.
To make her dolls, the creator of the Doll Tenderness brand, Arisha uses good American cotton from KONA. Cotton is not tinted, it is factory dyed in a flesh tone; in terms of density - thin, but with a fairly dense weave.
The pattern of the doll's head presented for MK consists of four parts, this is what allows you to form the desired contour of the head and profile with a nose and lips.
In the image below you will see what a sewn and tightly stuffed doll's head looks like. There are quite a lot of patterns on the Internet - there are plenty to choose from, so experiment. You can, for example, choose a pattern, sew only the head and see what you would like to change in it: maybe you need to move the nose somewhere, maybe you need to correct the oval of the face. This way you will be able to make your own unique pattern, which will be easy for you to work with and which will reflect exactly your idea.
Volumetric face of a textile doll
1. Sketch of the doll's face
The very first thing to do is to draw the details of the doll’s face, for example, with a simple pencil. It’s good if you already have the final image and expression of the doll’s face in mind. In any case, you can always look at facial features on the Internet and sketch a sketch on paper, and only then move on to the face on fabric. If you have never done this, it will be quite difficult to maintain symmetry on a fabric face. Therefore, you can feel free to use a ruler, a measuring tape, a paper template for drawing a face and other auxiliary devices. Then try putting your head down for 5-10 minutes, then look with fresh eyes and check the symmetry again.
Beautiful face for a doll
Drawing the doll's face
2. Tightening the doll's face
Think of thick winter quilts, the pattern is usually stitched in and creates bumps and “bumps.” So here too you need to stitch the head right through. The drawstring is fixed at the back so that everything can be covered with hair later. The face is tightened with a strong thread, but you can use regular thread and monofilament. This will require skill on your part, knowledge of how fabric works, and more than one test head will end up in the trash. You need to tighten and shape the eyes, nose, corners of the lips, and chin.
Doll face tightening
3. Tinting and drawing the doll’s face
You can use both oil paints and pastels. It will be much more convenient to work with pastel: the brushes will remain clean and it will shade well. You need dry pastels, do not use oil pastels. You can rub the pastel on sandpaper and dip a brush into it (see photo).
Pastel is used to draw the face of a textile doll
The more halftones you get, the more interesting the face will be. To tint the cheeks, take pink and light pink, the rest of the features can be light brown, beige, dark beige - at your discretion.
Doll face tinting
For further basic drawing of the eyes and fine dark lines, acrylic fabric paints are usually used. Eyebrows, wings of the nose, lips, whites of the eyes, the eyes themselves, it is recommended to paint all this with acrylic paint. The eyes can be coated with clear acrylic varnish on top, which will add a playful shine. 
Acrylic paints for textiles
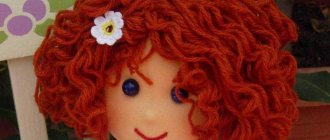
After painstaking, concentrated work and the manifestation of artistic talents, you should definitely end up with a face like this.
Volumetric face of a textile doll
Clothes for dolls from Arisha
4. Further work
Next you can glue or sew on the eyelashes and attach the hair. And just like that, your new doll will be born!
How to make a voluminous face for a textile doll
Shurochka doll. Author: “Doll tenderness from Arisha”
Of course, any beautiful product requires enormous perseverance, perseverance, experience, effort, time, and of course, great love for what you do! If you have all this, then you will definitely get a beautiful doll!
Author of the master class:
● Doll tenderness from Arisha: https://www.livemaster.ru/arishaskazka
———- If you really liked our master class, please write about it in the comments, and don’t forget to share your favorite article on social networks!
Be the first to receive all new articles from the site in your email!
How to paint the face of a textile doll
How to paint a doll correctly? A textile toy should be cheerful, a little naive, a little surprised. A smiling mouth and a round snub nose are already stitched along the contour. To complete the work you need to apply decorative makeup.
You may be interested in this: Christmas reindeer - crochet a toy
Note! You can paint a doll's face with acrylic paints, although in some places it is allowed to apply war paint with oil paints.
You need to prepare in advance a palette for diluting paint, brushes of different thicknesses and hardness, and white paper for testing. The master class begins with preparing the paint. Place a small amount of the product on the palette, then dip the tip of a dry, hard brush. The tone should be chosen slightly darker than the “skin” of the toy. It is advisable to smear excess paint onto a sheet of paper.
Use light, quick strokes to apply the paint to the cheeks, in the grooves of the stitches, near the eyes and mouth. You can tint the nose a little. If the paint is not applied evenly enough, you can shade it with a cotton swab. Next, apply white paint to the eye circles.
How to draw a face
The middle of the eyes should be marked with a pencil, then retreated a little upward (1-2 mm), and then a large circle should be drawn from this center. After this, you will have to step back another 1 mm and draw a smaller circle. The eyes should be made the same. Initially, you need to paint a large circle with light brown paint, then, without waiting for the paint to dry, make the outer diameter dark with a smooth transition to light brown towards the center. After drying, you will have to mark the black pupil.
Using a thin brush, you need to make two white spots on both pupils. One is small, the other is larger. At the end, you need to apply dry red paint over your lips.
Should I prime my face before work?
Face primer
Many people wonder whether it is necessary to prime a textile toy? This covering must be made for a doll with a voluminous face so that it holds its shape. To create a certain character, a textile doll must be painted and tinted correctly. But the very first step is to apply a primer.
When performing the work, the following fabric primer composition is used:
- PVA glue 1 tbsp. l. (15 ml.).
- Instant coffee 1.5 tsp.
- Water 50 ml.
Pour hot (warm) water over the coffee, let it cool, and then add PVA glue. Warm and cold solutions give different shades of color. If there are lumps, you need to strain the liquid through a sieve. Using a dish sponge, you need to dye the fabric. When dealing with the process of tinting fabric, you should periodically stir the primer composition so that the glue does not settle to the bottom of the container and the product is evenly coated. After priming, the product must be dried. You can leave the textiles to dry simply in the air, on a radiator, or dry them with a hairdryer.
Note! The primer composition can be stored for a week, but it is better to make it fresh. Coffee powder gives a richer color than granules. You can add cinnamon and vanillin. They must first be mixed with coffee and then filled with water.
What paints to use
Painting a doll's face
To create the image of a doll, it is better to use professional water-based acrylic paints. Oil paints are absolutely not suitable for painting a face, as they react with the material from which the toy is made, completely destroying it. You can get a varied effect using glossy and matte paints. They can be mixed with each other.
You might be interested in Two-component slimes - how to make them yourself at home
What else will you need for work?
Materials
To draw a little doll's face, you need to prepare the tools:
- Palette. It is better to choose glass or porcelain. It is convenient to mix suitable colors on it, but you can also use paper.
- A synthetic brush that captures details well on the base. Natural products do not combine well with acrylic. It is best to choose a thin brush. This makes it easier to draw small details.
- Toothpicks or cotton swabs are useful for working with solvent.
How to make a voluminous face for a textile doll.
How to make a voluminous face for a textile doll
Master class from Doll tenderness from Arisha
There are a lot of questions about the doll's face. The average person can’t even believe that the dolls are made of fabric. So I'll pull back the curtain a little and show some of the workflow. So that someone who starts sewing dolls understands which direction to move in, or choose another method 
Everything is simple for me. I use good American cotton from KONA. I don’t dye the cotton; it is factory-dyed in a flesh tone, thin, but with a fairly tight weave. The pattern of the doll's head consists of four parts, this is what allows you to form the contour of the head and the relief with the nose.
Look at the picture, this is what a freshly sewn, tightly stuffed doll head looks like. There are a lot of patterns on the Internet, sew one head according to the selected pattern and see what you would like to change in it, maybe move the nose somewhere, maybe change the oval of the face. This way you will be able to make your own unique pattern that will be easy for you to work with.
Draw the details of the face. It is very difficult to maintain symmetry, especially when your eyes are tired. I try to put my head down for 5-10 minutes so that I can look with fresh eyes and check for symmetry.
We tighten the face. Remember thick winter blankets, there is usually a stitched pattern and it forms bulges and “bulges”. So here we stitch right through. We fix the drawstring at the back. I tighten it with a strong thread, but you can use regular thread and monofilament. This will require skill on your part and more than one head will fly into the trash can. Eyes, nose, corners of lips, chin.
I used to tint with oil paint. Now I use pastels. I'm much more comfortable. The brushes are clean and blends well. The pastel must be dry, but there is also oil pastel. I rub the pastel on sandpaper and dip a brush into it (pictured). The more halftones, the more interesting the face turns out. Let's say you're tinting your cheeks, take pink and light pink.
I use acrylic fabric paint to create the eyes and fine dark lines. Eyebrows, wings of the nose, lips, whites of the eyes, the eyes themselves, all with acrylic paint. The eyes on top can be coated with transparent acrylic varnish.
After painstaking, concentrated work, I ended up with a face like this.
We glue the eyelashes, sew on the hair and a new doll is born.
Creating a face for a textile doll
Today, using the example of my Holly doll, I will show one of the possible options for painting the face of a textile doll.
Before painting, I do not prime the fabric with anything, since it is important for me to keep the surface of the fabric soft. But this imposes some limitations in work. A pencil sketch must be done with certainty, since a simple pencil can be erased, but this place will look dirty and worn out. To do this, I first stretch two threads, which serve as reference lines for the drawing.
After the general contours of the eyes, nose and mouth are marked, I remove the threads.
Now I’m clarifying the pencil drawing.
If you are planning to do a tightening, it is better to do it before painting.
I tighten it along the contour of the lower eyelid, along the crease of the upper eyelid and the corners of the lips. I don’t tighten the nose on this pattern, as the nose ends up depressed.
I paint over the eyes with white acrylic.
I paint the iris with acrylic of the desired color and outline the contours of the nose and lips with light brown. Not everyone is able to draw thin lines with brushes and acrylic paints, so they can be replaced with a liner. When choosing a liner, make sure that it is marked as waterproof.
A shadow falls on the eye from the upper eyelid, so I darken the upper edge of both the white and the iris. On the contrary, I lighten the lower edge of the iris a little.
I paint the pupil in black using acrylic paint. Now I tint the eyebrows, the crease of the upper eyelid, under the nose and under the lower lip with light brown color. I like to use watercolor pencils for shading. I line the upper eyelid with a brown liner.
Since the image requires it, I draw black arrows on the upper eyelid with acrylic. I draw the lower eyelashes with a light brown liner.
I specify the tinting: I darken the outer edge of the upper eyelid and lighten the inner edge of the upper eyelid and a little under the eyebrow.
I paint my lips with a watercolor pencil; for a more intense color, you can use acrylic paints. Notice that the upper lip is slightly darker than the lower lip.
I draw eyebrows with acrylic.
I place highlights on the eyes and lips.
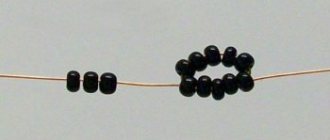
Most often I draw eyelashes, but for the image of Holly Golightly I needed something more expressive. That's why I use black sewing thread. I insert 3 threads into the needle and tie a secure knot.
I insert the needle into the back of the head and bring it out at the outer corner of the upper eyelid.
I cut the thread with a reserve.
I bring out the next bunch by stepping back a little. From the middle of the upper eyelid, it is better to reduce the number of threads in the bundle to two. Such eyelashes should not be applied to the entire length of the upper eyelid; it is better to stop before reaching the inner corner. The result should be spiders like this.
Now they need to be cut. I left the longest eyelashes at the outer edge, gradually reducing them towards the inner edge. I also don’t make eyelashes of the same length in one bundle. I blush my cheeks a little with a watercolor pencil.
I secure the entire face painting with a fixative. I cover my eyes and lips with glossy acrylic varnish for shine.
Ready
Volumetric face of a textile doll MK. Volumetric face for a textile doll. Author MK Irina Rodionova
There are a lot of questions about the doll's face.
The average person can’t even believe that the dolls are made of fabric.
So I'll pull back the curtain a little and show some of the workflow.
So that someone who starts sewing dolls understands which direction to move in, or choose another method
Everything is simple for me. I use good American cotton from KONA.
I don’t dye the cotton; it is factory-dyed in a flesh tone, thin, but with a fairly tight weave. The pattern of the doll's head consists of four parts, this is what allows you to form the contour of the head and the relief with the nose.
Look at the picture, this is what a freshly sewn, tightly stuffed doll head looks like.
There are a lot of patterns on the Internet, sew one head according to the selected pattern and see
What would you like to change in it, maybe move the nose somewhere, maybe change the oval of the face.
This way you will be able to make your own unique pattern that will be easy for you to work with.
Draw the details of the face. It is very difficult to maintain symmetry, especially when your eyes are tired. I try to put my head down for 5-10 minutes so that I can look with fresh eyes and check for symmetry.
We tighten the face. Remember thick winter blankets, there is usually a stitched pattern and it forms bulges and “bulges”. So here we stitch right through. We fix the drawstring at the back. I tighten it with a strong thread, but you can use regular thread and monofilament. This will require skill on your part and more than one head will fly into the trash can. Eyes, nose, corners of lips, chin.
I used to tint with oil paint. Now I use pastels. I'm much more comfortable. The brushes are clean and blends well. The pastel must be dry, but there is also oil pastel. I rub the pastel on sandpaper and dip a brush into it (pictured). The more halftones, the more interesting the face turns out. Let's say you're tinting your cheeks, take pink and light pink.
I use acrylic fabric paint to create the eyes and fine dark lines. Eyebrows, wings of the nose, lips, whites of the eyes, the eyes themselves, all with acrylic paint. The eyes on top can be coated with transparent acrylic varnish.
After painstaking, concentrated work, I ended up with a face like this.
We glue the eyelashes, sew on the hair and a new doll is born.
Of course, all this requires perseverance, perseverance and time,
and of course, great love for what you do and desire!
If you have all this, you will definitely succeed!
Login to the site
Every novice dollmaker has a lot of questions about making a doll’s face. So we'll pull back the curtain a little and show some of the workflow. This is necessary so that the beginning craftswoman understands which direction she should move, what materials to use, how much knowledge and time she will need.
To make her dolls, the creator of the Doll Tenderness , Arisha uses good American cotton from KONA. Cotton is not tinted, it is factory dyed in a flesh tone; in terms of density - thin, but with a fairly dense weave.
The pattern of the doll's head presented for MK consists of four parts, this is what allows you to form the desired contour of the head and profile with a nose and lips.
In the image below you will see what a sewn and tightly stuffed doll's head looks like. There are quite a lot of patterns on the Internet - there are plenty to choose from, so experiment. You can, for example, choose a pattern, sew only the head and see what you would like to change in it: maybe you need to move the nose somewhere, maybe you need to correct the oval of the face. This way you will be able to make your own unique pattern, which will be easy for you to work with and which will reflect exactly your idea.
Author of the master class: “Doll tenderness” from Arisha
1. Sketch of the doll's face
The very first thing to do is to draw the details of the doll’s face, for example, with a simple pencil. It’s good if you already have the final image and expression of the doll’s face in mind. In any case, you can always look at facial features on the Internet and sketch a sketch on paper, and only then move on to the face on fabric. If you have never done this, it will be quite difficult to maintain symmetry on a fabric face. Therefore, you can feel free to use a ruler, a measuring tape, a paper template for drawing a face and other auxiliary devices. Then try putting your head down for 5-10 minutes, then look with fresh eyes and check the symmetry again.
2. Tightening the doll's face
Think of thick winter quilts, the pattern is usually stitched in and creates bumps and “bumps.” So here too you need to stitch the head right through. The drawstring is fixed at the back so that everything can be covered with hair later. The face is tightened with a strong thread, but you can use regular thread and monofilament. This will require skill on your part, knowledge of how fabric works, and more than one test head will end up in the trash. You need to tighten and shape the eyes, nose, corners of the lips, and chin.
3. Tinting and drawing the doll’s face
You can use both oil paints and pastels. It will be much more convenient to work with pastel: the brushes will remain clean and it will shade well. You need dry pastels, do not use oil pastels. You can rub the pastel on sandpaper and dip a brush into it (see photo).
The more halftones you get, the more interesting the face will be. To tint the cheeks, take pink and light pink, the rest of the features can be light brown, beige, dark beige - at your discretion.
For further basic drawing of the eyes and fine dark lines, acrylic fabric paints are usually used. Eyebrows, wings of the nose, lips, whites of the eyes, the eyes themselves, it is recommended to paint all this with acrylic paint. The eyes can be coated with clear acrylic varnish on top, which will add a playful shine.
After painstaking, concentrated work and the manifestation of artistic talents, you should definitely end up with a face like this.
4. Further work
Next you can glue or sew on the eyelashes and attach the hair. And just like that, your new doll will be born!
Of course, any beautiful product requires enormous perseverance, perseverance, experience, effort, time, and of course, great love for what you do!
If you have all this, then you will definitely get a beautiful doll!
All about handmade dolls https://all-dolls.net/