DIY scops owl toy: master class with photo patterns
All children love soft toys, especially sleeping with them. This is why scops owl toys were invented. Of course, you can buy any toy, especially in our time, but it’s much more pleasant to make a Scops Owl toy with your own hands, filling it with your warmth and love. And absolutely every mother can do this, since the main thing in this matter is desire. And this article will help you choose the right model and get the job done faster thanks to detailed master classes.
Before we get started, let's decide what it should be:
- exclusively from natural materials;
- light pastel colors;
- small size so that the baby can sleep with it comfortably;
- have eyes closed;
- easy to wash;
- It can be either sewn from fabric or crocheted or knitted.
There are a huge number of ready-made patterns, some of which we propose to consider below, or you can create a pattern yourself, guided by your baby’s preferences.
So, let's look at how to sew one of these toys step by step.
Scops Owl Bunny
To work we need the following:
- natural cotton fabric in two colors;
- filler;
- needle and thread or sewing machine;
- scissors;
- pattern.
Let's get started:
- We prepare a pattern, it can be printed or simply redrawn by hand.
- Transfer the pattern to the fabric and cut it out.
- We embroider our muzzle: eyes, nose can be sewn from contrasting fabric and overcast, mouth.
- Ears cut out 4 parts.
- We sew the ears.
- The ears will not be stuffed with filler, just attach them with needles to the front part of the base and stitch along with the base.
Also, do not forget to leave room for the filler, it is marked with a dotted line on the pattern.
- We stuff the toy with filler and sew it up with a hidden seam.
At this stage, our Scops Owl toy is ready.
As you can see, there is nothing complicated in sewing, the patterns are quite simple.
Let's look at some more very interesting patterns in the next photo.
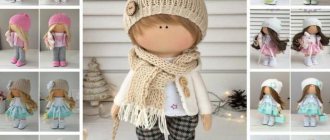
- First option.
- Scops owl in tilde style.
- Giraffe.
- Kitty.
- Baby elephant.
- Bunny.
Let's also look at several options for crocheted toys.
Video on the topic of the article
Similar articles:
knittochka.ru
Sewing sequence
The most difficult thing about sewing a comforter for a bear or a bunny according to a pattern is to finally decide on the model and choose a beautiful natural fabric.
For such a craft as a do-it-yourself comfort toy, patterns can be found on numerous handicraft or “mom” sites and forums on the Internet.
You might be interested in: Patterns and sewing of men's workwear, uniforms and work overalls
Important! To sew a scops owl toy, it is absolutely not necessary to buy new fabric. You can use scraps left over from other crafts, old diapers, fleece blankets - in a word, everything that is at hand.
The algorithm for sewing is identical in almost all cases:
- find or make your own pattern on paper or tracing paper;
- transfer the pattern to the fabric;
- cut out parts;
- sew the parts together;
- fill the toy with filler.
The size of the toy is an individual parameter. But you shouldn’t make the comfort too big or too small.
It is strongly recommended not to use hard parts or small fittings when decorating the face of a toy. A baby can easily tear off a button or bead, put it in his mouth and choke. To avoid this, it is strongly recommended to limit yourself to smooth embroidery and not to sew any elements to the comforter that could somehow injure the baby.
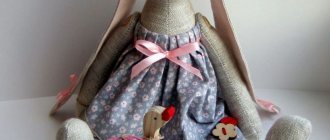
How to sew a Scops Owl toy with your own hands: bunny pattern
Today we will tell you how to sew a scops owl toy with your own hands. We suggest making a cute and soft to the touch bunny, with whom your child will feel warm and very comfortable. In this master class you will find the necessary scops owl patterns, step-by-step instructions and useful tips.
The Scops Owl toy is one of the most favorite items for kids. They hug them and don't want to part with them. However, the Scops Owls Bunny is also an excellent gift for an adult. It is unlikely that anyone will not like this cute creature. Also, some people make several similar crafts at once, sewing them together by the legs - this toy “menagerie” perfectly replaces the bumpers in a child’s crib. And, of course, the child really likes it.
Of course, there are many ready-made versions of such toys in children's departments today, but it is much better to sew a Scops Owl with your own hands. Firstly, you will be sure that it is safe. Secondly, you can adjust its parameters yourself. Thirdly, we will make it collapsible - that is, the toy can be easily washed. And finally, such a scops owl will be extremely budget-friendly, unlike ready-made analogues.
What do we need?
- fabric for the bunny's body (it's better to take cotton)
- fabric for the head, ears and paws of the scops owl (you can take terry or any other natural one)
- zipper (10-15 cm, less if possible)
- material for stuffing a soft toy (cotton wool or cotton balls would be optimal)
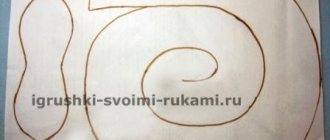
To sew a Scops Owl, you must first prepare a pattern. You can use the one below. You can print it out, but it will be easier to just draw it.
Choose the size of the toy yourself. In this case, all the details of the scops owl pattern fit on an A4 sheet. We cut out all the details of the future toy from fabric.
We stuff the bunny's head and paws with stuffing and sew it on the wrong side. This can be done either by machine or by hand. The ears do not need to be sealed.
Make the face of the Scops Owls Bunny using simple embroidery: a pink nose, freckles, eyes and eyelashes.
To keep the bunny clean, we will fasten the main part of the craft not with thread, but with zipper. This way you can remove the filling from the toy at any time. It can be replaced with a new one, and the scops owl itself can be washed in a machine with baby powder.
If you don’t have a zipper or you can’t make the dog hidden, you can replace it with small hidden buttons. To do this, you need to make a hem to create a pocket - this way the cotton wool will not fall out of the toy.
Ready! Scops owls can come in a variety of shapes and sizes. They are often made the size of the baby himself. It's no secret that children like to climb onto soft toys with their whole bodies.
Try to sew such a bunny, and you yourself will be delighted with it. What’s especially cool is that you can make a toy with your own hands very quickly and without even using a sewing machine. Well, all the materials are often already at hand.
Views: 3,786
33-podelki.ru
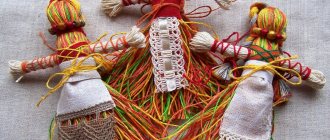
Crochet Scops Owl - master class
A lovely Scops Owl owl - it can be knitted for a child of any age. If you want to make a gift for your baby, put a Kinder Surprise container with beads inside the owl (don’t forget to seal it on the outside with tape), you’ll get a “musical owl.” The height of the toy is 16 cm.
Abbreviations: KA - amigurumi ring, STBN - single crochet, SSN - double crochet, СС2Н - double crochet. with two crochets, SST - connecting column, decreasing. - decrease, increase. - increase, VP - air loop.
For the master class you will need:
- Cotton threads, the owl is made with Yarnart Jeans yarn (55% cotton, 45% polyacrylic 160m/50g) in pink, yellow, blue and white colors.
- The recommended hook size is 2 mm.
- Filling: padding polyester, holofiber, padding polyester.
- The needle is thick.
- Marker.
Head (pink part).
The beginning is the same as for all amigurumi toys:
1st r: VP and 6 STBN in VP. Tighten the KA. 2nd row: 6 increases (12) 3rd: (1 STBN + increase)* 6 (18) 4th: (2 STBN + increase)* 6 (24) 5th: (3 STBN + inc.)* 6 (30) 6th: (4 stbn + inc.)* 6 (36) 7th: (5 stbn + inc.)* 6 (42) 8th: (6 stbn + inc.) )* 6 (48) 9th: (7 SC + increase)* 6 (54)
From the 10th to the 19th rows - 54 STBN (54) in the photo.
Next - decreases. 20th: (7 STBN, decrease)* 6 (48) 21st: (6 STBN, decrease)*6 (42) 22nd: (5 STBN, decrease)*6 (36) 23- th: (4 STBN, decrease.)*6 (30) 24th: (3 STBN, decrease.)*6 (24) 25th: (2 STBN, decrease.)*6 (18) 26th: (1 STBN, decrease) * 6 (12) 27th: 6 decrease. (6)
We fill the head with filler.
Connect all loops with a needle. Sew in the center.
Owl head (blue part).
1st: 6 sc in amigurumi ring 2nd: 6 inc. (12) 3rd: (1 sc + inc.)*6 (18) 4th: (2 sc + inc.)*6 (24) 5th: (3 sc + inc.)*6 (30 ) 6th: (4 sc + inc.)*6 (36) 7th: (5 sc + inc.)*6 (42) 8th: (6 sc + inc.)*6 (48) 9 th: (7 STBN + add.) * 6 (54)
From the 10th to the 19th row continue knitting without changes (54)
From this moment on, we must make a blue “visor” on the cap, which protrudes like a triangle above the beak.
20th row: we continue to knit the “visor” in turning rows. 14 STBN, turn. 21st: 14 SC, turn 22nd: start decreasing on both sides. Decrease 10 STBN, decreasing. (12) 23rd: decrease, 8 STBN, decrease. (10) 24th: decrease, 6 STBN, decrease. (8) 25th: dec., 4 STBN, dec. (6) 26th: kill, 2 STBN, kill. (4) 27th: decrease, decrease. (2) We finished the hat. The hat is decorated with flowers that can be crocheted or knitted at random.
Ears (2 parts).
With blue yarn we cast on 14 VPs and connect them into a ring 1st row: 14 STBN (14) 2nd: decrease, 3 STBN, 2 decrease, 3 STBN, decrease. (10) 3rd: decrease, 1 STBN, 2 decrease, 1 STBN, decrease. (6) 4th: decrease, 1 STBN, decrease, 1 STBN (4) 5th: decrease, decrease. (2)
We make “tassels” on the ears. To do this, cut off 30 cm of blue thread and fold it into 4 folds. Then insert the hook into the upper corner of the eye. Through this resulting hole we pull out a layer of thread. Tighten and cut off excess length.
Beak.
1st row: Yellow yarn 3 SC in KA 2nd: 3 SC (3) 3rd and 4th rows: same as 2nd. Cut the thread.
The body of an owl.
We start with pink yarn.
1st row: 6 STBN in KA 2nd row: 6 increases (12) 3rd: (1 STBN + increase)* 6 (18) 4th: (2 STBN + increase)* 6 ( 24) 5th: (3 sc + inc.)* 6 (30) 6th: (4 sc + inc.)* 6 (36) 7th: (5 sc + inc.)* 6 (42) 8th: (6 STBN + inc.)* 6 (48) 9th: (7 STBN + inc)* 6 (54) From the 10th to 19th rows - 54 STBN (54)
Next - decreases. 20th: (7 STBN, decrease)* 6 (48) 21st: (6 STBN, decrease)*6 (42) 22nd: (5 STBN, decrease)*6 (36) 23- y: (4 STBN, decrease.)*6 (30) 24th: (3 STBN, decrease.)*6 (24) 25th: (2 STBN, decrease.)*6 (18) Stuff the body with filler and you can sew it to your head.
Legs (2 parts)
First detail. 1st row: 4 STBN in KA from 2nd to 5th row: 4 STBN The second part is knitted in the same way as the first, then we attach the first part to the second part and continue tying. both legs in a circle. from 6th to 8th row: 8 STBN (8) 9th row: 4 decrease. (4)
Collar.
You can make a small piece of the collar, or make it in a circle. If you want to make a round collar, cast on 37 VPs with white yarn. 1st row: 36 STBN, VP, turn. 2nd: 2 VP, skip 3 SC, and in the 4th we knit a SC, * 3 VP, skip 3 SC, and in the 4th we knit a SC* - repeat until the end of the row. reversal 3rd: *ССН and here 5 СС2Н* - repeat until the end of the river.
Wings (two parts).
We collect 10 VP.
1st row: skip the 1st VP from the hook, in each. perform the subsequent one according to STBN - (9 STBN). Then 3 VP - moved to the other side of the chain.
In each VP, perform one STBN - 7 STBN in total (that is, without reaching the end of the row).
2nd r: VP, turn. In each STBN of the previous year. perform 1 STBN - (7 STBN). In a chain of 3 VPs we make 2 STBN, 3 VP, 2 STBN. In each column previous R. we knit 1 SC - (7 SC).
3rd row: VP, turn. In each column previous R. perform 1 sc - 9 sc. In a chain of 3 VPs we make 2 STBN, 3 VP, 2 STBN. In each STBN previous R. knit 1 STBN - (7 STBN)
4th row: VP, in each. column before R. 1 STBN each - 7 STBN in total. In a chain of 3 VPs, make 2 STBN, 3 VP, 2 STBN. In each column previous row we knit 1 STBN - (9 STBN). Tighten the knot and cut off the excess threads.
Sew wings and legs to the body. Sew ears with tassels onto the hat. Embroider the eyes and sew on the beak.
On the video - how to crochet an owl toy:
Crochet owl / Part 1/MASTER CLASS Watch this video on YouTube
Crochet owl /Part 2/ MASTER CLASS Watch this video on YouTube
Toys for sleep (Patterns) – Fair of Masters
Greetings!
Some time ago, for the first time, I sewed a collection of Splyushkas - toys for sleeping. Since then, I have received several requests from moms to share patterns. So, I got ready, drew it and now I’m sharing it. Sewing is quite simple.
A little about toys.
According to my idea, a sleep toy should:
- easy to wash (these can even be washed in the washing machine)
- be light, soft tones
- be made only from natural fabrics
- have sleeping eyes
- be small
The last point is quite controversial, I will explain why I think so. Well, firstly, there is no point in creating large dust collectors in the crib, which, moreover, take up space from the child. Secondly, at one time my daughter took the habit of sleeping with a big teddy bear, at night she came to me with it, the teddy bear was safely thrown onto my head, my hair became electric and in general it was unpleasant - since then we have been sleeping with small toys. In general, these two points are enough for me. But recently a third one was found by chance. I came across this thing that should be sprayed on the bed in order to get a better sleep (it contains an infusion of “sleepy” herbs). To be honest, I doubt the effectiveness of this method, but we spray since we already have it. And we spray it just on the toy, which then smells nice, the child hugs it and sleeps. From the same series there are all sorts of oils such as pine and other more expensive and advertised ones, which are recommended as a preventive measure during colds. It’s also convenient to drip them onto such toys, and then place them at night, if necessary, closer to the child’s head. I drew the patterns myself. I admit that I could have repeated something somewhere, but I can’t say where or what, because... it's unconscious.
The dotted lines indicate the places where, in my opinion, it is most convenient to leave a hole for turning inside out. The patterns are designed for non-stretch cotton. If you print the patterns on A4 format, you will get toys of the following sizes: Giraffe - 29 cmHare - 15 cm + earsElephant - height 9 cm, 2 times longer Whale - height 9 cm, length 14 cm Hedgehog - height 8 cm, length 18 cm .
So,
Giraffe
I usually cut giraffe legs by eye, so I drew them here too. We cut out the whole body from one fabric, sew spots on it and the “front of the muzzle”, and make sure that the sewn elements are symmetrical on the two halves. Then we grind down the legs, turn them inside out, lightly stuff them, and sew them onto one of the giraffe halves. We baste the tail and stitch the giraffe around the perimeter, leaving a hole where shown by the dotted line. We trim off the excess, make cuts in the places where the shape turns, turn it inside out, and stuff it. The neck needs to be stuffed tightly! So that it keeps its shape. We embroider eyes and nostrils on the almost finished giraffe. Hedgehog and Elephant
The hedgehog consists of 2 parts. We cut out the prickly part, leaving a larger allowance (1-1.5 cm) in the area where the muzzle is sewn. We cut out the muzzle in the ear area without any allowance. We place the muzzle on the spines and sew it with a zig-zag stitch. We make sure that the 2 halves of the hedgehog are symmetrical. We sew, cut off the excess, turn it inside out, stuff it, embroider the eyes. With the elephant everything is simple. We cut it out, baste the tail, sew it, trim off the excess, turn it inside out, stuff it, embroider the eyes and ears.
Bunny
For the bunny, first sew the belly onto the main part. Sew the ears. Well, then everything is as usual: Sew, trim off excess, turn inside out, stuff, embroider eyes, nose and mouth.Kit
Happy creativity!
www.livemaster.ru
pattern for creating a unique toy
Despite the abundance of modern toys with electronic filling, cute teddy bears, hares, and cats are still loved by kids. Most often, such toys are bought for children. But, for example, a Scops Owls bunny, whose pattern is the simplest, can be sewn for a baby by a mother or grandmother.
Dreams and fairy tales
They say that plush toys protect the baby while sleeping from the monsters that live under the bed. It’s not for nothing that every adult probably has memories of what his favorite toy was, hidden under the pillow during the day and carefully placed to sleep on the pillow at night. Nowadays, hand-made Scops Owls bunnies, the patterns of which can be very different, are just as waiting in the cribs of their babies.
Quite simply
The baby needs comfort. For the little ones, toys have been invented that have received the characteristic name comfort. Such a sleepy favorite could be the Scops Owls hare. Its pattern is simple - a two-layer base and a toy head. A toy-scops owl in the form of a comforter can be made in two ways.
Method 1. Soft fabric, you can use a children's fleece blanket, folded into a square measuring 35 x 35 centimeters, although you can choose any size. It is stitched on all 4 sides, leaving only a small area unsewn in order to turn the base inside out, cutting the corners diagonally. Sew up the hole and in the middle of the comforter use small stitches to sew the head of a bunny toy.
Method 2. On a sheet of paper, draw the base of a scops owl, reminiscent of an asterisk: two rays are legs, two rays are handles, and instead of the fifth ray a head will be sewn. Dimensions: height - 30-35 centimeters, width (according to the arms) - 40-45. Here is a Scops Owls bunny comforter, the base pattern of which is in the shape of a star. Fill the sections of the ends of the rays marked with a dotted line with padding polyester more tightly, separating them with a line from the main fabric.
For those who are bad at sewing
A toy in a crib for your beloved baby can be very different. For example, a Scops Owls bunny, the pattern of which is intended for those who do not know how to sew or cut, is done like this. A piece of beautiful fabric measuring 60 x 30 centimeters is folded in half. Separately, two pieces measuring 10 x 15 centimeters are cut, folded in half lengthwise, resulting in rectangles measuring 5 x 15 centimeters, which need to be sewn on the sides. Both rectangles are turned right side out. These will be the ears of a scops owl bunny. The ears are placed inside a large square. The square is sewn first along the side on which the ears are placed, so that they are sewn firmly, then along the other two sides. Don’t forget to leave a small hole to turn the scops owl onto its face and loosely stuff the toy pillow with padding polyester. Sew up the hole. Use fabric paints to paint the bunny's nose, closed eyes with eyelashes, mouth and paws on the belly. Like this.
The Scops Owls Bunny pillow, the pattern of which is primitive, is ready.
Long-eared dormouse
Many craftswomen sew toys according to the same pattern, using only the distinctive features of a particular character for identification. For example, a cat has triangular ears, and a bear has round ears. The pattern of a Scops Owls bunny with long ears will not be difficult, because cutting them is quite simple. A toy pillow on which it is convenient for a baby to fall asleep should be almost flat, because it is used in addition to a standard set of bedding. Any sleepy toy will be primitive, including the Scops Owls Bunny. The pattern will allow you to make a fairly flat sleepy pet. If you use it, you need to sew in the following sequence:
- Sew the ears along the outline, leaving the lower straight part open. Turn the ears out, straighten them, and stuff them a little with padding polyester.
- Sew the paws along the contour, leaving the straight section unsewn, turn them inside out, straighten them, and stuff them with padding polyester so that the paws are soft.
- Fold the body with the head wrong sides inward. At the location of the ears and paws, secure the necessary parts, placing them inside the work. Sew the scops owl toy along the contour, sewing on all the details at the same time, leaving a small area unsewn. Turn the bunny right side out through it and lightly stuff it with padding poly.
- Sew up the hole.
- Embroider or paint a bunny's face with fabric paints.
Sleepy bunnies
Every baby has his own favorite toy. She lulls you to sleep and tells you fairy tales, protects you from bad dreams and wakes you up in the morning to play. The Scops Owls hare can also become such a favorite. A life-size pattern will help you make a beautiful and entertaining toy yourself. Using the proposed pattern option, you can get a toy of two sizes - larger and smaller if you print it on an A3 or A4 sheet. Such a Scops Owls Bunny can become the keeper of not only dreams, but also children’s pajamas, or you can hide a heating pad in it if the baby is sick. To do this, sew a zipper or Velcro tape (Velkro tape) into the lower part of the toy’s body. Since this pattern is simple, you can sew several hares using it - dormouse hares will become both fun and useful for your baby.
Scops owl pillows
Things that are intended for the baby must always be clean. You need to take care of sewn scops owl pillows regularly. These toys can be washed either in the machine or by hand. You can sew a bag of herbs into any such toy - lavender, lemon balm, chamomile. They will serve as fragrances for the baby's crib, having a soothing and antibacterial effect. You can use buckwheat as a filler instead of synthetic padding. Naturally. it needs to be sewn into a separate bag, which is then put into the tummy of a hand-sewn Scops Owls bunny. In this case, the patterns do not require any modification, only before sewing up the hole through which the toy was turned right side out, a bag of cereal should be inserted into it.
Scops owl toys, no matter what they are, will always bring joy to a child, and he will keep them in his heart for the rest of his life.
fb.ru
Master class: Life-size bunny comforter
You can sew a toy for your child or as a gift. To get a beautiful comfort bunny, the pattern with dimensions must be taken from a reliable source or made on your own.
The pattern for comfort is simple
The process of sewing a comfort bunny according to the pattern should look something like this:
- The life-size pattern is transferred to the fabric. For convenience, it should be pinned down with pins and carefully outlined with chalk, allowing for seam allowances of 1-1.5 cm.
- After transferring the pattern you will get the following details:
- body - 2 pcs.
- ear - 2 pcs.
- head - 2 pcs.
- head wedge - 1 pc.
- The parts are folded facing inwards.
- The body is sewn together. At this stage, it is important to leave a few centimeters unstitched at the top of the workpiece. The hole will be needed to turn the body right side out. In addition, this is where the head will be attached later.
- The finished body is turned right side out. To carefully turn out all the corners, it is most convenient to use a knitting needle or hook.
- The paws are stuffed with filler. For this purpose, you will need to take a needle and make a horizontal seam. In this case, you need to step back from the edge of the future foot and tighten the fabric a little. A small amount of padding polyester is placed in the bag resulting from the described manipulations, after which the thread is secured and hidden inside the toy. Similar actions are performed with all the remaining limbs of the bunny. When filling the paws with synthetic padding, you must ensure that the same amount of filler is used. Otherwise, the toy will not be symmetrical.
You might be interested in Sewing a bolster pillow yourself: interesting patterns
The best option for filling the toy is padding polyester.
- Sew the darts onto the head wedge blank.
- Using pins, connect the wedge to the two parts of the head.
- The head is sewn together, leaving a small space for turning the fabric inside out and filling it with padding polyester.
- Turn the stitched blank inside out and fill it with padding polyester.
- The ears are sewn at the seams. Since the size of the bunny ears is quite long, they can be decorated with embroidery with the name of the future little owner of the toy.
- The ears are sewn to the head using a hidden seam.
- Embroider the face of a hare. It is recommended to tighten the ends of the threads a little after embroidering. This will give it a little relief.
- The head is sewn to the body using the same hidden seam.
The Scops Owls bunny is easy to sew and looks original.
With minimal sewing skills, you can make a cuddle toy in just a couple of hours. Alternatively, a similar product can be crocheted or knitted.
Comforters appeared on the Russian market relatively recently. Not everyone is ready to pay for from 800 to 2000 rubles (depending on the specific model), but most people can do it with their own hands.*
For children, comfort is a real find
Those who don’t want to spend money or do handicrafts can use the most budget-friendly alternative - place an ordinary diaper under the breast when feeding, and then leave it in the crib with the baby. Although this option will not look cute, it will cope with its main functionality - preserving the smell of the mother and transferring it to the child - no less successfully than an expensive toy.
Do-it-yourself scops owl toys patterns: quickly and very inexpensively
Based on a very simple pattern of a Scops Owl toy, you can very quickly sew for your baby the animal that he likes most.
Some people love cats, while others would like a scops owl or a bunny owl. It’s nice to make Scops Owl toys with your own hands. The patterns for them look like an ordinary rectangle, but at the end these soft, cozy toys can be very different.
You can sew them together with the kids and sew so many of them that there will be enough for both girlfriends and brothers and sisters. The activity is enjoyable for both adults and children. And we won’t even talk about the benefits of joint creativity. It is obvious.
DIY scops owl toy step by step
What you will need:
- a piece of fleece or an old soft scarf, or a soft old blanket or stole
- Threads, needle
- Plastic eyes or beads (optional)
- Holofiber or padding polyester for stuffing
The size of the Scops Owl toy will depend on your idea. It can be small, almost pocket-sized, or medium-sized so that you can carry it on your hands. Or it can be large, like a sofa cushion or a home decor item.
In any case, in order for the Scops Owl’s pussy to be proportionately harmonious, the length of the workpiece should be approximately 6-7 times longer than its width. With these proportions, your toy will look almost like a real sleeping cat. Somehow I got tired of the unidentified ugly creatures from primitive modern cartoons,
Cut out part for a toy. For the ponytail, a rectangle of the required length from the same fabric is cut separately.
Fold the cut piece in half and sew it together.
Where the neck of our toy will be approximately located, we make an incision through which we carefully turn the workpiece inside out so that the seams are inside. Through the same cut we will stuff the scops owl with holofiber or padding polyester.
Next, we fill the entire body of our Scops Owl, except for the ears, with filler. They will remain soft rags.
After stuffing, the cut area through which we turned inside out and stuffed the toy must be tightly sewn up with small hidden stitches.
First of all, we will sew the place marked on the pattern as “head-torso seam”. with frequent stitches and a strong thread that will define the neck (this is about one third).
Now, along the dotted line marked on the pattern, we tighten with thread the place where the closed arms are formed and the seam separating the legs.
We sew on the tail, previously turned inside out and stuffed loosely with holofiber.
It's time to shape the face of the toy. We pinch the fabric with our fingers and pull it tightly where it is marked on the pattern with one stitch, or rather several neat tight stitches at one point. But as unnoticed as possible.
Almost done, a few more points:
- We sew on the eyes or embroider closed eyelashes, which is preferable.
- Embroider the nose.
- Decorate with a scarf, ribbon, bow. Whatever the baby wants, but always soft and pleasant to the touch.
The eyes can be made open using plastic eyes or beads. But it’s best to embroider closed eyes and give the Scops Owl toy the appearance of a serenely sleeping pussy.
- There is no need to use any scraps of fabric, cotton wool, or any other type of stuffing to stuff toys. Everything except holofiber can serve as a source of allergies, and you won’t get cozy softness)
- If you don’t have holofiber, take padding polyester, but padding polyester clumps faster than holofiber and you will have to wash the scops owl with special care.
- Holofiber can be obtained from cheap IKEA thought pillows. (about 30 rubles for a pillow, which is enough for several scops owl toys).
- Based on this pattern, you can make many fairy-tale characters or other toy animals: bunnies, bears, foxes.
If you cut out the corners of the workpiece at the line in a rounded shape and make not two, but only one tie on the wrong side, forming the legs, you will get a baby scops owl.
You can put a bag of buckwheat into the toy. She will rustle comfortably, helping you fall asleep. Children love to crinkle the corners of pillows before falling asleep. But you don’t have to do this. Especially if the child is susceptible to allergies.
Make the toy so that it is not afraid of frequent washing and retains its original attractive appearance.
Bunny scops owl toy
It can also be made soft, from fleece, not cotton, as in the photo. If the Scops Owl toy is intended as an interior toy for decorating a room, then absolutely any fabric will do. Up to plush or tweed.
But if the Scops Owl toy is intended to be used for its intended purpose - as a cozy and favorite toy with which you fall asleep well and quickly, then, without any options, you need to take a fabric that is soft, soft, warm, warm and the most comfortable.
Do-it-yourself scops owl toy, the patterns that we offered you can be made together with the children. These are simple patterns and very simple work. But there can be a great many options.
Teach your children how to make Scops Owl toys and they will always be able to make a gift with their own hands when they grow up. And joint creativity will never be forgotten.
This may interest you
webdomovodstvo.ru
How to sew a tilde toy with your own hands, the Scops Owls hare with a heart
Good afternoon, dear needlewomen!
DIY toys are wonderful! They contain the warmth of the hands and warm wishes of the master. The Scops Owls bunny will appreciate such a gift! In the last lesson we learned how to sew a Tilda snowman and a Scops Owl with our own hands. Now we will learn how to sew a Scops Owls bunny with a heart; such a gift will be relevant for any holiday, especially for Valentine's Day.
How to sew a toy with your own hands, the Scops Owls hare with a heart
For work we will need:
- Material: two colors (cotton or fleece)
- Floss threads in two colors (for the nose, mouth and eyes)
- scissors
- sewing threads
- sewing needle
- embroidery needle
- filler synthetic winterizer
- two to three hours of free time
So let's begin.
We print or transfer the pattern to paper, cut out the pattern of the toy.
The pattern for the Scops Owl toy is presented below.
We prepare the fabric, choose the color.
Our hare will be blue-red, we use beige fabric for the ears, we dyed the fabric ourselves using coffee. See how to do this here.
Transfer the pattern to the fabric.
Next, we fold the details of the toy pattern facing each other, and sweep them away. Find out how to sweep correctly here.
To manually baste the toy, use contrasting threads and baste it at the main future seam.
The stitching was done on a sewing machine. On the body of Scops Owl and on the heart we leave a hole for everting, preferably on the side. We also do not stitch the base of the ears.
To ensure that when turning parts inside out, wrinkles and pulls do not form and do not spoil the appearance of the toy, make cuts with scissors on all folds and recesses.
That's the secret to running smoothly
We turn out the Splyushka toys we made, iron them, and steam them well.
We stuff the body of the Scops Owls hare with padding polyester through the hole left and sew it up with a hidden seam.
We bend the cut on the ears, shape them, bend them and sew the ears in the middle.
Sew the ears of the Scops Owl Hare to the head. We sew the heart to the tummy of the Scops Owl toy. Choose the seam yourself - hidden, open, or you can pre-stitch the heart on a machine with a zigzag or a simple seam before sewing the body.
The DIY toy is almost ready. All that remains is to design the face of our bunny Splyushka.
To do this, draw the muzzle with a pencil and embroider it with floss threads using the “Back needle” or Backstitch stitch. We look at how to make this seam in our previous lesson.
Such a cute Scops Bunny will protect sleep and serve as a pleasant and touching homemade gift for Valentine's Day and any other holiday.
Text prepared by: Veronica
Share this post:
masterica-rukodeliya.ru
Product requirements
The toy pillow is primarily intended for children, so the products must meet the following requirements:
- To sew a toy pillow with your own hands, you need to choose a soft, non-fading and hypoallergenic fabric. Many mothers use knitted clothes from which their child has outgrown.
- It is advisable to stuff the workpiece with synthetic down and other materials based on polyester fiber - it is easily and quickly washed and dried without losing its qualities.
- The height of the stuffed toy pillow should correspond to the length of the shoulder of the person for whom it is intended (for example, a 2-year-old child has an average shoulder width of 9 cm, which means the thickness of the pillow should not exceed the specified value).
- Eyes, nose and other decorative elements should be embroidered or made using the appliqué method. Buttons, ready-made plastic eyes and spouts are not used for scops owl pillows.
The pillow should be stuffed moderately - the product should be soft enough and not too hard, otherwise the child may experience discomfort while sleeping.
Originally posted 2018-08-29 08:45:19.
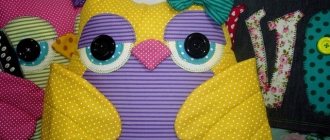
DIY scops owls with patterns: amigurumi toys
Scops Owls are unusually cute toys that sleep constantly. Most often they are depicted in the form of animals - cats, owls, bunnies, elephants, etc. These toys are great as gifts for children. It’s so nice to fall asleep with Scops Owl and have fabulous dreams. Our master class will help you sew scops owl toys with your own hands; patterns for them are given below.
Scops owls toys can be different in size and appearance; they are very popular in the form of pillows. When creating a Scops Owl, you can use your child’s favorite colors, as well as motifs from your favorite cartoons. There is only one condition: eyes closed.
Such a toy will be an excellent gift not only for a child; adults will also be able to appreciate the beauty and originality of the Scops Owl. Especially if it is made by yourself.
Technique for making Scops Owls toys
When choosing materials for making a toy, it is worth remembering that the child will fall asleep with this toy. Therefore, the product must:
- Can be washed in a washing machine without any problems;
- consist only of natural materials;
- have soft padding (cereals are not suitable for such a toy).
To create a scops owl you will need:
- textile. The number of types and colors depends on the selected pattern;
- filler - silicone, holofiber, etc.
- threads;
- sharp scissors;
- chalk or disappearing marker;
- pins;
- pattern. It can be printed on a regular printer;
- accessories for decorating toys: floss threads, buttons, faux fur).
Preparing materials for work
The first step is to choose the shape of the future toy. There are many options for patterns.
We will describe in detail the steps of sewing a scops owl using the example of a bunny.
Step 1 Pattern
The pattern template can be printed on a home printer. Then the toy will turn out to be small, about 15 centimeters in length (without ears). If desired, the scale can be increased. We cut out the parts and our pattern is ready.
Step 2 Prepare the fabric
Next, choose the fabric. All patterns are designed for cotton. We spread the canvas on the work surface, face down. Place the pattern on top and trace with a disappearing marker.
It is important to remember that the fabric should not be cut strictly according to the pattern, but should be left 3-5 centimeters. What is it for? To prevent the edges from fraying, they need to be overcast. Otherwise, the toy will quickly break. This can be done by hand or on a sewing machine.
Preparing materials for work
Before sewing the product, you need to choose the color and type of fabric. When talking about colors, it is impossible to accurately recommend a shade, since it depends on the personal tastes of the household and the interior of the room.
Additional Information! To decide on a pillow design, it is important to determine its function. To decorate a room, you must match the pillow with the color of the furniture. However, if the main function of the pillow is a toy for a child, then the most fun, unexpected options will do.
You might be interested in Description of bias tape: how to make it yourself
Types of fabrics for pillow toys:
- fleece;
- jeans;
- drape;
- linen;
- silk
Listed above are the types of fabrics that will not lose their shape or appearance after several washes.
You can also choose various fillers:
- feathers;
- fluff;
- foam;
- synthetic fluff;
- padding polyester
The padding material must have hypoallergenic properties.
Recommendations for preparing materials:
- choose the appropriate content;
- sharpen scissors;
- wash the fabric, check for deformation;
- set up your sewing machine.
Fleece fabric