At all times, people loved to decorate their heads with wreaths and headbands of various shapes. If we look at history, we can see that such head decorations were worn by the ancient Aztecs, Mayan Indians, ancient Egyptians, and Greeks. Not a single Roman emperor could do without laurel wreaths. In Rus', such an accessory, as they say now, appeared in the 10th century, and was intended not only for women, but also for men. Headbands had their own special purpose: they served as a talisman against the evil eye and evil spirits. That’s why they were called “chiefs”, from the word “chelo” (forehead).
Benefits of a headband
The sacred meaning of the head amulet has long been lost, but headbands still remain the favorites of many representatives of the fair sex. This is not only a beautiful accessory that adds zest to every girl, but also very practical. You can create it without spending any money in literally 1 hour, using available tools.
Ochelye - the second version of the name of the Slavic amulet
Suitable for almost every look: casual, home, sports, work style.
What are the advantages of a DIY headband?
- Saves time when creating a hairstyle;
- A universal and off-season accessory;
- Gives any image a finished look;
- Worn over loose hair;
- Perfect for bangs, ponytail, bun, curls.
Bandage options
The best headband models for girls
With the onset of cold weather, every mother faces the question of how to protect her child’s ears from hypothermia.
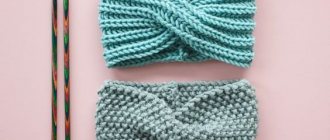
Not all children, especially girls, like to wear hats: they make their heads itch, their hair cannot be seen from under the hat, etc. - there are many reasons. A headband for a girl can be a worthy alternative to a hat. And almost anyone, even the most inexperienced knitter, can knit it. The main thing here is to choose the right yarn and pattern. The threads must be elastic so that the headband for girls stretches and fits tightly around the head.
It is better to knit headbands for spring and autumn using wool mixture or acrylic knitting needles. And for winter - woolen. The choice of pattern depends on the experience of the craftswoman.
Yarn and hook
The sewing departments offer a wide range of different yarns. It is very difficult to immediately focus your attention on certain threads. When choosing, be sure to study the composition and description indicated on the label - length, weight of the yarn, and clarify for which tool it is intended.
The style of the future knitted accessory depends on the composition, texture, and thickness of the threads. For headbands, yarn is mainly used, which contains at least 40% natural fiber.
The most common option for making summer products is cotton, which has a number of advantages:
- consists of natural plant fibers;
- absorbs moisture well;
- does not cause allergies;
- allows air to pass through;
- does not shed.
Viscose yarn made from wood cellulose is also often used. Sometimes it contains cotton fibers, so light shades are very similar to matte cotton. Crochet viscose headbands perfectly complement a summer look.
Another option is microfiber. This is a yarn consisting of synthetic fibers. It is soft and pleasant to the touch, but not recommended for small children. Suitable types of yarn for summer accessories for girls: iris, cable or cotton. These types are environmentally friendly and easy to care for in the finished product.
For headbands for cold weather, wool yarn is primarily suitable, which can be camel, goat, sheep, merino, alpaca.
When choosing an option for making a children's accessory, you should remember that the child should be comfortable in it. Children have sensitive skin, you need to select especially soft natural threads marked Baby:
- acrylic;
- merino;
- mohair;
- pure cotton.
Yarn that is too fluffy should not be used for children's products, as lint can get into the eyes and mouth.
Color matters too. To make the accessory cute, pastel shades are used, for example, powdery or peach, as well as mint and soft blue. They will always be relevant for children's accessories. Now yellow shades are also coming into fashion.
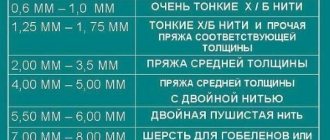
It is very important to choose the right hook. If the thread is thin, it is better to take a tool with numbers 1.5-3. For thicker yarn, hooks from 3.5 to 5.5 are suitable. Typically, the thread label will have instructions for the tool.
Different threads and hooks are used for different patterns. For example, for openwork motifs you will need a 1.5-1.7 tool and thin yarn, preferably cotton. Well, if the product should be dense, without thin patterns, you need to take a hook No. 2-5 and a denser thread, for example, acrylic or wool.
Acrylic
Merino
Mohair
Pure cotton
Crochet hooks
Hook selection
Selection of yarn and knitting needles
The choice of yarn directly depends on the season for which the accessory is intended. In autumn and spring, a knitted headband replaces a hat, protects the ears from the wind, and warms, so warm, thick threads are used. For the summer, you can choose thin and light yarn, since the accessory will serve more of a decorative function, replace the headband, and remove hair from the face.
Yarn is selected according to certain criteria:
- Pure wool or with acrylic, cotton. This yarn will make a warm knitted accessory with overlaps, braids, or in the form of a turban made from regular and French elastic.
- Cotton, linen. Suitable for openwork patterns, summer accessories.
- Acrylic, microfiber. A demi-season option for any pattern and people with sensitive skin.
- Cotton with acrylic. This yarn does not always hold elastic bands, but it is good in openwork knitting, suitable for accessories for warm spring and cool summer.
Today, simple knitting with garter stitch and tangle stitch is in fashion; braids are also popular. It is better to knit all this from thick yarn with a yardage of at least 280 m per 100 g.
It’s good if the thread is natural or semi-natural. As for the manufacturer, to knit a headband with knitting needles, you can take Turkish, Russian, Italian yarn, it all depends on personal preferences and capabilities.
The number of knitting needles depends on the thickness of the thread. To determine, you can look at the manufacturer's recommendations, they are on the packaging. Usually a range is indicated, for example, 3–4.5. If the accessory is for autumn or cold spring, then you should use a smaller number to obtain a dense fabric. The length of the knitting needles depends on the method used. If you need to knit headbands with long knitting needles and then sew them, then short knitting needles will suffice; stocking needles or any circular knitting needles will do. If the headband is knitted in the round - according to the diameter of the head without seams (like a hat), then you should use knitting needles with fishing line and a total length of at least 40 cm.
Acrylic
Linen
Spokes
Cotton with acrylic
Wool
Model selection
Current fashion trends are democratic, which allows you to realize any creative impulses and ideas. Not only children wear different knitted headbands. Women are also fans of this accessory. They can be combined with different clothes. It is important that the headbands look appropriate and match the color and style of the chosen image.
The most fashionable crochet headbands for women are divided into several types:
- Simple stripes-rims. Minimalism is always in fashion. A crocheted stripe can be made from warm yarn for the cold season to be used instead of a hat. And for the summer you should choose thin threads - such a bandage is convenient for removing hair while jogging or cosmetic procedures.
- With overlap. One of the varieties is the turban. A knitted headband comes in different widths and is mainly used in the cold season. This is a great replacement for a hat.
- Beautiful openwork headband with flowers. It needs to be knitted from thin yarn, as a thick one will make the pattern look rough. The summer headband goes well with openwork, light dresses.
- With a bow in the middle. Looks beautiful on both women and girls. You can crochet such a headband using either thin summer yarn or thick threads. The large bow in the middle attracts attention and looks very stylish.
- With an animalistic design - with the ears of cats, giraffes, mice, and animal faces. This headband is especially suitable for girls.
- With weaving. The products consist of a single braid in a classic style or interweaving of several complex strands. They turn out to be voluminous and are mainly knitted from warm threads.
- Sports. This is a lightweight strip, practical and comfortable, so that your bangs do not interfere with your hair while playing sports.
- Headphones. They are a special headband with thick knitting on the ears for protection from the wind. For work you can use fur and warm threads.
- Solokha. This is a crocheted headband for girls with wire inside so that the ends of the knots keep their shape beautifully and do not hang down. Can be used by women to create retro looks.
- Turban. Most often this is a wide canvas, sewn and pulled together in front. In the center, on the seam, a large brooch clings.
The appearance of the accessory depends on the imagination and skills of the craftswoman. You can combine any colors, patterns, decor. Such beautiful headbands will look with different wardrobe items, for example, with a knitted bag, cardigan or dress.
Simple
Turban
With flowers
With bow
Sports
With a pigtail
With ears
Headphones
Solokha
Turban
Pattern options
Knitting headbands with knitting needles opens up wide scope for imagination. Using this tool you can knit many different patterns, here are some of them:
- arans;
- braids;
- rubber;
- honeycomb;
- intertwined stripes;
- tourniquets.
When knitting, rows can be arranged either crosswise or in a circle. When creating a headband, it is important to ensure that the loops are the same, otherwise the pattern will turn out shapeless and the product will lose its aesthetic appeal. When working on complex weaves, it is better not to improvise, but to strictly follow the pattern.
But you can experiment with colors to your heart’s content, combining them in different combinations and ratios, matching them with wardrobe items, eye or hair color. To decorate a warm headband, you can use beautiful beads, buttons, and pull it in front, styling it like a bow. Knitted flowers can become an unusual element of decorating a product if you place them on the side of the headband. Whatever pattern and decor of the product is chosen, a knitted headband will always be a fashionable and functional accessory.
How to take measurements
In order to knit a headband, the following measurements are required:
- head circumference (that is, the length of the product);
- the height of the bandage (that is, its width; depends on the style).
The circumference of the head should be measured as follows: place the beginning of the measuring tape on the forehead at the hairline and wrap it around the entire circumference under the protrusion at the back of the head. Connect both ends. The height of the headband should be chosen so that it looks appropriate in a particular style. For example, if it is a strip, it can be from 5 to 10 cm. A product with a bow in the middle will look better with a width of 8 centimeters. Summer headbands should not be made wide so that they do not get hot. Winter ones, on the contrary, the wider, the warmer. For example, a turban looks better if knitted with a width of 13-17 cm. Products for girls should correspond to the age of the owner and be wide enough to cover the ears.
The height of the product is affected by the thickness of the thread. 10 loops knitted with thin yarn are significantly different from the same ten with thick yarn. This must be taken into account.
What to make from
If this is a light summer or home look, then it is better to choose a headband from breathable fabric, knitwear, cotton, chiffon, cambric. A winter headband is a great option for those ladies who don’t like to wear hats but care about their health. For knitted models, it is recommended to choose wool, linen, acrylic threads and yarn. They keep warm well.
Shawls, bandanas, scarves, kerchiefs, ribbons, even denim and lace are also used.
Important! You can choose any material, the main thing is that it holds well, does not slip off the hair, but does not put pressure. The scalp should breathe and blood circulation should not be impaired.
You may be interested in this Children's patterns for boys and girls
Winter headbands
How to decorate
A crochet headband will look more interesting if you decorate it. The following decorative elements can be used:
- ribbons;
- sequins;
- knitted flowers;
- beads;
- beads;
- felt flowers;
- brooches
This matter requires imagination. To decorate an accessory with crocheted ears, you can use decorative fur or fluffy threads. An overlapping knitted headband looks best with beautiful brooches that need to be attached in the center. Children's summer products can be decorated with brightly colored ribbons and knitted flowers that need to be attached to the side.
In addition to decorations, you can use unusual threads, for example, with a transitional color from one to another. When knitted, such yarn folds into an interesting pattern, and even the simplest children's headband will look original.
Crocheting allows you to create accessories for every taste. Instead of buying an advertised item and spending a lot of money, it is much better to make it yourself. A crocheted headband makes a wonderful gift.
With brooch
With rhinestones
With a knitted flower
With button
With ribbon
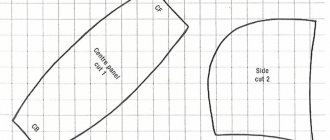
How to sew a headscarf for a girl
A headscarf for a girl is a necessary thing in summer. A child's skin is quite delicate and thin and is susceptible to rapid overheating. The mother must make sure that the girl’s head is protected from the sun’s influence.
Important! Before sewing a children's headscarf, you need to choose the right material. It is better to give preference to fabrics such as cotton, linen, calico, and chintz.
This instruction describes a step-by-step plan on how to make a scarf with an elastic band.
You will need the following: fabric, elastic band, measuring tape, sewing machine.
Before starting work, you need to measure the distance from ear to ear of the child + 2 cm.
- Select the length of the fabric according to the head measurements described above.
- Prepare a separate piece of fabric in the form of a small rectangle to decorate the elastic band.
- Select the length of the elastic to be half the size of the selected rectangle.
- Fold the small rectangle in half, wrong side up, and stitch along the length.
- Turn the resulting strip inside out and insert an elastic band, securing it at one end. In this case, do not completely remove the second end of the elastic band.
- Topstitch one edge along with the elastic.
- Pull the fabric over the entire elastic band (it should look like an accordion) and stitch the second edge. The elastic band for the scarf is ready.
- The edges of a large rectangle are beautifully decorated around the perimeter: folded on both sides and stitched.
- Place the resulting “accordion” for the scarf onto the cut.
- Fold the edge of the fabric in layers and stitch. In this case, all seams must remain inside.
- Do the same on the other side of the fabric, attaching the other side of the elastic.
The scarf is ready!
To learn more about how to sew a scarf, follow this video tutorial
.
Headscarf for girls
Types of models
Modern accessories can be classified depending on the type of sport. Among them are:
- Ski headbands. They are distinguished by their warmth, since skiing always means the presence of snow. The women's ski model insulates the forehead and ears well, because skiers often have to go down the slopes in severe frost and wind.
- Models for running, strength training. These products help well in strong gusts of wind. They can not only protect your ears from blowing air, but also collect hair that makes it difficult to concentrate while jogging.
- Fitness products. A sports headband designed for indoor activities is made of thin materials. Its purpose is to remove hair and sweat.
The modern model range is represented by a rich color palette. Manufacturers often make products in bright colors, so they can be easily combined with a sports outfit. The material used for sewing is as follows:
- cotton;
- wool;
- nylon;
- polyester;
- other synthetic materials.
For sports in the winter, it is better to give preference to warm products; if you are going to work out in the gym, choose a thin headband.
Advice! When choosing, the main criteria are color, sport and material. Don't forget to try on the product before purchasing.
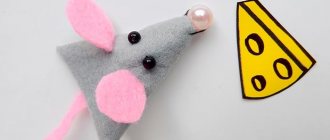
How to create a headband with felt roses
Decorative elements in the form of flowers and bows always look advantageous and add tenderness and romance to the image.
The decoration can be based on an elastic band selected in combination with the color of the future rose.
Creating a felt rosette yourself is not difficult, since the material is very pliable. The work will take literally 15-20 minutes.
You will need the following: 1 mm thick felt, scissors, elastic band, glue gun.
- The basic principle that you need to understand is that the petals are cut in a spiral. How to peel an apple in a circle without interruption. The same spiral stretch should be made from felt.
- Prepare 10x10 cm squares of felt in advance in an amount equal to the number of roses on the bandage. From this shape it is convenient to make a spiral 1 cm wide. It is cut with scissors in the shape of rose petals, in a wave-like manner.
- Start twisting the rose tightly from the center part, securing it with glue step by step. The last section of the spiral “wave” must be bent to make the base of the rose, which will be attached to the elastic band.
- The rose is ready. If necessary, the flower can be additionally decorated with beads, rhinestones and other applications.
You might be interested in: Making patterns and sewing a hat with a brim yourself
Secure the roses to the ribbon with glue so as to hide the elastic seam.
This headband can be made for both girls and girls. A detailed master class on how to make roses from felt can be seen at the link
.
Felt headband
Knitted children's headband with voluminous bow
A simple and detailed master class on knitting a children's headband with a voluminous bow. Suitable for anyone familiar with knit and purl stitches. With this master class you will learn how to knit not only a practical headband, but also a beautiful, voluminous bow that can be used to decorate other products - hats, pullovers, panama hats, scarves, toys.
Note! The number of loops when casting on knitting needles is calculated based on a head circumference of 48-50 cm. The width of the headband is about 9 cm. For more accurate calculations, you need to knit a sample with your knitting density and measure the head circumference.
Materials and tools
- Organic Baby Cotton yarn (1 skein - 50 g/115 m) or other yarn of appropriate thickness;
- straight knitting needles No. 3;
- needle with a wide eye.
Pattern (“pearl”)
1st row: 1 knit stitch, 1 purl stitch, 1 knit stitch, 1 purl stitch, etc.
2nd row: 1 purl loop, 1 knit stitch, 1 purl stitch, 1 knit stitch, etc.
Knit the 3rd and all odd rows as the 1st row.
Knit the 4th and all even rows as the 2nd row.
“Pearl” pattern with knitting needles - diagram
Description (main part of the bandage)
We cast on 22 loops on the knitting needles. We knit with a pearl pattern until we reach the desired length of the bandage. Usually it is equal to “head circumference minus 1-2 cm (for fit).”
Note! When knitting a pearl pattern with knitting needles, you do not need to knit the edge loops. The fabric immediately begins with a knit or purl stitch.
We close the loops on the knitting needles and sew the edges of the bandage with a mattress seam.
Description (bow)
We knit the bow in the form of an elongated rectangle, similar to the base of the headband. We cast on the same 22 loops on the knitting needles or reduce/increase their number depending on the desired height of the bow.
Once the desired length of the rectangle is reached, close the loops and sew the smaller edges of the product.
It is important! After stitching, leave a tail of yarn about 20-25 cm long.
We compress the rectangle in the middle, giving it the characteristic folds of a bow. Using the remaining tail of yarn, we pull the bow strictly in the center and hide the tip of the thread.
Description (jumper for bow)
To make the bow a beautiful middle, you need to knit another rectangle. Ideally, it should be tied a little tighter than the bandage itself. We cast on 8 loops and knit a rectangle, constantly trying it on the product.
How to do a fitting? Attach the bow to the headband and try to clasp them together with the jumper. It should slightly compress the bandage, forming a dimple where the bow is attached. The girth should be tight enough, but not so tight that the bridge and bandage become unsightly deformed.
Once the desired length of the rectangle is reached, close the loops and assemble the product.
Product assembly
Place the bow on the base where it joins to hide the seam. We place a jumper on top and, slightly pulling it up, sew it with a needle. The seam should remain on the wrong side of the bandage.
Carry out wet-heat treatment of the finished product: hand wash at a temperature of no more than 30℃. Dry on a flat horizontal surface in a straightened position.
If desired, the bow can be decorated with beads, rhinestones, ribbons, etc.
Skinny ribbon headbands are amazing!
Narrow ribbons are an accessory that amazes with its centuries-old history. Times go by, fashion changes, headbands made of narrow ribbons are always noted on its first pages.
They were relevant in ancient times, during the Renaissance, in the 20s (Gatsby-style images), were an indispensable attribute of hippies in the 60-70s of the twentieth century, and are still relevant now.
You can create a decoration in the Greek style using narrow ribbons of any length, decorating them with inserts of stones, gilded laurel leaves, and intertwining them into a braid. You can gather the entire length of your hair into ribbons, weave them in, or secure them over your curls. Such Greek hairstyles look incredibly feminine and sophisticated.
Greek hairstyles using narrow ribbons
The beginning of the Renaissance was characterized by a fashion for everything antique. Women's hairstyles were quite complex, with a combination of braids and curls, decorated with woven nets, veils, leather ribbons and fabric braids.
“Lady with an Ermine” by Leonardo da Vinci, 1489-1490 Early Renaissance
Gatsby-style or Chicago-chic headbands were popular in the 20s. A characteristic feature of jewelry of this style is accenting details in the form of flowers, feathers, beads in combination with a short haircut.
Creating a headband is not difficult: you can purchase ready-made applications, flowers, pearls, feathers and use a glue gun to firmly attach them to the appropriate ribbon. Add evening makeup and the look is ready!
Chicago chic hairstyles
To create hippie-style headbands, you can use absolutely any material. Narrow ribbons are tied over the hair, giving the image freedom and brightness. The most common materials are beads, fabric or leather ribbons.
Interesting fact! The hippie-style headband has its own name - hairdress, from the word hair.
Khairatnik
Felt headband
Another option for making an accessory from felt is a headband with a bow. To make a bow, as in the photo, you need to take two small pieces of felt. Glue the first wide section into a ring and secure it with a hairpin in the middle. The ends of the second ribbon are beautifully cut out. Place the pieces on top of each other, secure the middle with glue or thread. Decorate the top with a beautiful ribbon.
You might be interested in: How to properly sew curtain tapes to tulle and curtains
The finished bow can be used for a headband, hairpin, gift wrapping and even for a postcard
Bandana headband
For a bandana-shaped headband, take a square scarf, folded in half diagonally.
The classic way of tying: the scarf covers the entire head.
In the form of a bow: a scarf folded in several layers surrounds the head and is tied with a bow at the front. The ends can be beautifully laid out or hidden.
Bandana
Native American headband style
This accessory is suitable for followers of the boho style. Usually a narrow ribbon of leather or fabric is taken with the addition of feathers and beads along the entire length of the hair.
Characteristic details of a headband in Indian style
Purpose of the accessory
Regardless of the chosen sport, each of them has its own equipment features. In addition to the main costume, a headdress is also required to hide the hair.
An excellent solution was a headband for sports. She skillfully selects hair that interferes with training and secures it firmly on the head.
In addition, this accessory saves the skin from sweat. Drops of liquid collect on the forehead and begin to flow onto the face, which causes inconvenience during exercise.
Headbands can prevent drops from rolling down - they absorb sweat, and after training they are easy to wash.
Let us highlight the main advantages of using such a headdress:
- protection of the face from falling hair and bangs;
- sweat protection;
- aesthetic addition to a sporty look.
During training, the face turns red, some girls are ashamed of this appearance. A stylish headband perfectly completes a sporty look and gives the look a natural look.
Today, the Sportmaster store offers a variety of headwear: there are dozens of men's and women's models designed for different sports.
When choosing a product for exercise, pay attention to its size: headbands are often produced in one size, but individual model ranges can be designed for different head circumferences.
Knitted headband, models from the Internet
How to tie a headband with a 1x1 elastic band
Knitted headband with voluminous braid from Jana Bekkel
The headband is knitted with a popular pattern - a voluminous braid. An excellent MK, using it you can figure out how to tie a voluminous braid even for novice needlewomen. You can knit a headband for yourself or for children. Decorate it with a knitted flower or brooch.
Knitting a headband with knitting needles
Author of the description: Ksenia Nikulina.
Headband Size: OneSize – Adult, Women. Circumference 48-50 cm after blocking.
Yarn example: Drops Merino Extra Fine or 21 stitches per 10 cm yarn. For the headband you need 50 g white and 50 g pink, size 3.5 (40 cm) circular needles, scissors, marker and needle (or hook) for hiding the ends.
For a description of the bandage in Russian and diagrams, see the link
High knitted headband
Yarn Vita Brilliant 45% wool (laster), 55% acrylic, 100 g./380 m., color 4994.
Description and dressing diagrams
Knitting with knitting needles “Reaper”
Yarn (50% wool, 50% acrylic, knitting needles No. 2, knitting needles No. 4.5)
For tighter knitting, use the second knitting needles No. 4.
Master class, see the link
Knitting for beginners
Winter headband
Beautiful Austin headband
Description of knitting a hat and headband from designer Sarah Wilson translated from the magazine “Knitscene Accessories”.
Size: circumference – 44 cm, height – 10 cm.
description for knitted headband
headband knitting pattern
Knitted winter headband
One size. Stretches up to 24 inches. Materials: Filatura di Crosa 127 print (100% wool; 85 m in 50 g), color No. 21 (beige) 1 skein. Knitting needles 5 mm (American 8 mm), 2 markers, sewing needle, 1 button.
Description and knitting patterns for headbands
Jasmine headband
Headband with wide braid
For knitting, you will need yarn that contains 75% merino, 20% silk and 5% cashmere. Then the product will not be prickly; you will love this knitted accessory from the first minute for its softness and comfort. Consumption: 1 ball of yarn will be enough. Pay attention to the pattern - the bandage is carefully fastened with a small button and the ends are knitted in triangles. This makes it much more comfortable to wear. Size: 53 x 13 cm.
Description and dressing diagrams at the link
Video tutorials on knitting headbands
Knitted headband for girls
Size: for head volume 51cm. This model is suitable for both adults and children.
The video should load here, please wait or refresh the page.
Knitted headband with a bow
Yarn Krokha Troitskaya, more than half a skein and knitting needles No. 3.
The video should load here, please wait or refresh the page.
Spectacular headband with knitting needles
I propose to knit a simple, but at the same time effective headband. It is suitable for girls and women. Both an experienced knitter and a beginner in this matter can knit it. Happy Watching and Knitting!
Width 8 cm, head volume 54 cm. Yarn Art Shiny (55% cotton and 45% acrylic), knitting needles No. 3.
The video should load here, please wait or refresh the page.
How to make baby headbands with your own hands
How to make a headband with your own hands?
To make a beautiful headband for your baby, you need to use high-quality fabric and unusual decorations. This master class uses lace braid, which will become a wonderful basis for a future accessory. Materials:
- lace braid;
- tape measure;
- scissors;
- threads in the color of the braid;
- needle;
- cotton fabric for decoration;
- large beads or rhinestones for decoration.
Let's get started with step-by-step instructions for making a beautiful hair ribbon. To make a bandage with your own hands, you need:
- Measure the circumference of the child's head.
- The length of the bandage should match the circumference of the head in centimeters. If the strip of braid is longer, the bandage will fall off. If the tape is shorter, the accessory will put pressure . Cut the lace to fit the circumference of the baby's head.
- Using thread and needle, connect the two ends of the ribbon . You need to sew the tape carefully. This can be done with hot glue, but then the decoration will not be as durable.
- For three colors, cut three strips of cotton fabric 30 cm long and 8 cm wide.
- Finish the bottom of the strip . Stitch carefully. Assemble the workpiece into an accordion on a thread, slowly pulling it out.
- Close the strip of fabric into a circle and tie a knot. To make the circle look neat, tie a thread on the back of the product.
- Glue beads or rhinestones representing stamens onto the finished flower.
- Sew flowers onto the lace braid with threads or glue with hot glue. The decoration is ready .