Rococo embroidery differs from other techniques in its ease of execution, as well as the ability to work with a wide variety of materials and create three-dimensional works.
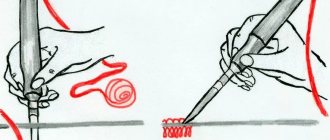
The Rococo technique is based on a specific decorative stitch. Navig is used as the main technique. Its essence is as follows: the craftswoman’s needle is wrapped around a thread, and with the help of the resulting curls, elegant patterns are created.
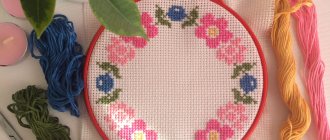
Using this technique, it is customary to embroider beautiful representatives of flora - proud roses and delightfully touching daisies. An effective addition to the design are knots and berries.
You can decorate many things with embroidery in the Rococo style, embroidering floral or any other patterns. This type of embroidery, at first glance, may seem complicated, but just learn how to make basic stitches, and you can transform any item, knitted clothing, or create paintings to decorate your home.
Using Rococo embroidery, you can easily decorate any knitted and denim items both for yourself and for the younger generation. In addition, using this technique, you can create cute and stylish designs for tablecloths and napkins.
The embroideries made in the Rococo style are very beautiful. Rococo is translated from French as curl, because. the thread is wound around the needle.
A few secrets about this embroidery
- Your work will delight not only you, but also your loved ones, if you “learn” some of the subtleties that the embroidery master class recommends.
- Thread separation (as well as flattened stitch) can be caused by clockwise winding;
- The stitch is too tight if done by winding counterclockwise;
- To prevent the wound coils from unwinding, it is recommended to hold them as tightly as possible;
- When fixing the stitch and pulling through the turns of thread, it is recommended to carefully ensure that they do not unravel;
- Your embroidery will be much more uniform and voluminous if each strand is laid in maximum density to the previous one;
- Work done using woolen threads looks more impressive.
It is better to choose a needle such that the eye is the same thickness as the entire needle. The threads must be smooth and strong.
Embroidery pattern for daisies using rococo stitch
- It should be remembered that if the thread is wound clockwise, the thread will unwind; if the thread is wound counterclockwise, the thread will begin to twist even more.
Rose embroidery with rococo stitch
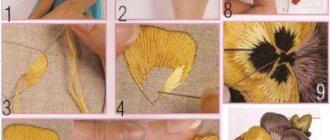
Embroidery of petals and twigs using rococo stitch
Rococo spiral seam arrangement option
- French knot:
- Blue flowers are embroidered with French knots:
- Embroidery in Art Nouveau style, French knots and Rococo stitches are used:
- Flowers are embroidered with rococo stitch:
- In the following embroidery, purple flowers are embroidered using French knots, pink flowers are embroidered with a rococo stitch with a thread that is used quite rarely:
Rococo seam with interlaced thread
- On the ribbon embroidery, small flowers are embroidered with rococo stitch:
- Rococo straight stitch embroidery is commonly used in leaf embroidery.
- Rococo stitch for embroidering branches and stems.
Rococo seam with loop winding
- Another type of Rococo seam, the thread is wound around a needle like a lasso, not in a spiral, but in a loop
Rococco embroidery: master class
- Source
Source: https://sozdavaisam.ru/vyshivka-rokoko-dlya-nachinayushhih-idei-i-video-master-klass
Rococo embroidery for beginners: ideas, patterns and descriptions... More than beautiful and chic!
Using Rococo embroidery, you can easily decorate any knitted and denim items both for yourself and for the younger generation. In addition, using this technique, you can create cute and stylish designs for tablecloths and napkins.
The embroideries made in the Rococo style are very beautiful. Rococo is translated from French as curl, because. the thread is wound around the needle.
A few secrets about this embroidery
• Your work will delight not only you, but also your loved ones, if you “wrap it up” not
which are the subtleties that the embroidery master class recommends. • Thread delamination (as well as flattened stitch) can be caused by clockwise winding; • The stitch is too tight if you wind it counterclockwise; • To prevent the wound turns from unwinding, it is recommended to hold them as tightly as possible; • When fixing the stitch and pulling through the turns of the thread, it is recommended to carefully ensure that they do not unravel; • Your embroidery will be much more uniform and voluminous if each strand is laid in maximum density to the previous one; • Work done using woolen threads looks more impressive.
It is better to choose a needle such that the eye is the same thickness as the entire needle. The threads must be smooth and strong. Pattern for embroidering daisies using a rococo stitch:
It should be remembered that if the thread is wound clockwise, the thread will unwind; if the thread is wound counterclockwise, the thread will begin to twist even more.
Rose embroidery with rococo stitch
Embroidery of petals and twigs using rococo stitch
Rococo spiral seam arrangement option- French knot: Blue flowers are embroidered with French knots:
Embroidery in the Art Nouveau style, French knots and a rococo stitch are used: Flowers are embroidered with a rococo stitch: On the following embroidery, purple flowers are embroidered using French knots, pink flowers are embroidered with a rococo stitch with a twist of thread, which is used quite rarely: Rococo stitch with a twist of thread: On the embroidery small flowers with ribbons are embroidered with rococo stitch: Rococo straight stitch embroidery. usually used in leaf embroidery. Rococo stitch for embroidering branches and stems. Rococo seam with loop winding
Another type of Rococo seam, the thread is wound around a needle like a lasso, not in a spiral, but in a looplll
Source: https://svoimi-rukami-da.ru/vyshivka-rokoko-dlya-nachinayushhih-idei-shemy-i-opisanie-bolee-chem-krasivo-i-shikarno/
Knot and Rococo seams
Knotted seams are usually used as a decorative addition. So, if we embroider with simple stitches or satin stitch, but want to get voluminous elements, then for this it is better to use a “knot” stitch.
It can be used if you need to embroider, for example, flower stamens. If you apply several shades of yellow, you can get voluminous mimosa flowers or daisy hearts. If we want to embroider a cute lamb, then we can combine white with gray.
On landscape embroideries, leaves of trees and bushes are embroidered in knots. A striking example of the use of this seam will be the embroidery of blooming lilacs, which have small, voluminous flowers.
Interrupted sutures can be divided into three large groups.
Regular simple knots.
Common simple knots include: simple or French knot, rococo stitch or flagellum and pearl knot, double knot, spiral and coral
.
Knots that are used to decorate simple seams
.
See how you can add a knot to a straight cross, or a chain stitch, or a zigzag stitch. You can also find more complex seams. For example, diamond-shaped.
Knotted stitches, which are found in embroidery of different peoples of the world
.
These include Portuguese, Armenian, Chinese and Spanish knots. Often such seams are called ornamental and are used in ornaments, framing or embroidering finishing braid.
Let's look at how a simple knotted stitch is performed.
It is performed with a needle that does not have a thickening in the eye area. Any thread is suitable for embroidery, but not rough ones.
This seam is made like this.
Let's take a closer look at another simple knotted seam - “rococo”. In order to perform it, you need to take a needle that can accommodate six thread attachments. But the eyelet should not be flattened so that the thread does not jump out. The seam technology is very similar. The main difference is that rococo is made on the basis of a loop-shaped stitch “back needle”, the thread is thicker and more windings need to be done.
In order to get a bending flagellum, you need to wind a section one and a half to two times longer. This will create a flagellum that looks like a rose or chrysanthemum petal.
Be sure to make a test seam to calculate the required number of turns.
If we embroider a daisy, then the flagella should be placed radially from the center of the circle. In chrysanthemums, flagella are usually made with thinner threads, and they have bends. Short petals should be alternated with long ones.
For the rose, it is recommended to fold the floss threads in four to six folds. It’s better to take several tones. The bud, that is, the inner part is embroidered with threads of a lighter shade, and the outer part with darker ones.
Let's summarize the lesson
.
Today we got acquainted with interrupted sutures. We examined the technology of a simple knotted seam and a rococo seam.
Rococo embroidery for beginners: a detailed lesson from A to Z
Rococo embroidery may seem too complicated for beginning needlewomen, but it is not. The rococo technique is very simple to perform; even a novice needlewoman can handle it. This type of embroidery has a very interesting history.
The well-known Rococo style appeared in the 18th century, the distinctive features of which were contrast, the use of curls and complex patterns. Therefore, this embroidery received this name because of its decorativeness, volume, and plant motifs.
Rococo embroidery will look great on clothes, for example, on blouses, jeans, skirts, and suits. This type of needlework is also popular when embroidering pictures.
Our master class will help you learn the basics of Rococo embroidery and learn how to transform ordinary things.
Little advice
Tips for working with Rococo embroidery:
- You should beware of thread delaminations, as well as flattened stitches, this can be caused by clockwise winding;
- If you wind counterclockwise, the stitch will be too tight;
- In order for the wound turns to hold well and not unwind, they must be held very tightly to each other;
- When fixing the stitch and pulling through the turns of thread, it is recommended to ensure that they do not unravel;
- Each strand must be arranged as closely as possible to each other so that the embroidery is uniform and voluminous;
- Woolen threads give the product an impressive look;
- The eye of the needle used should be as thick as the needle itself. The threads must be smooth and strong.
Read this: Types of Stitches for Hand Embroidery
Main motifs and types of seams
Schemes for working with main motives look like this:
- Insert the needle and thread from the inside out over the entire length of the thread;
- Then make a set of warp for the entire stitch size, while inserting the needle into two-thirds of the fabric;
- Perform winding of the working thread with counting of curls;
- Carefully pull the needle through the resulting column;
- Bring the needle to the wrong side, thus securing the element.
Types of seams:
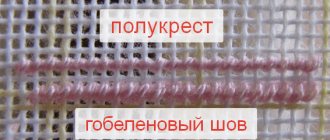
- Knot. This seam has 1-2 turns of thread, the length is minimal. This stitch is often used to make the core of flowers;
- Straight stitch. The winding numbers correspond to the pitch of the working thread. Straight stitches are used to depict thin petals and branches;
- A loop. The step length is less than the number of turns. When laying this seam, a three-dimensional figure is obtained. This stitch is often used as petals of different colors.
Sweet rose
First, you need to insert a needle from the wrong side and bring it to the front part where the first stitch is planned. Next, insert the needle into the bottom of the stitch, then up again. The thread does not need to be split.
Wind a thread onto the free tip of the needle. The turns should lie close to each other and correspond to the length of the stitch. Then pull the needle through the wound thread, holding it with your finger. Straighten the winding along the thread and secure the stitch. To make the next seam from the wrong side, pull the needle to the top of the future stitch.
When performing work in the Rococo style, the fabric should be positioned so that the seam to the master is vertical.
Next, start embroidering the rose from the center. Make three seams with 7 and 9 turns. Around the center add a row with 15 turns. When placing the seam, twist it into a spiral. For the next petals, increase the number of curls, making them longer. The leaves of the flower consist of two stitches with common vertices.
Read this: Hand toy for puppet theater
Rococo embroidery patterns ???? patterns, seams, video, master class
The main trick when doing Rococo embroidery is choosing the right needle. The needle should be long, thin and uniform along its entire length, without thickening in the eye area. Beading needles are perfect. It is almost impossible to make a beautiful rococo stitch with a thick needle with a wide eye, no matter how hard you try. An exception would be the use of thick Iris and Tulip threads; thicker needles are suitable for them.
Rococo embroidery is used on various fabrics and even on knitted items.
Rococo embroidery technique for beginners step by step
Rococo embroidery is a suitable technique for beginners; unlike other techniques, it is easy to perform, and also makes it possible to use various materials to create three-dimensional works.
Rococo is based on a specific decorative seam, and the main technique is threading. The needle is wrapped with thread and the curls are used to create elegant patterns. Using this technique, floral designs are usually created: lush roses, daisies.
To complete the picture, nodules, berries and leaves are often added to the flowers.
At the moment, four main methods are used in Rococo embroidery:
- nodules;
- spirals:
- loops;
- stitches.
Making knots
Knots are made very simply: such stitches use a small number of loops, and they should end in the same place where they began to be embroidered. Typically this embroidery method is used to create a flower center.
To complete the knot you will need:
- Fasten the thread to the wrong side of the embroidery.
- Bring the needle to the front side of the work.
- Wrap the thread around the end of the needle away from you no more than 2-3 times.
- Pull the needle inside out while holding the threads.
Gallery: Rococo embroidery (25 photos)
Making spirals
Spirals in Rococo are most often used to embroider petals. This method is more complicated than knots, but it can be learned quickly.
To make a spiral:
- Wind the thread around the end of the needle about 15 times; the more turns you make, the more voluminous and beautiful the spiral will be.
- Pass the needle through the spiral, carefully pulling it through the hole in the material. Approach this process with all responsibility; the shape and type of the spiral will depend on the puncture.
If the needle does not pass through the thread coils well, twist it with your fingers. This will loosen the thread.
Making loops
The loop is one of the varieties of Rococo knots. It is done in almost the same way, but the distance between the puncture points is reduced and the number of turns is multiplied. To create a loop, many windings are performed, smoothly distributed along the thread before fastening.
For this:
- Fasten the thread to the wrong side of the embroidery.
- Bring the needle and thread to the front side, pulling the thread.
- Raise the needle above the embroidery and wind it. Then pull the needle through it.
- Make a new puncture next to the old one, bring the needle to the wrong side. A loop is formed on the front side.
- Fasten the thread.
Making stitches
This technique is quite simple. You only need to make one winding, the length of which should be equal to the distance between the needle punctures.
If you want to master the rococo technique, then you should get acquainted with how to properly sew a seam with stitches .
- Mark two points on the fabric, mark them as point one and point two.
- Pull the thread to the right side of the embroidery.
- Return to point two, bring the needle through it, near point one.
- Make a twist with the thread.
- Raise the needle above the embroidery and hold it in this position, moving the threads closer to the fabric. Continue winding, making as many turns as you need. The threads should fit snugly to the needle.
- Hold the threads and pull the needle through them. Then begin to pull the thread away from you until the thread is taut in the eye of the needle.
- Soften the thread tension and fold a new stitch towards point two.
- Bring the needle through point two to the wrong side of the fabric.
Like any type of embroidery , the Rococo style has its own secrets , knowing which you can easily perform all types of seams characteristic of Rococo work. Below, in our master class, you will find some tricks that will help you achieve success in Rococo embroidery.
- Winding the thread clockwise can cause flattening of the stitch and delamination of the thread.
- If you wind counterclockwise, you may end up with a stitch that is too tight.
- Hold the threads as tightly as possible so that they do not unravel while embroidering.
- When fixing stitches or pulling the thread through the winding, look carefully so that the turns do not unravel.
- If you want to make your work more voluminous, then lay the threads as closely as possible to each other.
- Embroidery with wool threads looks more impressive than with floss threads.
- For rococo embroidery, choose a long, thin needle that is even along its entire length, without widening towards the eye. You can take a beading needle, it will easily pass through the threads.
- Be responsible when choosing threads. They must be strong, elastic and without roughness.
- When selecting thread, consider what fabric you will be embroidering on. Thick fabric, knitted items - thick and dense threads, wool, ribbons. Thin, light fabric - thin threads, silk, floss.
Rococo embroidery looks great on knitted clothes.
Embroidery of Rococo ornaments. Step-by-step instruction
In our master class, you have already become acquainted with various techniques for performing Rococo work, it’s time to move on to the most interesting thing - embroidery .
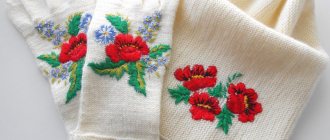
Using this technique, floral designs are usually created - lush roses, daisies, cornflowers, knots, berries and leaves. Which can be embroidered on mittens. We will move on to embroidering these elements.
Embroidery pattern for daisies and roses
When embroidering daisies, two types of stitches are used, which you met earlier - the petals consist of straight stitches, the middle of one knot .
- Secure a knot in the center of the future chamomile.
- Insert the needle into the fabric so that it enters the center of the flower and comes out from the top.
- Start winding the thread onto the needle and hold it there.
- Stretch the resulting winding to the center of the daisy, pulling the needle to the front side of the embroidery, through the punctures made at the beginning of the work.
- The first petal is ready, embroider all the rest in the same way.
Roses are made on almost the same principle as daisies, but have some differences. Chamomile petals radiate from the center of the flower in rays, rose petals are embroidered in semi-arches .
- Insert the needle into point B, bring it out at point A.
- Wind the thread around the needle, making about 6 turns.
- Pull the nick through the nave.
- Secure the stitch.
- You have the first petal, do the rest by repeating steps 1–4.
Embroidery pattern berry
Berries are used to complement the main patterns.
To make a berry on the canvas:
- Make a thread on both ends of the needle.
- Make the last turn in the shape of a figure eight.
- Secure the thread and stitch from top to bottom.
Embroidery patterns for cornflowers and leaves
To make leaves on the canvas, form them from stitches, placing them tightly on the fabric.
Embroidering cornflowers is reminiscent of making daisies.
Embroidery with ribbons Rococo style (video)
Embroidery using the Rococo technique is suitable for beginner needlewomen. Pictures embroidered with ribbons turn out very beautiful and voluminous. When creating such works, a rococo knot is often used, or as it is also called, a loop stitch .
- Pull the tape to the right side of the fabric through point A.
- Bring the needle inside out to the right of point A. The needle should come out at point B. Keep the ribbon to the left of the needle.
- Insert the ribbon under the point of the needle from left to right.
- Wrap the tape around the needle clockwise.
- Hold the thread while you pull the needle out.
- Pull the ribbon up to create a rococo knot.
- Bring the needle to the wrong side of the fabric at the knot.
- Straighten the ribbon and secure the resulting stitch.
You can decorate many things with embroidery in the Rococo style, embroidering floral or any other patterns. This type of embroidery, at first glance, may seem complicated, but just learn how to make basic stitches, and you can transform any item, knitted clothing, or create paintings to decorate your home.
Basic stitching techniques
Rococo has three ways of execution:
- embroidery using stitches;
- use of a knot;
- spiral embroidery.
All these methods have their advantages and disadvantages; each of them is described in detail below in the article. Therefore, a novice needlewoman can choose a more suitable option for completing the work.
Making a stitch
Step by step process:
- first you need to mark two marks on the fabric, you can mark them as A and C. The yarn needs to be brought to the outside of the embroidery, and then carefully tightened;
- then you need to return to point C and pass the needle through this mark, bringing it as close as possible to point A. There is no need to split and pierce the yarn;
You might be interested in Beautiful cross stitch patterns with wolves
How to perform the knot technique correctly
- Next you need to start making a turn clockwise;
- raise the end of the needle above the fabric, and, holding it in this form, move the thread closer to the fabric. Continuing to thread the yarn onto the needle, make the required number of curls;
- the curls should hold tightly enough to the needle, but not overlap each other;
- Press down the curl with the thumb of your right hand and carefully pull the needle through it. Then you need to start working with the thread. You need to pull it away from yourself until the thread in the eye of the needle becomes tense. This little “life hack” will help you make a tight and even stitch;
Work process
- Now you need to slightly loosen the tension of the yarn and carefully lay a new stitch in the direction of point C;
- upon completion of the work, you need to stick the needle into point C and pull it out to the wrong side.
This technique is more suitable for experienced needlewomen and tailors. Because it is considered one of the most difficult to implement.
Performing a knot
Step by step work:
- fix the thread on the wrong side;
- pull it out to the “front” of the ornament;
- curl it around the end of the needle a couple of times;
- pull the needle out to the wrong side, holding the threads with your fingers. A beautiful knot appeared on the side of the ornament;
- repeat the action with the needle, “make” a second knot next to the first.
Making a spiral seam
Embroidery with rococo knots will be an excellent option for beginning craftswomen. It's easier to do and also doesn't take as long as stitching.
Performing a spiral
To make this item you need to follow the process given below:
- Thread 10-15 turns of yarn onto the end of the needle coming out of the fabric;
- Pull the needle through the spiral and make a small puncture in the fabric. This is a very important point: the type of finished spiral depends on this hole;
- If the needle cannot pass through the yarn, you need to twist it a little between your fingers. This helps loosen the yarn.
This method will be of medium complexity; it is important to make a good puncture, otherwise the product will be damaged.
Decoration of a knitted sweater
Rococo embroidery: schemes and patterns for beginners
When experienced needlewomen hear the word “rococo,” they immediately imagine voluminous embroidery. Slightly less experienced people confuse it with the Brazilian technique
embroidery For those who wanted to try their hand at it for the first time, the name may be confusing.
And indeed, even from school, we associate the term “Rococo” with France of the 18th century: fancy outfits with abundant use of ribbons, fluffy skirts that create the effect of an “inverted glass”, extremely revealing necklines and voluminous high hairstyles - “frigates” and “gardens” .
The Marquise de Pompadour's favorite style was Rococo.
When we watch films about that era, we are never left with the feeling of splendor and luxury that reigned at court.
But was everything so rosy with the Rococo style? It turns out that initially and for quite a long time this term was used with a negative connotation.
For example, Lunacharsky in “The History of Western European Culture” writes with contempt that the entire Rococo style had features of some kind of pettiness, artificiality, and frivolity.
However, history, as always, has put everything in its place.
Invented in France in the 18th century, embroidery in the Rococo style quickly conquered the rest of Europe; it became known in Russia in the 19th century, and today it has literally gained a second wind.
Let's figure out how it differs from Brazilian embroidery, what main types of seams exist in it, and what rules must be followed to make rococo embroidery patterns look elegant and voluminous.
Nowadays, only famous fashion designers have the courage to completely decorate a dress with rococo embroidery. Although usually a few decorative elements are quite enough to emphasize the tenderness and sophistication of the image
What you will need for work and why
Rococo embroidery and Brazilian needlework techniques are very similar, so it would be logical to purchase the same materials for the work. However, this is only at first glance. In the Brazilian technique, the rococo seam is used mainly to create rosebuds; rococo is much more diverse in this regard. So, the main differences:
- If for Brazilian it is recommended to take a needle at least 5 cm long, then in Rococo there are no such strict restrictions. The main rule is the same - it should be long, but at the same time evenly thin along the entire length, that is, without thickening in the ear area. Therefore, it is better to purchase a bead needle
. - In the Brazilian technique, special Brazilian threads are used, in extreme cases Iris, in worst case floss will do. In Rococo there are again no such restrictions. The choice of thread depends on the thickness of the fabric: thin and silk threads, floss
are used for embroidery on thin fabric; woolen threads, ribbons, any thick threads are used when working with thick fabric or rococo embroidery on knitted items. - If in Brazilian embroidery you can only afford floral subjects (mainly roses, which we will talk about below), then in Rococo your imagination will not be limited by anything.
Using Rococo, you can create paintings depicting people, insects, etc.
Main types of seams
Everything couldn’t be simpler here: we will tell you about the three simplest ways to make a seam, so Rococo embroidery for beginners will not present any difficulties.
The main difference between these seams is the number of turns (turns) and the length of the stitches. Nailing is the entwining of a thread around a needle.
So, thread the thread through the needle, bring it to the front side of the fabric, not forgetting to secure it to the back side with a knot, and begin:
- The knot
is made by twisting the thread around the needle twice or three times. Holding the wraps with your fingers, the needle is brought out to the wrong side in the same place where it came out to the front. Usually, knots are used to make the core of the bud.
Rococo knot embroidery patterns
- The loop
is made in the same way as a knot, but the number of loops is very large (10–15), the needle is brought out to the wrong side close to the place where it entered the front side, or retreating just a few millimeters.
Using a loop you can make petals, for example, daisies
- A stitch
is a three-dimensional strip on fabric that can be used to sew stems, thin tree branches, etc. To make weavings, you need to pierce the fabric in two places, bringing the needle out from the front side at the site of the first puncture. Make loops around the end of the needle. The longer the stitch, the more there should be. Having pulled the needle through the turns, it needs to be injected into the previous puncture. The width of the turns should be equal to the distance between the punctures.
Rococo stitch embroidery pattern for beginners
“What about roses?” - you ask and you will be right. To embroider rose petals, you will need to use the same stitch, only the width of the threads on the needle will have to exceed the distance between the punctures.
After making the first rose petal, withdraw the needle at some distance from the first puncture
As you can see, everything is quite simple. When pulling the thread through the coils, hold them - then they will not get tangled and unraveled - that’s the basic rule.
Having mastered the simplest seams, try to combine them in one product, and then experiment with complex designs.
Using this technique, patterns can be applied to napkins, clothes, bedspreads - in a word, to any thing, making it original and elegant.
Source: https://zen.yandex.ru/media/id/5ae2108c610493953ec1fd9d/5d6023acc49f2900ad3a0864
Rococo on knitwear
The rococo embroidery technique looks good on knitted items because it stands out against the background of woolen threads. Even if the knitting is patterned, the motifs will be visible due to the large number of weaves.
It is best to perform embroidery on plain items knitted with stockinette stitch. In this way you can decorate both new and old things.
of threads and colors is of great importance . Multi-color embroidery can be used on a single-color product. For multi-colored knitting, you need to select threads of the same color or use fewer combinations so that the embroidery does not look tasteless.
You need to think about what is more suitable - ribbons or floss threads . If the knitting threads have a glossy sheen, satin ribbons will look good. Regular threads look better on matte wool items.
Editorial Voice
Matryona
Fan of embroidery and sewing
Ask a Question
There are cotton, silk and wool floss. Silk and cotton interact better with the needle and do not get stuck or cling to their own fibers, as happens with wool.
For thick threads, a thick needle is needed, but it is desirable that its thickness be the same along the entire length . The thickening in the eye area will create inconvenience when removing the turns. You will have to twist the needle to release the tension. This slows things down. Some craftsmen use cross stitch needles with a blunt tip for rococo.
Before embroidery, the newly knitted product must be washed so that it takes on its final shape. In this case, the embroidered pattern is not deformed.
If you combine rococo with satin stitch embroidery, you can create a more interesting pattern . It will not be too convex; the necessary details will stand out favorably.
Rococo embroidery for beginners - mastering the technique of volumetric embroidery
However, Rococo embroidery cannot be called monotonous. In total, craftswomen distinguish several seams, and first we will learn how to perform them.
So, get your tools ready:
In the Rococo technique, embroidery of any kind is based on winding. All seams of this style are built on it.
Rococo embroidery for beginners can be fraught with one big difficulty - the winding often falls apart, the seam turns out sloppy, loopy, shaggy.
We will try to explain the process to you so that you do not have such a problem. It is not for nothing that we mentioned that it is best to take viscose threads - they glide better and the winding does not get lost.
Let us, however, begin to study the seams.
Embroidery with rococo stitch
Nodule
- Fasten the thread on the wrong side and bring it to the face.
- Wind no more than 3 turns onto the end of the needle.
- Holding the threads with your fingers, insert the needle into the fabric not far from where it came out and gently pull it to the wrong side.
The knot is ready. Try a few more.
Petal
- Re-fasten the thread on the wrong side and bring it to the face.
- Wind 8-10-12 turns onto the end of the needle.
- Make a stitch, stick the needle into the fabric.
- Tighten gently.
- For very long petals (especially those with a bend), it is permissible to first lay a thread loop, and then carefully sew the base with small stitches laid closely, also grabbing the fabric.
- Berry
Fasten the thread on the wrong side.
Bring it to your face.
Stick it into the fabric at a distance of the height of the berry, make a second puncture from the inside out to the face in the place where you brought the needle out the first time. Do not pull the needle.
Remove the thread from the eye of the needle and wind it around both needle tips. Place the last turn in a figure eight.
Insert the thread into the needle again. Pull the needle out, holding the berry with your finger. Using a small stitch, grab the curls of the berry at the base (at the site of the first puncture), and then at the top of the berry (at the second puncture).
Does everyone remember what delicate, fragrant lavender looks like? Long stems, panicle flowers, narrow leaves. An ideal “model” for embroidery with the rococo stitch! And most importantly, it’s easy to embroider even without a pattern. You just need to sketch the pattern on the canvas with a pencil.
We embroider the lavender stems using a regular stem stitch. To embroider flowers we use the petal stitch. The same seam is suitable for leaves, or you can make it with a “berry”. Embroidering a rococo pattern requires patience, so take your time. Well, a few more tips to keep your embroidery neat:
- If you wind the thread too much clockwise, the thread may split. And if it’s counterclockwise, the embroidery will be too tight. Conclusion: no need to take a long thread;
- when pulling the thread through the coils, squeeze your fingers tighter so that the coils do not unravel;
- voluminous rococo embroidery will be even more expressive if you use wool for it - but don’t rush with it, first practice on more slippery viscose.
