Breakwater
To work you will need:
- medium thickness yarn – 150/200g (depending on the length of the scarf);
- knitting needles No. 3 and No. 4;
- marker.
What patterns will we use to knit bactus:
- knit stitch: in knit rows - all stitches are knit, in purl rows - purl;
- purl stitch: in the front rows - all the loops are purl, in the purl rows - the front ones.
Description of mating bactus “Breakwater”
We will work in three stages.
First
We start knitting the “Breakwater” scarf with knitting needles from the corner. You need to dial 3p. and knit 6p. persons Ch. At the end of 6 p.m. add 1p. from the inside and place a marker. Then we change the pattern - knit 6p. purl satin stitch In the last of them we again add 1p. Using this algorithm, knit the required length - at least 40cm. Be careful - do not forget to add increments on one side and alternate stripes of faces. and out. iron.
Second
Our goal will be to obtain a rounded profile of the product. To do this, in every even p. on the inside we make an increase of 1 p., and on the outer, opposite side we decrease 1 p. So tie the breakwater another 30 cm.
Third
For a big twist at the beginning of every 6r. close in 4 p. At the same time, we make increments by 1 point: in even p. - at the end of the row, in odd numbers - at the beginning. We get beautiful teeth.
We knit the bactus with knitting needles to the required length, close the loops with knitting needles No. 4. The “Breakwater” scarf is ready!
Colored bactus
This master class will show how to make bactus, although it is knitted according to the usual principle of scarves. This new product for 2019 is different in that it is knitted in an asymmetrical shape, and we also change the rows from knitting to purl.
For knitting, we need to take knitting needles number 3, and the threads must be wool - merino, cashmere or wool with any additives.
We need to knit from the corner and knit from three parts with different orders of adding and decreasing buttonholes. To avoid confusion, you need to mark the right places.
When 40 cm is knitted, you need to make a decrease in the buttonholes, which contribute to the formation of curvature, and do not forget to make a decrease on the other side of the scarf. And then another 30 centimeters we need to make additional decreases on the left, now two different angles are formed, one of which should be in the longitudinal direction, and the second in the transverse direction.
Related article: DIY brooch - master class
What should be the main pattern: 6 rows are knitted with front buttonholes, and after 6 rows with purl buttonholes, and so you need to knit one by one. When you add 1 buttonhole, we knit the front buttonhole behind the front and back walls.
Process description
First part: we put 3 buttonholes on the knitting needles, knit 6 rows of 6 buttonholes in stockinette stitch, now we add 1 buttonhole at the end of every 6 rows - on the inside of the product.
When performing this work, it is important to resort to marking the rows, so as not to get confused in the process; we mark the side where we make the additions.
We continue, based on the main pattern, adding a buttonhole at the end of each row and knitting until 40 centimeters are knitted or until the desired length is achieved.
Second part: now we knit the product in the transverse direction, add a buttonhole for every second row - we do this on the inside and at the same time close one buttonhole when we start knitting the 6th row - on the outside. And so we knit another 30 centimeters.
Now we knit the third part: when we knit 70 centimeters of the upper arc, close 4 buttonholes at the beginning of every 6 rows, this forms small corners, and add a buttonhole on the inside of each row - add a buttonhole at the end of even rows and add a buttonhole at the beginning of odd rows.
And so we knit until the desired length is knitted or until the threads run out. And we close the buttonholes, freely using knitting needles number 4.5.
Openwork bactus
The size of the finished product is 30cm wide and about 130cm long.
We will need:
- yarn - about 100g;
- sp. No. 3.
Description
We cast on 4 loops.
1st row: knit to the outer stitch, 1 yarn over, 1 knit;
2p.: 1knit., 1knit. for the lower lobule, faces. to the end of the river
Repeat both rows again, getting 6 stitches in the work.
Let's move on to the openwork pattern:
1st r. and 5th row: persons. to the last point, 1n., 1st;
2nd and 6th rows: 1 person, 1 person. behind the bottom wall, faces. to the end of the river;
3p.: 2knits., *1n., 2p. in 1 person* – repeat from * and to * to the last point, 1 person;
4th, 7th and 8th row: persons.
Repeat these eight r. until the scarf is half the length (about 60cm).
From this moment we make decreases:
1st and 5th rows: knit, up to the last 3 hp, 2 p. in 1 person., 1 person.;
2nd, 6th, 7th and 8th row: faces;
3p.: 2k., * 1n., 2p. in 1 person* – repeat from * to * to the last point, 1 person.
Repeat these eight r. until the last 4 p. Close the loops, break the thread and carefully hide the tip.
The knitted openwork scarf is ready!
Bactus in garter stitch
The highlight of this bactus is the garter stitch pattern, which creates a feeling of warmth and volume. This scarf is suitable to complement a spring look, protects from harsh winds and keeps you warm. It can be used as a scarf, thrown over your shoulders, or as a snood and wrapped around your neck in warmth and comfort.
We will need:
- 5 skeins of 100% merino yarn, desired color
- knitting needles No. 13 (US)
- markers;
Dimensions:
Description Take 8 loops, leaving a tail 25 cm long.
Row 1: slip 1 stitch, k1, (yo, k1) - twice, place a marker (k1, yo) - twice, k2, 12 stitches; Row 2: slip 1 stitch, knit to end, skip marker; Row 3: slip 1, k1, yo, knit to last stitch before marker, yo, k1, skip marker, k1, yo, knit to last 2 stitches, yo, k2, increased by 4 stitches;
Repeat 2-3 rows until you reach 200 stitches.
We close the loops.
It has some indentations that need to be sewn up to make the fabric look continuous. We cut off the tail and hide it!
Original bactus with leaves
Finished size: 33cm x 154cm.
For work we will need:
- primary color yarn - about 100g;
- contrasting color yarn - about 100g;
- ring knitting needles No. 2.5, no less than 80 cm long.
What patterns will we use to knit bactus:
- garter stitch - knit all stitches in all rows.
Knitting density: 24 stitches on a shawl pattern. for 31r. correspond to a 10cm by 10cm square.
Description
Main part
We dial 3p.
1p.: from 1 p. - 2 p., knit.;
2p.: 2p. in purl 1, knits. to the last point of 1 point. -2 faces;
We repeat both r. 4 more times. We do not break the thread.
Leaves
1p.: from 1p. – 2p., persons. to the last point, from 1 point. – 2 persons;
2p., 4p., 6p.: P1, k4, wrap the thread tightly around the sp. and turn;
3r., 5r., 7r.: persons. to the last point, from 1 point. -2 faces;
8p.: close 1p. broach, knit 4, wrap the thread tightly around the joint. and turn;
9r.: faces;
10p., 12p: p1, k1, close k3, pick up thread on sp. and knit together with the loop;
11r., 13r.: persons;
Row 14: P1, k1, cast off k3, pick up thread on sp. and knit together with the loop, knits. to the last point, from 1 point. -2 faces We break the thread. Next we knit to the desired size. We repeat the main part and leaves from the 1st to the 13th row. again. Finish on the 14th p. and close the loops. We break the thread and carefully hide the tip.
"Mint tenderness"
We will need:
- yarn of mixed composition of sectional color (390g/100m) -100g;
- sp. No. 3.5;
- marker (M);
- hook number 3.
Description and diagrams
We dial 7p. and knit the purl set row: k4, M, k3.
1p.: l., to the loop in front of M, 1n., 1l., transfer M to the working thread, 1n., 2p. in 1 person., 1n., 2p. 1 person;
2p.: 1n., 1l., knit from 1n. two l.: for the upper and lower segment, 2 l., transfer M, 1 l., knit 1 n. for the bottom d. in 1l., 1l.;
3rd: l. to M, transplant M, 1n., 2p. in 1l., 1l.;
4r.: 6l., transfer M, 1l.;
5r.: l. to the loop in front of M, 1n., 1l., transplant M, 1n., 2p. in 1l., 1n., 2p. in 1l., 1n., 2p. in 1l.;
6p.: 1l., knit from 1n. two l.: for the upper and lower d., 1 l., knit from 1 n. two sheets: for the top. and lower d., 2 l., transfer M, 1 l., yarn over for the lower d. 1 l., 1 l.;
7r.: persons. to M, transfer M, 1n., 2p. in 1l., 1l.;
8p.: 8p., transfer M, 1 person;
9r.: 1l. to the loop before M, 1n., 1l., transfer M, 1n., 2p. in 1l., 1n., 2p. in 1l., 1n., 2p. in 1l., 1n., 2p. in 1l.;
10r.: 1l., knit from 1n. two l.: for the upper and lower d., 1 l., knit from 1 n. two sheets: for the top. and lower D. 1 l., knit from 1 n. two l.: for the upper and lower d., 2 l., transfer M, 1 l., yarn over for the lower. slice, 1l.;
11 rub.: persons. to M, transfer M, 1n., 2p. in 1l., 1l.;
12r.: close 7p., 3l., transfer M, 1l.
We repeat the knitting for 12 rows. until half the desired height is obtained. Let's continue:
1st rub.: persons. up to 3 p. before M, 2 p. in 1l., 1l., translation M, 1n., 2p. in 1l., 1n., 2p. in 1l.;
2p.: 1n., 1l., knit from 1n. two sheets: for the top. and lower slice, 2 p., translation M, faces.;
3p.: persons. to M, transplant M, 1n., 2p. in 1l., 1l.;
4p.: 6p., translation M, 1p.;
5p.: knit., up to 3 p. before M, 2 p. in 1l., 1l., translation M, 1n., 2p. in 1l., 2p. in 1l., 1n., 2p. in 1l.;
6p.: 1l., knit from 1n. two sheets: for the top and bottom. slice, 1 l., knit from 1 n. two sheets: for the top and bottom. slice, 2 p., translation M, 1 p.;
7r.: like 3r.
8p.: 8p., translation M, 1p.;
9p.: knit., up to 3 p. before M, 2 p. in 1l., 1l., translation M, 1n., 2p. in 1l., 2p. in 1l., 1n., 2p. in 1l.;
10r.: 1l., knit from 1n. two sheets: for the top and bottom. slice, 1 l., knit from 1 n. two sheets: for the top and bottom. slice, 1 l., knit from 1 n. two sheets: for the top and bottom. slice, 2 p., translation M, 1 p.;
11 rub.: persons. to M, translation M, 1n., 2p. in 1l., 1l.;
12r.: close 7p., 3l., transfer M, 1l.
We continue in rows with decreasing stitches, until in the 11th row. there will be no 3p left before M. Close them and break the thread.
We carefully hide its end using a hook.
Single color product
We will knit this product in three stages. We start knitting by expanding, but the corners by decreasing.
What we need to have for knitting:
- knitting needles number 2 and 3;
- markers or threads of a different color;
- threads, in our example you need 300 g.
The pattern described below will help you knit a scarf without problems, while alternately we need to alternate the front rows with the back rows, every 6 rows.
First stage: we put 3 buttonholes on the knitting needles and knit 6 rows of knit stitches, and at the end of the sixth row we need to add a buttonhole. Next, we knit with a purl stitch and repeat the same steps as with the front loops - add one buttonhole. It is important to do this at each end of the sixth row, but only on one side of the product. And so we knit until it is 40 centimeters. It should look like in the photo.
Related article: How to sew shorts with your own hands for a girl
Second stage: to get an angle, we need to make the following decreases and increases:
- add one buttonhole on one side at the end of every second row;
- but on the other side we decrease one buttonhole every sixth row, but at the beginning;
And so we knit up to 30-40 centimeters.
Third stage: now we knit the product with aspen so that a narrowing is formed. And now we begin to decrease 4 buttonholes in every sixth row - we get interesting rows in the form of a ladder. At the same time, at the end of every second even row we make 1 buttonhole, and also in every odd row.
And when there are already three buttonholes at the end, we begin to loosely close them.
Elegant gray bactus
Finished size is about 102cm.
We will need:
- h/w merino yarn (100g per 283m) – 150-200g;
- knitting needles No. 4.
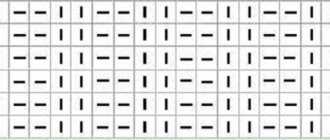
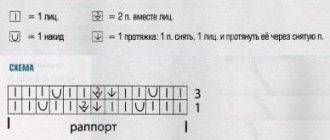
What patterns will we knit:
- use schema:
- Yarn over three stitches: yarn over, knit 3 stitches, remove yarn over from right sp. through knitted sts.