Pillows are perhaps one of the easiest ways to make the interior of your apartment bright, stylish and unusual. As a rule, designer products cost a lot of money, and it can be difficult to choose something to suit your taste... If you have a free evening, we suggest sewing exclusive decorative pillows yourself - it’s quick, simple and very inexpensive! Easy-to-make sofa cushions with your own hands, patterns, photos and diagrams of which are given in today’s lesson, will completely save you and everyone in your household from the autumn blues! Bright and stylish, they will create a good mood for the whole day and make your home even a little more comfortable;)
How to sew a round decorative pillow
Round sofa cushions are a great way to decorate any room. It harmonizes well with both the sofa and the bed, and would also be good as a floor seat. There are several dozen options for sewing round decorative pillows, but today we will look at just one - from scraps of multi-colored fabric.
We sew a round pillow with our own hands: master class
Stage one
For sewing, we will need multi-colored pieces of fabric of the same density and one large button.
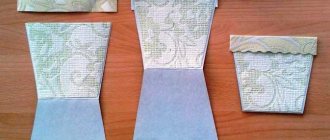
First, a pattern is made. On a small Whatman paper we draw a circle, the diameter of which will be equal to the diameter of the finished pillow. We divide this circle into twelve equal sectors and cut out one of them - the pattern is ready! We apply it to the flaps of fabric, trace it twice: first, clearly along the contour with a straight line, then again, taking into account seam allowances of one centimeter on all sides. We will get twelve of these multi-colored parts:
Stage two
Let's proceed directly to sewing. To do this, take two parts, fold them face to face and attach them to each other along one of the long sides. We sew the line, retreating three millimeters from the edge. Standard length stitches.
Turn the fabric over and iron the seam with a hot iron. Sew the remaining slices together in pairs in the same way:
Next, we sew together three pairs of double parts, in the end we get two semicircles:
We connect two semicircles face to face and sew them together from the wrong side. Carefully smooth out all seams with a hot iron.
Stage three
Now let's work on the back of the pillow. It can be the same as the front one, or one-piece. You already know how to sew the side with sectors, so now let’s look at the second option.
So, we take a piece of plain fabric, attach the finished one-piece front part to it, trace it with a pencil and cut it out taking into account the seam allowances.
Then we take another piece of fabric and cut out a strip from it, the length of which is equal to the circumference of the front part, and the width is equal to the desired volume of the pad. Sew the strip to the front piece, like this:
After this, we sew the strip to the back piece, leaving a little space for padding.
We turn the pillow right side out, stuff it more tightly with holofiber and carefully sew up the hole.
Sew a button into the center of the pad using a long needle and strong nylon threads.
That's it, the round sofa pillow is ready!
Padding
Read more about stuffing. First of all, you need to look at the properties of the filler itself, since this is the main characteristic of the future pillow. You can stuff the product with padding polyester or knitted tape, cotton wool and other materials that are quite cheap. In cases where stuffing is required specifically for a decorative model, it is important to approach the process of choosing filler more seriously.
You may be interested in this Patterns for women's and men's shirts: sewing order
Appearance of holofiber
The main properties that the material must have:
- Sufficient elasticity. When pressed, the product should quickly restore its shape and not leave dents if people sleep on it;
- Breathability. All materials, including those from which the base, cover and padding are made, must allow air to pass through well and allow the skin to breathe;
- Hypoallergenic. All these materials must also be safe for human health and not cause allergies or skin irritation;
- Easy to care for. The pillowcase, cover and pillow itself should be easy to wash and machine washable.
Sintepon
By type, padding is divided into three categories:
- Artificial material;
- Natural material of plant origin;
- Natural material of animal origin.
Hop cones for stuffing
Artificial padding
Artificial materials have a number of properties that put them on the same level as natural ones. Moreover, they also have their own distinctive characteristics. This composition does not allow dust mites to develop and will not cause allergies. Synthetic materials are easier to wash and dry quickly.
Foam pillow
The most commonly used artificial paddings are padding polyester and holofiber. The first option is budget. Sintepon is used not only for this, but also in the manufacture of clothing.
Important! A significant disadvantage of padding polyester is that it quickly falls into clumps and does not recover its shape well. If such a pillow is actively used, then tubercles will quickly appear on it, and its surface will become hard.
Pillow in the shape of a scops owl
That is why the best choice would be holofiber, a non-woven material consisting of interwoven polyester fibers. The space between the fibers has a porous structure and is filled with air, which makes holofiber light and warm. In addition, the composition has the following characteristics:
- Removal of moisture and water;
- Air permeability;
- High service life;
- No static electricity;
- Easy to care for and easy to machine;
- No smell.
Toy pillows in the form of cats
Vegetable stuffing
Plant materials are often used to form decorative pillows or sleep products. Among the most popular options:
- Dry herbs and algae;
- Leaves of herbs such as mint or lemon balm;
- Hop cones;
- Buckwheat husk.
Herbs can also be used as a filler
. Important! In many cases, such stuffing will be beneficial to health, will add some originality to the product and a pleasant smell of herbs, which will spread throughout the room.
Cotton is also often used. A pillow stuffed with cotton will be hypoallergenic, and harmful organisms and insects will not breed in it. If you stuff the cotton correctly and take care of the pillow, you can extend its service life.
Product with cotton
Animal stuffing
Down and feathers from birds (chicken, geese, swans, ducks) are considered traditional for animal stuffing. The pillows are light, soft, and quickly take shape after deformation. One drawback is that it is not advisable for people suffering from dust mite allergies to sleep on them. The thing is that over time, microorganisms can develop in such stuffing that can cause suffocation attacks in allergy sufferers. But this can also be avoided. It is enough to properly care for the item, constantly wash, dry and air it.
Sheep wool padding
In addition, you can stuff the pillow with camel or sheep wool. It will become not only comfortable, but also therapeutic, because camel hair helps people suffering from radiculitis get rid of symptoms. This material also has disadvantages: heavy weight and rapid rolling.
You might be interested in: Patterns and sewing of blouses, tops and dresses with peplum
Important! You can also use unnecessary pieces of wool yarn or an old fur coat. It can be cut into pieces and distributed evenly over the base. Such a pillow will collect a lot of dust, so it should be washed or knocked out more often.
Camel hair pillow
How to sew a decorative “shaggy” pillow
A “shaggy” pillow will greatly refresh any boring interior! It is quite easy to sew even for a beginner. Be sure to try it if you like this model;)
We sew a decorative “shaggy” pillow: master class
Stage one
To sew a decorative pillow for a sofa, we will need any soft fabric that does not fray when cut and cotton fabric for the base of the same color. Of course, you will need thread, a sewing machine, scissors and a little patience.
First, we draw and cut the soft material into strips, like this:
After that - on small rectangular parts:
We cut two square or rectangular pieces of the same size from a piece of cotton.
We draw one of these parts with vertical lines, moving away from the edge by about two centimeters. Leave one and a half centimeters between the lines. We do this for the front “shaggy” part of the decorative pillow.
Stage two
Using a sewing machine, we attach rectangular pieces of soft material in a row, slightly crumpling them in the center, like this:
And placing it under the paw like this:
If you want the finished pillow to be fuller, we recommend making the distance between the segments as small as possible. This is what the first sewn row looks like:
Having sewn the first row, fold it down in half, as shown in the photo, and lightly smooth the ruffle so that the markings for sewing the second row are visible.
Sew on all remaining rows of ruffles.
To make the ruffles seem even thicker, try sewing them in a checkerboard pattern, that is, sew rectangular pieces of soft material in the second row along the places where there was a gap in the first row.
Stage three
Now let's move on to sewing the sofa cushion. To do this, fold the face and back of the pillow with the front side inward and stitch along the entire perimeter, leaving a little space for stuffing the product with holofiber.
Turn the pillow right side out and stuff it tightly with filling.
We sew up the remaining hole by hand using hidden stitches.
That's all, the “shaggy” sofa pillow is ready!
Methods for decorating pillows
Decorating a pillow is a complex and exciting activity. Here are some finishing options that are feasible even for a novice craftsman.
Attention! It is more convenient to decorate the front fabric of the product before sewing it to the back side.
You might be interested in this: Step-by-step instructions for sewing beautiful pillows
Decoration
Using bows
Accommodation options:
- Corner of a pillow.
- In the middle.
- At an angle.
- Similar to a gift (crosswise).
- Make it a butterfly by embroidering antennae.
Making: carefully tie a ribbon or 3 pieces of fabric (connect the bow and tails with a belt loop).
Relevant in interior styles:
- Provence.
- Vintage.
- Country.
Placement of ruffles
How to place ruffles:
- Sew a strip of fabric (1.5 times the required length, the edges are turned).
- Pull the thread.
- Make the folds even.
Applicable in Rococo interiors.
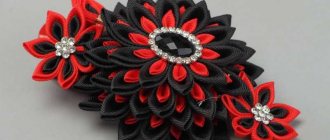
Idea! A ruffled flower will perfectly decorate a pillow.
Decor with flowers
How to make this decor:
- Cut an old T-shirt into ribbons.
- Fasten them in a circle.
Embroidery decor
Sashiko embroidery is simple; large stitches repeat the outline of the design.
Decoration with ribbons is possible (the direction of attachment depends on your imagination)
How to sew a cushion cushion
The bolster pillow is so easy to sew that even a child can handle it! A minimum of time, tools, fabric - the work will take you no more than half an hour.
Sew a decorative pillow-cushion: master class
Stage one
First, let's prepare all the necessary tools and materials, namely:
- piece of fabric;
- ribbon with pom-poms in the color of the fabric;
- lightning;
- holofiber or any other filler;
- sharpened scissors;
- sewing threads;
- ruler;
- measuring tape.
Stage two
As part of this master class, we will sew a pillow with a diameter of 20 centimeters and a length of 61 centimeters, but if you wish, you can easily change the parameters.
So, we cut out two round parts for the ends and sides of the pillow. Taking into account seam allowances, the diameter of the circle should be 22 centimeters.
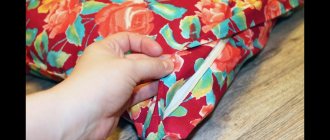
We measure the circumference at the sides and cut the main roller blank according to dimensions: width = circumference + one centimeter, length = 63 centimeters, taking into account seam allowances. We sew a zipper along the length.
We sew decorative braid with pom-poms along the short sides of the main part of the bolster pillow.
We turn the pillow inside out and connect it to the sides.
Turn the pillow right side out again and stuff it tightly with holofiber or any other filler.
That's it, the bolster pillow is ready!
To make the pillow easier to wash, we recommend sewing an inner pillowcase for it from a plain natural fabric. In this case, you should skip the step of sewing in the zipper and ribbon. Instead of a fastener, we leave a small hole, with which we stuff the pillowcase and sew it up with hidden stitches. Now we can safely put the cover we made earlier on the pillow and rejoice at the new thing.
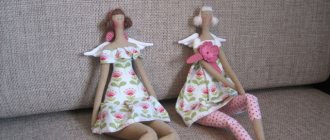
How to sew a sofa cat pillow
Such a pillow, in addition to its purely decorative and practical qualities, automatically becomes one of the favorite toys in the family! Sewing such a charming sleeping cat is not as difficult as you might think, but the work will require care and painstakingness. Are you ready to try it? :)
How to sew sofa cushions with your own hands: patterns, photos and diagrams
Stage one
First, let's prepare all the necessary tools and materials, namely:
- cotton fabric in three different colors;
- a piece of fleece;
- interlining;
- sharp scissors;
- holofiber;
- pencil or piece of chalk;
- floss threads;
- two buttons;
- tailor's pins;
- pattern.
Stage two
We start by printing out the pattern. If desired, you can draw it by hand in any form. We carefully cut out all the elements of the pattern.
Next, we place the paper blanks of the body on the selected fabric, trace them with a pencil and cut them out, not forgetting to add one centimeter of seam allowance.
We place the workpiece inside out on the adhesive side of the interlining, secure it with tailor's pins and cut it out. We do the same with the second body blank, cut from fleece.
Cut out the paws, ears and tail of the cat.
We take out the pins and iron the two-layer body blanks with a hot iron so that the fabric sticks to the non-woven fabric.
Stage three
We fold the blanks for the ears, paws and tail in pairs with their faces inward and sew them on a sewing machine, leaving small holes for turning the parts inside out. We cut the stitched parts with curly scissors or make small notches with ordinary tailor's scissors.
We turn the blanks inside out and iron them, stuffing them with holofiber. Now machine stitch the holes using a zigzag stitch. Using pins, we attach the resulting blanks to the front side of the kitten’s front. We sew them to the body using a zigzag seam.
Draw the kitten’s face like this:
We put a piece of fleece on top (back part) and secure it with pins. We sew the parts together, leaving a little space at the bottom to turn the product inside out. We trim the seam allowances with curly scissors or make small notches with regular ones.
Turn the pillow over your face and iron it. We stuff it with holofiber and sew up the hole with hidden stitches.
We sew the upper legs and buttons to the body for decoration.
We embroider the nose and closed eyes with floss threads.
The scops owl pillow is ready!
How to sew a pillow for a sofa from scraps
Pillows sewn using the patchwork technique always attract special attention. They are bright and stylish, so they will fit perfectly into any boring interior, refreshing it greatly.
Sewing a decorative pillow using the patchwork technique: master class
Stage one
As usual, we start by selecting the necessary tools and materials, namely we take:
- four pieces of colorful fabric;
- matching sewing threads;
- scissors;
- tailor's pins;
- ruler;
- pencil;
- linen cord.
Below we provide a diagram of the layout of the fabric scraps.
Stage two
To begin, we cut out pieces of fabric, focusing on the layout diagram above. We place the parts on the table in a given sequence, like this:
We place adjacent flaps face to face and fasten them with a pin.
We sew the parts together. We always start work with small elements!
Turn the small squares inside out before sewing them to the larger rectangles.
Using a ruler, mark the triangular blanks:
We sew the triangle with the rest of the blanks, as shown in the layout diagram.
Next, we sew together all the blanks for the future pillow.
From the reverse side the product will look like this:
And here is the front side:
To create a edging for a sofa cushion, take a linen cord and cover it with unused fabric, as shown in the photo:
We sew a piping around the perimeter of the product, stepping back from the lace by one centimeter and making a line running parallel to it.
To prevent the piping fabric from being too stretched in the corners, we make small notches.
We cut off the excess edging and join its ends.
Stage three
Next we will work on the back side of the decorative pillow. We put two scraps of the same fabric together with the wrong side out and sew them on the machine.
We sew the piping at the junction of the pieces of fabric, making an additional stitch one centimeter from the lace.
We fold the edge of the piping and secure it with threads.
Sew a piping along the edge of the front side of the back of the product.
This is how it should turn out:
Now we sew the back and front parts of the pad on three sides from the wrong side.
We turn the pillowcase inside out, stuff it with holofiber and sew up the open side with hidden stitches. The decorative pillow is ready!
This is what she looks like from behind:
And this is from the front:
How to choose fabric, filling and accessories
Before sewing a beautiful product for decoration, including a pillow, you should carefully consider its filling and the material from which it will be made. It is important to choose fabrics that will be as easy to care for as possible. Moreover, the material should not become electrified during use and attract dust. Ideal for this would be:
- Silk, satin and similar materials;
- Satin, flannel, calico fabric and linen material;
- Fabric used for upholstering furniture or chairs.
You can use the same material as when upholstering furniture.
For a more budget-friendly and original option, you can use old clothes or parts of them. The pillow will be in a patchwork style and no one will even guess that it contains old T-shirts, sweaters and pants.
Square decorative item made of silk with an oriental motif
Filler
If you have no idea what to stuff your future product with, then you need to familiarize yourself with the list of popular materials. You should choose those compositions that will not begin to clump after a certain time. Based on this, padding polyester and cotton wool disappear immediately. You should also not use feathers or down for these purposes, as these materials do not hold their shape well and are suitable for sleeping products.
Fillers
The most preferred options are:
- Holofiber, which can maintain its characteristics for 10 years of operation;
- Silicone, or rather its granules. Ideal for children's products. They are practical in that they can be taken out to wash the pillow and put back in;
- Natural materials such as hop cones, buckwheat husks, aromatic herbs.
Natural filler
Accessories
To sew a decorative pillow yourself by hand or on a machine, you will need threads of a certain color and number. Usually from 40 and above. In order to embroider on the product you will need floss. If the base of the pillow is knitted, then use almost any yarn. If the product cover is removable, it may require buttons or a zipper.
You might be interested in: Features of paint for denim products
Floss threads will be an excellent pillow decoration
How to decorate a finished pillow in an original way
When you want to update decorative pillows with your own hands, but don’t want to bother with sewing a product from scratch, our quick tips for transforming already finished products beyond recognition will come to the rescue!
Method one: airy heart made of roses
For work we need a pillow, fabric that does not require cutting, scissors and a needle.
We cut out circles from the selected fabric (not necessarily even, even if they are slightly different in shape) with a diameter of about eight centimeters. Next, we take one piece by the middle, gather it together, forming folds as in the photo, fix it with a couple of stitches and sew another circle at the bottom, forming a lush bud.
We continue to sew circles to the rose until we get a flower of the desired size.
Prepare the rest of the roses in the same way.
Sew the flowers to the front side of the pillow, starting with the outline of the heart.
We arrange the parts more closely, without leaving large gaps between them. We gradually move towards the center in a spiral. We fix the thread and hide the tail. The decoration for the sofa pillow is ready!
Method two: application
It would seem primitive! But look how an ordinary pillow was transformed in just half an hour! The pillow can be decorated with colorful flowers, animals, hearts, butterflies - it is not at all necessary to achieve natural colors. This pillow will make even the grayest and rainiest autumn a little warmer and more comfortable.
Method three: tapes
Ribbon, whether satin or fabric, can quickly transform any boring, plain-colored pillow! Experiment with the width and types of bows - it's easy and fun!
Method four: buttons
Bright and pastel shades, large and small – buttons will always decorate a finished pillow, especially if you collect interesting pictures from them.
Method five: pompoms and tassels
The same rule applies to pom-poms as to buttons. Experiment and use your imagination! :)