Materials and tools for work
To start cross stitching, you need to purchase the following materials:
- Canvas is a special fabric for embroidery. Its weaving is done in such a way that there are small gaps left for the needle to enter and exit. The canvas can be white or colored. In stores it is sold by the meter, and manufacturers put already cut pieces into embroidery kits.
- The hoop is a special design for tensioning the canvas. They are necessary for convenience, as well as to prevent fabric deformation.
There are round and square hoops. They consist of 2 parts, one is inserted into the other, and a canvas is placed between them. The large part has a screw that can be used to adjust the tension.
Plastic hoops are cheaper than wooden hoops. For large fabrics there are floor structures on legs that allow you to work with embroidery with both hands.
- Embroidery needles They have a rounded tip that will prevent injury, and a long, narrow ear. There is no chance of getting caught between the weaving of the fabric; embroidery needles easily pass through special gaps in the canvas. For each canvas size you need to choose the right needle number.
| Canvas number | Needle number |
| 14 | 22-24 |
| 16 | 24-26 |
| 18 | 27 |
For fabric with non-standard sizes, you need to select the needle number manually. From the edge, through one gap you need to pass the needle. It should go smoothly without getting stuck.
- Floss is a classic type of cotton thread for cross stitch. There are more than 20 well-known manufacturers of these threads. They have a wide range of colors, and embroidery kits contain the required number of skeins, selected by color. For festive projects, there are threads with lurex.
- A marker is needed to mark the canvas into squares for ease of work, as well as to indicate allowances for the hoop. A regular marker will not work, because the rod of a special felt-tip pen is filled with washable ink and after washing, there will be no traces of markings left on the back of the embroidery.
- Scissors are needed for cutting threads and canvas. They should always be kept sharp. It is better to buy a pair of scissors, some small, others a little larger.
Cross stitch for beginners requires a simple set of materials and tools.
There are also other additional materials for embroidery, for example, thimbles, bones for floss and storage kits.
You can learn cross stitch without them.
What is cross stitch
Cross stitch is a pattern on fabric created by special stitches called crosses.
Each cross stitch consists of 2 crossing stitches. This technique can be performed with threads from various fibers. Half-cross and Bulgarian cross techniques can also be used - depending on the design, its style and complexity. Cross is the most common type of embroidery. There is a wide range of kits on sale that contain the materials and instructions necessary for the work. You can also buy separate diagrams or canvas with a pre-printed design.
It is not recommended to master cross stitch immediately from complex paintings. First, you should practice making the stitches themselves so that when embroidering the pattern they are the same.
Cross stitch technologies
Cross stitch (for beginners, a step-by-step description with photos is provided) is performed using 6 different techniques:
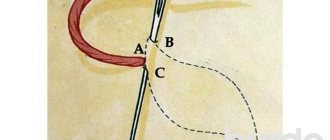
- Classic or English.
Each cross is embroidered separately. It’s best to start getting acquainted with embroidery with it.
- Danish technology.
The first row is embroidered with the bottom stitches, and then returned in the opposite direction, overlaying the top stitches.
- Diagonal simple or double.
Simple diagonal
Double diagonal (from left to right)
Double diagonal (from right to left)
In 1 case, the stitches are stitched from bottom to top and vice versa. In the double method, embroidery begins with 2 single stitches simultaneously in 2 parallel squares. When they reach the end of the row, they return and make crosses.
- Vertical technique.
Vertical stitches are made from top to bottom, and when returning, they pull the thread diagonally to form crosses.
- Fragment embroidery or enlarged crosses.
A separate color area must be filled with diagonal stitches starting from the upper left corner. Then they rise from the bottom corner, sewing stitches in the opposite direction.
- Tapestry technique.
This method is considered the fastest and thread saving. The stitches are sewn in a half-cross, where the rows are connected in a checkerboard pattern.
You can embroider without using a hoop only in the classical way. Other techniques require moderate canvas tension, especially tapestry.
A design made on loose fabric will be very difficult to straighten.
Black and white schemes
Monochrome cross stitch is a hobby that involves making a pattern on a fabric base using two colors of thread. Such canvases have a chic appearance, despite the ease of work.
You might be interested in this. Cross stitch lessons: MK on a hoop for beginners
It is important to remember that monochrome technology requires special care and labor-intensive work. The craftswoman has at her disposal only a few shades, which must be arranged so that the ornament looks clear, but at the same time catches the eye.
Today there are many kits on sale, with instructions, so it will be much easier to complete such embroidery. Cross stitch patterns for monochrome paintings are presented below.
Owl
It is recommended to make the owl using only black threads. This pattern would look great in the hallway. But for beginning craftswomen it will be quite difficult to complete, since you need to be careful when embroidering the feathers and face. A cup of coffee
If you need to make a cross stitch on a monochrome cup of coffee, then you need to use a light canvas, as well as black or brown floss yarn. The most important thing is to choose the drawing itself and find its diagram in electronic format.
First you need to mark the center of the cup. Next, embroider the details of the coffee cup, moving from top to bottom. First of all, you need to make large elements of the main design, then embroider small ones, for example, such as a saucer or something else.
Performing a monochrome tiger
Experienced needlewomen know that there is a thematic series of images using the cross-stitch technique, which is made from four different paintings, bearing the traditions of different countries. This is called modular embroidery.
Dancing girls
To complete this painting, you can use not only black, but also bright red threads (for girls’ dresses). The drawing is simple in execution, but looks quite catchy. It is definitely better to hang such a picture in the living room for everyone to see. Notes
The variety of templates with notes makes it take a long time to choose a design. They can be single or made in the form of a heart, circle or oval. Embroidery is made from black threads. At the end of the work, it is recommended to place the picture in a frame and under glass.
Work process
Little predator
The role of a small predator can be anything, such as a spider, chimera or lizard. Therefore, the craftswoman needs to decide on the drawings themselves. But as experienced embroiderers say, making small animals is a fairly simple task.
Selecting a canvas
Fabric for embroidery varies by type; the size and convexity of the crosses depends on this parameter. The most common canvas is No. 14. There are 55 cells per 10 cm. Other types are described in the table.
| Number | Number of cells per 10 cm | Application area |
| 11 | 43 | Creating large crosses |
| 16 | 63 | Convex embroidery |
| 18 | 70 | Small cross stitch |
Embroidery canvas Aida
There is an overlay canvas with thick weaving and large threads. It is sold starched and used as a lining for embroidery on plain fabrics.
Beginners are advised to choose quality material. Popular manufacturers producing good canvas are Aida, Zweigart and Astra.
Types of seams
Classic embroidery consists of a simple cross stitch, but there are 5 more types of stitches that help make the design more interesting:
- Half cross or ½ cross.
The stitches are embroidered in the same way as the top parts of full crosses. Usually their direction is indicated on the diagrams. Small diagonal stitches can be directed up or down.
- ¼ cross stitch.
This type of stitch has a second name: Petite. In French it means “small”. The seam is a small half-cross or a full cross, which is ¼ part smaller than the classic version. It is stitched halfway through one square, hooked under the threads of the fabric. One cell, where in the classic version there is only 1 cross, can accommodate 4 such seams.
- ¾ cross stitch.
A small stitch is drawn from one upper corner to its middle. The next stitch should become perpendicular. The direction of small stitches is indicated on the diagrams. It should be the same as other crosses throughout the embroidery.
- Backstitch.
Such seams give the embroidery a finished look. Backstitch is performed with threads of dark colors. To clearly indicate the outline of a drawing if it blends into the background.
- French knot.
These seams give the design an unusual relief. They are used to create unusual designer embroideries or to design a separate fragment that should stand out from the overall design.
To learn how to make different types of seams, you can practice on small jobs, size 10 cm x 7 cm.
How to mark an outline
Cross-stitching for beginners (step-by-step instructions with photos are provided below) will not be a difficult task if you mark the canvas correctly before starting work.
Marking the canvas with threads
Marking the outline with a marker
Most of the patterns are divided into squares, 10 x 10 cells. The total area of the square is 100 cells. It is necessary to line the canvas. You can start from the middle or from the corner.
Procedure:
- The canvas is laid out and ironed.
- Now you need to determine the center of the canvas. To do this, it is bent in half, first horizontally, then vertically. There will be a center point where the lines intersect.
- On each side, count 10 cells and draw lines using a ruler.
Marking can be done with washable markers, water-soluble filament, or disappearing ink.
How to secure the thread
It is not recommended to secure the threads with ordinary knots. When washed, they come undone easily, and also make the surface of the embroidery uneven and can be felt from the front side.
Loop method, option 1
Loop method, option 2
Microstitch at the beginning of embroidery, option 1
Microstitch at the beginning of embroidery, option 2
Fastening under stitches at the beginning of embroidery
Fastening the thread at the beginning of embroidery under previously made stitches
Fastening under stitches at the end of embroidery
Fastening with microstitch at the end of embroidery
At the beginning of work, you can fix the thread in a looped manner. To do this, the thread is bent and threaded into a needle. From the wrong side, the needle is inserted into the first cell and comes out to the front side of the canvas. The loop should remain on the other side. The needle is brought inside out and threaded through the loop. There is no need to tighten it too much, this will lead to deformation of the cage. You can start cross stitching.
When the working thread runs out, you need to carefully attach a new one. To do this, it is carefully passed under five stitches on the reverse side and secured with one segment of the “back needle” seam.
Cross stitch is completed in a similar way to the joining method. There should be about 5 cm of free edge left until the end of the thread. Beginners should practice on a small piece of canvas, repeating the steps step by step so that no difficulties arise during the work. Below are photos showing what the secured thread looks like.
Smooth color transitions
To change one color to another, and the transition remains unnoticeable, you can use 2 methods: gradual replacement of the thread or fractional crosses.
In the first case, a palette of floss may be required. To smooth out the sharpness of the transition, you need to choose an intermediate color. For example, from yellow, a smooth transition to green is required. Several thin fragments are pulled out of the yellow thread and green is added. This continues until the color changes completely.
Another option: knit the last row with fractional 3/4 stitches, with the angle up. Note the color of the thread and embroider in the opposite direction along the same squares, finishing the row so that it looks like a regular cross stitch.
How to work with the scheme
The patterns can be color or black and white, but with symbols for each color, as well as color, with the designation of different stitches. It is believed that working with color schemes is easiest, since the picture is already visible, all that remains is to select the threads and count the cells.
Designations on black and white diagrams are small symbols, which are explained at the bottom of the picture. Usually the diagrams are already divided into squares. All that remains is to mark the outline and get to work.
Learning correctly: how to quickly cross stitch
It takes time to learn how to embroider at high speed. First you should learn how to properly embroider individual squares on canvas. Then move on to learning different techniques.
Each embroiderer decides for herself which technique is closest to her.
You should pay attention to the fact that stitches can be made following different patterns. Some are applied directly to the canvas, others - to paper. The second option involves counting stitches, which makes the embroidery process more difficult.
Related article: Doors in American walnut color when decorating an interior
There are several techniques for applying stitches to canvas.
Stitch options:
- Counting;
- Uncountable;
- Machine.
Each of the techniques can be performed quickly, but it requires skill and experience. It is important to remember that fast embroidery does not mean high-quality embroidery. The stitches must be applied correctly so that you do not have to rip out the embroidery. To begin with, you can practice by purchasing simple pictures for children.
Easy patterns for cross stitch in squares
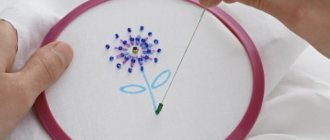
Cross stitch for beginners (a step-by-step description with photos is provided) should begin with children's patterns. There are no complex color transitions or difficult stitches to perform. As an example, you can consider a detailed master class on embroidering a flower according to a pattern.
Instructions:
- Smooth out the canvas. Determine the center and mark it with a dot.
- Marking with squares begins from the mark.
- Embroidery starts from the central square. A thread is inserted into the needle and secured on the wrong side.
- It is not necessary to embroider strictly in rows; you can try filling in fragments of each color separately.
- Having filled one section with crosses, you can begin to embroider another.
- First, the upper part of the design is embroidered, then the lower part.
- Finally, the embroidery is ironed from the reverse side.
If a water-soluble marker was used for marking, the canvas should be rinsed in cold water and dried, straightened out on a flat surface. When dense embroidery still seems difficult, it is better to use black and white outlines. There is no need to change the color of the thread or break it.
How to cross stitch
Cross stitch can be done in several ways . It all depends on the preferences of the needlewoman and what pattern she chose. Having mastered any of the techniques, you will be able to create paintings of any complexity embroidered using this technique. You can also place stitches in the opposite direction to the traditional one, it all depends on how comfortable it is for the craftswoman. Cross stitching is not difficult to do correctly.
Traditional method
With this technique, each cross is embroidered separately, one after the other. It is formed in stages by the lower and upper stitches.
- The thread is secured to the wrong side of the fabric. If the embroidery is carried out in 2 threads, secure it in a loop, and if in one - by inserting the thread through several weaves of warp threads.
- The first stitch is made by bringing the needle out to the front side in the lower left corner, then inserted back to the wrong side through the upper right.
- The second stitch is made similarly to the bottom one, but from the bottom right to the top left corner.
With this embroidery, the thread consumption is slightly higher than when working with the Danish technique.
Rows or Danish
With this method, a minimum number of threads , the speed of work is increased. This method is especially loved by embroiderers who create large paintings. In this case, first the lower half-crosses (stitches) are made along the entire length of their row, and on the way back to the starting point of the row they are closed with the upper stitches. Often in embroidery a half-cross is used, which is embroidered as one cross stitch. Large constrictions along the wrong side of the canvas should not be made, as they will appear on the front side. If the distance to the next element with the same thread color is more than 3 crosses of a different color, the thread is cut and re-fastened in a new place.
Cross stitch rules for beginners
In order for your embroidered work to look beautiful, you need to follow the following recommendations:
- Treat the edges of the canvas with PVA glue, non-woven fabric or hem them. This prevents it from fraying and gives the embroidery work a look.
- If the finished embroidery will be washed, then before starting work you need to make sure the quality of the thread coloring. Take 1 thread of each color and soak them in water heated to 95 degrees. Then run the wet floss over the white fabric. Poor quality material will leave colored marks. It is not recommended to use it for embroidery, as such threads will ruin the work.
- When embroidery threads are selected by hand, you need to straighten each skein and compare the shades, as well as the thickness of the threads. If you use different materials, the transition will be very noticeable in your work.
- To select a more accurate shade of floss, you need to pull out the threads and place them on the canvas, because in a bundle the color visually becomes brighter.
- If you don’t have a hoop at hand, you can embroider on vinyl canvas, which is rigid and resistant to deformation.
- The optimal length of the working thread is 45 cm. Too long will tangle, and a short thread will end quickly.
- If you plan to embroider on linen or cotton fabric, then it must be washed and ironed in advance. The fabric may shrink and the embroidery will be ruined.
- When embroidering on dark canvas, you can slightly increase its tension in the hoop. This will make the needle entry holes more visible.
Needlewomen recommend starting cross-stitching with ready-made creativity kits. They are accompanied by marked diagrams, threads of the desired colors and canvas.
When creating works with your own drawing, or using diagrams from the Internet, you need to follow simple recommendations and study all the basics in detail. Lessons with step-by-step descriptions and photographs can help with this.
Article design: Natalie Podolskaya
Where to start cross stitch (video)
Whatever you say, with all the huge assortment of accessories necessary for embroidery, which it is no longer a problem to buy at all (it will be a problem not to buy), the main thing is who has them in their hands. If you do needlework through force, when someone forces you, or realizing that it is “not yours,” you still stubbornly translate the material, it won’t do any good. If your soul doesn't lie, it's not worth suffering. Not everyone writes pictures or books, after all. But if embroidering gives you pleasure, then everything will work out, and the world will be illuminated by new flowers and landscapes that will come out of the hands of beautiful needlewomen.