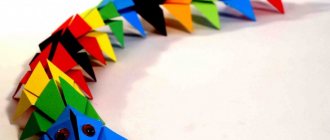
In this master class I will show you how to make a dragon from beads with your own hands. This bead craft will serve as an excellent decorative decoration for any interior, or will be suitable as an original gift. You can create very unusual things from it - from butterflies and flowers to unusual, fairy-tale creatures. For example, a dragon made of beads looks very attractive, and it is not difficult to create - you just need to find a suitable pattern and stock up on materials. Products made using the beading technique can serve as an original gift. It is only important to choose the appropriate theme for the product - and a surprise is guaranteed. Everyone will like this funny little dragon.
Scheme of weaving a volumetric dragon from beads
A step-by-step guide will make the task easier and help you make a beautiful thing. To get a cute little dragon, do the work using the parallel weaving method. When working with the torso, rows are performed from bottom to top, then vice versa. Carefully weaving the dragon with beads will help create volume without padding. The dragon's body and head will be voluminous, and the wings will be flat.
The weaving pattern presented below is not particularly complicated. You need to start making it from the head, and specifically from the nose, gradually moving to the body and tail. The dragon limbs should be done separately. In further work, the odd rows will act as the belly of your baby dragon. Even numbers represent the back. There are different patterns for figures, but with due diligence, even beginners can do it well. Take a closer look at working with the wings. The detail of the diagram will help to complete the details beautifully. First, a base is made for the wing, which should be carefully filled. The biggest problems can arise when hiding the wire ends, so it is better to immediately take one long one - then you will have to hide less.
Click to enlarge!
Preparing for work
Before you start creating a craft, you need to decide on the method of manufacturing the product and purchase the necessary materials. To work you will need:
- beads (transparent, blue and light blue);
- wire cutters;
- special wire for beading with a thickness of no more than 0.5 mm (3 m will be enough);
- round nose pliers.
To make a cute dragon, you need to work using the parallel weaving method. To create the body, rows need to be done from bottom to top, and after that - vice versa. If you do everything correctly, you will get a three-dimensional figure without stuffing. The body and head will be voluminous, and the wings will be flat. The general diagram of weaving a dragon from beads is shown in the picture:
Thanks to the step-by-step master class, making a dragon from beads according to the pattern will not be difficult even for beginners. Weaving should begin not from the head, but from the nose, smoothly moving to the body and tail.
The dragon's paws need to be made separately. The odd rows will act as the belly of the animal, and the even rows will form the back.
Particular attention should be paid to working with the wings. Detailed diagrams of each part will help you make them beautifully. First, a base is created for the wings, which is then carefully filled. The greatest difficulties can arise when trying to hide the ends of the wire, so it is better to immediately take a long piece so that you have to hide them less. Detailed diagrams of the tail and wings:
Head
To begin with, you will need to take a wire with a length of 120 cm. Place blue beads on one of the ends - 6 pieces. They must be placed in the middle of the wire. Pass the second end through three beads towards the first. You should end up with a wire loop.
We continue to weave the head. For this we will take beads a little larger in size, the color is at your discretion, you can even take red, then it will turn out very angry =). For the ears, place two light beads, one dark, three light, five darker, on the end of the wire in succession. Then skip the last one in the row and thread the next four with the end of the wire. After all the steps you should get a dragon's ear. The next step is to pick up a dark bead, then 2 light ones.
Pass the second end of the wire through this set: two light beads, one transparent, three light. Let's move on to making the second ear. Collect five transparent elements, then thread the base through four of them - as in the case of the first ear. Now insert the tip of the wire through the clear bead and two blue ones. The series has ended.
Let's move on to weaving the Dragon's legs
It is better to make the dragon's limbs using the flat weaving method. String a white bead onto the end of the wire to create a claw. Then blue beads are strung and the second end of the wire is threaded through it - in the same direction as the previous one. We assemble the elements like this: blue, white, then thread the wire through the blue one again. Next: a white bead, two blue ones, thread the end of the wire back and twist it around the white element. Make the required number of rows according to the diagram. The legs may seem long - we shorten them and thicken them, collecting beads into an accordion.
Animal paws
It's enough to just make the dragon's legs. They must be made using the flat weaving method. To do this, string a white bead onto one end of the wire, thereby marking the claw. Then string blue beads and thread the second tip of the wire through them in the same direction as the first. Assemble beads of different colors as follows:
- blue;
- white;
- Thread the wire through the blue one again.
After this, you need to string one transparent bead, two blue ones, then thread the end of the wire back and round it around the white bead. According to this pattern, it is necessary to weave the required number of rows. If the legs turn out to be too long, they can be shortened and thickened by gathering the beads with an accordion.
Wings
To make wings for a dragon, follow these steps: First, the base (skeleton) is created. It starts with the first of the “bones,” which should be the longest. We string 50 rows, each one bead wide. Then assemble the rows like an accordion. Then weave the next element in the same way - 31 rows of 1 bead. Connect the resulting parts. Take one end from each weave and create an additional row between them, 37 elements long.
If you are just starting to practice bead weaving, you should take a new piece of wire each time. Gradually you will get better and better and the need for this will no longer exist.
Next, we collect beads so as to create a long piece of 25 pieces. Then we weave 17 rows, each with 2 beads, and collect the results into an accordion. To continue working you will need to use one end of the wire. We put 6 beads on it, then thread it through the third and fourth of them.
Pass the end of the wire through the row again, directing it to the first and second beads - the direction should be the same as they were collected on the base. We pass the second end of the wire through the penultimate row. We continue weaving according to the diagram at the two ends of the wire. 19 rows must be completed, each with 2 beads. We connect all the resulting “bones”, removing all the extra ends. This is how you should assemble the frame of the dragon wing.
Next, in order to prevent “Tails,” we work with one end of the wire, collect 6 beads and pass the wire through the 3 and 4 collected beads, as in the photo.
We pass the end of the wire through the 1st and 2nd beads in the same direction as they were placed on the wire. It will look like 3 rows are woven (left photo below). Let's pass the second end of the wire through the penultimate row and now we will continue weaving according to the pattern at 2 ends of the wire. 19 rows of 2 beads each. The photo on the right shows what the end result will be.
Let's connect all the “bones” together, hiding all the extra ends of the wire. Now you can start decorating the wing. In general, according to the pattern that I took as the basis for my dragon, the wings are also woven on wire. But to be honest, I don't really like working with wire. At this stage, my wire began to break, bend... in general, nothing worked for me. And since I really wanted to finish weaving the dragon, I found another option. Fishing line and needle. Just as in the version with wire, hooking onto the wires between the rows of our “bones” on the fishing line, we will collect the amount of beads required according to the diagram and, grabbing the wire of the adjacent “bone”, we will collect the next row. It turns out faster and more convenient.
But the fishing line is soft and sagging rows cannot be avoided. Having walked a little with a needle and fishing line between the rows of the wing, we will fasten them together and we will get a smooth canvas without any sagging. Now, looking at my dragon, I’m already thinking that it would be easier to weave a wing with a mosaic...
Now the wing is ready. Let's do the second and start assembling. We will pass the ends of the paw wire through the body beads in the rows indicated in the diagram, secure the wire and hide the ends. All that remains is to secure the wings.
Assembly is done as follows: catching the edges of the product with wire, collect beads. Move to the adjacent structure, pick it up again and hook the end of the wire onto the next section. This must be continued until the entire structure is connected by beads. Complete both wings according to this pattern.
LiveInternetLiveInternet
Quote from Melissa
Read in full In your quotation book or community!
Little dragon made of beads. A simple diagram and master class
To work, we will need about 5 grams of brown and 2-3 grams of yellow beads No. 8, 130 cm of wire. We select the thickness so that the wire in 2 folds passes freely through the beads.
Place 2 brown beads in the middle of the wire. We put 3 brown beads on one end of the wire, pass the second end through the beads towards the first and tighten. The result is the second row. Let's collect 3 yellow beads and pass through them with the second end of the wire. We arrange the rows like an accordion, all odd rows are the belly of the dragon, and even rows are the back. We weave rows 4 and 5 according to the pattern.
In row 6 we will make horns for the dragon. To do this, put 2 brown beads on one end of the wire, then another one, placing it at a distance of 0.5-1 cm. Holding the bead, twist the wire, as in the photo below; let's collect one more brown bead. On the second side, we will similarly collect beads and make a horn, and we will pass the wire through the beads collected at the first end of the wire. The first end of the wire will also pass through the beads collected at the second end. You will get a regular row, only in 2 places will our horns stick out. At this stage, you can twist them a little more, now it is much more convenient to do this. Next, we continue weaving according to the pattern, alternating the rows of the abdomen and back.
Let's make the front legs of our little dragon. To do this, after the 18th row of our pattern, we put 8 beads on one end of the wire, pass through 5 beads in the opposite direction, leaving 3 beads free. Let's move the collected beads closer to the body and tighten. Now the paw is ready. Let's make another one on the second side. And then the usual row of the belly: we collect 5 yellow beads on one end of the wire coming from one foot, and with the second end of the wire we pass towards them through the collected beads. Gently tighten. The animal may already run away, hold tight
In the next row we will make wings. They are performed in the center of the back row, just like the horns. So I won’t write about the design of this back row. The wing itself is made with yellow beads according to the diagram. We collect 10 beads, pass the wire in the opposite direction through the 9th bead. It turns out to be such a sharp “tooth” on the wing. Let's collect 4 more beads and pass the wire through the 3rd one. Similarly, we will make the 3rd “tooth” on the wing.
After the 3rd clove, we will collect 6 more beads, and then we will go through the very first bead of the wing. Let's do the second wing in the same way. I came across a wire that was not very flexible and it broke at the wrong time. I had to hide the tips in the wing. If you look closely, you can see extra passages. I hope you have better luck and don’t have to bother with sealing up the extra ends, and the dragon will turn out neat and beautiful. The photo below shows how a row of backrests with woven wings is made.
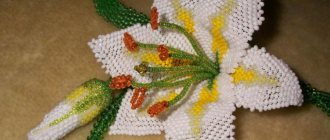
Then we continue weaving according to the pattern, not forgetting to make the hind legs. They are made exactly the same as the front ones. We no longer use yellow beads on the tail. The photo shows how the weaving is completed. Well, the new fairytale dragon made of beads is ready! What kind of dragon will you get?
SOURCE
Product assembly
To assemble the dragon, thread the ends of the wire from the paws through the beads on the body - the diagram shows the rows for this. Carefully secure everything and mask the ends. Now the toy is almost ready - all that remains is to attach the wings. At this stage, you can already hide one of the ends of the wire - only one of them will participate in further weaving. The beads are collected gradually, the wire clings alternately to the arc of the body and to the wing - the outermost “bone”.
For beginners, this scheme may seem complicated, but it is not. With some skill, you can even slightly change it and build another creature - a crocodile, a snake, a lizard. Before you make a beaded dragon, decide on your preferred colors. According to the scheme given above, work can be made in any color combination. For example, you can choose different shades of the same color, beads of similar tones, or contrasting options. You can also find micro lessons where you can familiarize yourself with other model options. A detailed guide will help you make a stunningly beautiful product without any problems.