The essence of art
The basis of needlework is gluing a selected pattern (special or regular napkins, newspaper or magazine paper, fabrics, other materials) onto the surface of almost any product with a dense texture. It is not allowed to use a porous plane. The background is usually painted white to preserve the brightness of the design.
Types of applied arts:
- The classic method of decoration involves gluing a picture onto a smooth surface. Various reliefs, slopes, and curves are excluded. After gluing the pattern, the product is treated with several layers of varnish. Then the errors are sanded down with sandpaper to a uniform coating. If necessary, techniques of coloring, tinting, and artificial aging of the material are used.
- The reverse decoupage method is used for glass surfaces. In this case, the image in the figure is glued face down on the reverse side, and the order of work is performed in the reverse order.
- Volumetric technique combines the techniques of artistic painting and sculptural creativity. In this case, a three-dimensional panorama is recreated on the surface of the object.
- The smoky pattern involves a complete combination of motifs on the background and image. As a result, the work is similar to the artist’s original painting.
The decopatch technique is reminiscent of a patchwork quilt, in which the storyline is created from multi-colored images of different sizes that are not connected by color or theme.
Despite the variety of techniques, needlework is quite accessible to beginners who have decided to take up decoupage for the first time.
Necessary tools and equipment
The word decoupage translated from French means “to cut,” so the work requires tools that allow you to cut out and paste the design onto the selected surface. You must first select the item to be decorated.
Basic tools:
- manicure scissors with blunt tips;
- glue brush, brushes for applying varnish to the surface;
- sponges to smooth the paper surface and remove folds;
- fine-grained sandpaper;
- PVA glue diluted with water;
- multi-colored paints, preferably acrylic;
- white primer. Acrylic or water-based paint is often used, which is diluted with water to the desired thickness;
- drawings for special purposes or independently selected.
To draw small details of the picture, thin natural bristle brushes are suitable. A ruler, eraser, and pencils may come in handy.
Master class on decoupage from napkins - tips for beginners
For needlework you need thin paper with a pattern printed on it. The following types of material are most often used:
- napkins made of three layers, of which only one with a printed pattern is used in work. The material has low strength (it breaks when stretched), so it is necessary to adapt to it when doing needlework. Napkins cost about 15-18 rubles per package;
- paper made from rice or mulberry fiber is less susceptible to deformation, but the cost of one element reaches 70 rubles;
- paper decoupage cards have low elasticity, so they use the material on a flat surface. Cards cost from 30 rubles.
In addition to special materials, pieces of wallpaper, glossy pictures cut out from newspapers and magazines, and thin multi-colored fabrics are used. Every home has raw materials for handicrafts.
Bottle decoupage for beginners
Decorating glass bottles, which have a smooth surface, is accessible to beginners in decoupage techniques. The result is a beautiful and original container for wine, which can be used for its intended purpose during special and festive events.
As a covering, special napkins are chosen, which are torn to better compose the pattern.
- Before starting work, you must completely remove the old label. To do this, soak the bottle in warm soapy water for 20-30 minutes. The surface is cleaned with a metal sponge to remove the adhesive layer. The dried product is thoroughly disinfected with acetone or alcohol liquid.
- 1-2 layers of acrylic paint are applied to the surface, after which has dried, all irregularities are processed with fine sandpaper. The pasted pattern looks brighter against a light background. If it is necessary to darken part of the surface, use appropriate paints, applied with a soft sponge.
- A suitable picture is cut out from a three-layer napkin for decoupage needlework using nail scissors. You can tear out the pattern. In this case, the edges are better connected. The prepared area on the bottle is carefully treated with glue. It is more convenient for beginners to use PVA diluted in half with water. A napkin fragment is glued onto a wet surface, fixing the image from the center to the edges.
- It is recommended to smooth the picture with a brush or sponge, “driving away” excess glue. Perform the procedure over the entire surface of the bottle, gluing the drawings in a certain order or randomly. The space between the stickers can be shaded with acrylic paints of a suitable color. It is allowed to add missing details with a thin brush.
- The finished drawing is covered with a layer of glue. When the product is completely dry, apply 1-3 layers of clear acrylic varnish on top. In this case, a second layer is applied after the previous one has completely dried. The souvenir is ready. If necessary, it can be washed with warm water.
Decoupage technique for beginners
The decoupage technique has its own basics that beginners need to know:
- You can glue the design in different ways, but it is best to smooth it out from the center to the edges. There should be no bubbles or folds initially.
- It is recommended to glue using the old proven method, that is, PVA glue. It will hold the drawing very tightly
IMPORTANT: Do not try to do everything quickly - it is very important to let the furniture dry thoroughly. And not with the help of a hairdryer, but in a natural way.
- Do not neglect acrylic paint - this way the image does not look alien, and the thing itself becomes more elegant. Apply paint preferably with a roller
Acrylic paint for decoupage is available in a wide range of shades
- How many layers of varnish should there be? As a rule, the best results are obtained when there are two layers. Moreover, before applying the second one, you must wait until the first one has dried.
IMPORTANT: Construction varnish will work, but acrylic varnish is preferable, as it is odorless and does not cause allergies.
- It is useful for beginners to know that acrylic paints and varnishes are washed off with plain water during the first 24 hours after work. Thus, not entirely successful work can be easily corrected
- Whatever the idea, the thing must go through the preparation stage. It includes cleansing both from various types of contaminants and dust.
IMPORTANT: It is advisable to use a solution containing alcohol, however, just a damp cloth will do.
As for the types of techniques, there are few of them:
- Classic is when the picture is attached using a dry, wet or hot method, and then varnished and then polished. You can also tint it
Decoupage boxes using classical techniques
- Artistic or smoky - looks like a real painting due to the successful combination of the pattern with the background
Decoupage of a chest of drawers using smoky technique
- Reverse - recommended for processing transparent surfaces
- Gluing occurs on the reverse side of the item being decorated.
- Decopatch or patchwork - in other words, similar to a patchwork quilt
IMPORTANT: Decopatch can be achieved on any materials, but beginners are recommended to use special paper.
Decoupage a suitcase using decopatch technique
- Volumetric - very similar to relief painting. Fabric and so-called structural paste will help with this. They also use a material that is very similar to eggshells
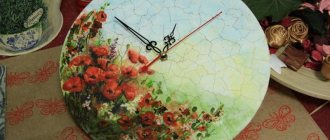
Decoupage plates using 3D technique
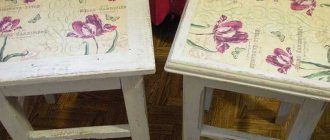
Furniture Conversion for Beginners
Decoupage needlework allows you to continue using old furniture, updating its appearance beyond recognition.
- It is first recommended to disassemble the products into separate fragments. It is advisable to replace or clean the fittings. Glass surfaces must be degreased by treating with alcohol and dishwashing detergent without dyes.
- Metal products must be cleaned with an acidic solution (use vinegar and water in equal proportions). Then the dirt is cleaned off with a wire brush.
- Wooden products are processed with fine sandpaper to smooth out all the unevenness as much as possible.
- A primer is applied to the treated surface; after complete drying, it is recommended to clean the surface with zero-grade sandpaper.
Pictures-images are attached to the furniture surface in various ways:
- With the standard technique, renovation materials are glued to the surface of furniture fragments. After drying, the area is covered with several layers of colorless varnish.
- Reverse decoupage extends to the enhancement of glass surfaces.
- The artistic technique gives the effect of volume to the picture. In this case, manual shading of the colored background is performed, combined with the finishing of parts of the pattern.
- Using fragments torn out with uneven edges for decoration. Napkins, material that imitates the appearance of plastic, and designer paper are used.
- The volumetric technique uses fragments of napkins to create a unique finished picture. After the surface has completely dried, fragments of the image are drawn more clearly.
If polished furniture is being updated, it is recommended to first completely remove the shiny layer with sandpaper.
Step-by-step instructions for decoupage on glass
Decoration on a transparent surface is performed on the outer or inner surface. For example, a vase or bottle is decorated on the outside, since a liquid is poured inside, long-term contact of which with the varnish is not desirable. If transparent dishes are used for eating, decoupage is applied on the opposite side so that microparticles of varnish do not get into the food.
If the working surface is smooth, you don’t have to prime it, but be sure to degrease it. If desired, the background is pre-applied with acrylic paints of the selected color.
Step-by-step instructions for decoupage needlework on glass:
- materials and necessary tools are laid out at the workplace;
- the image is cut out from a napkin, rice paper or printed on your own using waterproof paint;
- a future picture is planned on the glass, the location of the pattern is marked with a marker, so that if it moves, the picture can be returned to its intended place;
- the napkin is moistened in clean water and pasted onto a surface pre-lubricated with PVA glue, without waiting for the layer to dry;
- It is more convenient to straighten the napkin from the center to the edges in order to smooth out all the folds and level out air bubbles;
- carefully lubricate the product with glue diluted in half with water, applying a layer with a soft brush;
- when the adhesive base is completely dry, it is recommended to open the decoupage surface with varnish;
- The entire product is placed in the oven, gradually heating it to 150°C.
After complete cooling, the glass decorated object can be used.
The dishes can be given the appearance of historical antiquity by covering the surface with many cracks characteristic of antiques. The artificial aging technique is called craquelure.
A quick-drying varnish is applied to a not completely dry painted surface.
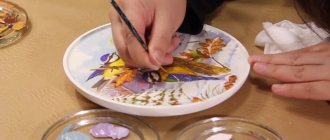
Decoupage for beginners from napkins: master class
The smooth ceramic surface of the plate is what beginner decoupage artists need. It is still not recommended to eat from such a plate, but as a decorative item it is incomparable. You will need to stock up:
1. Actually, with a plate 2. Alcohol napkin 3. Napkin for decoupage 4. Stationery file 5. Spray bottle with water 6. Glue 7. Acrylic varnish 8. Acrylic paints 9. Brush 10. Roller
Decorative plate made using decoupage method
Let's get started:
- First of all, we take alcohol wipes - they will perfectly degrease the plate. After it has dried thoroughly, you need to apply PVA to the entire surface. And leave it to dry again
- Now it's time to start making decoupage napkins. You need to carefully separate the first layer with the pattern from it.
IMPORTANT: Many beginners mistakenly believe that the drawing should look up after applying the napkin to the surface. In fact, it is applied with the front part precisely to the surface.
- Place the layer on the file so that it does not tear. Then spray it all with water from a spray bottle.
- That's all - the file can be applied to the surface of the plate
- Next, the roller smoothes it in the direction from the center to the edges. This must be done, otherwise excess moisture and air will interfere with the normal fastening of the image. However, you can do without a roller - a flat brush will serve as a good alternative
- Now the file is removed, and the remaining moisture is removed with an ordinary napkin. You can coat it with varnish or paint, glue three-dimensional elements from colored napkins
Decoupage from napkins can be supplemented with lace glued to the edges
Decoupage from napkins can be complemented with golden paint
Decoupage plates in Victorian style
Box decoupage
Decorating a wooden box in decoupage style allows you to create a unique souvenir with your own hands. Required for work:
- small box made of wood;
- It is advisable to dilute PVA glue in half with water;
- acrylic paints and varnish;
- scissors, brushes with natural bristles;
- napkins for decoupage.
The surface of the product should be painted with white paint 2-3 times, allowing it to dry thoroughly each time. Prepare applications from a single sheet or individual components.
The outside surface is covered with a layer of glue. Without waiting for it to dry, fragments of the picture are applied, carefully smoothing the pattern, protecting the product from forming wrinkles. The top of the box is coated with a layer of glue, after which it dries, the box is opened with 2-3 layers of acrylic varnish.
What you need for decoupage: tools, materials
- First of all, this is the object of decoupage itself. And it can be anything from furniture to small plates. Any surface is allowed - wood, glass, fabric, plastic, ceramics, porcelain, metal
IMPORTANT: It is better to take the first steps in decoupage on wooden surfaces.
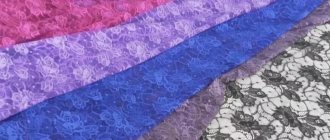
- Special napkins for decoupage with images of your choice
The choice of napkins for decoupage is quite large
- Cards for decoupage are a little more difficult to work with than with napkins, but the paint on such cards is of good quality. Beginners are recommended to purchase cards on rice paper - they are thin and durable, and do not stretch during work.
Fairy card for decoupage made from rice paper
- It is recommended to use scissors that are small in size and have rounded ends - this will guarantee that small parts can be cut out of thin paper without any problems
- The brush needs to be flat, the width is preferably within a centimeter or two - varnish and paint are applied simply perfectly with such tools. And keep in mind that the larger the item being processed, the larger the brush should be
This brush is what you need for decoupage
- Glue - as previously mentioned, PVA is still desirable, although for fun you can purchase a special glue for decoupage
IMPORTANT: Usually, after gluing a picture, craftsmen treat it with paints and varnish. Sometimes the adhesive properties of the varnish are enough, but it’s better to keep PVA with you.
- Varnish - and again a flight of fancy is guaranteed. Matte, glossy, acrylic, diamond glitter effect and craquelure - a choice for every taste. The advantages of decoupage varnishes are that they are odorless, do not turn yellow over time and, which is important during the work process, do not allow brush marks on the surface
- Sandpaper is an indispensable assistant in preparing the surface for work.
- It is also advisable to purchase a primer, as it perfectly levels the surface and helps reduce paint costs. The best choice is an acrylic non-toxic water-based primer
It’s difficult to do decoupage without a primer
Watch processing
The wooden base of the watch dial is usually renewed. First you need to disassemble the product into its components, separating the arrows and numbers.
The work is divided into 2 stages: decorating the circle along which the hands move, and the outer contour of the clock. The first part of the decoupage is updating the arrow space:
- a circle is cut out of paper;
- the dial is cleaned and puttied, if necessary;
- napkins or rice paper are glued onto the prepared plane, the pattern of which is made in a circle of paper;
- the picture is glued to the base, leveling the plane;
- the top of the napkin is treated with glue;
- after the workpiece has dried, the middle of the dial is covered with a paper circle, and the outer part is decorated;
- a structural paste mixed with acrylic paint of the desired color is applied to the surface;
- the finished surface is varnished 1-2 times and lightly sanded after drying;
- The watch is assembled by inserting the hands and numbers into place.
Decoupage bottles for beginners
Will come in handy:
1. Bottle 2. Acrylic paints and varnishes, special varnish for decoupage 3. Sketch 4. Alcohol 5. Picture of your choice 6. Sponge or sponge. Preferably several pieces - depending on the number of expected colors
These amazing bottles can be created using decoupage
Let's get started:
- Using alcohol, as in the case of a plate, we degrease the surface. The surface dries out
- Acrylic paint needs to be poured into some container.
IMPORTANT: Paint is applied to the bottle not with a brush, but with a sponge or sponge using blotting movements.
- Do not skip this point under any circumstances! It is important to wait until each layer of paint is completely dry. It is recommended to apply two of them per bottle
- Fill a deep container with water and dip the sketch into it.
- Try on how the size of the sketch fits the bottle
- The glue should be diluted with water in a ratio of 2 to 3.
- Apply this sticky mixture to the bottle with a brush. Choose directions from the center to the edges
- It is recommended to use a sponge dipped in paint to go over the part of the bottle not occupied by the picture. This way you can achieve smooth transitions
- Dry the bottle thoroughly - only then can you apply a second coat of paint. And let it dry again
- Now you need to coat the product with varnish for durability. You can tie a ribbon around the neck
Decoupage bottles can be anything you want
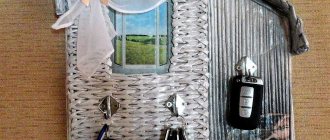
How to decorate a tea house
Using the example of decoupage of a decorative house “May Roses” for tea bags, the processing of hard-to-reach places is practiced:
- It is first recommended to finish the surface of the house with a primer, dry it, sand small irregularities with sandpaper, and cover the working surface of the product with white acrylic paint in several layers. It is recommended to maintain one direction of strokes.
- The corners, the plane under the roof canopy, and the figured arch must be painted with background green paint.
- For more comfortable work, a napkin with images of pink bouquets must be ironed with a hot iron and then lightly sprayed with aerosol quick-drying varnish.
- Paper moistened with water is placed on the file so that the image hangs slightly over the edge.
- Smooth out the glued pattern to completely eliminate wrinkles and bubbles.
- Cover the surface of the house and the lid, painted green, with several layers of acrylic varnish.
As a decoration, place a butterfly figurine on the roof, and glue a decorative bouquet of roses above the arch.
With each completed job, the master’s qualifications increase. Perseverance and a flight of imagination help make your home beautiful and cozy.
Main stages of work
As with any process, for decoration using the decoupage technique, there are main stages of work, which are almost always performed in a certain sequence:
- Cleaning the decoration item from any contaminants (label, plaque) using an alcohol-containing solution.
- Coating the surface with acrylic varnish.
- Applying a layer of primer or white acrylic paint.
- Re-coating with acrylic varnish.
- Grinding.
- Attaching a picture.
- Another layer of acrylic varnish.
- The process of artistic underpainting, applying the main background, and so on.
- Coating with acrylic varnish in several layers.
- Decorating, creating various effects (for example, the effect of cracks is achieved by applying a layer of craquelure)
- Applying the last layer of acrylic varnish.
When working using the reverse decoupage technique, the order of some steps changes: first, craquelure is applied (if necessary), then an image is attached, then decoration occurs using patterns, stamps, and the main background.