0
51697
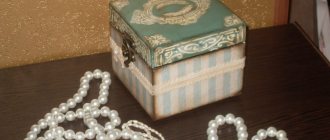
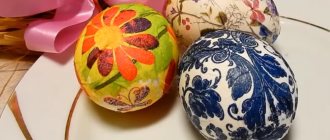
Decoupage is an easy and inexpensive way to update furniture. An old cabinet, bureau or sideboard, decorated using a similar technique, becomes a real work of art, turning from a standard model into a real designer masterpiece. For restoration, you can use various materials - fabric, newspaper and magazine clippings, special paper. We invite you to learn an interesting and simple DIY decoupage of furniture with napkins, which is not difficult to do.
Simple wood decoupage for beginners: napkins and general instructions
The decoupage technique appeared in the 17th century. This type of decoration has become so popular today due to its ease of execution. There are many types of materials that decorate, as well as a wide variety of materials used to produce decoupage.
Creative work begins with choosing the item that will be decorated. When it comes to wood, the choice is very large: from boxes and trays to pieces of furniture.
Before starting work, beginners need to familiarize themselves with the instructions and general rules that apply to all decoupage techniques. You should also prepare the necessary tools and materials, without which high-quality decoration will be impossible.
Before you start decoupage, you should definitely prepare the wooden surface
What you should pay attention to:
- Preparing the wooden surface;
- Study of issues related to sealing joints and irregularities;
- Selecting the type and quality of surface primer.
Preparatory work is extremely important, since the quality of the decorated surface depends on it. All stages of work must be performed carefully, in the exact sequence. Do not neglect the advice of professionals - small nuances can sometimes significantly simplify your work.
Choice of motives
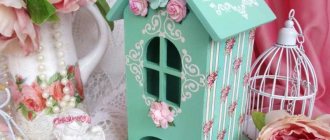
There are a great many motives for decoupage, all of them are limited by the personal preferences of the author and the degree of integration of the decorated object into the surrounding interior. You can cut out a beautiful pattern from paper napkins, decorate the selected surface with old photographs, use pictures from magazines, or make a printout with the design you like on a laser printer. Furniture modules of standard models, decorated using the decoupage technique, will immediately attract everyone's attention and add zest and exclusivity to the interior decoration of your home.
Since decoupage is most often used to restore worn out, problem areas on furniture, bright and ultra-modern designs are rarely used as a basis for decoration.
The most common subjects used for decoupage furniture are:
- floral motifs;
- pastoral drawings;
- country style;
- fruits, berries, vines;
- angels, religious subjects;
- birds;
- Japanese, Asian motifs;
- old postcards or photographs.
It is precisely such scenes that fit most organically into the interior of the beloved Provence, ethnic or always relevant classic style.
How to make decoupage from napkins on wood: preparation of material
After choosing a wooden object for decoupage, you should begin to directly clean it from possible dirt and dust. Typically, such items are wiped with damp microfiber. You should pay attention to the presence of wood defects that may affect the quality of decorative work.
If the item being decorated has chips or cracks. They must be sealed with construction putty.
Putty can be purchased at any hardware store. Instructions for preparing the solution can be read on the packaging or on the Internet. Apply the putty to the wooden surface using a spatula. After this procedure, it is better to treat the surface with sandpaper.
In order for the napkin to stick evenly, it is necessary to thoroughly clean the wooden surface of dirt.
Instructions for processing wooden surfaces:
- Apply wood primer. The material can be purchased at a construction or art store. The surface is primed with a sponge or brush. After finishing the work, the wood should dry well.
- Sand the primed surface. To do this, use sandpaper.
- Wipe the product from dust using a damp cloth.
The surface can be primed twice. This will lead to a stronger effect: the tree will become perfectly straight. If the master is satisfied with the initial result, re-application of primer and sanding are not necessary.
Decoupage pencil case
A can of tea, coffee or cocoa will make a very convenient pencil case for pencils or brushes. Choose a suitable napkin of such a size that the design is visible and not cut off. Paint the jar with thick white paint or seal it with regular PVA paper. Cut the required piece of napkin and divide it into layers - you will only need the top one with the pattern.
Coat the jar with glue in an even layer and carefully wrap it in a napkin, expelling air bubbles and straightening the folds. Trim off all excess, fold the edges and coat the top with PVA again. Add color, decorations and other little things, and when everything is dry, coat it with clear varnish for safety.
Selecting materials for decoupage on wood with napkins: master class
Before you begin the decorating process, you need to prepare a set of materials and tools. Napkins for decoupage can be very diverse: this concerns sizes, paper quality, multi-layering and decor. It is important to decide on the design in advance.
The blank for decoupage must be prepared separately - the wood must be carefully processed.
Materials and tools can be purchased at specialized craft stores. Many materials can be found in art stores. It is important to remember that the quality of the work performed depends on the quality of the auxiliary materials.
When doing decoupage, experienced craftswomen recommend preparing materials and tools in advance so as not to be distracted during the work process.
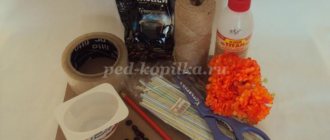
Necessary materials:
- Wooden blank;
- Napkins;
- Scissors;
- Tassels;
- Acrylic paints;
- PVA glue;
- Varnish for decoupage.
To decorate wood with napkins, you can also use special decorative glue and acrylic varnish. Three-layer napkins are most suitable for decoupage. The images on them can be very different.
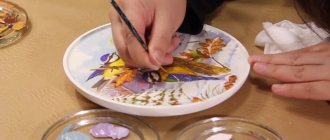
Decoupage plates
Take a regular old plate and sand it on all sides, then degrease it with alcohol and open it with primer. Paint the surface with acrylic paint using a small sponge. Don't forget about the reverse side so that it is beautiful too.
Choose a napkin, separate the top layer with the pattern, coat it with PVA, apply it and smooth out all the irregularities with a brush with glue. Make a relief in a circle using the crumpled inner layer of the same napkin. Immediately coat each new part with glue - let it dry right in the process.
Once everything is dry, add color using colored acrylic paints and brushes. You can add a little shine with a wide brush using sweeping movements along the edges. Open the plate with clear varnish and attach a loop to the back to hang it on the wall.
Doing it right: decoupage wood with napkins step by step
Work on decorating wood must be done carefully and in accordance with the instructions. At the same time, you should not be afraid to work with paper - even if the napkins are torn, they can easily be glued to the product and the “breakage” will not be noticeable. To get started, separate the top layer from three-layer napkins.
The napkins are cut into pieces of the required size. If there are unnecessary inscriptions or numbers on the napkin, they can be cut out or carefully torn out by hand.
After the fragments are ready, they need to be “tried on” to the object being decorated. This will help avoid problems with decoupage. After this, you can start gluing the napkins.
A soft brush is indispensable when decoupage, which helps to quickly apply glue to the surface.
Step-by-step actions:
- Using a soft brush, apply glue to the napkins.
- The fragment is applied to the product.
- Leave the product to dry for half an hour.
- Dry the surface with a hairdryer.
- Paint over it with acrylic paint of a suitable color.
The final stage is coating the product with acrylic varnish. The varnish can be applied in one or two layers. Decoupage with napkins is very easy to do - even a beginner can handle this task.
Features of the technology
The principle of the decoupage technique is inherent in the name itself. From French, the word “decoupage” is translated precisely as “clippings”. This is the basic principle of work - cutting out various images and gluing them on the surface. A wide variety of items can be decoupled. From large furniture elements - cabinet fronts, table tops, doors, to the smallest things - vases, candles, original jewelry or boxes. When decoupage, everything depends on your imagination and patience.
The history of decoupage dates back to the 12th century in China. The heyday of decoration in this style came in the 17th century, when European aristocrats began to fill their homes with expensive Asian household items, and Venetian craftsmen, sensing good earnings, learned to add exotic notes to the products of local furniture makers.
In our time of faceless industrialization and templates, any hand made products are in great demand and interest among creative people. Therefore, decoupage is again at the peak of popularity.
The most common today are six main types of decoupage techniques:
- classic (direct) decoupage is a basic method in which a picture is glued or implanted onto a prepared surface. If you want to decorate a product made of wood, MDF or chipboard, the surface must first be sanded and primed. This method is good for beginner needlewomen, as it will help you understand the basic techniques of decoupage;
- reverse decoupage - used for decorating transparent surfaces - dishes, glass, mirrors. It differs from the direct one in the sequence of actions - first, a base (napkin, clipping or any other picture) is applied to the reverse side, and then the surface is primed and varnished;
- artistic (smoky) decoupage is shading and drawing of the background, which allows you to effectively emphasize all the outlines and nuances of the design. Using smoky decoupage, you can create a full-fledged picture with shadows, volumes and accents, as well as hide small flaws in the work. A colored haze is created using pastels or acrylic paints, after which the surface is coated with matte varnish;
- deco patch – paper patchwork. This version of decoupage uses pictures that have been previously torn into arbitrary pieces. This style of decoupage is also great for beginners, as it does not require any special skills and is based only on the artistic intentions of the author. The flaps can be glued overlapping or almost end-to-end, leaving a thin border. Thus, the item can be given a touch of artificial antiquity or create the effect of natural stone. Do not forget to cover the finished work with a protective layer of acrylic varnish;
- volumetric – a modern version of the technique, which creates pictures with a fashionable 3D effect. This is a technique for experienced craftsmen; it is better for beginners to start with simpler work. For three-dimensional paintings you will need modeling paste, special art gels, putty, and a base. The base is pieces of fabric, multi-layer napkins, or you can use decoupage cards or special Sospeso Trasparente equipment.
Working in the 3D decoupage technique requires a lot of experience and accuracy, but the result is very impressive and unusual.
Decoupage: implanting a napkin into wood
There is a decoupage technique called “implanting a napkin” into wood. This technique is slightly different from simply covering a wooden product with napkins. It requires more serious preparation and elaboration of details. To “implant” the napkin you will need a fairly large amount of materials.
This technique involves the use of wax, acrylic primer, acrylic paint, varnish, glue, brushes, napkins, tape, wax polishing cloth, sandpaper.
Before starting the main work, the tree must be carefully prepared. For this purpose, the technique of burning and brushing is used. You can find instructions for this technique on the Internet.
The technique of “implanting a napkin” into wood allows you to make a beautiful, original and unique product
How to perform “implantation” step by step:
- Rub dark wax into the wood.
- Sand the wooden surface.
- Apply the napkins and let them dry.
- Rub the surface of the product with dark wax.
- Coat the product with varnish.
This technique requires careful execution of the work. The appearance of the surface to be decorated depends on this. Master classes on “implanting” napkins into wood can be found on specialized websites.
Procedure
The decoupage technique requires extreme accuracy and patience. Each of the stages is important. The slightest carelessness or excessive haste will not have the best effect on the result. Strict adherence to the recommendations below will facilitate and speed up the decorating process. The sequence of actions is as follows:
The first step is to thoroughly prepare the wooden surface of the product. Processing is carried out using sandpaper or a special sanding machine along the wood fibers. The previous coating must be completely removed. This also applies to the glossy surface when working with laminated wood. There is no point in trying to apply an image on top of the varnish. There should be no splinters, debris or dirt left behind. It is recommended to cover chips and deep cracks with putty. A couple of layers of water-based primer are applied to a cleaned and level surface. It will fill the existing pores so that the paint and varnish are then evenly distributed over the surface. Only after complete drying (as a rule, the time is indicated on the packaging) can you proceed to the next stage.
Using a brush or roller (depending on the area), a decorative coating is applied to the prepared base. Use acrylic paint or decorative wood glaze. This will ensure better adhesion of the application to the surface, as well as better adhesion during further varnishing. For color saturation, two layers are allowed.
Now contrasting paint is applied, for example, white decorative and protective impregnation. The surface must be blotted immediately with a sponge so that the darker shade of the lower layer can appear. If you do this with a slightly damp sponge, the underlying color will be more visible.
Now you will need the selected decorative napkins. They are laid out on a prepared and painted piece of furniture in such a way as to create an interesting and aesthetic composition. Experienced decorators recommend using three-layer napkins. In this case, it is necessary to slowly and carefully separate the two snow-white unnecessary layers.
The napkin must be placed on the object to be decorated and the file in the form of a layer with the pattern down. Next, you need to lightly wet the entire area of the design and carefully level the surface with a brush so that the print sticks properly to the substrate. There should be no creases. Excess water must be blotted off, after which you can make applications in the selected places. As soon as the drawing has set on the wood, the file can be removed.
After complete drying (a hairdryer can speed up the process), it is necessary to cover the wooden object with a couple of layers of varnish for reliable fixation and protection from damage. To give the product the effect of noble antiquity, you can use golden varnish, which will give the wood an interesting platinum-colored sheen.
Instead of using a file, you can simply glue the design to the base. To do this, you need to prepare an adhesive solution by mixing 1:1 PVA glue with water. There are also special adhesive compositions for decoupage on sale. It is advisable to use a soft brush when applying.
When applying paint, varnish, or glue, it is important to ensure that there are no smudges or other defects that will spoil the attractiveness of the item and negate all efforts. After drying, sanding can be done if necessary.
It is obvious that anyone can master this skill. Special skills are not required here, nor are professional expensive materials. What you can’t do without is patience and a sense of taste.
There are quite a lot of design options using the decoupage technique, from the simplest and minimalist to the most non-standard. An alternative to various prints and designs can be black and white photographs or newspaper clippings, which will give the item special significance and uniqueness. The retro style is generally popular in this technique.
Use your imagination, but don’t forget that everything in the interior should be harmonious. Even a small thing can both decorate the environment and introduce dissonance. With your own hands you can create a small masterpiece that will add variety to your usual interior or become an original gift for a loved one.
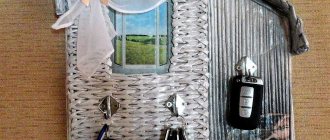
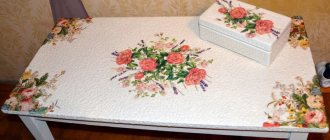
Decoupage chest of drawers
To freshen up an old, boring chest of drawers to suit your interior, remove all the paint, sand and prime it. You will need napkins or cards for decoupage, PVA, whitewash, sandpaper, sponge and roller. Apply white paint to the entire surface in an even layer using a roller. While the paint is drying, cut out patterns from the napkins and separate them into layers.
Sand the surface according to the location of the wood fibers to create the effect of aged furniture. Coat the parts with PVA napkins and put them in place, then coat them with glue again. Complete them with swirls and designs using colored acrylic paints and fine brushes. Paint the entire cabinet with 2-3 coats of clear varnish so that it lasts for years.