Wedding scrapbook.
You always want to keep happy wedding moments in your memory for as long as possible. But time flies, exciting emotions and memories are gradually displaced by the everyday bustle of family life. Wedding photographs collected in an album are a universal remedy that can revive emotions, remind of the crazy love that united the spouses and resolve all family disagreements.
A wedding album using the scrapbooking technique will excite, charge with warmth and positivity for many years to come to everyone who touches its heavy pages.
This will be an album where each page will be meaningful and exciting, and not just a series of beautiful photographs. The owner of the album will be able to share her happiness on its pages, add things and comments that are dear to her heart.
You will see how interesting it is to create beautiful things using the scrapbooking technique with your own hands, especially if it involves photo fragments from the happiest moments of your life.
What could a wedding album look like?
Before you make a scrapbooking album with your own hands, you must imagine what it will look like, in what style, its color, design and volume. And of course, be prepared to spend a lot of time and effort. It is preferable, but not necessary, that the style of the wedding album echo the style of the wedding itself. But in principle, imagination should never be limited.
Albums for newlyweds
[Show slideshow]
The wedding album should mainly show tenderness and romance. They are perfectly conveyed by retro and vintage style, shabby chic and European style. More daring, but no less romantic - American style and media mix.
Nothing can decorate and enrich your wedding album like scrapbooking. The scrapbooking technique allows you to combine photographs with a variety of accessories - postcards, letters, clippings, drawings, appliqués. Involves the use of various decor, fabrics, flowers, decorations, three-dimensional figures.
Scrapbooking loves texture and volume. Therefore, it can combine various techniques, such as decoupage, quilling, origami, embroidery, drawing, etc.
So feel free to use all your skills by creating a wedding album with your own hands.
Wedding album
Scrapbook in different styles
Wedding album scrapbooking, ideas.
The handmade technique that came to us from Europe amazes with its magnificence and variety of styles. Thanks to different directions, everyone has the opportunity to create their own unique product. The choice of scrapbooking style largely depends on the mood that you would like to convey.
Retro
The main idea of the retro style is that, looking at it, you get the feeling that it was made many years ago. This means that antique details are needed. For example, ribbons, buttons, images of rare vehicles. Be sure to print your photos in black and white. In this case, they will fit perfectly into the very idea of your wedding album.
The advantage of execution in such a concept will be the difference in time. The 60s and 70s, the time of the dudes, are also considered retro. Retro is recognized both in the 18th century and in the classical era. Therefore, you need to decide based on the mood that you would like to lay the foundation for. If this is a holiday, a riot of colors, eternal youth and joy of life, then think about the era of dudes.
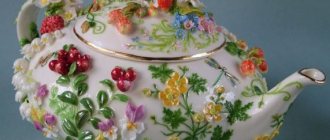
Shabby chic
One of the most popular styles of performance because it is incredibly airy, gentle and romantic. Shabby chic is created using muted shades. For example, pastel pink, green, soft blue.
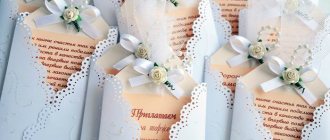
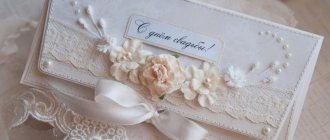
Interesting to know Ideas for beautiful and original design of wedding invitations
Shabby chic fits perfectly into the wedding theme. It abounds in flowers, birds, delicate shades, butterflies. In addition, the great advantage of this style is the ease of its execution. To do this, you will only need to purchase in the store the necessary elements that are attached to the glue gun.
Mix media
A special type of art that requires knowledge of special techniques and skills. With the help of mix media, it is possible to mix several styles at once that suit each other.
For example, a synthesis of shabby chic with modern art is used. The media mix allows you to do everything. The only thing is that you need to carefully ensure that there is no overload.
Vintage
A style that so many people love in interior and clothing design. With the help of vintage, you can recreate the special atmosphere of the past. As a rule, it is closely associated with bohemian luxury and pomp.
This technique uses brooches, the synthesis of several fabrics, lace, ruffles, newspaper clippings and rust embossing, which conveys the special atmosphere of that time.
American style
A classic type of scrapbooking. It is considered one of the most common due to its simplicity. The style originates precisely from America, where needlewomen began to make similar albums. They contain not only photographs, but also pieces of fabric, pieces of a tie, and a flower from a bouquet.
For such things, special gatefold envelopes are made. The technology does not have clear regulations regarding photographs. This can be either one picture on a spread, or several pictures at once.
European style
Wedding album design, scrapbooking.
If the newlyweds see their album as restrained, elegant and laconic, then their idea is best realized in European style. This is the direction in which there are no unnecessary decorative elements.
Additional figures, pieces of fabric - all this is practically absent from the album. The main point is given to the paper on which the photographs are attached. It is presented in color and colorful versions.
Interesting to know Design technique for wedding decoupage
Necessary preparations
Let's move on to the list of tools and materials that will be needed in the work:
- Cardboard, watercolor paper.
- Scissors, glue, double-sided tape.
- Lace, ribbons, bows, threads.
- Beads, rhinestones, sparkles, stones.
- Eyelets, rings, hole punch.
- Stencils, stamps, curly stickers.
- Cover fabric.
- “Love” accessories: flowers, heart, doves, rings, angels, etc.
All the necessary materials and decor
There are probably a bunch of little things left over from the wedding that will come in handy for scrapbooking. These are bows, ribbons, possibly artificial flowers, elements of outfits, veils, wedding invitations, business cards, wrapping paper, maybe earrings, necklaces, etc.
Necessary materials
Master class on scrapbooking
- We make the album entirely with our own hands. We calculate the sheet format according to the available photographs. We place one photo on each sheet and design it. We connect sheets of watercolor paper in pairs with glue for density. We decorate the sheets with gold patterns using stencils. Along the edges of the sheets we paint with a dry brush with gold.
- Separately cut out the backgrounds for the photographs. We apply fragments of the pattern onto them using the same stencils. In the corners of these sheets we make slots for photos. We glue the backing sheets onto the sheets and place the pictures on them.
- Around the backing you can stick lace, satin ribbon, sparkles, flowers. But before you decorate the pictures. Think over the design. The photographs themselves should not be lost in the diversity.
- For the cover, cut out thick cardboard to a size slightly larger than the album sheets. We cover it with velvet or other beautiful material. You can decorate it with the inscription “Happiest Day”, “Happy Wedding Day”. You can put these inscriptions with small pearls or beads. On the other cover, make a beautiful applique of white flowers with your own hands or stretch a strip of beautiful lace.
- For volume, padding polyester sheets can be placed under the velvet.
- We collect all the details, as shown in the video master class. To do this, we make holes in the sheets and covers with a hole punch, and insert rings into them. This connection makes it possible to freely open the album without damaging the sheets and photographs.
Video gallery
Photo gallery
The best posts
- Master class on beaded guitar: weaving pattern for beginners
- Straw weaving for beginners: master class with photos and videos
- Curtains-partitions for rooms as a way of zoning
- Crafts for the garden: metal figurines and decor - 3 master classes and 15 photos
- Plasticine crafts for children on glass with photos and videos
- Decorative flower beds: ideas for planting greenery in the garden (44 photos)
- How to make a corner shelf with your own hands?
- Valve repair
Selection of photos
At this stage, you need to decide what you want to dedicate your album to. Portrait photographs or group photographs, photographs from the registry office or a cheerful feast, and perhaps even devote more than half of the album to the honeymoon.
You can put the photos that are dearest to your heart in your wedding album.
You may want to post photos without people to create a certain mood. For example, a photo of the bride’s bouquet, a photo of that sunny day, how the banquet hall was decorated, or remarkable places that you visited that day.
The main rule for making an album interesting is to follow the chronological order of events. Even if many years later you flip through the album, your memory will reconstruct in detail all the events of that day.
Selection of pictures
To design the pages of an album, you need to take it with all responsibility, because this is a memory for a lifetime that will be looked at by friends, relatives, and, over time, children and grandchildren.
Before you start:
- ask your guests to send photos and videos that they shot, because one photographer is simply not able to capture all the bright moments of your celebration;
- using framing, select only the best, cutting off the unnecessary;
- to design thematic pages, such as “Dressing the Bride”, “Ransom”, “First Dance”, “Marriage Ceremony” and others, sort the pictures according to the chosen topic;
- sort the pictures in chronological order if you decide to prefer this design option;
- if there is a lot in the album, then you can start it with photos of the bachelor and bachelorette parties;
- be sure to allocate space for close-up shots of the bride’s bouquet, groom’s boutonniere, and original gifts;
- When printing photos, opt for high-quality archival matte paper (glossy paper, although more attractive, is less practical and may leave marks on it.
Editor's choice: Wedding vows - how to compose, how to format, how to read
Page designs
Page design is only a matter of your imagination. There are no restrictions in materials, colors and shapes.
You just have to remember about the aesthetic beauty and harmony that should be present in any creation created.
It is recommended to stick to one chosen style and color scheme. Do not overload the page with decor, but only “support” the photo with decorations.
The decoration is simple and tasteful
It is better to use cardboard for the substrate, because the substrate must withstand many layers and volumetric elements that will be glued to it.
And for this, anything that beautifully decorates the page is suitable: paper with an ornament, openwork paper patterns, lace, napkins, stamps, appliqués, paints, journaling.
There can be one photo on a page, or there can be several, in the form of a collage or layered on top of one another. You can sew together several photos with an accordion or fold them into a stylized pocket. The main thing is that the photos on the page are dedicated to one moment or person.
The pages with a surprise are an original invention. Made in the form of an opening postcard, where the photo will be hidden inside under a lock. Or, for example, a photo designed in the form of a pocket containing one or more photographs.
Photo Mounts
You can attach photos to a sheet in different ways.
- Simple – stick with glue or double-sided tape;
- Creative - sew on with thread;
- Mobile - use paper clips or staples for fastening;
- The classic one is to insert photos into the corners glued to the page. They can be made of paper, or cut from fabric or lace.
- Practical - invest in transparent plastic pockets.
Mounting options for photos
[Show slideshow]
Inscriptions
The final most emotional touch of your work will be the inscriptions. You can, of course, do without them, but imagine how fun and exciting it will be after a while to read humorous comments on the photo, or descriptions of your feelings experienced at the moment the frame was taken. Beautiful toasts or wishes left by your loved ones and friends. After all, over time, details are erased from memory, and this is the kind of album that is designed to preserve the most precious memories.
Inscriptions for newlyweds
[Show slideshow]
In addition, notes can be an element of page decor, that is, they can be in the form of an appliqué, a cutout from a postcard, or they can be embroidered or typed.
Album selection
When buying an album, you need to decide which of the ones offered will be the best option for you. The range of modern photo albums is quite diverse. They are:
- round;
- square;
- oval;
- thick;
- thin;
- large format and small;
- with adhesive-based pages;
- with pockets.
An album with an adhesive base will allow you to place photographs of different formats on the page, but over time the photographs in such an album may turn yellow. Albums with pockets require photos of a certain size, but they have a special place for comments.
Editor's Choice: 6 Years Wedding Anniversary
Cover
Of course, special attention must be paid to the cover to make the wedding album a real family heirloom. To make the cover look presentable and luxurious, fabric or leather is often used for its design. Silk, satin or velvet are ideal.
Original album cover
For the base, thick cardboard is used, several layers can be used, which is sheathed or covered with fabric. For massiveness and volume, a sheet of padding polyester of the same size is glued to the cardboard.
The cover size should be slightly larger than the main sheets.
As standard, the cover has a window for the main photo. In this case, you need to cut out the required size in all elements of the cover and then glue it together. Glue a photograph or other thematic picture to the back of the cover and cover the entire side with beautiful paper.
Next, the cover can be decorated with voluminous flowers made of paper or fabric, ribbons, hearts, and a string of pearls. You can add a three-dimensional inscription using a ready-made chipboard, for example, “Our wedding.” Write the names of the newlyweds and the wedding date on the cover.
An original addition to the cover can be an improvised clasp, for example, a metal hook, a vintage clasp, a tongue with a button or a button, or simply a cover tied with a ribbon.
Now all that remains is to fasten everything together.
Album cover
DIY wedding album using scrapbooking technique
Traditionally, preparations for a wedding begin long before the celebration itself, so that the bride and groom have the opportunity to choose outfits, decorations for the banquet hall, think over the style of the photo shoot (you can find an idea for it in our thematic article “Wedding Photo Shoot”) and the future wedding photo album. In addition to inscriptions and photographs, it should contain original decorative elements - only then can the young people safely say that this is their first joint creation.
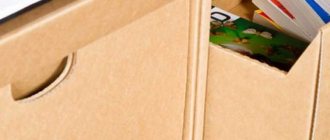
Today we will make your first photo album together using scrapbooking technique. For example, let's take this cute checkbook of wishes - this basis is quite suitable for a small and easy-to-make wedding photo album if you are doing such a craft for the first time.
For work we will need:
- A large sheet or several sheets of Majestic chocolate-colored designer cardboard (you can buy it in the online store, color to your liking).
- Scissors, a simple pencil and a ruler for cutting.
- Scoring board.
- Binding cardboard 1 mm thick.
- Masking tape.
- Cover fabric of your choice and fabric glue.
- Magnetic buttons.
- The marker is black.
- Decorative elements to taste.
Manufacturing process
- From a sheet of Majestic cardboard we cut out the facing pages of the future album - this is our basis. Dimensions:
- Inner spread – 12cm x 17cm + 0.7cm +17cm. That is, you should get a blank 12 cm high with two pages of 17 cm each and a binding of 0.7 cm (in the photo this is the bottom blank).
- Average spread – 12cm x 17cm + 3x0.7cm + 17cm.
- The main spread, which is attached to the cover, is 12cm x 17cm + 5x0.7cm +17cm + 3.5cm +3.5cm. Thus, you get a blank with a final binding size of 5x0.7 cm, and 3.5 cm is the part opposite to the binding, and the remaining 3.5 cm will serve as the closing part for installing snap fasteners.
- The second step is scoring the binding. For this we need a special board.
- Now we are assembling the entire structure of our future album. To do this, we bend our blanks along the punched lines and carefully glue them together, starting from the central spread of the album. You will end up with a bare mini-album, which will later need to be dressed up with a cover.
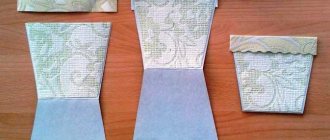
- Cutting out the cover is an equally important moment, as it requires accuracy and precise measurements. For the cover, you can take special binding cardboard 1 mm thick. We cut it out like this: 2 sheets measuring 12.5 cm x 17.3 cm and 12.5 cm x 3.2 cm, and 2 more strips of 12.5 cm x 3.5 cm. To make it convenient for you to work, glue the parts with masking tape at a distance of 3-4 mm from each other.
- Now let's install the magnetic buttons. To do this, you need to mark the puncture sites for the fasteners on the workpiece strap that will be closed. At the same distance from the edge we mark places for two more buttons.
At your request, the buttons can be located next to or at a distance from each other. - We fix the buttons on the back side and install washers (they are sold complete with buttons of the appropriate size).
- We glue our design with a cover already covered with fabric. You need to start gluing from the back of the cover and the strap on which the buttons are located. The front part remains untouched at this stage. We install the second halves on the cover, tinting the centers of the installed buttons with a marker, thus making marks on the cover.
- We attach the buttons to the cover and glue the structure completely. Our wedding photo album using scrapbooking technique is almost ready. All you have to do is design the face of the cover and the inner sheets where the photos will be located.
Following the example of such a checkbook, cut out and glue cardboard photo frames, decorate the cover with beads, satin flowers, figures of birds, angels, hearts - whatever your soul desires.
If you don’t like such pockets for photos, you can simply glue them to sheets and make beautiful inscriptions.
Here are a few more original ideas for decorating a wedding album using the DIY scrapbooking technique.
We hope you have already taken note of several ideas we have proposed for your wedding masterpiece!