The popularity of vintage products is currently quite high. You can make an antique-looking item yourself using the now popular decoupage technique using a technique such as craquelure. This is a special technology with which characteristic cracks of different sizes are made on the surfaces of products. The art of aging an object with craquelure in decoupage will be the topic of today’s article. A review of the theoretical part and practical examples will help you understand the technology of using two types of craquelure compositions.
Using craquelure in decoupage
Cracks are a kind of witness to the passage of time. They appear on centuries-old objects and give them a special charm. Craquelure helps to create such a highlight on the surface of products. Moreover, absolutely various things from dishes to furniture are suitable for aging.
The main requirement when creating craquelure is accuracy and patience.
At first, craftswomen who are fond of the decoupage technique are engaged in the consistent decoration of different surfaces with plot motifs obtained from napkins. Over time, having already gained experience, needlewomen are in search of new ideas and technologies that could complement their decoupage. In this case, a craquelure master class is the first thing you should pay attention to.
Craquelure is made using a special composition. In addition, there are two ways to create cracks on products:
- One-step;
- Two-step.
Already from the names themselves it becomes clear that the craquelure process in the first case takes place in one stage, and in the second, you need to perform a certain sequence of actions in several steps.
One-component craquelure is applied between two layers of paint, which as a result crack along the top layer. In this case, the pictures from the napkin are glued last, and the cracks are visible through it.
The two-component composition is applied in several layers, using different types of compositions. To figure out how to make one-step and two-step craquelure yourself, it is best to use a step-by-step master class, supported by photo and video materials.
Water base (Maymeri 753-754)
Water-based craquelure is the most convenient for working with decoupage technique. They also create a thin network of cracks on the object, reminiscent of a cobweb. All components are applied very easily, cracks appear quickly enough, the compositions are washed off hands and tools with warm water and soap.
- Use a flat synthetic brush to apply the first step. Leave for at least half an hour. It does not dry out completely and always remains sticky.
- When the first step is completely clear and tacky, apply the second. Work with a dry, flat, clean brush. You can pour a small puddle and smooth it over the entire surface. Rub it in until it starts to dry out and your fingers stop slipping. Leave the work to dry. After an hour, you will notice thin and transparent cracks appear on the surface.
- To highlight cracks, rub in pigment (pastel, shadow) of the desired shade with a dry cloth or brush.
- Rinse the second step under running warm water and after drying from the water, secure the work with acrylic varnish.
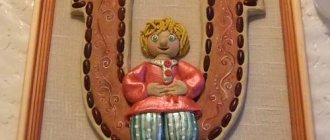
Photo master class on decoupage of a key holder with a door using a pair of craquelure Maymeri 753-754
Depending on how you dry the craquelure varnish, the type of resulting cracks directly depends. Using a hairdryer will speed up drying, but the mesh will be very thin and fine. It is better to leave the work to dry naturally.
Features of one-step craquelure
One-step craquelure is an interesting and simple technology that can be used to artificially age objects with different surfaces in a fairly short period of time. In addition, this is quite a fascinating process, which is a pleasure to watch.
Read
Basics of decoupage on wooden surfaces and planks in a detailed master class
This type of craquelure forms cracks in the paint layer, through which the paint of the underlying layer is visible. To create it, one composition is used.
When working with one-component craquelure, it is applied between two layers of paint. To do this, take a workpiece that must first be primed. After this, cover the surface with paint of the shade that will result in your cracks. The paint is applied to the area where you want to create craquelure. Next, craquelure varnish is applied to the dried surface and dried. At this stage, you should not completely dry the layer. At the next stage, paint of a base tone is applied, and then the drawings are glued, with which the processes of patination and varnishing can be carried out.
Thus, the craquelure varnish cracks the paint of the base shade, and the previous layer of paint can be seen in the resulting cracks.
When creating a one-step craquelure, some of its features should be taken into account. You should pay special attention to them to obtain the desired result.
So, the rules for creating one-component craquelure:
- You should not apply paint in the same area (if using a brush), as the formation of cracks can begin instantly;
- The process of applying paint must be carried out with careful movements in one even layer to avoid gaps in the paint located below;
- The top layer should have a natural appearance with the effect of cracked paint that has formed naturally over time.
In terms of consistency, the base color paint should resemble thin sour cream. To obtain spectacular cracks, the surface is covered with an even layer, taking into account the same pressure on the brush. If you press the brush hard, the layering will be thin, which will lead to the formation of long and elongated cracks.
In addition, if you decide to supplement your decoupage with craquelure, you should take a responsible approach to choosing the composition.
The one-step craquelure from . With its help, graceful cracks appear on the surface of objects that are pleasing to the eye. But all these are conventions. Each craftswoman, in the course of practical work, selects for herself a certain composition that suits her best for a particular process.
Thus, we can draw the following conclusions that in order to obtain cracks that will have a presentable appearance, you need:
- Select a high-quality one-step composition for craquelure;
- Apply paint to the surface in an even layer;
- Monitor the degree of drying;
- Use paint of medium consistency.
Read
Decoupage motifs and pictures in shabby chic style and black and white
Please note that it is better for you to use artistic paints in your work, because construction paints are not always capable of cracking.
Another very important point when working with one-step craquelure is the question of its coating. In order to cover the finished work with craquelure, it is necessary to use varnishes with a non-aqueous base. If you decide to apply several layers of acrylic-based varnish to the product, taking into account the accuracy of all actions performed, your product will retain its presentable appearance. But three or more layers can eventually crack and your cracks will become cloudy.
And remember that you shouldn’t add craquelure to every piece of work. It all depends on the nature of the chosen picture. Cracks enhance old vintage motifs and may look out of place on modern subjects.
Reasons for the different sizes and nature of cracks in one-component craquelure
The size and nature of cracks in crackle depends on many factors. If you apply it with a sponge, you will get a chaotic mesh, if you apply it with a brush, then the cracks will seem to “go” in the direction of the brush stroke.
The size of cracks in craquelure depends on the thickness of the varnish layer and on the time after which paint will be applied to it ( the damper the craquelure and the thicker the applied layer, the larger, rougher and deeper the crack, respectively, the thinner the layer and the more dried it is, the smaller and more delicate it turns out to be a network of cracks ).
It is advisable to use only acrylic matte paints . For example, glossy and metallic paints are very heavy and the varnish simply under their weight may not show cracks.
After finishing work, brushes and sponges should be rinsed with water.
Basic technology for creating two-step craquelure
Most often, in combination with the decoupage technique, two-step craquelure is used. And before we consider the master class, let's look at some of its features.
We can briefly define two-phase craquelure. This technology reveals cracks in the varnish layer based on the finished image.
The difference between one-step and two-step formulations is obvious. It is based on the use of two components, applied one after the other. The top layer cracks, and for their better appearance, various grouts are additionally used.
As a basic scheme of actions on the basis of which two-step craquelure is made, the following can be distinguished:
- At the first stage, the product is decoupaged, varnished and dried;
- Next, as a first step, the first craquelure composition is applied;
- Partial drying of the product;
- Applying the next step. At this stage, cracks will begin to appear;
- Applying crack grout;
- Coating an object with varnish for finishing work.
As a grout, various products are used, for example, pastels, dry shadows, butim, patina or oil-based paints.
Please note that when working with two-step craquelure, you must first study everything about what properties it has.
The most popular two-step craquelure is from Maymeri, as well as Akrilanas and Ars-hobby. But again, everything is learned by comparison. Everyone chooses a composition that is convenient for themselves. And remember the harmonious combination of decoupage and craquelure. This way you can get a product with a characteristic vintage image with an additional touch of antiquity.
Read
The use of rice paper in decoupage products
Description and technique of applying craquelure varnishes for decoupage
All craquelure varnishes used in the decoupage technique are divided into two main types: one-step or one-component and two-step or two-component. The only difference between the two types of varnish is that one varnish is a one-component one, applied between layers of paint. A two-component varnish is applied to a layer of shellac varnish, then it is grouted, the image is glued and a layer of regular varnish follows.
Sometimes two-component varnishes are applied directly to the prepared and glued design, thus creating an antique effect.
Two-component varnish using the craquelure technique should be applied to the product with a soft brush in a thin layer
Such varnishes can be bought in specialized stores; there are quite a few types of them, so before purchasing it is worth familiarizing yourself with their range and characteristics.
To apply such varnishes correctly, you should adhere to a certain technique:
- A one-component varnish is applied in a thin layer to the prepared surface using a soft kolin brush. Apply so that no brush marks remain, after which you must wait until the layer dries.
- When applying two-component varnish, be aware that it can be very sticky, so you should not touch it with your fingers to avoid leaving fingerprints and also be careful not to get dust on it. The second layer is applied after the first is almost dry, and after that the product should dry, in accordance with the instructions for this type of varnish.
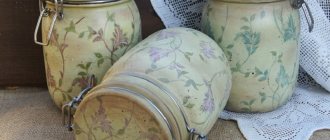
Master class on decoupage with two-step craquelure
This master class will help you imagine firsthand how decoupage of a product occurs using the two-step craquelure technique. A flask with glasses is used as a decorated item.
So, in order to repeat this master class, you need to prepare:
- blanks in the form of a flask with glasses;
- a napkin with a suitable motif;
- light acrylic paint;
- decoupage glue;
- two-step craquelure;
- bitumen patina;
- tassels.
The master class begins with surface preparation. To do this, several layers of light-colored paint are applied to the flask and glasses, which in this case will also serve as a primer. After this, the products are left to dry.
Next you need to cut out fragments from the napkin. Usually in decoupage they use three layers of napkins, so you need to separate the first one, with a colored image. This picture is glued to the flask and the bottom of the glasses. To accurately replicate the shape of the glasses, you need to make cuts on the napkin, as in the photo, which are carefully connected to each other during the gluing process. Then, the glued products are left to dry.
The next step, the master class will demonstrate the creation of two-step craquelure.
So, using a brush, cover the objects with a fairly dense layer in the first step. After this, you need to wait a while until your fingers begin to come off the object. For each manufacturer, this time can vary between sixty and eighty minutes. Please note that products should dry naturally.
Now, the second step is applied. You can coat the product yourself. So you will feel all the areas you were able to cover. After this, the items are thoroughly dried.
During the drying process, the necessary cracks will begin to form. They can be of different sizes. It depends on what layers you applied in the second step. A thicker layer underlies the formation of larger cracks. To reveal cracks, the presented master class uses bitumen patina as a grout. In addition, you can use pastel or oil-based paint. Excess patina can be removed with a cloth and solvent.
The final stage will be coating the dried products with several layers of acrylic-based varnish.
This concludes the master class. See what wonderful themed items you can make with your own hands using decoupage and two-step craquelure composition.
Video: How to properly apply craquelure varnish
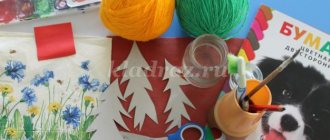
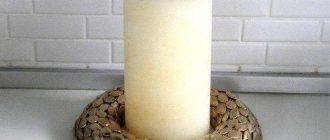
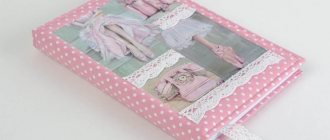
The following master class uses a specific example to show exactly how to decoupage a small wooden box using the “craquelure” technique. We will prepare the following materials for work:
- small wooden decorative box;
- water-based acrylic paints;
- craquelure varnish;
- decoupage glue;
- three-layer decoupage napkins;
- sponge;
- stencils;
- synthetic brushes and scissors.
We begin decoupaging the box by covering its slats with gold-colored acrylic paint. Apply the paint using a thin brush. Dry the slats with a hairdryer and rinse the brush with water, because acrylic paints are water-based. After this, you need to start coating with craquelure. For this purpose, you can use the same synthetic brush that we used to paint the slats. Apply the varnish in one layer of medium thickness and dry slightly, but not completely. While the varnish is drying, we will prime a thin plywood board, which we will need to decorate the box, with white acrylic art primer. After this, we leave the soil to dry and cut out the desired picture from a decoupage napkin.
We separate the top layer of paint and glue it to the board with glue, smoothing the napkin with a brush. We will also cover the top layer of the napkin with decoupage glue and set the board aside.
It takes forty minutes for the craquelure varnish to dry, after which you can begin painting the box with contrasting dark acrylic paint. It is advisable to do this very quickly, without repeating strokes as much as possible. The thicker the top contrasting layer of paint, the larger the network of cracks. The cracking process will continue until the paint dries. We paint the sides of the box with brown paint, and then draw gold patterns on them using a stencil. The final touch to decoupage the box is gluing a plywood sign to it.
How to use craquelure varnish for decoupage
Crackle is one of the techniques that imitates the aging of something, for example, in order to make beautiful boxes or to process a plate or several plates. For this, a variety of varnishes are used, which come in two types: one-component and two-component. Each varnish uses its own technique and a specific varnish. It is impossible to replace a special varnish for the crackle technique with a regular one, since it will not give the required effect.
After applying all the necessary layers in craquelure, the top of the product is coated with aqua varnish
But, despite this, when using varnishes, there are certain tricks:
- Paint should be applied to the surface, wait until it dries, and then varnish should be applied to it, which should be applied with a wide soft brush, and those who are starting to practice this technique for the first time should use a foam sponge.
- After the first layer has dried, apply a second layer if the varnish is two-component. If the varnish is one-component, then one layer is enough, but applied thickly. The varnish can be applied in different directions with a brush or sponge, creating different patterns.
In detail: decoupage with craquelure step by step (photo examples)
Similar articles
- How to paint the walls in the kitchen - painting the walls in the kitchen + photo
Whether we like it or not, the time for renovations in the apartment is inevitably approaching, when we roll up our sleeves and have to work hard. Someone has a gap between... - Basics of painting technology: photos, video instructions, stages of execution and necessary tools
Preface When performing painting work, especially on those surfaces that are not intended for subsequent finishing, special… - DIY relief plaster + photo
The so-called relief plaster is a rather effective method of covering surfaces, providing unique textures and colors…
What is craquelure?
Craquelure is a term used in painting. These are fairly small cracks that form on the surface of paintings over time. You could say it's a sign of old age. Previously, masters tried to avoid this sign in every possible way. They tried to create such paint compositions that by all means could delay the appearance of unfortunate cracks. But everything in the world is changing. And now craquelure is no longer a sign of old age, but a distinctive feature of antiquity. Modern artists create it purposefully in order to give things the effect of luxurious antiquity.
A huge number of special tools and materials have been created for this. Aging not only souvenirs, but also furniture, as well as doors and windows, has become fashionable. What can I say? Even a special plaster has been created to reproduce craquelure on walls or ceilings. Craquelure is often used in decoupage. A master class on the topic of creating such things will be discussed in this article.
Two-component craquelure
The two-component product is used, unlike the previous one, after painting and gluing the drawings. Already from its name it is clear that it consists of two substances. The first is applied to the surface of the object to be decorated in a thin layer and dried to a sticky state. Then it is covered with a second substance on top. Moreover, the thicker the second layer, the larger the cracks that are formed as a result. All resulting cracks are rubbed using various materials. The most commonly used are gold and silver powders. But there are also multi-colored powder pigments.
And finally -
A note that applies to any of the related techniques. When using one-component craquelure, ask yourself the question: why am I using it here? What meaning does it carry? Is it possible to do without him, won’t he be superfluous at this job?
I will not post here a photograph of one work found on the Internet, I will only describe it in words, but I think you can imagine it perfectly: CRAQUELURE UNDER DOGS (one-step craquelure, a motif with dogs is pasted on top of it, and brown cracks are visible through the dogs) . The question immediately arises: what did the author want to say with these brown cracks under the unfortunate puppies?