Materials and tools needed for wood decoupage
For decoupage on wood, you need to prepare several tools that will help you decorate the desired element. All of them are presented in stationery stores or handicraft stores, which are found in every city.
- The first thing that is required is a wooden blank or a prepared wooden surface of a table or other thing.
- You also need paper napkins with a design you like, which will be transferred to the tree. In specialized craft stores you can find blanks on rice paper. They undergo special processing and are easier to work with.
- Brushes are needed to smooth and adhere the napkins. It is recommended to choose wide options with artificial pile.
- A special primer for wooden surfaces is also required.
- The obtained result is fixed with varnish intended for decoupage. There are several options with a glossy or matte effect.
You should also prepare:
- wood putty;
- rags;
- PVA glue;
- sponges;
- containers for glue, varnish;
- scissors;
- sandpaper.
Decoupage on wood for beginners
Beginners are recommended to perform decoupage on small, flat surfaces. It's easier to use small applications. When everything works out well, you can begin more complex work.
- You need to start the process by removing old paint from the surface and sanding it. This can be done using sandpaper or a grinding machine. You can get the desired result only if you work with even wood.
- After this you need to apply primer. This can be acrylic paint or a special primer, which is sold in construction stores. The primer is applied with a brush or sponge. To continue working, you should wait until it dries completely.
- The next step is preparing the drawing. The necessary parts are cut out of a napkin and laid out on the surface. This will help avoid design errors.
- Apply glue under the napkins using a brush. Starting from the center of the image, the napkin is smoothed out so that there are no unevenness. You need to let the glue dry well, about thirty minutes. Then you should dry the decoupage with a hairdryer. After this, the surface with the pattern is painted with acrylic paint of a suitable shade.
- The final stage is applying varnish. It can be applied in one or two layers, depending on preference. It adds shine to the product and protects against various external influences.
Master classes on furniture renovation
Decorating wooden and plastic surfaces with your own hands is a great option to bring old furniture back to life. With the help of creative ideas and a minimal set of materials and tools, you can create a chic antique dining nook in Provence style, update your desk and do other useful things. There are many interesting master classes that will allow you to fill your home with real antique masterpieces, teach you how to work with napkins, lace, and how to properly restore and treat cabinets, wardrobes, and shelves with a special varnish.
Decoupage the dining table with colored wallpaper
First of all, you need to decide on the type of equipment and prepare the table for decoration. To make decoupage last longer and make it easier to apply, remove any remaining paint from the surfaces, clean it with sandpaper, and cover it with putty. We take measurements of furniture and cut off the amount of wallpaper required for work.
After the preparatory work is completed, we apply a piece of wallpaper with the image facing up to the surface of the table. Before fixing, the picture must be carefully smoothed, all creases and unevenness removed. Mix glue with water and spread it over the entire area of the paper element.
A thick piece of wallpaper should be well moistened, so the glue should be applied thickly in several layers. When the material becomes pliable, turn it over and smooth out the folds with a roller. Leave it alone for a day to dry. After a radical renovation, the countertop in the kitchen remains to be varnished. If the edges are uneven, they should be sanded.
Coffee table decorations
You can decorate a coffee table using several techniques. The most popular is decoupage with napkins. Specialty paper products can be purchased with a variety of motifs (vintage, holiday themed, animals, nature, big cities, etc.). It can also be clippings from newspapers, magazines, geographical maps, photographs. But it should be taken into account that it is more difficult to work with dense material; it must be thinned before fixing. Decorating a coffee table using the napkin technique takes place in several stages:
- We decide on the color scheme. For a heavily damaged countertop, it is better to use light shades.
- We prepare tools and consumables.
- We disassemble the table, remove the tabletop, unscrew the legs.
- We clean all wooden parts from old varnish and paint using sandpaper. If the table is made of plastic, it is enough to degrease it with alcohol.
- We treat cracks and joints with putty. Let it dry for several hours.
- We carry out priming and painting of surfaces.
- We lay out decorative cards or individual pieces of napkins on oilcloth and carefully smooth them under running water.
- Lubricate the tabletop with glue and lay out the pictures.
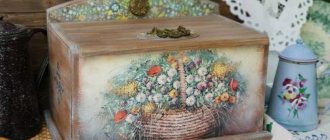
Restoring a chest of drawers with napkins
A very popular option for restoring an antique chest of drawers in the shabby chic style. This is simultaneous decoration and aging. Simple decoupage using napkins can be done on any painted surface, but it is better if it is white, pink, light green, blue or beige.
Before work, a piece of furniture must be prepared - remove varnish and paint, since old polish and impregnation will not allow you to obtain the expected effect and will significantly reduce the service life of the decor. The cleaned surface must be primed.
The first step is to paint the old chest of drawers. It can be acrylic paint or based on colored chalk. Experienced craftsmen recommend using the second option, since, in their opinion, it lies more evenly. You can work with a wide brush or roller.
While the chest of drawers or bedside table is drying, prepare napkins for decoupage. You can replace thin pictures with photographs and various printouts. Now we carry out artificial aging. Use a metal scraper or sandpaper to randomly wipe off the paint. Then we coat the pictures with glue and apply them to the wood. Using a small brush with glue, we expel the air and strengthen the edges. When all the napkins are glued, all that remains is to polish the chest of drawers with varnish.
Decoupage kitchen set
You can make a real exclusive out of a standard kitchen set using pieces of unnecessary wallpaper. We choose the type of decoupage and determine the area to be processed. Is a continuous coating necessary or can you get by with partial application of elements to the facades?
We begin work by preparing the surfaces. While the soil dries, we think over the composition, give the napkins the desired size and shape. You can make straight lines or cut off the edges with special scissors. We saturate the drawings with glue and apply them to the surface to be decorated. Smooth the picture with a brush, remove the bubbles. To update, you can use whole pieces of wallpaper. The final touch is varnishing. The strengthening solution should be applied over the entire area of the facades, and not just in the picture.
Decoupage stool
You can decorate the stool in any style. The main thing is that the updated design fits into the overall interior of the room. This could be Provence, vintage, newspaper technique or the use of fabric. You should start with a careful selection of colors. It should not differ from the main background of the walls, headset or other large furniture. Now we print out napkins with the selected pattern.
If there are cracks or burrs on the stool, they must be removed and smoothed with sandpaper. If the pictures are transparent, the product can be painted. We wet the napkins with water, cover them with glue and apply them to the surface. If you decide to use wallpaper, then you should keep it in the liquid longer, about 1 minute. Use a roller or brush to push out the air. Finally we coat it with varnish.
You can achieve the most harmonious combination if you decoupage the stool with wallpaper that covers the walls in the room.
Using decoupage to decorate a bed
When entering a child's or adult's bedroom, the first thing that catches your eye is the bed, namely its headboard. This part of the bed will be the most successful for applying decor. Various inscriptions, flowers, and vintage drawings are suitable for decoupage. The baby's bed will be decorated with fairy-tale characters, animals, fish, and pieces of fabric. All decor should be matched to the main colors of the interior. You should also understand that all wooden surfaces of the bed are polished and will have to be removed. You can get the original scuffed effect if you listen to the following recommendations when decorating:
- A darker paint must be applied over the primer in the area of joints, sides, and relief patterns;
- Then these areas are rubbed with paraffin and painted in a light tone;
- After the top layer has dried, it is partially removed;
- The surface is covered with napkins and varnished.
Cabinet decoupage ideas
You can transform a closet of any size using a variety of available tools. Napkins, colored pictures, wallpaper and other paper elements are suitable. A piece of furniture can be given an aged look using the craquelure technique.
Napkins are the most convenient material for decoupage. Thanks to thinner paper, you can achieve imperceptible transitions on the overall surface. It is better to choose sophisticated, romantic images in Provence and vintage style. Pastel colors will create an unimaginable atmosphere of comfort and tranquility.
Decoupage with wallpaper on a large surface of a cabinet or whatnot is best done by novice craftsmen. You can completely cover all the parts or use them on the ledges of facades. The only difficulty is the need to remove the outdated varnish coating. In addition to paper, you can use fabric elements, beads, sequins and other decor.
Decoupage furniture with fabric
A new interesting direction is decoupage of furniture with fabric. When working, you can use any combination, combine different themes and colors. You will need all kinds of scraps, glue, varnish, sponge and brushes.
Regular PVA glue is applied to the cleaned furniture, and textile pieces are treated with a special adhesive composition. The flaps are applied to the surface and pressed with a sponge. If these are round legs, the material must be wound in a spiral. When all the pieces are glued, they should be sprayed with additional glue through a spray bottle. The final touch is coating with clear varnish.
How to do decoupage on wood correctly, features
All stages of decoupage must be carried out carefully, without haste. Trying to speed up the process can simply ruin everything, it’s better to be patient.
- One of the important points is the preparation of the wooden surface. It should be even and smooth. If there are gaps and cracks, they need to be puttied. There should be no varnish or paint on the surface; they interfere with the quality of the application.
- It is better to tear out the design rather than cut it out with scissors. Cropped edges are more difficult to blend into the overall background.
- If the drawing is taken from a napkin, you need to separate the layer on which it is depicted most clearly. It should be remembered that the material is very thin and can be easily damaged. Therefore, all movements must be smooth.
We offer you to watch step-by-step wood decoupage master classes with photos at home.
Be sure to read our article Decoupage for Beginners, which contains interesting and useful tips.
Decoupage wooden table
Decoupage gives any furniture, especially children's furniture, a unique originality. In addition, this technique helps restore old furniture - see how a new children's chair was made from an old chair using the decoupage technique. This master class will also discuss in detail the process of restoring an old product and turning it into a new one - we will decoupage a children's wooden table.
Was:
Became:
To work you will need:
- coating on the floor against paint smudges;
- sandpaper No. 5 and No. 0 (if possible, it is better to use a sanding machine);
- white acrylic paint;
- clear acrylic varnish;
- color scheme of a suitable shade;
- masking tape 2-3 cm wide;
- container with a lid of at least 0.5 l;
- stick for stirring paint;
- brush 4 cm;
- napkins with a pattern;
- spray bottle with water;
- one sheet of transparent file;
- PVA glue;
- small capacity.
Work process
If the table is made of solid birch, then there is no need to sand it after the first coat of paint. Pine furniture needs to be treated with sandpaper to remove raised lint after painting.
- It is better to lay newspaper or film under the table. It is necessary to carefully sand it, paying special attention to its surface.
- After there are no traces of varnish and paint left on the table, the surface must be degreased. Wash with soap and let the table dry.
- It is necessary to cover the entire table with acrylic paint, carefully going through hard-to-reach places with a brush. The inside of the countertop should also be painted. The paint should dry for the number of hours indicated on the package. It has a short period of complete hardening.
- Then again, without touching the areas that will be a different color, apply another 2-3 layers of paint with drying intervals in between. Let this be the tabletop on which the composition will appear in the future.
- Only after the surface of the table has completely dried, it is necessary to seal the joints of the places that will come into contact with the colored paint with molar tape.
- Pour white paint into a separate sealable container. Stirring constantly, add color in a thin stream, achieving the desired shade. There should be enough colored paint to paint the table legs in three layers.
- It is better to choose napkins for decoupage without perforations and blurred contours: the brighter, the more contrast they will look against a white background.
- It is necessary to cut out combinations from napkins, try them on and place them on the table. It is worth being careful when separating the top layer of paper (there are 3 in total).
- Place the top layer of tissue paper on a single sheet of file, face down. Moisten generously through a spray bottle. The paper must be completely submerged in water. Remove air bubbles and drain excess water. Turn it over and place it on the desired place on the table. Carefully remove the file. Repeat this with all the cut out parts.
- As the composition dries, dilute PVA glue and water in a small container in a 1:1 ratio. Using your finger, after dipping it into the composition, use tapping movements to process all the drawings on the table, not forgetting the edges. The layer should be very thin so that there are no yellow spots left later.
- After everything has dried, you need to cover the entire table with acrylic varnish: the table top three times, the legs twice.
In this way, you can not only decoupage a wooden table, but also decorate various wooden furniture.
Decoupage of a wooden comb, master class with photos
Inspiration is a great power! The power that helps create the most incredible things. Every needlewoman is capable of decorating absolutely any thing that falls into her hands. For example, an ordinary, unremarkable wooden comb, decorated using the decoupage technique, easily turns into a wonderful, individual item in a few hours.
To work you will need:
- wooden comb;
- a napkin with your favorite design or motifs;
- PVA glue;
- medium-sized soft brush;
- acrylic paints;
- small sponge for washing dishes.
Work process
It is advisable to choose a bright, comfortable place for creativity. It is advisable to cover the working surface with oilcloth or file. First of all, remove the part with teeth from the comb. The surface of the comb can be degreased using pharmaceutical alcohol, but this is not necessary.
Then we proceed to prepare the napkin elements with which we will work. They need to be cut out carefully. For decoupage, only the top layer with a pattern is needed.
Then the most interesting thing happens. We place the element on the surface of the comb and very slowly, gently begin to coat it with glue from top to bottom. This must be done extremely carefully and accurately. The pattern should lie flat, without air bubbles or tears, and without stretching too much.
Glue the remaining parts in the same way. The smaller the piece, the easier it is to apply. For beginners and those who do decoupage for the first time, it is better to work with small motifs. It is difficult to glue a napkin in full size, and even more so on such a figured surface.
Then leave the comb to dry thoroughly in a dry, ventilated, but draft-free place. Once it dries, it will become faded.
Now you can start painting. We apply acrylic paint to the entire surface, painting a little on the edges of the motifs.
Don't forget to paint the other side as well.
The finishing touch is the application of gold and silver glitter. Apply acrylic paint to a piece of sponge and lightly blot all surfaces.
We repeat the procedure on the other side. Acrylic dries instantly. We put back the part with the teeth and – that’s it, the decoupage is ready!
So easily and quickly anyone can make a wonderful thing for themselves or as a gift to a friend. This is the final decoupage of a wooden comb:
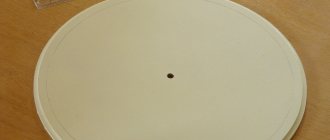
Decorating a cutting board
Any thing decorated according to your own design is always interesting and unique. And if this item performs an important function, its significance increases several times. One side of the cutting board is used for cutting food, and the other is decorated at your discretion with the image you like.
What is needed for work:
- acrylic paints white and golden;
- PVA glue;
- gouache in yellow and green shades;
- surface coating varnish, 2 napkins;
- brush, foam rubber, sandpaper.
Preliminary work boils down to the following:
- Preparing the board involves sanding its surface with fine sandpaper. After cleaning, apply white acrylic paint to the place where the napkin will be located. As soon as the board dries, you need to clean the surface again to completely get rid of roughness.
- Prepare 2 napkins, layer them, taking the top layer with the pattern. Tear out the ornament you like with your hands and place it on the surface of the board, after moistening it with water. Place a piece of napkin and carefully smooth the edges.
- Dilute PVA glue by half with water and apply to a napkin. Dilute white paint with yellow gouache and decorate the background with it. (It turns out a creamy shade).
- Dilute white with green and draw a frame.
- Dip a piece of foam rubber into golden paint and paint the unpainted part of the board along the previously drawn frame.
- Treat the surface with clear wood varnish.
To master the technique of decoupaging a kitchen board, you can practice on special wooden blanks, shoe boxes, and glassware. To prevent the paper drawing from merging with the base, try to choose monochromatic, desaturated tones for this part.
Decoupage of a wooden board with one-step craquelure, master class with photos
Every housewife has an assortment of cutting boards in her kitchen. Nevertheless, a board will never be superfluous in the household, especially if it is made by yourself. Any housewife will be happy with such a gift. In this master class we will tell you how to decorate a wooden board, namely, we will make decoupage on wood with one-step craquelure.
To work you will need:
- board;
- sandpaper;
- PVA glue;
- white architect paint for carpentry (as a primer);
- colored acrylic paints;
- brushes;
- foam sponge;
- stationery clip;
- decoupage card;
- craquelure varnish;
- bitumen varnish;
- acrylic lacquer.
Work process
Before you start decoupage, the surface of the wooden board needs to be sanded with sandpaper.
Coat with PVA glue and dry.
Cover the board with white paint, creating a smooth, even surface.
Prepare a decoupage card, choose a plot, tear off the edges of the card to make it easier to disguise the border.
Mark the place where the drawing will be located.
Since the decoupage card is thick, the craquelure will not be visible through it, so leave the rest of the space on the board for craquelure. Paint it dark.
Dry the board. Cover the painted base with craquelure varnish.
Dry, but not until completely dry, but so that stickiness remains.
Paint the edge of the board a contrasting color, touching each area only once.
After some time, cracks appeared.
Glue the decoupage card onto the remaining space.
Dry. Protect the drawing with acrylic varnish.
After drying, level the overall background of the board so that the borders of the glued card are not noticeable.
At the end of the work, stain the edge of the board with bitumen varnish, giving the appearance of aging. This is how the decoupage of a wooden board turns out in the end:
Aging using dry brush method
- Apply 1-2 layers of paint of the selected color to the prepared surface.
- If you choose dark or bright paint, then you must apply a layer of light paint under the image, otherwise the picture will be lost.
- Paste on the motif you like. If pieces of wallpaper are pasted, then after drying the edges must be sanded with fine-grained sandpaper so that the transition does not stand out as a step.
- If necessary, use acrylic paints to paint on the background.
- Apply varnish once or twice.
- Take a flat bristle brush, pick up a little contrasting paint and tap the excess onto the paper. The brush should remain just semi-dry. We begin to draw the brush from the edges or protruding parts of the furniture to the middle. This is done with very light movements, as if brushing off dust. As a result, the effect of dustiness or slight soiling is created, as if from time to time.
- Finally, cover the entire surface with two to three layers of varnish.
- The fittings of the chest of drawers or cabinets, if any, are removed before all work is carried out. It can also be treated with a dry brush, but use metallic paints: old copper or old bronze. You can enhance the effect of antiquity if you additionally cover the fittings with an antique patina.
As you can see, it’s quite easy to remake furniture with your own hands, creating a unique atmosphere in your home. See examples of successful remodels and get inspired!