Varieties of decoupage
The ancient technique of decorative design of objects today has several popular directions.
Creation of growths
There are several ways to get growths with your own hands when decoupaging bottles. You can make the container voluminous using nylon tights. Before work, they need to be dipped in PVA glue, and then put on the bottle. The container must be free of grease before starting work. The tights need to be pulled over the bottle and folds formed. The container must dry for at least two days, after which it is decorated with paints and napkins.
You can also form growths using toilet paper, which is rolled into ropes or heavily wrinkled. The container is first covered with crumpled paper, and the strands can be used to make a beautiful edging.
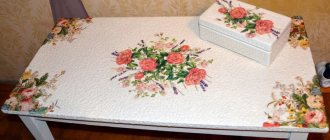
Work done using the decoupage technique looks impressive; in addition, it can be used to develop your imagination, decorate your interior, or make a beautiful gift with your own hands.
Decopatch
The technique is essentially similar to creating a patchwork quilt. The design consists of individual small elements that are united by a common theme or similar color scheme.
Selecting details for decoration requires a competent and thoughtful approach. To make the task easier, purchasing a ready-made kit designed to work specifically with this technique will help.
Not only decoupage
Having mastered simple decoupage of bottles with napkins, you always want more. The smooth surface of the bottle does not provide texture, which can be used to achieve a more interesting effect. You can create an interesting surface with tights or stockings. A master class on this type of decor can be found on the Internet.
To do this, cut one part from a pair of tights, soak it in a mixture of PVA glue and water (proportion 1 to 1) and put it on the bottle. Lay out coattails, waves, any texture.
Instead of tights, you can use decoupage with fabric; the procedures for materials and techniques are similar.
Leave a few spots flat to apply the napkin. Dry completely, prime with a special compound or acrylic paint. Now you can decoupage the bottles, tint them, bring your ideas to life, or leave them as is.
Related article: Decorating a bucket using decoupage technique: step by step
Another way to get texture: wrap the bottle with threads; colored threads are quite suitable for sewing of different thicknesses. Colored thread decor is also quickly obtained when using cotton yarn for knitting.
Using alternately threads of different colors you can get a very stylish decorative item; secure the threads with PVA glue. The decor of bottles with twine and threads should be varnished and used as a vase, or you can prime, paint and stick on napkins.
Classic (direct) decoupage
It is the simplest technique with which it is recommended to begin acquaintance with this decorative art.
The creative process consists of gluing paper elements onto a previously prepared surface. Creating decor requires care, otherwise unsightly bubbles and folds will appear on the surface of the bottle being processed.
There are several basic methods of working in the direct decoupage technique:
- using a file;
- brushes;
- ironing.
For beginners, it is recommended to master bottle decoupage using classical techniques.
Decoupage bottles with putty
Putty can be used as a base coat for the background instead of paint or applied to individual elements. It is most convenient to work with a thin artistic spatula or wooden sticks. Do not apply the putty in too thick a layer at once - 2-3 mm is enough. You can create an imitation of brick or wood on the bottle, experiment with fine-grained textured plaster, or glue patterns and decor on top.
Reverse technique
Reverse decoupage of bottles will require a product made of transparent glass, since the placement of decorative elements occurs on the inner surface of the product. The technique involves a slightly different order of actions.
Note!
- DIY gifts for February 23rd - a large selection of ideas for creating unusual gifts for Defender of the Fatherland Day
What to give a 2-year-old boy - a list of the best options for an interesting and useful gift (120 photo ideas)
Papier-mâché - TOP 120 photo reviews of original products. Detailed instructions for beginners on creating beautiful crafts
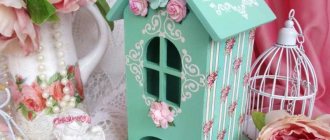
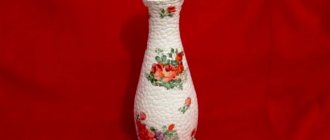
Volumetric decoupage: master class
Thanks to imagination and skill, you can create a new one from an old thing. All women like to do something beautiful and interesting with their own hands, for example, volumetric decoupage of bottles. The master class will help you create very attractive little things that can be used as a flower vase, etc.
Before you start working, you need to wash the bottle and wipe it dry. After this, you should cover the surface with white or yellow acrylic paint. It is necessary to prime in several layers. At the very beginning, you should apply the paint with a soft, wide brush, then with a piece of foam rubber.
After painting the bottle, you need to set it aside to dry thoroughly. While it is drying, you should prepare all the elements for decoupage. In stores that specialize in handicrafts, you can buy special napkins, and then carefully cut out a picture from them. When the surface is completely dry, decorative elements need to be glued onto it. When the glue dries, you need to cover them on top with acrylic varnish. After this, apply three layers of structural paste to the contours of the design. When everything has dried well, you need to sand the resulting relief and paint the bottle at your discretion. Volumetric decoupage is almost complete. All that remains is to decorate the neck of the bottle with a bow.
Volumetric decoupage
This is a relatively young decorative technique that is rapidly gaining popularity. The decor allows the use of shells and molded parts to create three-dimensional decorations on the glass surface.
Experienced craftsmen often use a special plastic paste as a base.
An important advantage of the decoupage technique is the absence of strict frameworks that limit the creative imagination of the master.
You can use any techniques, decorative details and artistic design methods to create unique designer items. You can admire the creations of experienced craftsmen by studying pictures of bottle decoupage.
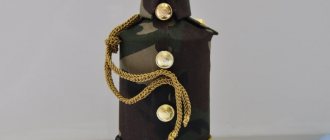
Decoupage for men: how to choose a design style
A bottle as a gift for a man can be decorated using decoupage technique with absolutely any materials (you can use napkins, textiles, polymer clay, etc.). The main thing is to choose the right design theme. So, depending on the man’s hobbies, the bottle can be decorated with napkins with images of the sea, ships, cars, airplanes, etc.; hand-made items (anchors, twines, decorative nets, etc.) can be used as additional decor. P.).
When decoupaging a bottle for a man, you need to take into account his interests and hobbies
You should choose a decoupage technique based on the reason for the gift: for example, to congratulate a man on his professional holiday, a bottle decorated in the theme of his occupation will be suitable (a law enforcement officer can be presented with a bottle, the decoupage of which is made with ribbons imitating the shape), and for a gift to the birthday boy, you can choose more personal design (decoupage using a joint photograph, congratulation text, etc.).
Tools
The list of necessary devices is small. Usually these tools are found in any home. Therefore, a new hobby will not require serious financial investments.
You will need:
- brushes of different sizes;
- containers for water and various materials;
- soft fabric;
- stationery knife;
- foam sponges;
- sandpaper;
- sharp small scissors.
Decoupage bottles with crumpled paper
There are many options for decoupage with crumpled paper, it all depends on your imagination. We will look at two of them. In both cases, we will need the simplest things that are found in every home: toilet paper, PVA glue, sponge, acrylic paint.
By the way, if you don’t have acrylic paint, you can use gouache or watercolor, but then you will definitely need to cover the composition with acrylic varnish.
Option one
The paper should be torn randomly, without clear, even edges. As a result of the fact that PVA glue forms a hard texture after drying, the craft will be very durable.
We apply a double layer of paper soaked in glue to the product, creating small wrinkles. We make the entire vessel in this way.
After the background is finished, you can decorate the sides, for example, make a decorative flower, a bird, or simply lay out an abstraction:
- Apply glue to the place where the decoration will be
- We twist the paper into tubes and place them on the background of the bottle with the desired design.
To emphasize the resulting texture, paint the top layer. We varnish the product to ensure its moisture resistance.
Option two
This time we will simulate rain. We measure a piece of toilet paper according to the height of the bottle with a small margin. Place the product on a stand and coat it with glue.
Starting from the neck, glue the paper to the bottle, slightly bevelling it to the side. When gluing, we form relief folds. After the container is finished, we take hold of its bottom, fixing each part that has not been glued.
After the product has completely dried, we begin painting. First we paint with one color of acrylic (choose which one you like), then paint with white with an almost dry brush along the protruding folds. Then we coat it with varnish.
This is how easily decoupage is done with crumpled paper, resulting in a wonderful product that can decorate any interior.
This method can be used to decorate bottles, glasses, vases and many other tableware. This can be thematic decoupage: March 8, February 23, New Year, wedding.
Materials
In addition to the original shaped bottles themselves, you need to prepare:
- PVA glue;
- acrylic paints;
- varnish of various types (including craquelure if necessary);
- primer;
- masking tape;
- decorative elements (napkins, postcards, photographs, etc.);
- degreaser (dishwashing detergent, alcohol, solvent);
- additional details (ribbons, braid, beads, beads).
Varnish for decoupage is used differently depending on its functional purpose.
The final protective coating requires a varnish that is resistant to abrasion and changes in air humidity.
Note!
- Kinusaiga technique - TOP-140 photos of the best ways to create crafts using the Kinusaiga technique with your own hands + instructions for beginners
- Do-it-yourself passe-partout - a master class with step-by-step do-it-yourself schemes. Making tips + photos of the best examples
- Decoupage with napkins: TOP-150 photos of ways to decorate with napkins. Simple instructions for beginners at home
Experienced professionals advise:
- acrylic, polyurethane and alkyd varnishes for a high-quality protective layer;
- decorative varnishes with different effects for decoration.
As an adhesive, you can use inexpensive PVA glue or special decoupage mixtures.
Decoupage with tights: master class
Decorating bottles with tights that can easily drape and take any shape allows you to create very beautiful crafts. For beginners, below is a step-by-step procedure for completing the work:
- Preparing the bottle - removing the label and degreasing the surface.
- Cut off the top part of the tights, soak the stockings in glue, squeeze to remove excess glue and put on the bottle, pulling the material tightly. The edges of the stockings are beautifully distributed over the glass in the form of graceful folds.
- Allow the material to dry well for several days and apply acrylic paint.
- Supplement the product with bright decorative elements and varnish.
You can add volume to the image on the bottle by gluing eggshells to its surface. Using the decoupage technique, you can give interior items a new look, completely transforming familiar things. A bottle of drink decorated in one of the described ways will be a wonderful decoration for the holiday table.
Preparation
Work always begins with preparing the glass surface. A prerequisite for obtaining a quality product is the complete removal of stickers and labels from the surface of the selected bottle.
Then it is thoroughly washed with dishwashing detergent and dried. Experts use alcohol solutions or solvents to effectively degrease glass surfaces.
The glass is carefully sanded with sandpaper and degreased again.
Leather for decoration
Decorating bottles with leather is one of the most beautiful opportunities to recycle leftover leather or outdated jackets, boot tops and get an interior item for home decoration. You can decorate any glass surface with leather. To work, you need “Moment” type glue, tweezers, scissors and a knife, as well as imagination.
To make folds, the pieces of leather need to be soft. A detailed master class can be found on the Global Network. Coat a bottle and a piece of leather with glue, apply the leather to the surface and form folds.
Working with leather is a little more difficult than decoupaging bottles with fabric, but folds are also formed directly on the glass bottle.
The formed decor should be given time to dry completely and, if desired, additionally painted, gilded, or glued on other elements - it all depends on the idea.
Coins are suitable for decorating a piggy bank; a beautifully made thick cork would not hurt for a gift wine container; it is also trimmed with leather.
Don’t throw away empty beautiful bottles; with their help you will create a unique art object for your home. And it doesn’t matter whether it’s decorating bottles using decoupage technique, leather finishing or dyeing, uniqueness and creativity are the most important things in decorating.
Video gallery
Photo gallery
Preparing paper elements
A variety of paper blanks are acceptable for artistic decoration.
- When using special napkins, the elements are simply cut out and removed from the base.
- Magazine illustrations and postcards require pre-soaking in warm water so that they can be easily removed from excess layers of paper. The parts are cut out with sharp scissors.
- Using regular napkins will require cutting out the intended patterns.
To learn more about the process of preparing various paper parts, watch the video tutorials.
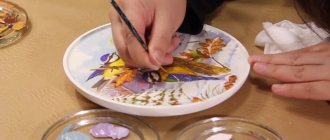
Master class on decoupage bottles with napkins for beginners
At the request of our readers, we prepared a master class in which we examined step-by-step how to decoupage a bottle with napkins with your own hands.
The lesson is suitable for beginner craftsmen of all ages. The basis is a gift for a man, hence the corresponding design. However, you can choose a different design and decorate containers of any shape using the same principle. Try it! It's very exciting, beautiful and really simple and fast!
- Preparation of the material part
- How to make decoupage from napkins on a bottle
Preparation of the material part
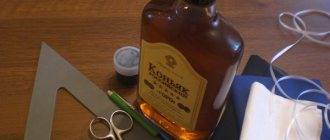
To do decoupage, prepare materials and tools:
- a glass half-liter bottle, the same as for a marine-style photo frame and a leather flask;
- a three-layer napkin with a thematic picture (it’s better to buy a special one);
- white acrylic water-dispersion paint;
- PVA glue;
- glossy water-soluble varnish;
- a new sponge for washing dishes;
- soft brush;
- decorative rope;
- large beads or pendants;
- scissors;
- nail polish remover;
- cotton wool;
- disposable containers for glue.
The master class uses the simplest decoupage technique - napkin . If you are interested in what other techniques exist and how to work with them, then get acquainted with the fashionable hobby in this publication of ours. And if you have a lot of bottles, then be sure to look at how you can decorate them using different handicraft techniques.
How to make decoupage from napkins on a bottle
First, soak the waste bottle in warm water for one hour to soak the label paper. Remove any paper from the glass.
As a rule, glue remains on the surface, which is difficult to wash off with water. To completely remove residue, use nail polish remover. Dry the vessel.
Cut the dish sponge into two parts.
Before decoupaging a glass bottle with a napkin, create a uniform background. This will hide possible errors when gluing the pattern. Apply white acrylic waterborne paint to the surface.
Do not spread the paint , but make frequent tangential movements, as if “smacking”. Wait until the paint is completely dry.
Select a picture. A suitable option could be photos of cities, cars, all kinds of geographical maps, images of large and strong animals and fish. Consider the man’s character, his hobbies and your relationship with him.
If this is a loved one, then romance is acceptable; if it is a colleague or boss, then everything should be in a strict style. Carefully peel off the top layer.
Wrap a colored layer of napkin around the bottle and determine which fragment will be needed for decoupage. Gently tear it off with your fingers. You can cut it off, but then the edge will be clearly visible on the craft. It is better to cut with a margin, and then tear off the edges .
Dilute PVA glue with water in a one-to-one ratio in a disposable container. Place the fragment face down on a stationery file. Gently stretching the napkin, apply diluted PVA glue with a brush.
Attach the drawing on the file to the glass. Carefully remove the file. Use a brush with glue to correct the drawing where necessary.
While the glue dries, prepare the pendant for decoration.
Since the image of one of the cities of Cuba was chosen, which at the beginning of the last century was the center of the gambling business, beads in the form of dice and chips were taken as pendants in this bottle decoupage master class.
Cover the surface of the craft with varnish.
Tie the pendant by tying several rows of rope around the neck.
Decorate the cork if you like. It also needs to be pre-coated with acrylic paint.
All that remains is to fill the vessel with noble fiery water and you can present the gift to the man. Need more gifts? Decorate cup coasters with decoupage. And look at our selection of MKs with step-by-step photos.
A master class on decoupage from napkins on a bottle for beginners was prepared specifically for the online magazine “Women’s Hobbies”. See other decoupage lessons in this section of our website. Handicrafts are ideal for those who do not know how to draw, but want to create masterpieces.
Visit us more often, and in order not to miss new publications, subscribe to our news on social networks. We always have a lot of interesting lessons and articles for women.
Gluing parts
The most exciting step in the creative process is gluing paper elements onto the glass surface.
The work will require accuracy, attention and concentration.
- The parts are carefully coated with an adhesive; in addition, it is easy to apply it to glass.
- The blanks are placed on the glass and their surface is very carefully smoothed, expelling air bubbles and excess glue.
Once again about decor
Even just by painting a bottle with your own hands, you can achieve an incredible effect of silver or gold gloss, shimmering with the lights of a New Year's fairy tale, covered in carnival sparkles or a vintage treasure.
Related article: How to make a Christmas tree for your home with your own hands: the best master classes
To get a stylish effect of gold/silver plating on a future art object, it needs to be prepared. Preparing glass for subsequent decoration with your own hands, at the initial stage, is the same for any painting method: the object should be washed, dried, degreased and treated with a universal primer.
The prepared glass vessel can be painted. Car paint in a can is suitable for these purposes. It should be sprayed at a distance of 15 centimeters from the object, in the open air or on the balcony. If you don’t have a spray can, purchase gold/silver acrylic paint from hobby stores or hardware stores. Use a foam sponge to apply. You should paint with point-to-point (tamping) movements, leaving a mark on the surface, not a stripe, the surface will be smooth, without streaks.
Gold, like silver, can be colored, i.e. has several shades, which makes working with these paints exciting.
You can complement the decor in several ways. For example, wrap the thick part of the container with lace, securing it with a glue gun. Or partially wrap it with twine, colored threads, or beads. Glue on hearts or ribbons. Decorating bottles is a fun activity, and you can use all available materials for each idea.
Applying varnish
The final step in the work is applying a varnish coating to the surface of the product.
This is necessary to protect the bottle from aggressive environmental influences, abrasion, and scratches.
The varnish is applied to a thoroughly dried surface. For better protection, experts recommend applying several layers of varnish. Any master class includes the final varnish coating stage. It is important to thoroughly dry the previous layer before applying a new coat.
Paper fairy tale
The very word “decoupage” came to Russia back in imperial times from the country of the Gauls, along with the fashion for everything French, including the language itself. The technique of the craft was borrowed by Europeans from China, where its history is lost in the darkness of centuries. In Europe, it quickly spread not only in France, but also in Germany, Spain, and Russia.
Russian birch
It all started with poor Chinese peasants who at least somehow tried to decorate their poor home. Nowadays, even more than wealthy people do not shy away from creating an original interior using improvised means. Creative workshops for children, focused on the art of decoration, have also appeared.
The simplest master class on decoupage bottles with toilet paper:
- Coat the bottle with glue. This can be done in parts, otherwise you will have to hold the base with your finger, pressing on the neck.
- Cover with paper at random, pinching small wrinkles.
- If you have multi-colored consumables, then at the same stage you can create a color background (blue sky, green grass).
- In the event that you only have one roll at your disposal or you decide to use large quantities of paint, there is no point in forming tones yet.
- Let the paper dry. You can even leave the craft until the next evening - this craft doesn’t like those in a hurry.
- Use a soft pencil or felt-tip pen to draw the contours of the birch tree. No special care is needed here.
- Mark the sun at the top. Here you can safely draw rays, because this is not a naturalistic picture, but a game, an invention. Scatter a couple of birds and clouds across the sky.
- At the bottom, outline grass, a few flowers, a mushroom family, and a hedgehog.
- Then there are several options of varying complexity: using thick paints to create a landscape drawing; Glue each line with rolled paper tubes moistened with glue; Model individual figures from paper.
- The most interesting effect is obtained by gluing the contours with tubes of different thicknesses (it is clear that the tree trunk, branches and grass differ in format) and then coloring them.
- After gluing the images, the craft should dry again.
- Now the draft needs to be colored. It's better to start with the background, large interior spaces. It is more convenient to go from top to bottom. There is no point in saving paint: the thicker it is, the more textured the painting will be.
- Once again, let the product dry and then coat it with varnish. In this case, a clear or beige varnish is suitable.
- If it’s the right season, then the craft should be decorated up to the neck with birch earrings.
Any varnish can both highlight the details of a craft and hide its flaws, but also vice versa. Even if something stood out (or disappeared) not as planned, it is always easy to explain the stroke by the subtlety and originality of the author's plan.
flower composition
Gluing bottles with napkins gives a similar option. The technique is almost the same. The differences begin if the composition is created on the basis of napkins with drawings. The style is determined by the theme of the pictures themselves.
A flower arrangement would look good:
- Apply paint to the prepared base. You need to start from the neck. For a spring meadow, blue, green, and light green tones are useful.
- There is no need to wait for final drying. Pieces of napkins with designs can be attached directly to the paint (but it is safer to use glue).
- Pictures can be arranged in one line or in a checkerboard pattern.
- When gluing, it is better to smooth the drawings from the center to the edges. This removes air and straightens out wrinkles. Even if the horizontal or vertical order is slightly disrupted, nothing terrible will happen.
- You can attract attention by not only making one floral background, but by highlighting the center of the composition. To do this, you need to select a larger image, which is additionally decorated with a frame made of tubes.
- Next, using bright colors, you should use a brush to frame the entire ornament, as well as its individual parts.
- After drying, coat the surface with varnish.
Any paper will do, even old newspapers. It’s just not very comfortable to work with them due to the presence of printing ink.
Before coating the craft with varnish, it can be decorated with sparkles and thin lace. The work will become brighter. This option is suitable for New Year's holidays. If the composition itself is more important, you shouldn’t make it sparkle.
Applications of rice paper
Simple decoupage of a wine bottle can be done using rice paper, which is used for baking.
The best option would be paper with a floral pattern.
Operating procedure.
- The surface of the washed bottle must be dried and degreased.
- It is recommended to tear the paper to obtain an original effect.
- It is easy to glue the elements onto the glass using glue. Another way involves placing damp paper on the bottle and drying it with a hairdryer.
- At the final stage, the bottle is coated with transparent varnish.
Decoupage algorithm using rice-based pictures
The work is based on the use of rice paper:
- The surface of the bottle is degreased with alcohol.
- Prepare rice paper and a napkin with patterns on its surface.
- To give a natural base, the rice paper must be torn into pieces by hand.
- The base is applied to the bottle in 2 ways: using glue; the paper is saturated with water. After drying, in any case, the base must be coated with acrylic varnish.
- The remaining steps are performed in the same sequence as described in the design process with a napkin (decoupage using a napkin).
Decoupage helps breathe new life into completely ordinary things. Decorated items will transform your interior.
Decoupage with tights
An original option for voluminous design is the use of tights for voluminous decoupage.
The advantage of this method is that it is easy to shape the tights into any shape and create a beautiful drapery on the surface of the bottle.
Using this method, it is easy to perform original decoupage of a bottle of champagne.
Operating procedure.
- The first step is to prepare the surface of the bottle.
- The tights must be soaked in the adhesive composition, having first cut off their upper part.
- Then the tights are pulled over the bottle, gathering them into folds.
- The dried workpiece is painted with acrylic paint.
- Additional design involves the use of paper parts, beads, and decorative varnish to give the bottle an impressive look.
- At the end of the work, it is necessary to apply a varnish coating.
The original design involves the use of beads or coins for additional stylish decor of the gift bottle.
Smoky decoupage bottles
An unusual artistic technique is suitable for those who want to add elements of painting to decoupage, but do not know how to draw at all. This way you can add color, gradients, make chiaroscuro or shading, and give the composition volume. Due to this, smooth transitions from one part of the work to another or even a fresco effect are obtained.
With simple acrylic paints you can complete small details, add brightness or smooth out sloppy transitions. For shading, crushed pastel of the same shade as the drawing is suitable. With a translucent haze it is easier to incorporate elements with clear edges. Only with pastels it is better to use a matte varnish, because it will not adhere to a glossy surface.
Decoupage bottles for a wedding or anniversary
Wedding decorations are usually kept in the same style. This affects the decor of flower bouquets, celebration halls, and festive glasses. It’s easy to complement the style with original decoupage bottles.
You can use paper napkins, original wedding cards, or even photographs of the newlyweds as decorative details.
Additionally, it is easy to decorate such bottles using lace, beads or beads.
An original bottle of champagne with the image of the hero of the day will be a memorable and pleasant birthday gift.
As additional decorative elements, it is easy to use thematic drawings or spectacular craquelure varnish to create a unique product.
Decoupage bottles with fabric
Flaps and fabric inserts create additional volume and texture. They can emphasize individual elements of the design - for example, to drape the skirt or umbrella of a romantic French lady, or to form convex flower petals. Thanks to the panel effect, the image looks more alive and realistic.
Before gluing, be sure to thoroughly saturate the fabric with PVA. Don’t wait for it to dry and immediately apply it to the bottle, create bruises and volume. After drying, you can add acrylic, glitter, foil or patina, and finally fix it with varnish.
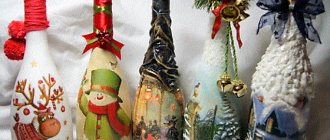
New Year's decoupage
Celebrating the New Year also involves a non-standard approach to decorating the festive table or arranging New Year's gifts.
Decoupage of a New Year's bottle involves the use of a white background or openwork lace as decoration. New Year themed designs are easy to cut out from greeting cards.
An excellent design option would be beautiful snowflakes, which are easy to cut out of ordinary paper napkins, towels or toilet paper.
You can get ideas for decorating bottles by looking at a photo of a decoupaged bottle. A creative approach will allow you to create an original interior element or customize a gift.
New Year's decoupage bottles with toilet paper
Toilet paper is perfect for decoupaging a New Year's bottle: lightweight paper will create interesting folds and will adhere firmly to the surface of the bottle. This type of decoupage is easy to do with your own hands; it does not require serious financial or time expenditure. In order to decorate the bottle, we will need white paint or decorative primer, silver pigment, PVA, a napkin with a New Year's design (for example, a winter forest, Santa Claus in a sleigh, etc.), synthetic brushes (flat and round), scissors , foam sponge.
For decoupage in New Year's style, a bottle of cognac, wine, or champagne is suitable
To make a New Year's bottle using toilet paper, you need:
- Prepare the container: remove all labels and glue, degrease the glass with a special product, alcohol wipe or nail polish remover.
- Using a brush or sponge, tightly cover the surface with primer or paint in several layers. A new layer must be applied only after the previous one has completely dried.
- Glue the napkin, first rounding its corners with scissors. The applique must be glued dry, distributing the glue from the center to the edges of the design. When fixing the napkin with glue, you need to carefully ensure that air bubbles do not accumulate under the application and that the edges of the picture do not curl.
- Cut a strip of toilet paper half the height of the bottle.
- Cover the surface of the bottle free of the design with glue and, starting from the top of the neck, glue a strip of paper, forming folds with your fingers.
- After the paper has dried, paint it to match the background of the napkin.
- Apply silver pigment to the protruding areas of the folds with your finger.
- Cover the entire surface of the finished product with a finishing varnish-fixer.
This master class is suitable for decorating a bottle in any theme: using toilet paper, you can decorate a bottle in a marine theme (folds are great for simulating waves), imitate textiles on a flask, etc. In any case, volumetric elements will look impressive and unusual.
Photo of decoupage bottle
Using tights
Thanks to their qualities, tights have become a popular material for decorating bottles. They are easy to drape, tightly fit the product, taking any shape. The work is carried out as follows:
- Remove labels from the bottle and degrease the surface.
- Trim the tights to make a stocking. Coat it with glue, squeeze out excess glue and pull it onto the bottle. Distribute the folds on the edges of the stocking evenly around the perimeter. Leave to dry for several days.
- Cover with acrylic paint.
- Decorate the product according to your preference and apply varnish.
Using the technique of decoupage, it is possible to transform the appearance of an object, giving it a new, more interesting look. A bottle decorated in this way will perfectly decorate a festive table and surprise guests.