09/21/2016 Category: Do it yourself Author: Natalya Ivantsova
DIY crafts are usually associated in our minds with children's creativity. However, now many adults devote their free time to this activity, happily creating interesting and original things. It is this trend that we owe for the renewed interest in the ancient technique of making decorative elements using the papier-mâché technique.
DIY crafts are usually associated in our minds with children's creativity
- Photo gallery: papier-mâché dolls and figurines
- What kind of paper is used
- Making a lot of papier-mâché from toilet paper
First method: paste based on flour or starch
- Second method: use PVA glue or putty
- Preparing a thicker mass - the third method
- Video: how to prepare a lot of papier-mâché
- Let's make a snowman
Directions of paper creativity
Initially, papier-mâché gifts were only available to aristocrats
The origin of papier-mâché occurred in France. This happened at the end of the 16th century. Translated from the language of the pioneers, this hobby is translated as “torn paper” or “chewed paper.” Initially, dolls were made from paper pulp mixed with glue. Then snuff boxes, music boxes and so on. Nowadays, there are two areas of technology:
- crafts made from paper pulp mixed with glue and paste (this allows you to sculpt three-dimensional figures, like from dough);
- products made from paper strips glued to a base (this method is called mashing).
They are labor intensive. In the first case, it is enough to prepare the mass and, having given it a shape, dry it well. And in the second - carefully, layer by layer, place strips of paper on a base made of cardboard, wood or plastic. Whatever method you choose, you can make dolls, jewelry, boxes, souvenirs, masks, etc. from papier-mâché.
This is interesting. The huge rotating globe that Harry Potter used in the film of the same name was made from papier-mâché by a Scottish craftsman. Following the success of the Boy Wizard films, the set was auctioned off for $20,000.
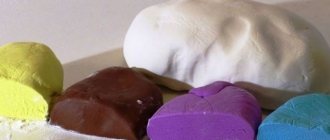
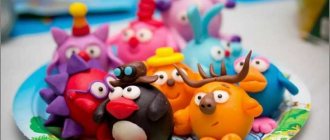
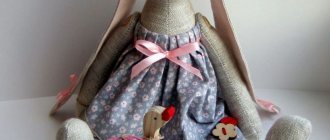
Photo gallery: papier-mâché dolls and figurines
Such a girl could be an appropriate gift for the beginning of the school year.
To create a colored item, you need to carefully paint all the details and glue the cat’s whiskers
Unpainted items occupy a special place among crafts made from toilet paper.
Initially, papier-mâché meant making dolls
These cats can be used to decorate a shelf in your closet.
This craft will take about 8-10 hours to dry.
"Apples You Shouldn't Eat"
The easiest thing for kids is to make fruits and vegetables using the papier-mâché technique with their own hands. Fruits and vegetables can be made by crumpling paper into a ball and pasting small pieces of glue.
Or entirely from liquid modeling dough - papier-mâché.
A simple video compilation here:
Whatever garden craft you do, the main thing is to remain calm and balanced, then everything will work out for you.
Making a lot of papier-mâché from toilet paper
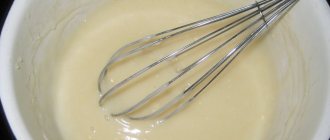
For voluminous crafts, you need a kind of paper dough, which is easiest to prepare from the most useful paper - toilet paper. The convenience of this material is explained by the fact that it soaks well in water. Let's consider several options for preparing papier-mâché mass.
You can prepare the mass for papier-mâché more than once
First method: paste based on flour or starch
- Tear two rolls of toilet paper into small pieces, pour in ½ liter of hot water and let sit for 5 to 8 hours.
- Preparing the paste. Fill a pan of suitable volume (2 liters) with water, put it on the fire, stirring.
- In a glass, mix cold water with 4 tbsp. l. starch (or flour), after boiling, remove from heat.
- Meanwhile, we bring the paper pulp to condition. Put it on the fire and let it boil.
- Using a blender or food processor, mix the pieces of paper until smooth.
- Mix the mixture with the paste and let stand for 20 minutes until the mixture thickens. The material for papier-mâché crafts is ready.
This amount is enough for 2-3 medium-sized crafts, and making them is a pleasure, as the dough turns out elastic and soft. How long will it take for the finished figures to dry? Approximately 3–4 days. If you doubt your patience, then use a different recipe.
Second method: use PVA glue or putty
- Take 1 pack of toilet paper and fill it with 1 tbsp. hot water.
- Soak for 7–8 hours.
- Heat the mixture and mix with a blender.
- Pour the mixture onto paper and dry it slightly - this way it can be stored for up to 2 weeks.
Dry preparation significantly saves your time for making subsequent crafts
- Bring the required amount of paper pulp (if you used more than 1 roll) to a boil.
- Add 2 tbsp. l. PVA glue or putty, mix, wipe off traces of clay. Papier-mâché is ready.
If you add more glue, the material will turn out to be slightly rubbery. This is convenient when making round-shaped crafts. This amount of papier-mâché is enough for 1 medium-sized craft, which will dry in 1–2 days. If you make more of the finished material, don't worry: you can put it in a plastic bag and store it in the refrigerator for about 2 weeks. To work, you will need to heat it in a water bath.
Preparing a thicker mass - the third method
To obtain a mass resembling plasticine or clay, add wallpaper glue to the mixture.
- Fill 3-4 rolls of cheap toilet paper (it soaks best) with tap water.
- Let it sit for 5-8 hours, then knead it with your hands.
- Wrap in gauze and squeeze out the remaining liquid.
- Mix 1 tbsp. l. wallpaper glue with 1 tbsp. water.
- Pour it into the paper.
- Add ½ tbsp. PVA glue.
The combination of glue and water makes the craft material strong and elastic
- Mix until you get a paste-like mass.
Video: how to prepare a lot of papier-mâché
Sculptures for the garden
Every housewife would like to achieve cleanliness in the house and garden. And, of course, this article will help you in making garden decorations using the papier-mâché technique.
For more originality, you can make a large fly for the garden:
- Toilet paper or newspaper;
- Balloon;
- Glue;
- Water;
- Scotch;
- Wire for paws and nose;
- Acrylic paint;
- Tassels;
- Construction gypsum;
- Gloves.
The first step in preparing a garden sculpture is, as always, to tear the paper into small pieces. Then inflate the ball to the size you would like your fly to be. The ball should be coated with wet hands so that the paper lays on it in an even layer.
Related article: Reducing stitches with knitting needles in a hat with photos and videos
Next, for papier-mâché we use paper soaked in water.
Lubricate each layer of the product generously with glue, repeat this about 10-15 times.
Remember that the more layers you make, the better quality your fly will turn out.
After the last layer of newspaper, the body should dry thoroughly. When everything is dry, do not forget to pierce the ball with a nail and you can proceed to making the legs and proboscis.
For greater strength, we make the frame using wire. We cut off equal parts of the wire, secure our legs and nose with masking tape, leaving bare wire at the ends to secure our fly in the garden so that the wind does not blow it across the entire front garden.
We cut wings for the fly from rolled wallpaper.
Since the base is ready, we grind the toilet paper into fine crumbs using a blender and add water, leaving this whole mixture for about 15 minutes.
A garden sculpture must be dense and waterproof, otherwise the whole work will be unsuccessful, so you should seriously coat the finished frame with a mixture of plaster and toilet paper.
After the plaster has dried, we paint our fly with acrylic paint in the desired color and draw eyes and wings on it.
Master class on crafts made from papier-mâché using toilet paper
Before starting work, you need to prepare everything you need so as not to be distracted during the process.
Making crafts from paper dough does not require a frame; the creation process is reminiscent of modeling from clay or plasticine. The only difference is that the finished item must be dried. But this is not the most difficult thing. The fact is that, despite its apparent lightness, it is quite difficult to make small details, for example, faces, from the mass of papier-mâché. So the complexity of step-by-step instructions will be determined by precisely this parameter: the presence or absence of small elements.
Let's make a snowman
This is an excellent craft for those who are just beginning their acquaintance with the papier-mâché technique - there are few details.
Materials:
- A mass of papier-mâché (from 1–2 rolls of toilet paper), prepared using PVA glue;
- A couple of small pieces of cotton wool;
- PVA glue;
- Shish kebab skewer;
- A piece of cardboard;
- Acrylic paints (white, black, orange, gray, brown);
- Tassels.
Instructions:
- We prepare a lot of papier-mâché.
The finer the grind, the easier it will be to work with the material.
- From the warm dough we form 3 balls of different sizes, 2 twig handles, a spout and a scarf. Place the round pieces on a skewer.
It is important to place the balls firmly on the base
- Let all the parts dry (up to 2 days), glue them onto cardboard along with two balls of cotton wool - these are the snowman’s legs.
You need to glue the parts when they are well dry.
- We paint the balls with white paint, the hands in brown, on the top ball we draw the eyes, mouth, and eyebrows with black paint. Glue the hands and scarf. The snowman is ready.
It turned out to be a nice toy
Making a souvenir - Babu Yaga
Despite its small size, this craft requires certain skills in working with papier-mâché, since you will have to sculpt the character’s face.
Materials:
- A mass of papier-mâché (from 2–3 rolls) based on wallpaper glue;
- Pieces of fabric, woolen threads for finishing (Baba Yaga’s clothes and her hair);
- PVA glue;
- Beads for eyes;
- Wooden skewer for detailing.
Instructions:
- We make materials for crafts.
- We form a cylindrical shape, immediately draw out the nose, but for now direct it upward so that it does not interfere with the rest of the face.
- Use a skewer to press through the mouth and make eyes.
It is very important that all small details are clearly marked
- We form hands and fingers.
- Let the details harden.
- We glue the hands, eyes, and “dress” the figure. The craft is ready.
Working on the image requires careful study of the face