Unfortunately, handicrafts are not always cheap. However, one of the most economical hobbies is working with paper. We all learned to work with this material in school. However, despite the simplicity and cheapness of paper, you can create real masterpieces from it.
- What kind of paper will we need?
- Wicker paper vase
- Quick Vase
- Vase made of glass and paper
In this article we will look at a paper craft such as a vase. How can you use a paper vase? Of course, in order to put paper flowers in it, but not only for that. In fact, you can make quite durable products from paper, and in this case, a paper vase can become a vase for sweets, a container for storing various small items, keys, etc.
What kind of paper will we need?
To make our crafts, we can use almost any paper, including old unwanted newspapers and magazines. Regular office paper and colored paper, which children usually use for their crafts, will do. All you have to do is arm yourself with scissors, glue, a pencil, a ruler, an interesting idea - and you can start creating!
Wicker paper vase
A wicker vase made of paper is a rather labor-intensive craft, but it looks very impressive. It is best to make such a vase from the pages of old magazines, and the more colorful these pages are, the better.
The vase is woven like a basket, but instead of a vine we will use paper tubes. Of course, they are very flexible, but at the same time they should be quite durable, so weaving based on them is quite simple.
Necessary materials
To make a wicker vase with your own hands, we will need the following materials:
The process of making straws
- take paper and cut it into long strips;
- Please note that the strips should have the same width, approximately seven centimeters;
- after that we begin to make tubes, for this we take a wooden knitting needle or skewer and wind a strip made of paper onto it;
- then, so that our tube remains a tube and the paper does not return to its original state, we need to glue the remaining corner of the paper at the end;
- after this, remove the wooden knitting needle or skewer as carefully as possible - and now the first tube is ready;
- first you need to make about 20 of these tubes; during the weaving process you can always make additional tubes, because it is not clear in advance how many of them will be needed for one wicker vase - it all depends on what size vase you need.
Weaving a vase from paper tubes
After this, we bend the outermost vertical tube down and pass it first under the “leg” of our plus, and then over its left side and under the crown, as shown in the photograph. We wrap the other tubes in the same way.
As soon as the length of the tube is not enough, we simply insert a new tube into it, pre-well lubricated with glue, that is, we increase its length. This is how we weave the bottom of our vase. We continue this process until the size of the circle seems sufficient to you.
The principle of making the walls of a vase is very similar to the process of making the bottom: our goal is to braid the leading end of the tube with all the others, while alternating its position, that is, now outside, now inside.
Pay special attention to the fact that the non-leading ends of the tubes must be at the same distance from each other at all times. Continue weaving in this way until the height of the vase seems sufficient to you.
By the way, your paper vase does not have to resemble a faceted glass in shape; you can give it an interesting complex shape. If you loosen the weaving, your vase will begin to gradually expand; if you strengthen it, then, on the contrary, it will narrow.
- cut off the leading tube at the top of the homemade vase;
- after that, coat the tip of this tube with glue;
- then firmly and carefully press this tip to the edge of our craft;
- hold the tube in this position for a while or fix it with a clamp - our vase with your own hands should turn out strong and stand for a long time in its original form;
- Now we still have eleven more protruding paper tubes left - we thread each of them in turn through the bent neighboring one, and this must be done in such a way that the result is an arc loop;
- at the end, all the loops made from paper tubes must be tightened tightly, all excess must be removed using scissors - now the processing of the neck of the vase with your own hands is finished, and at the same time the vase itself is ready!
Quick Vase
The second method of making a paper vase is very simple, much simpler than the first, and fully lives up to its name. However, despite the fact that it is very simple to make such a vase with your own hands, it looks very interesting.
So, what does it take to make such a craft and how exactly will we make it? The vase is made from cardboard bases taken from used up toilet paper rolls.
The algorithm of actions is as follows:
- cut out a neat circle from thick cardboard;
- this circle will serve as a stand for our vase - that’s why it needs to be made dense;
- After that, we glue a cardboard base from under a roll of toilet paper exactly to the center of the made circle - and now our vase is ready!
Of course, we won’t leave it in this form; we still have to make the decor. You need to make it to your taste - which allows you to do it with your imagination and the materials at hand. You can simply paint a vase, or you can make some kind of voluminous decoration on it - it’s up to you.
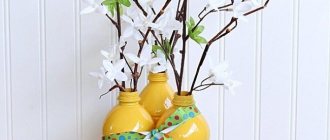
Vase made of glass and paper
It is worth noting that paper serves as an excellent decor for glass containers. You can take an interestingly shaped bottle or jar and use it to make an interesting vase by covering the glass with colorful paper.
You can make interesting three-dimensional applications using paper - and a simple glass bottle can become a real work of art!
The video shows another idea for a paper vase:
Evaluate the manufacturing method:
Source: https://sdelai-sam.pp.ua/?p=11473
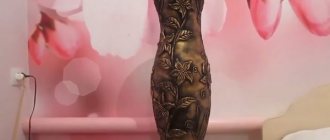
creative vase
This product has a regular shape, but attracts attention with its decoration.
To create you will need the following material:
- hot glue;
- paints;
- varnish;
- sheets of newspaper;
- sheets of cardboard;
- PVA;
- cardboard pipe (any diameter).
How to do:
- Measure the required length. The craft will be this tall.
- It is better to cut the bottom out of thick cardboard according to the diameter of the pipe. This will make the vase more stable. Glue the pipe to the bottom with hot glue and let dry.
- Cut newspaper sheets into strips of small width.
- Fold each strip in half and twist into spirals, gluing with hot or regular stationery glue.
- Cover the entire pipe with paper spirals.
- After the glue has dried, you can start decorating. Apply the paint of the selected color in several layers and leave it alone until it dries.
- The space between the spirals can be filled with multi-colored beads or cereals.
- All that remains is to apply only a couple of layers of varnish and wait until it dries.
All is ready! Details can be seen in the video.
Paper vase. How to make a paper vase with your own hands?
The golden time of autumn has arrived, the time of rains and bad weather. This means that we began to spend more and more time at home. If you dream of making your home cozy and beautiful, fashionable and original, and love geometric and straight lines, then you will definitely like this master class.
In this article we bring to your attention a paper vase that you can make with your own hands.
To make a paper vase with your own hands, you will need the following materials: colored cardboard, ready-made templates, scissors, double-sided tape, as well as any device for making neat folds (you can use a ballpoint pen, which no longer writes, and a ruler).
How to make a paper vase with your own hands
A handmade and very stylish paper vase can be a good decoration for any room. Many people love indoor flowers, and I am no exception. They please the eye and lift your spirits. The only pity is that over time, the flower pots in which they grow become old and shabby. Or they simply don’t fit the overall style of the room. For me, in this case, the best solution was a vase made of paper using the origami technique. This vase is made quite quickly and is an excellent decorative solution.
How to make a paper vase
To do this, we only need a dense one of at least 150 grams. a sheet of double-sided colored paper, an old pot and a little good mood. The size of our vase depends on the height and circumference of the pot that needs to be decorated.
So, to make a beautiful vase out of paper, take a bright sheet and start drawing horizontal lines on it. The lines must run in the same direction, parallel to each other, and be at the same distance. They will serve as the top of the fold
Then we draw diagonal lines on our sheet of paper. They should also go in the same direction and at the same distance from each other. When applying them, it is advisable to use a pen or pencil whose color is different from the color of the previously drawn horizontal lines. These lines will serve as the basis for the top of the future fold.
After all the lines have been drawn, you need to go over the lines, applying a little pressure, with a tool with a round tip to make indentations. Use a ruler to make sure the lines are straight. With the help of such a treadmill it will be easier to bend along the intended lines.
Now you need to carefully bend the paper naturally along the drawn lines. First, horizontal lines, from the front inward.
And then diagonal ones, so that the horizontal ones are bent inward and the diagonal ones outward from the front part.
It will be easier to do this if you wrap the sheet with one hand and use the fingers of the other hand to form the tops of the diagonal lines, pressing the horizontal ones.
Having folded the paper along all the lines, we take the paper glue and apply it in a thin layer to the narrow edges of the future vase. Bend the paper naturally in a circle and carefully glue the ends of the paper to each other. Our stylish vase is ready.
Now you also know how to make such a beautiful paper vase. All that remains is to take an old flower pot and put it inside to make a stylish flowerpot. Or decorate an ordinary glass jar to create the same stylish flower vase. Also check out other paper crafts
Thanks for the great new idea Madame Citron
There are many more master classes on needlework:
- DIY ADVENTURE TIME heroes - paper toys
- Paper models of Teenage Mutant Ninja Turtles characters
- Let's make an origami crane for good luck
- Bouquet of Flowers made of corrugated paper
- Origami lotus flower
- Magnificent paper modeling from Novosibirsk designers
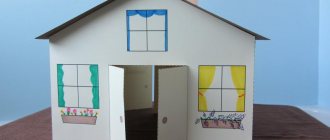
- Paper house layout
- Paper frog model with diagram from BandyFrog
- DIY Japanese paper doll, also known as a bookmark
- How to make a paper box using origami technique
- DIY dollhouse from a box and furniture from garbage
When copying materials, an active link to the website CREATIVETHERAPY.RU is required!
Source: https://www.CreativeTherapy.ru/2013/11/07/kak-sdelat-vazu-iz-bumagi-svoimi-rukami/
Small vase
This cardboard vase looks very interesting. It is done as simply as possible, and to create it you will need:
- cardboard box;
- glue;
- compass;
- scissors;
- varnish
First of all, let's cut the box into parts to make it easier to work with. Then draw circles with a compass. Their size will depend on the size of your vase. You can make it big or small as you wish. Let's start with the largest circle. Each subsequent circle should be 3 mm smaller. The vase can be assembled in different shapes - narrowed towards the bottom or towards the top. We cut out the circles. And we begin to collect our vase. Depending on how you decide to assemble the vase, place the circles on top of each other, pre-lubricating each of them with glue.
Related article: Crochet hexagon boots: master class with diagrams and videos
The vase is ready. It can be coated with paint and then varnish, or you can use only varnish, preserving the original color of the cardboard and its texture. Looks very stylish!
Moreover, such a vase can be adapted not only for flowers, but also for anything.
DIY paper vase: diagram, interesting ideas
You can make a paper vase with your own hands to decorate your interior, or as a gift for your mother on March 8 or her birthday. Manufacturing methods are very different, the choice depends on the skills and age of the craftsman.
In this article we will present several options for simple crafts made from paper. This includes folding origami, making a composition from newspaper tubes, weaving from strips of colored paper.
You can make a vase out of paper using the papier-mâché method. Beautiful crafts are made from origami modules.
You can buy them separately and just assemble the vase, or you can create each element yourself by purchasing paper specially designed for modular origami in the store.
Some crafts can be assembled even by children in the senior group of kindergarten, while others will require the experience and diligence inherent in adults or high school students.
Product made from modules
This vase is assembled using modular origami technique. Making it with your own hands is not at all difficult. The main difficulty may only be that you will need to make about 200 triangular modules.
For a small vase you will need modules measuring 1/32 of an A4 sheet. For a larger vase - 1/16 of the part. The color of the modules can be one color or different colors; we recommend practicing on a single-color vase.
How to make modules, watch the video.
Related article: Weaving a grapevine basket
For the first and second rows, you need to connect 12 modules of one color and 12 modules in the second row of another color. Since we do not use glue, the modules will be attached to each other, as shown in the photo.
The next row consists of another 12 modules.
For now, we will make all subsequent rows with 12 pieces. As already mentioned, you can make them colored or plain.
We assemble rows of 12 modules up to the 10th row.
Row 11 will require a little more modules. We took 18.
We put them on in the same way, sometimes putting them on the pockets of the previous row.
The last row will be the 14th row; it will also have 18 modules, which we fold like an accordion.
The vase is ready. You can put decorative flowers in it, and if you put a small bottle bottom or other small container in it, you can put succulents in such a vase.