Origami applications
These dogs will require both glue and scissors. We cut out two squares from colored paper, for which we fold the paper so that the top side coincides with the side. We cut off the excess part that does not match.
You can take ready-made origami paper; it is more convenient for folding, as it is more suitable not only in shape, but also in thickness. And you will also need one sheet for the background:
- Head. Fold the triangle diagonally from the square with the colored side up. We bend the corners down at the same distance - these are the doggie's ears. Now let’s add the muzzle. At the bottom of the head we should have two free ends, bend them upward. Bend the bottom tip back. And from the top corner we form the dog’s nose. We turn the workpiece over and bend the corner down, making a tongue on the front side.
- Torso. We also form a triangle from the second square of paper. We bend one of the acute corners of the triangle upward - this is the tail.
- Glue the head and body blanks to the background. We draw eyes or glue ready-made movable ones. We color the tongue red or pink.
Step-by-step instructions on how to make origami
In total, you first need to assemble three rows of modules, each of which should contain ten elements. For the first row, you need to select twenty blue modules, with the second row we do the same, but the third row consists of eight blue elements, three white and nine more blue
When the circle is assembled, you need to carefully bend the central part inward so that the edges rise a little - this must be done extremely carefully, otherwise the whole structure will fall apart.Note! DIY paper hyacinth - 120 photo ideas and a master class on creating a flower and bouquet
The next step is the fourth row. In the place where three white elements are located, you need to put four more of the same color on top. And the entire subsequent row will consist of twenty elements, but since four are already there, it remains to add sixteen more blue ones.
The fifth row increases the white modules to five, and reduces the number of blue ones to fifteen. The sixth row is absolutely exactly the same as the fourth, that is, four white elements and sixteen blue ones are put on.
For the seventh, the scheme of the fifth row is identical, make no mistake. The eighth row is being reduced, so four white and sixteen blue are put on. For the last row of the chest we put on three white elements and seventeen blue ones and here we finish assembling the main part.
This pattern for folding origami is not at all difficult if you follow simple steps and follow the sequence.
The final step is to give the shape a roundness, and this is done by squeezing the product from the inside using your fingers, but only with careful movements, since there is a possibility that everything will fall apart.
The tenth row is assembled a little differently. To do this, you need to insert the modules with sharp corners inward, and not outward, as we did before. But the eleventh row is assembled as from the first to the ninth, and the twelfth row is also assembled. We do the same with the thirteenth row.
The fourteenth row again requires the use of four white elements exactly above the white modules below, and the remaining row is filled with blue. The fifteenth row has three white elements and seventeen blue ones, this completes the formation of the dog's bangs.
Again, it is necessary to give the product roundness with your fingers from the inside and, again, this must be done gently and carefully. The last, sixteenth row, is assembled from ten white modules that are inserted into each other.
Note! Origami flowers from paper: diagrams, templates and descriptions of how to make paper flowers with your own hands. 135 photos TOP ideas
From any colored paper suitable for our product, we cut out the ears, muzzle, and you can use store-bought eyes. The ears are inserted into the holes of the modules, and a drop of glue is dripped inside so that they do not fly out. In the same way, the eyes and muzzle of the animal are glued on top.
A small collar is cut out of paper of a different color, which is wrapped just below the muzzle and glued together to keep its shape. At this point, the origami figure will be 100% complete. Keep in mind that origami is used without glue, so there is nothing to talk about the strength of the product, so all parts can be simultaneously lubricated with PVA glue for greater reliability.
Paper Fox Terrier
To fold a simple dog figure, you will need a square of double-sided colored paper and step-by-step instructions on how to make origami:
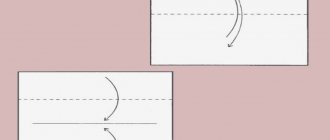
- Fold the sheet diagonally into a triangle, unfold it and repeat the action in the other direction. This is how the center of the square is determined, the corners are folded towards the center.
- Bend half of one of the corners outward.
- We open the corner opposite, bend about two-thirds of the corner inward and close it back.
- We fold the workpiece in half into a rectangle to create a sharp tail.
- We take out the corners from the bottom from the workpiece. We bend one half up diagonally from the tail to the head of the rectangle. Turn the workpiece over and do the same on the other side.
- Between the two halves that have been folded, we straighten the fold from the side of the muzzle and bend it into an acute angle.
- We bend the large edges down on both sides so that we get ears. The side of the ear should coincide with the line of the muzzle.
The dog is ready. Now you need to draw an eye and nose with a felt-tip pen.
Craft dog made of cardboard
Cardboard will make the dog more stable and strong. Paper will also be used in this case. The complete list of materials is as follows:
- Cylindrical sleeve made of cardboard.
- Paper white, black.
- Simple pencil.
- Glue.
- Scissors.
- Pencil (felt-tip pen) black and red.
You might be interested in How to make a glove doll with your own hands
The step-by-step work plan is as follows: first you need to prepare all the paper parts, then glue them in order so that you get a dog.
The dog's head is an oval made of white paper.
Dog face
Dog ears are made of black paper - slightly curved ovals.
Black ears
The front legs are also identical ovals. For them you need to take white paper.
Front paws
The hind legs are of a slightly different shape - they resemble small felt boots, the toes of which are directed in different directions.
Hind legs
Now you need to place the head on the cardboard base, with ears on its sides. At the bottom in front are the front legs, and the hind legs are visible a little to the side. Then you need to draw a muzzle: two eyes, a nose, a mouth and a red tongue. Decorate the animal’s body and paws with black spots, and mark the claws with dashes.
Note. You don’t have to look for a sleeve for the body; you can make a similar cylinder yourself from a rectangular sheet of cardboard. Since cardboard is denser and stiffer than paper, it is recommended to use double-sided tape or a stapler as a fastening material.
Cardboard dog
Photo of an origami dog
Several dog models
A paper figurine made together with your child will not only give you pleasant memories, but will also become your child’s favorite toy. It can also be the beginning of a new family hobby.
There are many schemes that allow you to create dogs of completely different breeds and styles (from animated to realistic); in this article, several of the simplest schemes will be given.