Needlework
07/12/2018 Anastasia Prozheva
Kanzashi is a world-famous Japanese technique for creating flower crafts. This craft will be a wonderful decoration and will highlight a woman’s style. Original products are made from natural silk, but other fabrics can also be used. For example, crepe-satin, organza, satin and grosgrain ribbons. The latter are perfect for just beginning needlewomen, because they singe well and are easy to cut. The “Marshmallow” flower is a beautiful and easy-to-make decoration. This master class on kanzashi marshmallows will definitely help lovers of needlework create a small masterpiece with their own hands.
Tips for wearing kanzashi
— Young girls can wear as many kanzashi as their heart desires. Married ladies can afford one or two small flowers.
— Kanzashi flowers are worn for weddings, New Year, birthdays and other festive events.
— For each month of the year there is a separate type of kanzashi flower. 12 months - 12 different shades of colors.
What kanzashi should be like:
— Products must match the color of the kimono;
- Match eye color;
— Correspond to the status of the carrier.
Original marshmallow
How to make Japanese jewelry is described in this lesson.
To work you need:
— satin or grosgrain ribbon in several shades (2.5 cm wide);
- a lighter or candle for scorching the edges of the ribbon;
- needle;
- threads;
- scissors.
Note! The tape can be cut into the required lengths or gradually unwinded from the reel.
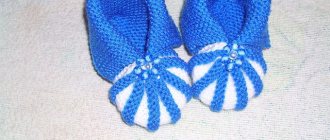
First you need to take a couple of ribbon pieces and connect them along the wrong side closer to the center. Use a lighter to connect.
The pattern must be located around the perimeter, as on the blue ribbon in the photo. To ensure that the pattern is inside the marshmallow, you need to turn the patterned ribbon face down.
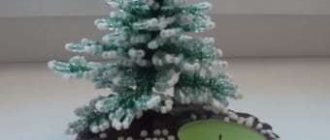
Related article: DIY Christmas tree decorations from scrap materials - 36 ideas
Then you need to put the tape in the soldering area on the right side. Measure a 2.5 centimeter wide tape from the soldering point, approximately 5.5 centimeters. A tape with a width of 5 cm is approximately 10.5 cm. Along the marked line, bend the corner on the right at an angle of 90 degrees. Then roll it again from the right side to the left. Now a figure of an isosceles triangle should be formed from ribbons of a contrasting color. The result is shown in the photo below. Tuck the protruding tail back.
Next, prepare a needle and thread. Fix the corner on the right side together with the end.
Then take the ribbon that should be on the left side and bend it to the bottom at an angle of 90 degrees. And roll the working tape to the top, aligning the bottom of this element.
With your right hand, wrap the ribbon from the left side to the right side again at an angle of ninety degrees.
To complete the marshmallow petal, you must first finish making a shape that looks like an isosceles triangle. To do this, take the working ribbon and roll it from the right to the left side, passing it among a pair of petals. You should get the following element, as in the photo.
Using a thread, secure another triangle-shaped figure made of ribbons, just like with the first one.
Now it's time to start working on the left side of the working thread. Bend the tape 90 degrees and then bend its main piece towards the top. Fold the ribbon at a 90-degree angle so that the ribbon goes to the right side.
Make another isosceles triangle. You will get the following element for marshmallows, which looks like this:
Take a thread and secure 3 already made petals.
Repeat this process 16 times on a 2.5 centimeter wide tape. If the tape is 5 cm wide - about twenty times. The more times, the more magnificent the marshmallow will be.
Related article: Do-it-yourself pillow-cushion under the neck: master class with photo diagrams
Having made all the petals, cut off the tail and burn the end. Pull the resulting petals together with a thread. Now all that remains is to combine all the created elements into one product. The kanzashi marshmallow mk is finished, the product is ready!
Marshmallow in the form of a bow
This master class (mk) will teach you how to create another type of marshmallow, which is used for most hair accessories. To do this, it is enough to have satin or grosgrain ribbons, at your discretion. Their width should be within 2.5 cm.
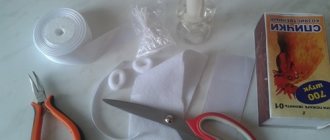
You should prepare some material that can be easily purchased at any specialty store, and this is:
- white tape;
- colorful ribbon;
- thin mesh;
- decoration for the inside of the marshmallow;
- metal fastening;
- elastic band or hairpin;
- matches;
- scissors;
- needle and thread;
- glue.
The master class (mk) will begin with the fact that you need to fold a light and colored piece and glue them together after singeing.
The wrong side should be at the top. Take the ribbons and wrap them. The photo below shows how the work happens.
Leave a small edge, which will need to be hidden when finished. Hold the cut with your hands.
Bend the tip in the opposite direction and sew it so that it does not interfere with the process. The folded edges are sewn together with thread stitches.
Continuing the master class, we take the next turn. The main part is laid so that the unused end is on the right side. Then, move it up, forming an angle of 45 degrees. The line should remain level with the first turn.
We turn the tape to the bottom so that it coincides with the primary turn. Then, he should look to the left. Master class (mk) in the process itself, again, we tuck the matter, which will make it possible to dub the first turn. Two edges of the ribbons point to the right.
The point at which the thread is fixed is shown in the photo. As a result, the next turn is formed, in which matter goes to the right.
Read
How to decorate bottles, glasses and other wedding paraphernalia with ribbons
Stitch the corners. They must be secured to each other.
This is how 4 turns should look.
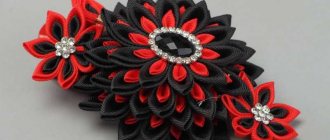
After all the work done, a lush marshmallow is formed.
In order to get a fluffy ring of ribbons, sew the edge located in the center and the corners. After this you will get the expected result.
Using glue, hide the edges in the background. This is what the inside should look like. Turn the craft over and straighten all the turns with your hands.
In the central part of the marshmallow, glue the decoration, and fix the mesh at the bottom. The entire blank can be safely attached to a hairpin or on a headband.
Such an interesting master class is completed. As a result, you get marshmallows of the required type and size, which will decorate your hair. To consolidate the material, watch the current video.
Before you start making marshmallows yourself, take a simple master class. Especially if you are just starting to make your first kanzashi products. It is very important to have a little training before the main creation of any complex accessory, even though it seems like overwhelming work.
After you manage to master the basic rules of kanzashi, you will be able to make your first marshmallows.
There are a large number of options for creating different kanzashi marshmallows. They are called that because they are similar to a famous sweet. But we told you about the simplest options for beginners.