Knitted items are very attractive in modern society. Many beginners want to learn this type of needlework.
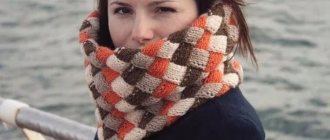
When starting to knit, first of all you need to learn a simple technique for doing garter stitch. Even in ancient times, this pattern was very popular for knitting scarves.
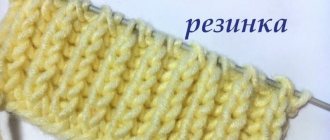
It looks like relief alternating rows. Using this type of knitting, a variety of products are created. Let's take a closer look at the garter stitch technique.
This type of knitting has several types and advantages compared to other knitting options:
- garter stitch is not prone to stretching and retains its original shape for a long time;
- finished products look voluminous and impressive;
- the edges of the canvas are not wrapped;
- This type of knitting provides an excellent skill for beginning needlewomen.
Instructions and description of garter stitch
Initially, we will study knitting for beginners. Let's take a closer look at the different types of patterns and how to create them. Using the instructions, you can create fabrics using garter stitch without much difficulty.
Pattern creation is carried out in three types:
- facial;
- purl;
- circular view.
Instructions for creating stockinette stitch
This method looks classic and is easy to do, even for beginners.
- The initial loops are cast on a pair of knitting needles, taking into account the edge stitches along the edges.
- Then one knitting needle is removed and taken with the other hand.
- We place the thread from the ball on the index finger of the left hand and lightly hold it with the remaining fingers.
- We shift one loop from the left knitting needle to the right one, without knitting it with thread. This is the first edge stitch, which will be the first stitch in the next row.
- Then we grab the next stitch and knit it with the front one, behind the front side.
- Thus, the entire row is knitted. We turn the product over and knit it again with facial loops.
- We do this work until we get the canvas of the required length.
Instructions for creating a purl stitch
You can knit a fabric with this pattern even without any knitting experience.
- Cast on the required number of chain stitches, taking into account the edge stitches on the sides.
- Then we remove the knitting needle by the thread. Your thread should be to the right of the loop on the left knitting needle.
- We put the right knitting needle into the left loop under the thread.
- Then you need to grab the thread and knit from left to right.
- We knit the required length of fabric, turning the product over at each row.
Instructions for creating fabric with circular knitting needles
This type of garter stitch is made using knitting needles connected with fishing line. You can work with knitting needles in which both sides are working (double-sided knitting needles).
The work is simple and easy to do, especially after understanding the principle of the first two methods, creating a garter stitch. The work process includes alternating rows.
- The method of doing the work is slightly different from the previous ones, which are done with straight knitting needles.
- Cast on chain stitches and close them in a circle, knitting the first row with knit stitches.
- We mark the junction in any convenient way, this will be the intended seam of the product.
- We knit the second row starting from the junction, using purl stitches.
- Then repeat the rows, alternating the front and back rows to the required length of the fabric.
Important! The fabric is not turned over while knitting.
In garter stitch, using circular knitting needles, the impression of twisted loops is created, and the product takes on an unusual appearance. To get the usual pattern, you should insert the knitting needle into the loop from the back, like you unwind it.
To make knitting convenient, the length of the fishing line should be equal to the width of the fabric. Garter stitch significantly shortens the fabric along the height of the product; this feature should be taken into account when making things.
To get an openwork type of knitting, you must choose knitting needles 2 - 3 sizes larger than recommended for the selected type of yarn. This way you will get a knitting pattern similar to what was previously used in making down scarves.
What items can be knitted with garter stitch?
This type of knitting is soft and pleasant to the touch. It is often used when working on children's things: blouses, booties, hats, scarves, and so on. Men and women can make many things with this type of knitting.
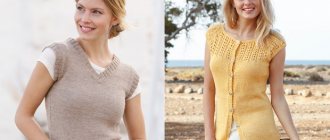
These can be scarves, sweaters, vests, socks, scarves, coats, hats, mittens and much more. Often, needlewomen combine shawl stitch with other designs and get magnificent masterpieces with which they can please themselves and their loved ones.
- Beginners can first knit a scarf and then try knitting a hat using the stitch reduction technique, and once you learn how to make simple projects, you can move on to more complex projects.
Garter knitting is the first type of fabric creation. Initially, the ancestors of this knitting stitch performed all the work until they came up with the purl loop. Then they began to combine them with each other.
In the modern world, there are many incredible and beautiful complex patterns, but garter stitch cannot be replaced by any modern ornament and it is still relevant today.
Garter stitch patterns
Photo of garter stitch ideas
Source: https://podelki.guru/kak-vyazat-platochnuyu-vyazku
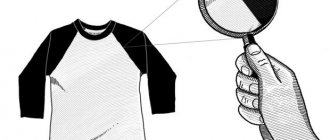
Oversized pullovers with stockinette stitch - 3 patterns with descriptions, video
There is no need to talk about the fashion and relevance of oversized pullovers for autumn-winter 2018-2019, you already know this very well, better than us. If anyone doesn’t know, then the massive filling of such a plan with models on the shelves of the mass market has already made it clear to you.
However, Poshiwczyk’s editors love to diversify their wardrobe and knit something that others don’t have. The main idea is simplicity. So, it is the stockinette stitch that pullovers meet all our requirements. They are knitted very simply, look stylish and attractive, and are worn in a fashionable and modern way.
By the way, such models, by the way, we have already knitted oversized from braids, fit perfectly with jeans and trousers, dresses and skirts. Be sure to knit yourself one or more of these pullovers.
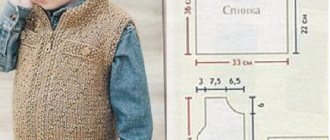
Oversized jumper with lace edge
A softly flowing loose jumper with narrow, almost tight sleeves and short rows for the shoulder slopes, despite its width, does not look fat at all.
DIMENSIONS 34 (36/38–40/42–44/46)
YOU WILL NEED
- Yarn (100% sheep wool; 220 m/50 g) - 400 (450-500-550) g white;
- knitting needles No. 3;
- circular knitting needles No. 3, 40 cm long.
PATTERNS AND DIAGRAMS
RIBBER Knitting in the round:
1st row: * k1, p1, from * repeat.
2nd row: * K1, slip 1 st, as with purl knitting (thread in front of the loop), from * repeat.
Repeat rows 1 and 2 in height.
FACE SMOOTH Front rows - front loops, purl rows - purl loops. In circular rows, knit all stitches.
LACERY PATTERN Knit according to the given pattern. In width, start with a loop before the 1st arrow, repeat the repeat (the number of loops in the repeat varies from row to row) between the arrows, end with a loop after the 2nd arrow. Perform in height 3 times from the 1st to the 16th row. = 48 rows.
DOUBLE LOOP At the beginning of the row (after turning), lay the thread before work, insert the knitting needle on the right into the 1st stitch and remove the loop along with the thread. Then pull the thread back strongly, as a result the loop will be put on the knitting needle and you will get a double loop. In the next row, take both parts of the loop together and knit according to the pattern - front or back.
KNITTING DENSITY 25 p. x 37 r. = 10 x 10 cm, knitted with stockinette stitch; 25 p. x 37.5 r. = 10 x 10 cm, knitted with an openwork pattern.
The samples are made on needles No. 3.
COMPLETING OF THE WORK
BACK On needles No. 3, cast on 202 (227-227-252) sts and 1st r. (= purl row) purl.
Then do 48 r. for the border. openwork pattern and continue working with stockinette stitch.
After 29 (31-31-31) cm = 108 (114-114-114) r. from the beginning of the front stitch, additionally dial on both sides for seamless knitted sleeves 1 time for 16 (12-12-7) sts and in every 2nd p. 2 times 15 (11-11-7) p. = 294 (295-295-294) p.
After 9 (9-9-11-13) cm = 34 (34-40-48) r. from the beginning of the sleeves, begin to form the upper bevels of the sleeves/shoulder bevels: first, put 12 stitches on both sides, then knit in short rows, for this in every 2nd r. Turn the work 6 times after 12 sts and 3 times after 11 sts, each time performing 1 double loop for turning.
After 4.5 cm = 18 r. from the beginning of the upper bevels, close the middle 56 (55-55-56) stitches for the neckline and finish the left side first.
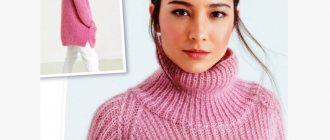
Knitted sweater from Temperley
For this model you will need about 800 grams of yarn. I don’t take “fur” into account. Knitting needles - 3 or 4 mm.
The main background fabric is the purl stitch. Elastic band: knit 2 to purl 2; 9-10 cm at the bottom of the product and on the collar; up to 20 cm - on the sleeves.
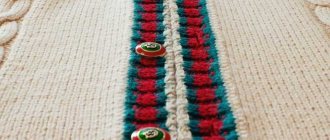
The front and back are knitted straight, without fitting. The sleeves are something between an armhole and a raglan sleeve. The photo clearly shows the contractions, there are about 8-9 of them in every 8th row, 1 loop, i.e. The armhole is very flat.
Sleeves are loose. If you refuse fur, you can also knit some part of aran in the center of the sleeve. Or leave the back fabric. The top of the sweater, where the fur is located, can also be replaced with purl stitch.
The back is sagging, so after ribbing it is better to set aside the purl loops at the edges, continue knitting the pattern, gradually picking up these side purl loops in shortened rows. Model the aran based on the diagram, the photo is very clear, so everything can be repeated.
Garter stitch, stockinette stitch with knitting needles - diagram, description
The ability to knit always commands respect from others, because it requires skill, perseverance, and things turn out unique.
It is believed that knitting - counting stitches, monotonously knitting each row - has a therapeutic effect.
And in order to please not only the process, but also the result, you need to be proficient in technical techniques, in particular, knit and garter stitch.
As with any type of needlework, you need to start learning the basics of knitting with simple, basic patterns. They, like any of the most intricate patterns, are built on a combination of front and back loops.
To make a knit stitch, you need to pull the thread into the loop captured from behind with the knitting needle. To knit a purl stitch, the thread is passed through the front.
By alternating knits, purls, and also the formation of yarn overs (air loops that are obtained when the thread is thrown onto a knitting needle and knitted in the next row like the rest of the loops), original patterns are obtained.
Garter and stocking stitches are considered the easiest to perform. These types of designs were once used in the most popular products - down scarves and stockings (hence the names). But even today, products knitted with scarf or stockinette stitch are in demand.
Features of garter stitch
If you want to learn how to knit, then garter stitch with knitting needles, a pattern described below, is the best place to start. It is not for nothing that needlewomen, as already mentioned, used this design to make scarves. The pattern is an alternation of smooth and embossed, “scaly” rows. In the old days, this type of knitting was called “ruffle”, “beds” or “rope”. Garter stitch has a number of advantages compared to other patterns:
- holds its shape well and does not stretch;
- adds the volume necessary for knitted items to the finished product;
- does not deform (the hinges do not move or move apart);
- does not curl the edges of the product;
- is an excellent background for more complex drawings.
So, to understand the basics of knitting you will need:
- knitting needles No. 5 (thickness corresponding to this number allows you to knit fairly large loops and avoid pulling the yarn);
- any yarn of medium thickness (acrylic threads are more suitable for beginners, as they do not tangle and are elastic in work).
The execution of a garter stitch pattern is as follows:
- For the prototype, we cast on 20 loops plus two edge loops - they make the edges of the product neat and even.
- We knit the first row. Having grabbed the back side of the loop from the left with the right knitting needle, we pull the thread through it, which is located loosely draped over the index finger of the left hand, and form a new loop. This is a classic way to knit knit stitches.
- We knit the second row in the same way, but now we always grab the loop from the left knitting needle not from the back, but from the front, so that the pattern does not twist. This method of tying loops is called “grandmother’s”.
- We knit 10 rows and secure the pattern with a hook.
This method takes facial loops as a basis - the pattern turns out smooth. If you knit on circular needles, make sure that the base of the loop does not twist. To do this, remove it from the knitting needle and turn it in the “right” direction.
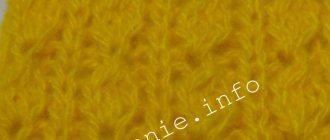
There is another way in which you can knit a scarf fabric. Purl loops are used for this. That is, the thread is brought out through the leading edge of the loop on the left knitting needle.
Then the product will have a looser, wavy structure.
For some needlewomen, this method of garter stitch seems more convenient, since even and odd rows are knitted identically, which can be seen, for example, in a video about garter stitch with knitting needles.
How to knit in satin stitch?
The most popular type of knitting is “ knit stitch ”. It knits very simply. With this knitting, it will not be difficult to knit the fabric even according to the most difficult pattern.
The knitting is dense, and we can safely say that it can knit everything. You can knit socks, a hat, mittens, gloves, sweaters, trousers, skirts, dresses, coats, household items, soft toys, etc.
The stockinette stitch is the basis of knitting.
Now let’s look at how this “universal” fabric is knitted. First, cast on the required number of loops. Then we knit one row with facial loops, at the end of the row we make an edge loop and turn the work.
Second row, knit all the loops - purl. We also knit an edge loop at the end. Thus, all odd rows are knitted with knit stitches, and all even rows are knitted with purl stitches.
When knitting in the round, all stitches are knitted with knit stitches.
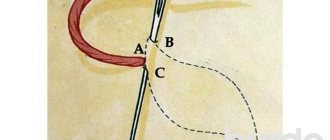
For beginners, I will describe how the knitting stitch is knitted : when knitting, the thread is behind the work, so we insert the right knitting needle into the loop that is on the left knitting needle and grab the working thread and knit it. Remove the loop from the left needle. This is how one facial loop turned out.
The purl loop is knitted like this: first we make a working thread before knitting, then we insert the right knitting needle into the loop on the left knitting needle (from right to left), grab the working thread and knit it.
We remove it from the left knitting needle and get a purl stitch. The side of the fabric where only purls are knitted is called purl stitch .
- The row always begins and ends with an edge loop; it is knitted like this: at the beginning of the row it is simply removed onto another knitting needle, and at the end of the row it is always knitted with a knit stitch.
- Also for beginners on our website there is a section in which you will find many tips and interesting articles on knitting: Training course for beginners on knitting .
There is another way to knit stockinette stitch. Knitting without turning the product. To do this, we also cast on loops and knit a row with facial loops.
When the first row ends, we knit an edge loop and, without turning the work over, insert the left knitting needle into the loop on the right one so that the end of the left knitting needle is opposite the end of the right knitting needle.
Next, we throw the working thread, which is located behind the product, onto the knitting needle: from back to front, as if wrapping around the knitting needle, and now we knit a loop with the working thread using the left knitting needle.
These wonderful patterns can be knitted using stockinette stitch:
Tell your friends about the article:
Source: https://vse-sama.ru/voprosy-po-vjazaniju/kak-vjazat-gladju.html
Women's raglan sweater
To knit the very popular raglan sleeve, watch this video.
The diagram below shows how you can knit raglan.
Ways to reduce raglan sleeves.
Reducing the loops using raglan sleeve needles.
Decorative decrease in raglan sleeves.
Stockinette stitch: how to knit, knitting patterns in stockinette stitch, diagram and video
In the lesson, see how to knit stockinette stitch with knitting needles, a description of knitting and pattern of stockinette stitch, a diagram and links to models knitted with such a fabric. In the training videos for the lesson, there is material useful for beginners in knitting.
Lesson content:
Stockinette stitch with knitting needles
Stockinette stitch is one of the basic and simplest knitting patterns . Many other have been developed based on this pattern .
When knitting various patterns of clothing, stockinette stitch is used very often . The number of loops when making this pattern is absolutely arbitrary .
The lessons below explain step by step where to insert the right needle and where the working thread is located. And even people who absolutely do not know how to knit (both women and men) will be able to complete this pattern .
Front stitch pattern
In the picture below, look at how knitting with stockinette stitch is depicted using symbols in the diagram :
Facial stitch video
- In two parts of the video we showed 2 ways of knitting stockinette stitch.
- How to knit stockinette stitch using the first method:
- Description of the knitting method for stockinette stitch:
- In the front row we knit each front loop behind the back wall , while the working thread is behind the work (i.e. behind the left knitting needle);
- In the purl row, knit each loop purl in the 1st way (insert the right knitting needle into the loop, grab the thread from the bottom up) by the front wall of the loop, while the working thread is in front of the work (i.e. in front of the left knitting needle).
- This is a classic way of knitting knit and purl stitches.
How to knit in another way:
Description of the method:
- In the front row we knit each knit stitch behind the front wall , while the working thread is behind the work (i.e. behind the left knitting needle);
- In the purl row, knit each loop purl in the 2nd way (insert the right knitting needle into the loop, grab the thread from top to bottom) by the front wall of the loop, while the working thread is in front of the work (i.e. in front of the left knitting needle).
- The difference between these two methods of doing knit stitch is in knitting both knit and purl stitches.
But the general appearance of the front stitch is the same in both methods, both on the front and on the wrong side of the fabric . In both methods, in the front row all the loops (except for the edge loops) are knitted with facial loops, in the back row - all loops are knitted with the wrong side (except for the edge loops).
When knitting various patterns, both the first and second methods are used.
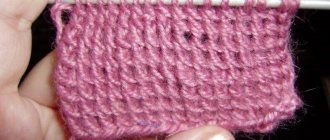
The stockinette stitch, despite its simplicity, is equally beautiful, but looks different from different yarns - plain and uniform, section-dyed yarn and textured yarn (ribbon-like, non-uniform threads of different thicknesses, fluffy, etc.). In the photo below, see how differently the stockinette stitch can look in a fabric knitted with different yarns .
Stockinette stitch fabric with different yarns photo 1:
Knitting stitch with knitting needles using textured yarn photo 2:
Oversized cotton sweater
Step-by-step visual master class on video of knitting a sweater from start to finish. The yarn used is Vivchari Cottonel 75% cotton and 25% acrylic. It took 400 grams of yarn.
Part 1.
Part 2.
Part 3.
This video shows how to crochet the edge of a product. The method is very simple and fast, and the product has a neat and finished appearance.
Return to content