The benefits of homemade bouquets
For the hero of the day or other gift recipient, such a gift will be very pleasant. For the master there are a number of other advantages:
- Possibility of adjusting financial investments as a gift.
- The master has the opportunity to independently determine the composition of the sweet bouquet.
- The choice of decorating part also belongs entirely to the owner of the original gift.
- A large assortment of models, as well as step-by-step instructions for creating a bouquet of sweets with your own hands for beginners.
- There is no need to study in special courses - a little dexterity and skill, improvised materials, office supplies.
Bouquets made independently will be appreciated by any birthday person.
Materials for work
It is better to carry out the work in a well-organized place where there is a source of high-quality lighting. You also need to prepare:
- Metal wire.
- Wooden skewers.
- Corrugated paper of various colors for decorative purposes.
- Adhesive tape.
- Wrapping paper.
- Cardboard or felt for making a flower pillow.
Candies, chocolates, lollipops - this component is chosen directly by the master, depending on the wishes of the hero of the occasion.
Ideas for sweet candy surprises for women
Our mothers, sisters, girlfriends, teachers, fitness trainers, managers - everyone, without exception, loves it when they remember their birthdays and professional holidays.
I offer you the top 5 original projects made from sweets:
Sweet Christmas tree
We certainly associate this evergreen tree with the New Year, with the Christmas holidays, with home comfort and the warmth of the family hearth. The chocolate-wafer tree will be an original souvenir for any representative of the fair sex on frosty days.
Simple instructions for creating a winter beauty are presented in the photo.
Rowan sprig
The ancient Slavs considered rowan a sacred tree. Houses were decorated with its branches and fruits, because... They believed that they were able to protect the house and the person from any harm. In addition, she is a symbol of peace and happiness in the family. Rowan branches are used to create amulets.
And rowan as a souvenir will bring sweet joy. To create it, you need confectionery in a red wrapper, wire, green tape, an artificial leaf and a little time. You need to create elements as shown in the photo:
Bouquet of candy roses
This surprise is perfect for both a teacher on a professional holiday and a manager on a birthday. Living roses, of course, will delight women, but they will not surprise them. A gift made with your own hands is original and creative, and therefore will leave a mark on your memory for a long time. You can use corrugated paper of the same color as shown in the video, or you can choose one to suit your taste. The main thing is that everyone is satisfied with the result.
Heart
This gift is perfect for Valentine's Day or any day for your girlfriend. What else can you add? All love and stormy emotions are combined in this symbol. A sweet heart will melt the ice in the eyes of your loved one. You can create it like this:
Handbag
How can a lady live without this stylish accessory? A bag is needed for going out, for shopping, for a harmonious look with new shoes. I offer you a video of making a handbag, which probably has not yet been in the arsenal of the girl you are going to surprise:
Practical tips for creating a bouquet
The decorative part of the gift bouquet got its name for a reason. There is no need to strictly observe the proportions and ornament of the flower bud. The most important principles to work with are to firmly secure the sweet surprises in the packaging, and also to give the bouquet a compact and stylish look.
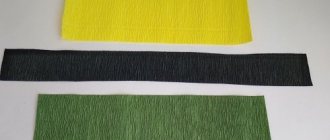
You can use any material for decoration, but crepe is the most popular and accessible. Corrugated paper makes realistic buds, petals and inflorescences.
How to choose correctly
Here are some of my tips for choosing my favorite crepe paper, because not all are suitable for making flowers.
- Please note the manufacturer.
No China suits us (like the option in the photo)! This paper has a loose layer of corrugation.
And many beginning needlewomen often take it for their studies: it is quite cheap, it seems to be also corrugated, and stretches. But…
It is not strong enough, it stretches so much that it looks like a crumpled mass. After using it, the flower petals do not hold their shape well. The work looks cheap and even ugly.
Advice: don’t take it, even if you just want to learn how to create some types of flowers. In our business, it’s better to study right away on paper of the best quality, so you’ll save your nerves and won’t be disappointed in the end.
It can be used, for example, only when making the base of a bouquet, for decoration, where it will not be visible.
- Pay attention to durability.
If you take very thin paper (crepe, quiet - like the option shown in the picture), then the flowers will turn out delicate, but there will be no shape.
This paper is suitable for children's creativity.
But it can also be used in making compositions from sweets. For example, I sometimes use it to seal the foam base when working with baskets.
“But what then to choose?” - you ask.
Finally, we come to the most important thing:
- All attention to quality.
My favorite is corrugated paper made in Italy, in different colors and shades, which we can talk about endlessly.
This is exactly what we use. Even from the photo you can immediately distinguish it.
And what are its properties?
It is quite strong and durable, like plasticine it can take any desired shape. When stretched, flower petals perfectly create volume and curl.
Candies from such a paper blank do not fall out, and after pulling out a sweet surprise from a bud, the flower does not deteriorate and retains its original appearance, and this, you see, is also important for our needlework.
You can distinguish it by a special sticker on the packaging, which indicates the manufacturer (Italy) and density. And its density is 180 g/m2.
Sold in rolls measuring 50 cm * 250 cm.
The material is of the highest quality! It 100% meets our goals in creating realistic colors.
This is where you need to start your first steps in the retinue if you don’t want the result to disappoint you after the first work.
Methods for assembling sweet buds
Working with crepe has a number of advantages, and one of them is the ease of assembling parts. There are several options for the master:
- Using a topstitch stitch. A long strip of paper is prepared from the crepe and a stitch is laid in the center. The blank is wrapped around the candy, forming a bud.
- Stitching petals around the surprise.
- Sewing the petals to the base (in the form of a cardboard circle or felt pillow) to which the candy is glued.
Sometimes in practice there are other methods: mounting on foam plastic, screeding with adhesive tape.
How to do it?
Let's look at unusual but simple ideas for sweet sets that do not require a lot of investment - both time and money.
Bouquet of sweets
When creating a sweet floral arrangement, the materials used by florists are used, with the exception of an absorbent sponge, which can be replaced with ordinary polystyrene foam or other cheap analogues (a floral sponge holds moisture so that the flowers do not wilt, but we do not need this function). You will need the following materials and tools:
- double-sided tape or glue gun;
- wrapping paper for flowers;
- corrugated paper;
- multi-colored ribbons;
- artificial flower stems or sticks, which you can wrap in green crepe paper or paint (if it is not a plastic base) green;
- candies;
- base (pot or bottle) optional.
First of all, you should decide on the color scheme of the bouquet. If you are an inexperienced artist, it is better to take 2-3 shades of the same color. It is better to assemble complex compositions if you already have experience working with these materials. Next, you should choose candies, round shapes are better, they are more convenient to work with.
Once you have decided on the candies, they will need to be wrapped in petals that are cut out of corrugated paper. We wrap the candies with petals and glue the edges with tape or glue so as to leave two to three centimeters of the sweet product below. Attach the stem to the bottom. One sweet flower is ready!
We make the required quantity, insert them into polystyrene foam and wrap them in wrapping paper. We tie it with a ribbon and round the ends.
A basket of flowers
To create such a present, you will additionally need a wicker basket. We insert foam inside; empty juice boxes can also work to secure the stems in the basket.
Next, we decorate the candies in the form of flowers, for example, peonies or daisies. We attach the petals in such a way that the candy looks like the core of a flower. You can decorate the finished bouquet with beads, ribbons, artificial flowers and herbs.
Popular articles Interesting crafts for school and kindergarten on Cosmonautics Day
Sweet bag
To create this composition you need beautiful floral paper and ribbon. We form a bag, which we fill with all kinds of sweets: candies, marshmallows, waffles, etc. To decorate the gift, you can use sweet powder or even fruits and berries.
New Year's sweet gift
The most popular attribute of the New Year holidays is the Christmas tree. Even children can make a sweet tree. To do this, just make a cone out of polystyrene foam, attach candies to sticks (toothpicks) and insert them into the cone.
You can decorate this composition with tinsel, corrugated paper, homemade or purchased snowflakes. You can make a base for the Christmas tree - a decorated bag or box in New Year's style.
A pineapple
The basis for such an unusual gift will be a bottle of champagne, which will be closed with candies with yellow or golden wrapper (it is better to secure the candies with double-sided tape) to the base of the neck of the bottle. We hide the neck under the tops cut out of green paper (you can use holographic paper for a fashionable effect). The gift pineapple is ready!
Gift in the shape of a heart
A great option for a young couple. If you want to give a gift on Valentine's Day, this might be the option for you. We make the base in the shape of a heart (you can use thick cardboard). Next, we beautifully arrange the candies inside, wrap the front part of the form with red paper or decorate it in another way, and add a ribbon.
For Easter
It is also popular to use sweet gifts at Easter; they are mainly made from Kinder surprises. You can decorate the gift in different ways, for example, in Western style, simply by placing it in a basket.
Master classes on making bouquets
Any birthday person dreams of receiving an original gift, and the master has the opportunity to realize this dream using his creative potential. For those whose needlework experience is limited, there are detailed instructions and video tutorials on how to form bouquets with sweets.
Note!
- DIY fruit bouquets - TOP-200 photos with instructions for creating a bouquet of fruits with your own hands. Unconventional ideas with simple diagrams and work overviews
Crocheted flowers: TOP-160 photos and step-by-step knitting pattern, review of finished products with your own hands. Crochet master class for beginners
Paper lily - TOP 100 photos of the best product options. Master class with step-by-step diagrams and drawings for creating an origami lily with your own hands
The most famous models of gift items are:
- Bouquet of lollipops.
- Chocolates in packaging.
- Bright pineapple on the bottle.
- DIY gift bouquet of sweets and tea in a basket.
- Bouquet of roses with Raffaello.
- Tulips with truffles.
Each presented bouquet is beautiful in its own way, and delights the owners with bright colors and unexpected surprises inside the bud. Instructions for pleasant and high-quality work can be found freely available on various web resources.
Bouquet of lollipops
Everyone loves small delicious lollipops - from a child in kindergarten to an adult in the office. Giving a box of chocolates is too simple and does not have a festive spirit.
It’s a completely different matter to present a lush bouquet with a whole collection of fragrant candies. To work you need to prepare:
- Wrapping paper.
- Satin ribbon.
- A piece of foam.
Step-by-step guide on how to make a candy bouquet:
- The foam acts as a support in which the candy sticks are located.
- Plastic sticks are dipped into a small piece of foam, placing the elements of the bouquet close to each other.
- The sweets are wrapped in wrapping paper and tied with a satin ribbon with a bow.
In practice, another method is used - plastic sticks are tied with adhesive tape without using foam.
Note!
Crochet rose - diagrams and descriptions of how to crochet a rose with your own hands. Crochet technology + interesting craft ideas
DIY edible bouquets - TOP 130 photos with instructions for creating a bouquet with your own hands. Creative ideas with simple diagrams and photos of finished works
Craft primroses - simple instructions for creating crafts from scrap materials. Schemes of beautiful DIY products + photo reviews
How to make a bouquet of daisies from candy
Shot: @Kateryna Bay / YouTube
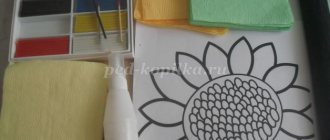
What do you need
- Orange corrugated paper;
- scissors;
- ruler;
- white corrugated paper;
- candies;
- glue gun;
- toothpicks;
- green interlining;
- Styrofoam;
- knife;
- box;
- green corrugated paper;
- decorations;
- wide ribbon.
How to make a bouquet
From orange paper, cut out a strip measuring 20.5 × 5 cm and a rectangle measuring 7.5 × 6 cm. From white paper, cut out a strip measuring 33 × 6.5 cm. This is how many details will be needed to decorate one candy. Calculate and cut out the required number of parts for all candies.
Fold a small rectangle in half crosswise and round it at one corner. Stretch this part, wrap it around the candy and glue a toothpick on the bottom.
Shot: @Kateryna Bay / YouTube
Fold the orange strip in half twice. Make many small cuts on one edge.
Shot: @Kateryna Bay / YouTube
Unfold the strip and slightly bend the cut edges using scissors. Glue its edge to the base of the candy and wrap the entire confectionery product.
Shot: @Kateryna Bay / YouTube
Fold the white strip of paper in half too. Make several cuts on one side, about 2 cm short of the other edge. Also cut the paper along the side folds.
Shot: @Kateryna Bay / YouTube
Round each of the cut strips so that they resemble chamomile petals.
Shot: @Kateryna Bay / YouTube
Unfold the strip and glue its edge to the candy. Wrap it first in one row.
Shot: @Kateryna Bay / YouTube
Then form a second row of petals, placing them between the petals of the first row. After this, add a third row in the same way as the second.
Shot: @Kateryna Bay / YouTube
Spread the petals and cover the bottom of the bud with a piece of non-woven fabric folded diagonally.
Shot: @Kateryna Bay / YouTube
Make the rest of the candy flowers in the same way. Cut a piece of polystyrene foam to the size of the box, cover it with green paper and insert it inside.
Shot: @Kateryna Bay / YouTube
The author of the master class also made the box herself and explained the creation process in detail in a separate video:
Insert the daisies into the foam. Then take out each flower, coat a toothpick with hot glue, and put it back in. This way the flowers will be securely fastened.
Shot: @Kateryna Bay / YouTube
Cut out leaves from green paper and glue them and other decorations between the daisies. Decorate the box with a ribbon bow.
What other options are there?
This master class shows how to make a bouquet of daisies in a basket:
Bouquet of chocolates
Birthday people with a sweet tooth will be very pleased to receive a real bouquet made from candy bars or chocolate bars. Instructions on how to make a beautiful bouquet of sweets with your own hands:
- Place a sheet of wrapping paper in the shape of a diamond on the table.
- Chocolate bars are placed on the bottom corner of the paper sheet.
- Wrap the bouquet, securing the edges of the package with a glue gun or tape.
For strength, you can wrap another sheet of crepe or illustrated paper over this base.
Bright pineapple on a bottle
To create this masterpiece you will need a more extensive list of materials:
- Old glass bottle made of durable glass.
- Decorative mesh for attaching candies.
- Glue gun.
- Satin ribbons for decoration.
- A sheet of green corrugated paper.
- Scissors, needle, thread.
As a sweet part, Ferrero candies are perfect, the packaging of which is quite bright and suitable in color. Operating instructions:
- A circle of cardboard should be glued to the bottom of the bottle, slightly larger in diameter than the circumference of the bottle.
- Place the candies in rows around the glass base, attaching them using a glue gun.
- Place a decorative mesh over the candy rows. Its color and diameter of the elastic thread will not stand out against the background of yellow candy wrappers.
- For pineapple leaves, templates are prepared in the form of a narrow, long layout.
- Leaves are cut out from green crepe using templates.
- Using thread and a needle, sew the leaves into a small bundle.
- Place a bunch of leaves in the area of the bottle neck (on the cork or directly at the mouth of the bottle neck).
The pineapple can be complemented in an original way with a beautiful ribbon with a curly bow.
How to make flowers from napkins with your own hands
Napkins can give you a lot of imagination to create amazing products. They are useful not only for your hands, but also for making various crafts and decorative items.
Popular articles Coffee, tea or cocoa, which product is best for hair coloring
Carnation
Let's start with one of the simplest flowers - the carnation. The finished product looks like a real flower. And by making several of these carnations you can get a beautiful bouquet.
For manufacturing you will need the following materials:
- green crumpled paper;
- a strip of double-sided light green paper;
- threads;
- glue stick;
- pen rod;
- stapler;
- scissors;
- ruler.
Let's move on to step-by-step production:
Let's start working with a napkin. Ours is pink, you can replace it with red or white.
- We unfold the material and place the lower part slightly above the center line. Cover with the top layer.
- Turn the napkin over with the narrow side facing you. We cut the sides along the fold lines. We measure ten centimeters in width for each side obtained. We measure thirty centimeters in length. We cut off the excess.
- Fold them in half and cut along the fold line. We put the parts one on top of the other and make an accordion. We bend the resulting workpiece in half, mark the center and secure the paper in this place with a stapler. You need to make three such products. We tie them together with a thread in the middle.
- Making a stem. We take double-sided light green paper with dimensions of 4 by 29 centimeters. We treat the tip of the paper with glue and screw it onto the rod from the pen. Towards the end of the paper, once again grease everything with glue.
- We wrap the workpiece from a napkin. We glue it with glue and fix it with a stapler for reliability. The edges of the napkin need to be fluffed with scissors. After this, we begin to separate the layers by lifting them up. We omit the last layer.
- From corrugated paper we cut out leaves and a piece that looks like grass.
We attach it under the flower, hiding the lower petal. We attach the leaves and wrap the stem with a thin strip of paper.
How to make roses from napkins
You can even make roses in a simple way. They will turn out voluminous and realistic. To make them we will use:
- red napkins;
- green corrugated paper;
- scissors;
- pencil;
- skewers;
- scotch.
Let's start making roses from napkins:
Cut off the edges of the prepared napkins that are connected. You should now have separate squares. We divide them into a layer.
- Take one of the squares. We begin to wind it onto a pencil. Do not twist the paper all the way, there should be a straight edge.
- Using gentle movements, squeeze the twisted part, press it tightly and remove it from the pencil. We do the work with the remaining parts.
- We begin to roll one of the parts into a roll.
- Leave the untwisted section of the napkin at the bottom. Add the remaining layers in the same way. Add petals until you get the desired size of the rose. We press and twist the material at the bottom.
- We insert a skewer from below; this will be the stem.
Use tape to secure the flower. Cut a strip from green corrugated paper. Wrap a strip around the skewer. We secure the material with tape at the top and bottom.
Dandelion
How to make a flower from a napkin in the form of a carnation to decorate a table or room, and in the form of a dandelion, is equally simple.
You need to take 2 bright yellow napkins and place them on top of each other.
- Using a compass, draw a circle with the diameter of the napkin on the top napkin.
- Napkins are cut out in a circle.
- In the middle, all layers of the napkin must be stapled.
- In a circle, cut the napkins into thin strips (1 cm), leaving a distance of 1-2 cm to the middle.
- Each strip in the circle needs to be bent perpendicularly and slightly twisted into a tube. All the petals of the bonded layers of the napkin are folded in a circle and given shape, while simultaneously dividing each napkin into layers.
- Then the bottom of the bud is secured with a piece of wire. A stem is formed from the remaining part of the wire.
- You need to cut several green stripes from a piece of napkin.
- The first strip is attached to the base of the flower using a glue stick and wrapped around the base of the flower.
- Attach 2 strips of napkins and wrap the stem completely. The edge of the napkin is folded inward and glued to the bottom of the stem.
- The bud needs to be shaped by fluffing it.
- Dandelion leaves (2-3 pieces) are cut out from a green napkin according to a template and glued to the bottom of the stem. All is ready.
Bouquet of roses with Raffaello
A lush bouquet of crepe roses will delight any girl as a present. To work, you will need red or pink crepe, wire to create a stem, glue, thread, needles, and candy.
Instructions for making a simple bouquet of sweets with your own hands:
- For rose petals, you can use the bud rolling technique.
- A long strip 5-6 cm wide is cut out of red or white crepe.
- Line stitches are laid in the center of the paper tape and a free thread is left.
- Pulling the thread gives the tape a corrugated appearance.
A strip of crepe is wrapped around the prepared candy. The finished buds are placed on a wire stem. The bouquet is collected together, the lower contours are wrapped with adhesive tape. The last step is to wrap the bouquet in beautiful paper.
How to make a bouquet of roses from candy
Shot: @Useful Tips From Violetta / YouTube
What do you need
- Red corrugated paper;
- ruler;
- scissors;
- green corrugated paper;
- candies;
- wooden sticks;
- glue gun;
- threads;
- scotch;
- wrapping paper;
- ribbon.
How to make a bouquet
From red paper, cut out two squares measuring 6 × 6 cm. From green paper, cut out a rectangle measuring 7 × 6 cm and a strip measuring 20 × 1 cm. This number of paper parts is needed for one rose.
Cut out as many blanks as there are candies in your bouquet. Curl the red squares on one side around the edges so that they resemble petals.
Shot: @Useful Tips From Violetta / YouTube
On one narrow side of the green rectangle, cut out long, pointed triangles (approximately to the middle of the workpiece).
Shot: @Useful Tips From Violetta / YouTube
Lightly stretch the whole part of the rectangle and twist each strip into a flagellum. This will be the sepal.
Shot: @Useful Tips From Violetta / YouTube
Fold two red petals overlapping each other and stretch them slightly.
Shot: @Useful Tips From Violetta / YouTube
Place the candy inside the petals and wrap it, forming a bud.
Shot: @Useful Tips From Violetta / YouTube
Glue it to a wooden stick.
Shot: @Useful Tips From Violetta / YouTube
To be secure, tie the base of the bud with thread. Glue the edge of the sepal to this place.
Shot: @Useful Tips From Violetta / YouTube
Wrap the green piece around the base of the bud. Secure the edge with hot glue.
Shot: @Useful Tips From Violetta / YouTube
Glue a long green strip horizontally to the base of the bud and wrap it around the entire stick. Glue the edge of the paper to the wood.
Shot: @Useful Tips From Violetta / YouTube
Bend the tips of the petals slightly outward, opening the bud. Twist the green stripes around it inward.
Shot: @Useful Tips From Violetta / YouTube
Make roses with the rest of the candies in the same way. Gather them together and secure them with tape.
Shot: @Useful Tips From Violetta / YouTube
Cut a rectangle from the wrapping paper. Place the flowers on it with the buds towards the corner and wrap them in paper. Tie the bouquet with a ribbon.
What other options are there?
This video shows how to make open lush roses with candies inside:
The bouquet looks great in a basket:
Another original bouquet option:
Tulips with truffles
The principle of making a sweet bouquet of sweets with your own hands is similar to the technique of creating a present of roses.
The method of assembling the bud is significantly different: instead of a single ribbon, parts for the inflorescence are prepared. The lower edges of the petals are sewn together with a thin thread, and the upper edges are glued together after attaching the candy.