History of the box
The first boxes appeared a long time ago. Almost every lady of the 18th and 19th centuries had a box in which she kept things dear to her heart. Many boxes had a secret, and they could only be opened after certain manipulations.
The material of the thing was created from wood, leather, porcelain, precious stones, and metal. And now in museums you can see examples of ancient boxes richly decorated with expensive stones and gold.
Purpose of the boxes
Today the box contains: Cosmetics, Jewelry, Accessories
For cosmetics, multi-tiered boxes with several floors with compartments are made. They can comfortably fit eye shadow, lipstick, cream, and perfume. Some cosmetics boxes have no compartments at all, but they are spacious and deep, so you can put everything in them.
Jewelry boxes are made small and compact. But they can also have compartments so that chains and rings do not fall apart or get lost. Slightly larger accessory boxes.
Types of boxes
There is a huge variety of boxes available on the modern market. These are boxes with many compartments inside, with a lock, boxes with a mirror, boxes that resemble small chests, leather boxes, multi-tier boxes, glass boxes and so on.
They can be of different shapes, from standard rectangular to triangular, elongated cone-shaped or original, for example, heart-shaped. The color of the box can also be any.
Women prefer light and bright colors - white, beige, pink, blue, while brown, gray and black colors are suitable for men. You can also make the box yourself. And then it will be unique.
How to choose a box
To choose the right box, you need to consider:
- The number of decorations and things that you will store in it. You don’t need to buy a large chest for one or several rings. Conversely, the more jewelry and accessories you have, the larger the box should be. It is desirable that it has several compartments where you can put all your things separately.
- If there are children in the house, it is better to buy a chest with a lock.
- The box should match the style of the room. Choose a chest in accordance with the style of the interior. Shabby chic, Provence, loft, vintage... Each design direction has its own box.
And, of course, when purchasing this elegant item, you need to be guided by your own preferences.
Selection of equipment
The size of the box doesn't matter. However, before decorating large items, it is recommended to practice on small ones. It’s important to try different techniques to find the one that’s right for you. This does not require a lot of time and materials. The reasons for finishing the box are the following:
- Most women have this accessory. Since it is intended for storing jewelry and cosmetic products;
- Any dimensions and shapes of the product are allowed for decoration;
- You can make a box with your own hands from a variety of items;
- Any restrictions in the choice of technology can only be set by one’s own imagination.
The design technique should be selected based on the functional purpose of the accessory. The most popular ones include decoupage, quilling, painting, shabby chic, paper art, etc. Some of them require some training.
Mosaic technique
Decoration of ladies' boxes can be done using fashionable mosaic techniques. To do this you will need simple tools:
- Sharp cutting objects, as well as a brush with a roller for rolling;
- Polymer clay or plastic;
- Adhesive binder and varnish;
- Cardboard;
- Talc;
- Ribbon for decoration.
The first step is to cut out circles from cardboard that will form the future appearance of the box. To finish the interior, it is best to use white clay. You can take a bobbin to create a mold. It should be coated thoroughly with a polymer material so that no bubbles or joints remain. Trim off excess. Then the clay circles need to be baked in the oven.
The outer walls should be treated with talc to make it convenient to apply plastic. From the latter you can form various patterns. When the circles have cooled, a mosaic is laid out on them. The order of the parts depends on your imagination. The tape should be glued to the base and lid, forming a loop. When the product is ready, it can be baked again and coated with acrylic paint. Next, matte varnish will be useful for finishing. The stylish box is ready.
Mirror box
Delightful decor is created using the following materials:
- Sharp knife, ruler and brush;
- Adhesive binder;
- Gloves with safety glasses for work;
- Acrylic plastic with reflective coating;
- Scotch.
Decor ideas
Each type of box, depending on the material from which it is made, can be decorated differently. A wooden box is usually decorated with a carved pattern; you can burn some design on it, or decorate it using the decoupage technique.
Decor of a leather box - patterns, additional weaves of leather or the inclusion of fabric elements, rhinestones, embroidery. A metal box is often decorated with stones or combined with glass.
The imagination for decorating boxes is limitless. Artists and designers offer more and more new options.
Step-by-step instructions for beginners
Before you begin master classes on decoupage boxes, you need to understand the essence of its implementation. This will help beginners to master the technology of such decoration at the initial stage. First of all, you need to prepare tools and materials, namely:
Decoupage box. For beginning craftsmen, it is best to take a ready-made wooden blank (such a product can be purchased at handicraft stores).- You also need to get decoupage cards or napkins, which are sold at retail outlets specializing in hobby goods. In general, any type of paper with a pattern is suitable for the technique (regular table napkins, wallpaper, postcards, clippings from literature, etc.), but for a beginner it is still better to use special blanks.
- Sharp scissors for cutting out pictures.
- Brushes of different sizes for glue and varnish.
- Glue (regular PVA or for decoupage).
- Glossy or matte high-quality acrylic varnish (the durability of the product depends on the quality of the varnish).
- Acrylic primer.
- Sandpaper.
As auxiliary tools you may need: an old toothbrush, tape, foam sponge, finishing putty, wax candle, various decorative elements.
Surface preparation
In order for the decoupage to turn out neat, the surface of the object being decorated must be perfectly smooth, so it must be properly prepared. This is done in several stages:
- Using sandpaper, you need to carefully sand the workpiece. This will help remove paint or varnish from the old product, as well as remove minor scratches and other defects.
- If the surface has very deep cracks or chips, they are first puttied, then the putty is allowed to dry for 3 to 5 hours, and then sanded again to a smooth state.
- Dust and debris remaining on the object after such treatment must be carefully removed, and then degrease the surface with acetone or an alcohol solution.
- After the workpiece is completely dry, an acrylic primer is applied.
- 30-40 minutes after the primer has dried, you can begin decoupage.
Paper thinning
The thinner the paper with the image, the more effective the decoupage will be. Thinning the material is one of the important stages of the technique, so it must be treated with special attention, otherwise the design will look sloppy or completely deteriorate. For this reason, beginners are recommended to use special decoupage cards on rice paper, which do not require prior preparation. In other cases, the paper is thinned using one of the following methods:
- Using tape. Varnish is applied to the front side of the picture in several layers, and after it dries, tape is glued to the back side of the picture. The adhesive tape is carefully peeled off along with the excess layers of paper. The procedure can be repeated several times until the picture becomes almost transparent.
- Softening in water. As in the previous method, the outer side of the image is treated with varnish, then the picture is lowered into a container with warm water for several minutes. The time it takes for the paper to soak depends on its density. The soaked drawing is carefully removed from the water and placed face down on a stationery file. Next, remove excess layers of paper, rolling them from the wrong side using careful finger movements. As a result, only a thin layer with a pattern should remain.
Decor of the box using decoupage technique
You can decorate the box yourself. The easiest and most affordable way to transform a purchased or gifted item is decoupage. A ready-made box can be purchased at any hobby market.
This technique is suitable for wooden and metal boxes, as well as plastic boxes. Tools needed: decoupage napkins, decoupage glue, acrylic paints, adhesive tape, brushes.
Decoration with vinyl wallpaper
If after repair there is a piece of vinyl wallpaper left, you can use it to decorate a wooden or cardboard box. Our master class will tell you how to decorate a simple thing with your own hands using textured wallpaper and give the surface a metallic effect. Let's say you have this roll of wallpaper left. Wallpaper can be of any color; our task is to paint the paper to match the color of the metal.
To work you will need:
- A piece of wallpaper or textured paper.
- PVA construction adhesive.
- Paper towels.
- Acrylic paints: black, copper, red, silver, green, dark gold.
- Varnish for coating.
To decorate a box with your own hands, you need to take a roll of wallpaper or textured paper, attach it to the box and cut off a piece with an allowance for the sides.
You can decorate only the lid of the box without touching the side walls. You can decorate both the lid and sides. Who likes it more? To cover the lid, apply a brush or sponge to the back of the paper. Take PVA glue and dilute it a little with water. You need to spread it so thickly that the paper is well saturated with glue and swells. Leave the paper aside for a while until it swells completely. Then we glue it onto the surface of the box. Press firmly with a sponge or with your hands to the surface. Make sure there are no wrinkles or bubbles.
Next, let the glue dry and only then paint the box and give it the look of metal, aged by time. To apply paint to the surface, use disposable paper towels soaked in water. We need the paint to lie unevenly and in irregular islands. First, cover the surface of the box with black acrylic paint. We have it in a can, but it can also be in a jar.
Let it dry and then cover it with red acrylic paint.
Add silver paint after the previous one has dried.
We tone down the red silver with bronze color.
Next, add a little black. Then again a little red.
Next, it’s time to oxidize our product. We proceed as in previous cases: with a damp disposable towel we cover the product with green paint. The latest decor is dark gold.
At the end of the master class, we apply a varnish coating to the resulting product. The varnish can be any: matte or glossy, aerosol or simple. You can also decorate a vase, you will get a set.
Master class on decorating a box
First you need to prime the surface of the box. Then, when the chest is dry, glue the decoupage napkin using special glue. After complete drying, you need to apply varnish on top. And now, our box is ready!
Here you can add dried rose buds, rhinestones, ribbons, newspaper clippings and postcards, lace and so on. Napkins for decoupage in Provence and shabby chic style can be with images of flowers, birds, plants, angels.
You can decorate a New Year's box in the same way. Only napkins need to be chosen in accordance with the theme of the holiday - snowflakes, Christmas trees, snowmen, New Year's toys and so on.
Decoupage in different styles
Decoupage for beginners is a creative activity. Even using the instructions does not deprive the product of its originality. After this technique, the box or book will become original of its kind. Before you begin converting a product, it is worth considering all available options.
Design can be done in different styles:
- vintage;
- Provence;
- shabby chic.
vintage style decoupage . With the help of certain tricks, the box can be somewhat aged. To achieve maximum effect, experts recommend using the craquelure technique. The aging effect is created using paint, which is applied directly to the prepared surface. To begin with, dark paints are used, and lighter colors are applied on top of them.
Decoupage boxes in vintage style
Stages of decoupage in vintage style:
1. The first layer can be applied with brown paint, then wait for the surface to dry.
Related article: Creative refrigerator using decoupage technique
2. Next, they begin to create the worn effect. To do this, apply a small amount of wax to the edges of the product. This will make the second coat of paint look somewhat worn.
2. A second layer of paint is applied, only in a lighter shade. The best option is white, light gray and beige.
3. When the paint has dried, lightly sand the areas with sandpaper. Processing is carried out until the bottom layer of paint comes out.
3. At the final stage, the product is decorated. The best option here would be retro pictures, roses and other patterns. The craquelure technique is also often used for decoration. This box made using decoupage technique will become an original decoration for any room interior.
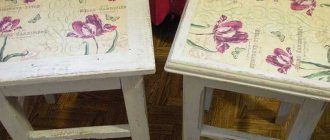
No less popular is decoupage in Provence . The work is performed in the same sequence. Of course, there are some peculiarities here. Flower designs or rustic motifs are used for decoration. It is rational to use paint in bed shades. The aging effect is also appropriate here. Using the craquelure technique, you can create the appearance of cracking of the design.
Decoupage boxes in Provence style
Provence style is ideal for transforming a round box.
A box in the shabby chic is decorated almost the same as in previous techniques. Characteristic features are bed colors, old pictures, images of flowers, twigs and other “delicate” details. Shabby chic is used to decorate various items, regardless of their shape and size. This is especially true for products made in the form of a book.
Decoupage using the shabby chic technique and using printouts (2 videos)
Interesting ideas for decoupage boxes (41 photos)
The best posts
- Is it possible to glue wallpaper onto wallpaper: how to glue non-woven wallpaper, will wallpaper stick to paintable wallpaper, water-based paint, vinyl, liquid, video
- What should be the dimensions of window openings according to GOST
- Finishing the floor on the loggia and balcony
- Quick-drying, odorless paint for the floor of your country house
- DIY kites for children: drawings with diagrams and photos
- Stylish and fashionable: interior like Zverev’s [house review
- Types of hinges for cabinet doors and their installation
- Silk: types, properties, fabric care
Related article: Original do-it-yourself photo frames (+50 photos)
Photo decor of the box
Kitchen decor - a review of the best ideas and 130 photo examples of current kitchen decoration options- Fireplace decor - 145 photos of modern ideas and methods of decoration in a house and apartment
- Bathroom decor: 125 photos of the best ideas and original design options from professionals
0
Did you like the article?
0