Variety of shapes of beaded pendants
Today, designers offer fashionistas many different patterns for weaving beaded pendants. Some of them are very simple, others are amazing in their complexity. Such variety allows every needlewoman to choose something that suits her liking.
As you can see in the photo of beaded pendants, despite all the differences, they have one thing in common - uniqueness. That is why this kind of jewelry is highly valued all over the world.
Bead pendants in training lessons (photos and videos)
Jewelry made from beads is becoming increasingly popular. Due to their uniqueness, they often turn into a highlight and complement the chosen outfit.
We will devote this lesson to making pendants and pendants that will become your favorite accessories.
Pendant made of beads and beads
Necessary materials for work:
- 12 large pearl beads and 6 faceted ones;
- 12 bicones;
- 5 grams of beads;
- a special needle and thread or fishing line.
We start weaving by stringing six bicones onto a fishing line and tying its ends, forming a ring from them.
Near all the bicones we create loops of three beads (like pearls). We thread a fishing line into each and collect 3 beads on it; above a separate bicone we have a loop of these 3 pearls. We continue until all 12 are finished. After this, we add one faceted bead in the spaces between the pearls, which protrude most from the pendant, being at the peak of the loop. We pass the fishing line through these pearls and string faceted beads between the peaks.
We embroider the pendant with beads. We do this at will, the main thing is to maintain symmetry.
Attach a metal connecting ring and hang the pendant on the chain. If you wish, add a bicone, a pearl and a long faceted bead to it.
Weaving a large pendant
For work we prepare:
- beads of copper and silver colors;
- beads 10 mm;
- Swarovski crystals 4x6 mm and 14 mm;
- fishing line;
- a needle;
- scissors.
We string 28 copper-colored beads onto a fishing line and close a ring from them; to do this, we thread the thread through the last bead in reverse. Then we put on another one and pass the rings through the beads to secure the thread. We continue to string, then pass the thread through the next bead of the ring. We perform such actions until the end of the ring.
When the first row is ready, we remove the needle from the enclosing bead to the next row and begin weaving with silver color. We continue weaving and weave two more rows.
Then we return to the first row and continue working with copper beads. We put five beads on the fishing line, insert the needle into one bead of the first row, count four more and pass the working “thread” into the fifth bead, an arc is formed. So we braid the first row.
We form the following: we add one bead along the entire circumference of the arcs to the middle beaded arc, it becomes sharper. After this, we place a large 14 mm crystal in the middle of the resulting figure, tighten the outer row with fishing line and fix it inside. For strength, add another row along the edge.
We bring the needle to the row from which we started weaving and weave another one along the edge. Add a large bead and 1 silver bead to the edge of the weave. We string 7 beads around the circumference, hooking them to the protruding beads.
At the end, we take the fishing line to the left side of the large bead. We collect three copper beads and seven silver ones, and pass the fishing line into the silver one, located above the large bead.
Then we make a set of 7 silver, three copper and draw a line to the right and below the bead. It turned out to be braided with beads of two colors, like in a halo. We move the fishing line to the next one, draw the needle into the bead to the left of this bead. We braid the second bead with copper and silver beads as we did in the first case. We do the same with all the beads.
We string one silver bead, a bead and another bead onto the fishing line. We will secure this set in the gap between the large beads, forming another row. After this, we string 1 bis., a crystal and another silver one, and draw the thread into the last row, fastening them in the gaps.
We make a loop, the pendant will hang on it. To do this, we collect 12 beads and secure them with fishing line above the last row.
The decoration is ready and all that remains is to attach it to the chain.
Video: Weaving a pendant
Video: Master classes on beading pendants
vnitkah.ru
Round pendant in ethnic style
If you want to make something picturesque and textured, then take a closer look at such an original idea for a beaded pendant as a round pendant in an ethnic style.
Making such a decoration is not as difficult as it might seem. You will need to prepare:
- a piece of leather (both natural and artificial leather are suitable);
- spool of strong thread;
- needle;
- beads or beads;
- glue;
- something as the central element of the pendant (it is appropriate to choose a beautiful button and first cut off its stem).
Next, you need to follow the following instructions on how to make a pendant with your own hands:
- First of all, glue the button to the skin.
- After the glue has dried, start sewing it with beads of the chosen color, for example, green, picking two beads on the needle at a time. Thus, embroider the first circle.
- Then fasten the thread, select beads of a different shade and continue working. The number of circles, as well as the shape and color of the beads used, depends on your imagination and desire.
- If you decide that that’s enough, then cut out the resulting pendant blank. This must be done with extreme care so as not to damage the stitches.
- Finish the edges of the cut pendant. To do this, fasten the thread, pick up 1 bead, step back a little and pierce the edge. Pull the thread, catch the loop, pull the needle through it and tighten. The bead stood up, covering the cut of the pendant. Finish the entire contour of the product in the same way.
- Make a loop so that the pendant can be hung on a chain. It can be either leather or made of decorative cord. Glue it to the wrong side.
- Cover the reverse side of the jewelry with a piece of leather of the appropriate size and shape.
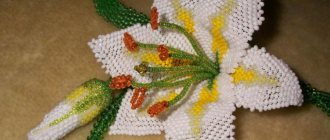
Weaving a flower pendant
In fact, it is absolutely not difficult to do, you just need enthusiasm and a little of your time.
To make it you will need some materials, namely:
- Needle with hook for weaving beads
- Strong thread, pliers and small scissors
- The bead you like
- Pin with clasp
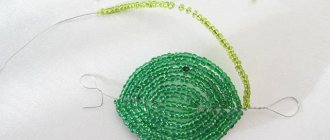
First you will need to weave 6 strands, each should be 10-15 centimeters long. They need to be made into half-columns, which will have 5-6 small beads.
Next, you begin to form the very first petal of the flower. If you want to make a voluminous pendant from beads, then instead of 6 beads, insert 10-12 pieces. Bend the flagellum in half and pierce it with a pin.
Then form the next petals. After 5 petals have been formed, make a bead pendant. Intertwine several wires with thread, add a couple of beads for decoration and the pendant is ready.
Read here - Nutrition for pregnant women
By showing your creativity and imagination, you will make a beaded pendant with your own hands, which you can then keep for yourself or give to a loved one.
It’s not without reason that they say “the best gift is the one made with your own hands.” A gift made with love and tenderness is remembered and remains with the person for life.
Pendant with cameo
Lovers of the classics will definitely like this pendant. It will be appropriate as an addition to both an office suit and an evening outfit.
To create it you will need:
- cameo (cabochon) 4×3 cm;
- two types of beads (Japanese and Czech);
- crystal and hematite beads;
- a piece of felt;
- glue “Moment Crystal”;
- sheet of cardboard;
- leather;
- thread and needle;
- simple pencil.
- Glue the cameo to the felt. It is desirable that the color scheme of these elements be in harmony with each other.
- Cover the cabochon first with crystal beads, then with hematite and Japanese beads, respectively. Each row has its own type of beads.
- Carefully cut out the workpiece.
- Attach it to the cardboard, trace it with a pencil and cut out the resulting shape along the contour. Remember to move 3mm towards the center.
- Glue the cardboard to the back of the future pendant.
- Cover the wrong side of the product with a piece of leather. Trim off the excess.
- Finish the edges with Czech beads. For greater effect, you can select beads of different sizes and alternate them.
- Decide and make the suspension mount.
- Assemble the pendant and hang it on a chain or cord.
In conclusion, we note that bead weaving is one of the most popular women's hobbies. This hobby allows you to create your own individual style.
In addition, over time it can develop into a means for additional income. All that is required for such needlework is desire and imagination. The rest will definitely follow. Good luck!
Photo of a beaded pendant
Industrial vacuum pumpDIY stencils of beautiful snowflakes from A4 paper
- DIY paper crown: ideas, templates and tips on how to make a real crown (video + 130 photos)
How to make a three-dimensional paper house: step-by-step master class and instructions for making a doll and toy house (155 photos + video)Making peony flowers from corrugated paper - a guide for beginners and a step-by-step master class on how to make a flower with your own hands
How to make a beautiful tree of happiness with your own hands: step-by-step master class for beginners (100 photos + video tutorials)
How to make a beautiful lampshade with your own hands: simple ideas for table and floor lamps (125 photos + video)How to make polymer clay at home: DIY master class (125 photos + video)
How to make a paper hat with your own hands - templates, design ideas and tips for those who are making a hat for the first time