Italian method of closing loops with a needle with photos and videos

Any knitting technique involves a set of loops. There are many ways to do this, which depend on the product, patterns and simply ease of use. One of the varieties is the Italian set of loops. With its help, an elastic edge is created, ideal for knitting elastic for cuffs on the sleeves and along the bottom of the product, as well as for decorating the neckline. The main advantage of this method is a smooth edge, as close as possible to industrial.

For knitting you will need:

  • metal knitting needles one size smaller than those that will be used to knit the rest of the fabric;
  • high-quality yarn with an even, smooth thread;
  • skill - the final result largely depends on skill; you need to constantly monitor the tension of the thread.

For those who are just getting acquainted with this method, it is better to start with the classic method, using an Italian set of loops with knitting needles for knitting 1x1 elastic.

Knitting with one thread

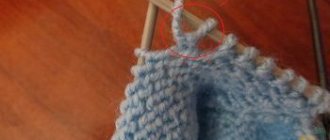
In this case, only one knitting needle is used, which makes the work easier and makes it possible to quickly master the technique. This is done like this:

  • the first loop is formed as usual;
  • for the second, the thread is grabbed from under the thumb, while the knitting needle rises above the thread from the index finger and extends already under the thread from the thumb;
  • the purl loop is formed from top to bottom from the index finger, and then the thread rises up and is grabbed from the thumb;
  • This is how a row is knitted, alternating purl and knit stitches;
  • In the next row you need to knit only the front loops and remove the purl ones. The row will look upside down.

If you like this set of loops for the elastic edge, you can try a more complex option.

Introduction to technology

The Italian stitch closure technique is also called the needle stitch technique. Use this method if you want the knitted elastic to retain its elasticity after closing the loops and not increase its edge with unnecessary weaves.

When using this technique, the edge, on the contrary, remains very attractive, it is smooth, not protruding and, interestingly, is double-sided.

Such an edge will be simply ideal for covering a detail of an interesting composition. This Italian method is performed with a needle.

Method with additional thread

For the set, you will need an auxiliary thread of a contrasting color or you can use a thin elastic band if you need to make the edge more springy. This technique is often used when making elastic bands for socks or waistbands on thin knitted skirts. The Italian set of loops with knitting needles is done like this:

  • the initial loop is knitted in the traditional way;
  • the main thread is on the index finger, the auxiliary thread is on the thumb, the threads are fixed with the little finger and ring finger;
  • the knitting needle passes under the auxiliary thread and grabs the main thread, forming the first working loop;
  • then the main thread is picked up, and the auxiliary thread is placed behind the loop, and the previous point is repeated;
  • This way the required number of loops for knitting the product is formed.

The Italian method of casting on loops with an additional thread assumes that in the first row after casting on, the loops will be placed in front of and behind the additional thread. Those that are in front are knitted with knit stitches, while others are removed as purl stitches.

LiveInternetLiveInternet

Quote from tati_mama

Read in full In your quotation book or community!
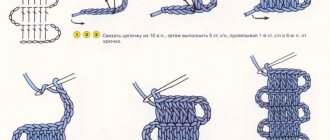
Italian set of loops for straight and circular knitting.

Italian set of loops with elastic and tight edge.

Italian set loops for circular knitting.
Italian hinge set

This method of casting on stitches, in which the edge, while remaining elastic, looks impeccable, is ideal for knitting cuffs and panels in 1 x 1 rib (= alternately k1, p1) and patent patterns. The initial row and the next 4 rows are made with thinner knitting needles - one full size smaller than those used to knit the rest of the fabric. Fig. 1 Lay the thread (the length of the free end of the thread should be approximately 3 times the length of the cast-on edge) around the thumb and forefinger, as shown in the figure (thread with an arrow = thread from the ball). Place the knitting needle under the thread, then unfold the knitting needle, moving its end in the direction of the arrow. Fig 2 The figure shows the 1st loop. Fig. 3 Place the knitting needle under the thread coming from the thumb, in the direction of the arrow, grab the thread coming from the index finger, and tighten the loop on the knitting needle. Fig. 4 The figure shows the 2nd loop obtained after performing the technique (Fig. 3) Fig. 5 Place the thread coming from the index finger in front of the knitting needle, as in the figure, and grab the thread coming from the thumb in the direction of the arrow. Repeat techniques 3-5 until the required number of loops is cast. Attention! This method always casts on an odd number of stitches. The next 4 rows are performed as follows: 1st row (knit row): 1 knit, * remove 1 loop like a purl, pass the thread in front of the loop, 1 knit crossed; repeat from *. finish: slip 1 loop as if purling, 1 knit. 2nd row (purl row): 1 purl, * 1 knit, slip 1 loop as if purling, pass the thread in front of the loop; repeat from *, finish: 1 knit, 1 purl. 3rd row (knit row): * Knit 1, slip 1 loop like a purl, pass the thread in front of the loop; repeat from *, finish: 1 knit. 4th row (purl row): knit as 2nd row. From the 5th row, continue working with an elastic band (alternately 1 knit, 1 purl, sample - see photo) or a patent pattern, while switching to thicker knitting needles.

Italian set of loops with auxiliary thread

This is another version of the Italian set of loops. As when casting on without an auxiliary thread, the first 4 rows are made with knitting needles one full size smaller than the rest of the fabric, and knitting continues with a 1 x 1 rib (alternately 1 knit, 1 purl). Fig. 1 First perform the initial loop, as with a simple cast-on. Wrap the working thread around the index finger of your left hand. Place an auxiliary thread of a contrasting color (the length of the auxiliary thread is equal to twice the width of the finished knitted piece) around the thumb of the left hand. Hold the ends of the thread with your right hand. Place the knitting needle under the auxiliary thread and, in the direction of the arrow, grab the thread coming from the index finger. Fig. 2 Lay the thread coming from the index finger in front of the knitting needle, bring the knitting needle under the auxiliary thread and grab the thread coming from the index finger in the direction of the arrow. As a result of each technique, 2 loops are formed on the knitting needle. Make sure that loops are not formed from the auxiliary thread! Together with the initial loop, the number of loops must be even. Fig. 3 We knit the loops of the initial row: the loop in front of the auxiliary thread is knitted, the loop behind the auxiliary thread is removed, as in purl knitting, while the working thread is pulled in front of the loop. Attention! Purl the penultimate stitch, slip the last stitch (= starting stitch) from the needle and unravel. Fig. 4 In the next 2 rows, knit the front loops with the front ones, remove the purl loops, as in purl knitting, while pulling the thread in front of the loops. Then switch to thicker knitting needles and continue working with the corresponding pattern. The auxiliary thread can be removed at this stage of work.

https://mvz.kz/index/italjanskij_nabor_petel/0-58

Italian set.


We take a thread of a contrasting color, a hook of a suitable size and knit a rather loose chain of air loops. The number of loops in the chain is calculated as follows: if you need N loops for work, the length of the chain should be N: 2+1 loops.


We put aside the hook, take a knitting needle and cast on loops on it using the following sequence of steps: one loop is knitted from the chain as a knit stitch, yarn over with a thread from a ball, knit from the chain again, yarn over again, etc. Having completed the row, we connect the second knitting needle to the work: we knit all the yarn overs of the previous row with knit stitches, and remove all the knit yarn overs (now we see them as purl ones) as in purl knitting, leaving the working thread before work.


We will knit three more rows in this mode. It is curious that a side effect of such knitting is the cavity that is formed between the many knit stitches and the many slipped stitches: if all the knit stitches of one row are removed on one knitting needle, and all the slipped loops of the same row are removed on another, then we will get two parallel fabrics. A side effect with great potential! The contrast thread unravels.


The cast-on edge - with neat teeth, absolutely elastic - is ready.

Italian method of casting on loops. https://domihobby.ru/457-italyanskiy...bora-petel.html

The Italian method of casting on loops looks very neat and is ideal for making sleeve cuffs, 1 x 1 ribbed panels, patent or semi-patent patterns, since the edge remains very elastic and soft. This method consists of an initial set of stitches and knitting the next 3 rows, which are recommended to be done with knitting needles half a size smaller. Let's consider the Italian method of casting on loops with an additional thread .

First, make the initial loop with the main thread as in the classic cast-on (you don’t have to leave a long end of the thread). Then place the main thread around your index finger and the secondary thread around your left thumb, holding the ends of the threads with your ring and little fingers.

Then *insert the knitting needle with the initial loop under the auxiliary thread and grab the main thread, the first loop is formed on the knitting needle in front of the auxiliary thread.

Then simply pick up the warp thread with your knitting needle.*

Insert the knitting needle under the auxiliary thread again, pull out the next loop as the first and grab the main thread with the knitting needle, we get the fourth loop.

So repeat from * to * further, casting on the required number of loops.

Make sure that all the loops on the knitting needle are the color of the main thread, and the auxiliary thread is located under the knitting needle, wrapping around the loops.

To knit the first row, consider the initial chain of loops: the loops alternate in location in front of the auxiliary thread and behind it. We begin to knit the first row: with knit stitches we knit the loops located in front of the additional thread, and remove the loops behind the auxiliary thread as purl loops, passing the working thread in front of the loop.

In the next two rows, knit the knit stitches and remove the purl stitches.

Then switch to larger knitting needles and knit with a 1 x 1 rib stitch, knitting the knit stitches with the knit stitches and the purl stitches with the purl stitches. After completing several rows, carefully pull the auxiliary thread from the initial row.

Italian set of stitches with knitting needles. https://ladies.by/dom/vyazanie/yroki_spicami/italyanskij_nabor/

The correct choice of the method of casting on loops is not only a beautiful appearance of the product, but also a durable, elastic edge that will not lose its original shape when wearing and washing a knitted product. The inlaid edge can be hard, elastic or decorative. There are many ways to cast on loops (depending on the further purpose of the cast-on edge). The Italian cast-on stitches are done with knitting needles using an auxiliary (contrast) thread, which is then removed. The auxiliary thread must be strong, because it must be tightened, aligning the loops from the main (working) thread. Instead of an auxiliary thread, you can use a thin rubber vein. It is left in the initial row, and the ends are secured. When using a rubber vein, the inlaid edge becomes more elastic. In Italian cast-on, the stitches are cast on with needles one-half number smaller than the needles that are then used to knit the main patterns. It should be borne in mind that in the descriptions, when referring to an Italian set, the first three rows are automatically considered an Italian set and are not included in the row count. The Italian set of loops can be done in three ways: 1st method

Step 1. The initial loop is formed as with a regular cast-on. Subsequently, this loop unravels and is not included in the calculated number of loops. Place the working (light) thread around the index finger of your left hand. Loop an auxiliary (dark) thread, the length of which is equal to twice the width of the finished knitted piece, around the thumb of your left hand. Hold the ends of the threads with the fingers of your right hand. Place a knitting needle under the auxiliary thread and, grabbing the working thread in the direction of the arrow, form the 1st loop: make a movement around the auxiliary thread, like around a knitting needle, and pull the loop towards you.

Step 2. Place the working (light) thread in front of the knitting needle. Bring the knitting needle under the auxiliary (dark) thread and grab the working thread in the direction of the arrow - a pair of loops is formed. Each time this technique is repeated, 2 loops are formed. Cast on the last stitch as usual. Attention! The auxiliary thread should not be used to form loops.

Step 3. Knit the cast-on loops of the 1st row with a double (hollow) elastic band: knit the loop in front of the auxiliary thread; remove the loop behind the auxiliary thread, as in purl knitting (working thread before work). Attention! Purl the penultimate stitch, and slip the last (and starting) stitch off the needle and unravel.

Step 4. In the next rows (their number is indicated in the description), knit the front loops, and remove the purl loops, as described above. After this, you can switch to larger needles and continue knitting with any pattern. Attention! Having finished the part, remove the auxiliary (contrast) thread.

2nd method (double elastic band)

With an elastic cast-on edge for a 1x1 elastic band, on smaller needles, use an auxiliary (contrast) thread to cast on half the required number of loops + 1 stitch and then knit with a working (main) thread: 1 row: 1 edge; * 1 person; 1 yarn over **; repeat from * to **; 1 chrome When knitting in the round, knit in the same way. 2nd row: 1 edge; * knit 1 yarn over; remove 1 purl. (thread before work)**; repeat from * to **; 1 chrome When knitting in the round - * purl 1 yarn over; remove 1 person (thread at work)**. 3rd row: 1 edge; * 1 person; remove 1 purl. (thread before work)**; repeat from * to **; 1 chrome When knitting in the round, knit in the same way. 4th row: 1 edge; *Knit 1, remove 1 purl. (thread before work)**; repeat from * to **, 1 chrome. When knitting in the round - * 1 purl; remove 1 person (thread at work)**. Remove the auxiliary (contrast) thread. At this stage we have a neat, one-piece edge of the double (hollow) elastic band. Next, knit a regular 1x1 rib.

This is what a double (hollow) elastic band looks like when you remove the stitches from the knitting needle.

For 2x2 elastic, perform the first 4 rows as described above, and then continue: 5th row: 1 edge; * 1 person; remove 1 purl. on aux. knitting needle (thread at work); 1 person; 1 purl. with aux. knitting needles; 1 purl**; repeat from * to **; 1 chrome So, line up the loops in pairs in a 2x2 elastic band and then continue working with a regular 2x2 elastic band. Note. Crossed loops in the 5th row can be made without an auxiliary needle. To do this, knit the second loop, inserting the right knitting needle into the loop in front of the first and leaving a loop on the left knitting needle, then purl the first loop and remove both knitted loops from the left knitting needle (i.e., swap the loops so that they lie in pairs: 2 faces., 2 p.). Little secret. For the elastic to be beautiful and symmetrical, the number of loops must be a multiple of 4+2.

3rd method

The elastic cast-on edge for 1x1 and 2x2 elastic bands is made on an auxiliary chain of air loops, crocheted with a contrasting thread. Then loops are pulled out of it from the beginning of the chain using the working (main) thread. The chain of air loops is subsequently removed (dissolved): Attention! With this set of loops, initially 2 times fewer loops are cast on, since the second part is taken from the jumpers between the loops being cast on.

Making an elastic cast-on edge for 1x1 elastic

Step 1. Crochet a chain of air loops with an auxiliary (contrasting) thread, then cast on loops from the knots of the chain with a knitting needle (Fig. 1).

Step 2. Knit the 1st row with knit stitches, the 2nd row with purl stitches, the 3rd row with knit stitches, and knit the edge loops. On the wrong side, insert the knitting needle into the edge loop and into the bottom jumper and knit them with a purl loop, as shown by the arrow (Fig. 2).

Step 3. Using the right knitting needle, pick up the jumper between the loops of the 1st row, moving away from you (from the front of the fabric back) and knit a knit stitch into the jumper, as shown by the arrow (Fig. 3).

Step 4. Then knit a loop from the left knitting needle purlwise (shown by the arrow), and a knitting stitch from the jumper between the loops of the lower first row (Fig. 4).

Step 5. Finish the row with a knit stitch from the jumper knitted together with the edge loop (Fig. 5).

Step 6. Continue knitting with 1x1 rib (Fig. 6). Remove (weave) the auxiliary (contrast) thread. We get a beautiful elastic cast-on edge.

Making an elastic cast-on edge for 2x2 elastic

This method is also suitable for 3x3 elastic, only when casting on loops from an air chain with a knitting needle, you need to skip three loops (for other elastic bands, skip the required number of loops in the cast-on chain).

Step 1. Using the main (working) thread, use a hook to knit a chain of air loops. Using a separate contrasting thread from the knotted edge of the air chain, cast on loops in the following order: * pick up 2 loops, skip 2 loops**, repeat from * to** (Fig. 1a).

Step 2. Using the main (working) thread on the cast-on loops, knit 3 rows (purl, knit, purl), knitting the edge loops. Next knit: 1 edge; 1 front; from the first jumper between the loops of the first row, knit 1 purl; from the second jumper - also 1 purl (shown by arrows in Fig. 2a).

Step 3. Knit similarly to the end of the row: knit 2 knit stitches from the left knitting needle, and knit 2 purl stitches from the jumpers (Fig. 3a).

Step 4. In subsequent rows, knit the last loop of the row and the edge loop together (Fig. 4a).

Step 5. Don’t forget to remove (weave) the auxiliary contrast thread (Fig. 5a).

Elastic band 2x2.

Manufacturing method 1. For men's pullovers, you may need a 2x2 elastic band. Nothing could be easier! It is a derivative of the 1x1 elastic band. So, we knit 3 rows of 1x1 elastic: 2.1 row: edge, * purl, yarn over * to the end of the row, we finish depending on whether we need an even or odd number of loops, in the first case we knit a yarn over, edge, in the second - yarn over, purl , edge We turn the work around. 3.2 row: those loops that were knitted in the previous row are knitted with knit stitches, the yarn overs are removed as purls, the thread is in front of the loop. We turn the work around. 4.Next we repeat only the second row, making 4 more rows (two in one direction, two in the other). The number of rows can be more, but less is undesirable: the edge will not hold well. 5. Now the fun part: from a 1x1 elastic band you magically get a 2x2 elastic band! 6.7 row: edge, * purl, knit stitch on additional needle before work, purl, knit stitch from additional needle, knit stitch * to the end of the row. We turn the work around. 7.8 row: edge, *2 purl, 2 knit* to the end of the row. Turn over and knit the required number of rows. 8.After the 7th row, you can transfer the knitting to stocking needles and knit the fabric in the round (cuffs, neckline, bottom of the product).

https://vk.com/love_vjazanie?w=wall-82895734_20689

Knitting elastic 2x2

This set of loops is well suited for knitting a popular elastic band, where the loops are cast on in multiples. The principle is as follows:

  • The first row begins with a front loop, which is knitted behind the back wall, and the purl loop is removed. The thread is placed in front of the loop;
  • in the second row, the front loop is formed behind the front wall, the purl loop is traditionally removed. The thread is still located in front of the loop;
  • the third row is knitted according to the principle of the second, and the fourth repeats the third.

In the fifth row of the Italian set of stitches for 2x2 rib, we change the knitting needles to larger ones. We knit the purl loops in the classic way, in which the front loops are knitted behind the front wall.

Method 2

When casting on the initial row, the auxiliary contrast thread is not knitted, but pulled through. After five to ten rows you can pull out the auxiliary thread.

English gum

One of the most popular knitting techniques - English rib - is also formed using an Italian set of loops, and an odd number. Then the elastic band itself is knitted, following the principle:

  • The front loop is a yarn over, the next one is removed, and so it is repeated until the required number of loops. The working thread remains behind the wall;
  • the next row begins with a yarn over, then a loop is removed, and the working thread is placed in front of the wall. The yarn overs of the previous row are knitted with knit stitches;
  • then the first loop and yarn over are knitted, yarn over and the loop is removed;
  • The second and third rows alternate, forming the desired elastic size.

Winter hat made of wool yarn

Winter knitted hats for children and adults, made on knitting needles with a double elastic pattern, are very warm.

  1. Measure your head circumference.
  2. Make a control sample from the model yarn.
  3. Using the sample, calculate how many loops are needed for the hat.
  4. Dial the calculated number using the Italian method. Take knitting needles 0.5–1 size smaller than the main part of the hat will be knitted.
  5. Knit the required number of rows with a hollow elastic band; the height of the cap, depending on the model, is from 24 to 30 cm.
  6. Divide the work into four parts.
  7. Work the crown, decreasing stitches at the end and beginning of each part in each odd row.
  8. Pull the remaining open loops onto a thread. The warm hat is ready.

Circular knitting

The Italian cast-on in the round begins by casting the required number of stitches on smaller needles. Plus one additional loop is cast on to connect the initial row. Afterwards the loops are evenly placed on 4 knitting needles or left on special circular knitting tools.

  1. In the first row, the front loop is knitted behind the back wall, and the purl loop is removed. The thread is placed in front of the loop.
  2. In the second row, the front one is removed, and the purl one is knitted. The thread is behind the loop.
  3. In the third row we switch to larger knitting needles and continue knitting according to the chosen pattern.

Remember to join the stitches in the cast-on row to avoid a gap between the first and last stitch.

Closing the last row of the pattern

Method one. To maintain the elasticity of the closed edge, all removed loops are knitted and closed using the purl method, and the front ones are knitted and closed using the front method. The edge obtained by this method is very elastic and stretches easily, so it is used for knitting collars of sweaters and turtlenecks.

Method two. Closing the edge with the following knitting pattern will allow you to preserve the shape of the part: Two loops are knitted together (one from the face, the second from the back) and pulled through the previous one.

Method three (Italian). After finishing knitting, the long end of the yarn is threaded into the eye of a thick needle. The yarn should fit into the eye of such a needle freely.

  • Through the first knit stitch, pull the needle and thread into the second loop (purl stitch), remove both loops from the knitting needle.
  • Through the first knit stitch, pass the needle into the next knit stitch, pull the yarn through, and lower the loop.
  • Thread a needle through the purl stitch removed into the next purl stitch, pull the yarn through and remove the loop.
  • Repeat these steps, alternately tightening knit stitches with knit stitches and purl stitches with purl stitches. To keep the edge elastic, do not pull the thread too tight.

Fourth method. Having finished knitting, you need to divide the work into two parts, leaving the knit stitches on one knitting needle and the purl stitches on the other.

The end of the working yarn is threaded into the eye of a thick needle and the edge is closed with its help.

Pull the needle through the first loop on the knitting needle moving away from you and through the first loop on the second knitting needle from right to left, then lower both loops.

Insert the needle through the knitted loop on the first knitting needle, pull the yarn through both loops from right to left.

Do the same with the second half of the work. Repeat these steps one by one until the entire knitting edge is covered.

Loop closure options

When knitting, you will be faced with closing loops every time, so it is best to immediately familiarize yourself with all kinds of techniques, or at least know what they mean, so that you know which one to use at the right time.

The most common way to bind off stitches is to knit stitches. This method can be used to close any parts, it is of course not completely elastic, but it will leave the part in the same tension as it was connected.

The next method is to close the loops as purl stitches. It is knitted according to the same principle as knitting, but here a purl loop is involved in each manipulation.

A separate method that you should know about is closing the loops using the elastic method. If you knitted, for example, a neck that should stretch a little when worn, then you simply cannot do without this method. It is also very relevant for sleeve armholes.

Having at least such basic concepts about possible ways to close loops, you can learn more about the method you are interested in and, with the help of lessons and master classes, knit great things.

Elastic set of knitting stitches

It is used both to start knitting and to increase the number of loops in a row. With this method, the free end of the thread should be short, only to form the first loop. Cast it on in the usual way onto one needle.

This set of loops gives a very elastic, well-stretchable edge. Suitable for 1x1, and most importantly 2x2 elastic bands.

1. Take the knitting needle with one loop in your left hand, and the other knitting needle in your right. Knit a stitch and throw it over the left needle.

2. In this way, cast on the required number of loops.

Elastic set of loops with knitting needles video

Up

How to knit a super stretch edge

To begin with, we form one st. We place the working thread on top of the index finger, and place its end on the left side of the hand, on the thumb. We hold the knitting needle with the loop in the center.

We bring the knitting needle under the thread on the thumb, grab the second thread from the index finger under it and pull it towards ourselves. As a result, a loop is formed that will be similar to the front one.

Now we move the knitting needle in a downward direction away from us, place it under the thread on the index finger, grab the yarn coming from the thumb, and get a loop similar to the purl one.

We alternate these two stitches throughout the entire row. Important! The penultimate one should be “purl”.

Next we knit an elastic band. We suggest trying to knit a Polish one. To do this, it is necessary that the number of stitches cast on be a multiple of 4 + 2 edge stitches. Odd r. knitted this way: 2 l. p., 2 i. n. Even r. we knit differently: 1 and. p., 2 l. p., 2 i. p... The last one should be the front one!

Watch the video master class:

Rating
( 2 ratings, average 5 out of 5 )
Did you like the article? Share with friends:
For any suggestions regarding the site: [email protected]
Для любых предложений по сайту: [email protected]