crochet technique for beginners step by step
We bring to your attention a master class on the topic of enterlac. A crochet technique for beginners of this type may seem complicated and labor-intensive, since from the outside it seems that it is made of separate elements. However, this is a method of making a single fabric with an unusual beautiful pattern in almost continuous knitting.
The enterlac technique uses, as in patchwork, squares, triangles and rectangles. As shades, you can choose either a variety of colors or monotony. Since you can knit in the longitudinal, transverse direction and from the corner, this allows you to play with color for the entire product as a whole, i.e. you can make a gradient (color transition from dark to light), you can alternate shades in different ways, etc. p. And now familiar things began to sparkle with new facets.
Basics of technology
Products are made using the enterlac technique, both with simple crochet and Tunisian crochet. If in doubt, simply link trial options and choose the one that seems most suitable for your future creation.
If the product consists of several parts, for example, in a jacket there are shelves, a back, sleeves, then decide what size element (square, triangle or rectangle) will look harmonious. For convenience, you can draw a sketch, or patterns.
The rest of the article will describe step by step how knitting is done using the enterlac technique.
For the first square, we will dial a chain of 13 chain stitches.
Next, through the first loop from the hook we knit the first of the next row.
Leave the loop you just knitted on the hook. We also knit seven more loops.
Then we grab the working thread and knit the two outer loops that are on the hook.
Thus, we knit two loops on each hook.
Now, if we look at what is knitted, we see vertical jumpers. It is for them that the loops of the next row will be knitted.
In this way we make six more loops, but we will knit the seventh through the loop of the initial chain.
Then we repeat the same procedure with knitting loops in pairs on the hook.
Two rows are ready. From the third to the sixth we knit by analogy.
The seventh row, which will be the last for this square, is knitted with connecting stitches. Moreover, we hook both the jumper and the front wall of the loop with a hook. At the end we fasten the thread and cut off the excess.
We attach a thread of a different color to the lower right corner of the blue square and cast on 7 chain loops.
Again we put on six loops on the hook, but we knit the seventh into the side loop of the blue square.
Then, as for the first row, we knit the loops that we picked up on the hook.
From the second to the sixth row we knit in the same way, not forgetting to knit the seventh loop to the side of the first square.
We close the last row with connecting posts. Moreover, the outermost loop should be knitted into the corner loop of the blue square.
We cast on seven chain stitches again and knit a square again. At the end we cut the thread.
You should end up with something like this:
From the bottom corner of the second square we collect a chain of seven chain stitches with a thread of a different color.
And we knit the next square.
Since the top square of this color will be connected to the others on two sides, we first cast on six loops of the first row over the loops of the yellow square, but the last (seventh) through the side wall of the first top one. This is how we knit the entire square.
For the third square of the same color, we cast on seven chain stitches and knit it above the second yellow one.
In this way, we knit the volume that is necessary for a particular product, each time starting the diagonal row from the lower right corner of the base squares.
Product options
You can knit socks using this technique.
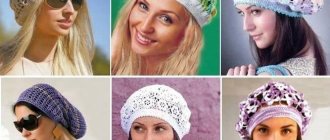
It is also used to make hats.
Blankets are more labor-intensive, but no less beautiful. If you don’t like using many colors, then choose a color scheme that matches your interior.
At the end of the article, we suggest you watch the video tutorials. They offer not only knitting variations, but also models with descriptions of products in which the enterlac technique can be used. Get inspired, try it, come up with something of your own using already familiar knitting.
Video on the topic of the article
Similar articles:
knittochka.ru
Enterlak: crochet technique step by step
The enterlac style in appearance resembles a patchwork technique, and the fabric knitted with this pattern resembles a wicker basket and consists of multidirectional squares. The only difference is that the item in the enterlak technique is knitted entirely without breaking the threads, while in the patchwork technique all the fragments are knitted separately and then joined into a single fabric. The original enterlak crochet technique for beginner needlewomen is also called Tunisian knitting and consists of knitting squares with a checkerboard pattern, and the resulting fabric is much softer than a regular crochet one and does not stretch as much as when knitting.
Using this technique, you can knit fabric with squares of any size, but if you want to get large squares, then it is better to use a long Tunisian hook for the work, since when knitting there will be loops on the hook that form these squares.
Let's take a step-by-step look at how to crochet a fabric using the enterlac technique; for this we will knit a pattern with a square width of six loops.
Master class on knitting fabric using the enterlac technique
In our example, the width of the square is equal to six loops, so you can use a regular hook, and if you are interested in this technique, then later you will buy yourself a special tool.
1 step
We cast on a chain of 13 air loops (12 loops are square loops, and the thirteenth is a corner loop) and insert the hook one by one into eight loops of the chain, starting from the first loop - eight loops should form on the hook.
Step 2
Turn the knitting over, grab the working thread and knit all the loops on the hook, two at a time, to the end of the row.
Step 3
We cast on a new row of the square by inserting the hook behind the vertical jumpers that formed in front of each loop of the first row, grab the working thread and pull the loops onto the hook. In this case, we pull six loops from the loops of the first row, and the seventh from the loop of the chain.
We knit the second reverse row in the same way as the first.
Step 4
We knit the next four rows according to the same principle, that is, we pull out six loops from the previous row, and the seventh from the loops of the original chain, then we knit the row in the opposite direction, two loops at a time.
Step 5
In total, the square consists of seven rows, and we knit the final seventh row in this way - insert the hook simultaneously behind the jumper and half-loop, grab the thread and knit a connecting post. Repeat until the end of the row seven times, fasten the thread and cut it.
Step 6
From the lower right corner we cast on a chain of seven air loops, then we pull out six loops from it, as when knitting the first square, and the seventh loop from the side of the previous square. We knit the reverse row similarly to the reverse rows of the first element.
Step 7
We repeat this knitting technique from the second to the sixth rows. We knit the seventh row with the same connecting loops as the first square, and make the last loop in the corner of the first square.
Step 8
From the end point of the second square, we collect a chain of seven chain stitches and knit the third square from it in the same way as the second. After finishing the work, fasten and cut the thread.
Step 9
We begin to knit the fourth square from the lower right corner of the second square, and from the point where it ends we knit the fifth element of the pattern.
At the same time, for the fifth square we do not cast on a chain of air loops - it is fixed on the previous squares, so first we pull out six loops from the horizontal side, and the seventh from the vertical, after which we knit the row in the opposite direction.
Step 10
For the next outer square, we again cast on a chain of seven chain stitches, knit the square, fasten and cut the thread.
In this simple way, you can knit a pattern using the enterlac technique, while the squares can be knitted from the inner corners, creating canvases of the required shapes and sizes.
The enterlac knitting technique can be used to knit a wide variety of products from socks to hats, you just have to take into account the fact that crochet enterlac is denser than on knitting needles, and for some products this is unacceptable.
Socks and mittens knitted from wool yarn using the enterlac technique are especially warm due to the warm yarn and tight knitting, so it is very often used for knitting warm items.
It is best to start mastering the enterlac technique with flat products, such as a scarf, pillowcase or blanket, and after you have mastered the principle of knitting chess squares, you can begin to make more complex products. On the Internet you can find a variety of models with a description of the work involved in their implementation, which even novice needlewomen can knit. So, if you wish, you can also master this original and popular knitting technique without much difficulty.
Video on the topic
In conclusion, we invite you to watch several video master classes that will allow you to learn more clearly and in detail about how you can knit things using the enterlac technique and will help you master this skill.
sdelala-sama.ru
Learning to knit a pattern
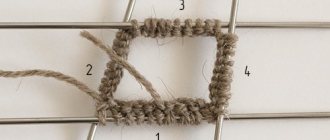
This sample, made using this technique, will consist of five triangles, each of which will consist of six loops. Therefore, the initial number of loops will be 30. The main thing is to master and understand the first bottom row of triangles. To do this, we provide you with a detailed knitting pattern:
Row 1 (wrong side) – remove 1 edge stitch, purl 1 stitch, turn the fabric over; 2nd row (face) – 1 edge loop, 1 knit stitch, turn the fabric over; 3rd row. (wrong side) – remove 1 edge loop, purl 2 stitches, turn the fabric over; Row 4 (face) - 1 edge stitch, 2 knit stitches, turn the fabric over; 5 row. (wrong side) – remove 1 edge loop, purl 3 stitches, turn the fabric over; Row 6 (face) – 1 edge stitch, 3 knit stitches, turn the fabric over; 7th row. (wrong side) – remove 1 edge loop, purl 4 stitches, turn the fabric over; Row 8 (face) – 1 edge stitch, 4 knit stitches, turn the fabric over; Row 9 (wrong side) – remove 1 edge stitch, purl 5 stitches. The first triangle should be knitted, with 6 stitches remaining on the working needle.
To make it clear, you just need to remember that for the first triangle, a loop from the initial cast-on row is added to each purl row. Then you can start knitting the next second triangle.
Scheme for the 2nd triangle:
Row 1 (wrong side) – purl 2, turn the stitches with the left needle; 2nd row (face) – 1 edge stitch, 1 front loop, turn the fabric; Row 3 (wrong side) – remove 1 edge stitch, 2 purl stitches, turn the fabric over; 4th row (face) – 1 edge stitch, 2 knit stitches, turn the fabric over; Row 5 (wrong side) – remove 1 edge stitch, 3 purl stitches, turn the fabric over; 6th row (face) – 1 edge stitch, 3 knit stitches, turn the fabric over; Row 7 (wrong side) – remove 1 edge stitch, 4 purl loops, turn the fabric over; 8th row (face) – 1 edge loop, 4 knit stitches, turn the fabric; Row 9 (wrong side) – remove 1 edge stitch, 5 purl stitches. As a result, 12 loops must be left on the right needle.
Continue alternating such triangles until there are five triangles completely connected on the right knitting needle. Beginners need to know that the knitted first row of triangles will have an uneven edge and will curl up. This should not happen in the finished product, since the triangles will be located at an angle. For greater clarity and the direction of the slope, consider the following diagrams.
The direction of knitting the side triangle will be different, so this must be taken into account when turning the fabric.
Next, you need to throw an additional 6 loops onto the knitting needle.
We continue knitting the fabric in this order: 1st row (face) - removing 1 edge stitch, 4 knit stitches, 2 knit stitches together, turning the fabric over; Row 2 (wrong side) – knitting 1 edge, 5 purls, turning the fabric over; 3rd row (face) – removing 1 edge stitch, 4 knit stitches, 2 knit stitches together, turning the fabric over; Row 4 (wrong side) knitting 1 edge stitch, 4 purl stitches, turning the fabric over. Afterwards, you need to leave one loop on the left knitting needle, which remains unknitted. Row 5 (face) – removing 1 edge stitch, 3 knit stitches, 2 knit stitches together, turning the fabric over; Row 6 (wrong side) – 1 edge stitch, 3 purl loops, turn the fabric over. Afterwards there should be 2 loops left, leave unknitted. Row 7 (face) – removing 1 edge stitch, 2 knit stitches, 2 knit stitches together, turning the fabric over; Row 8 (wrong side) – 1 edge, 2 purl, turn the fabric over; Row 9 (face) – removing 1 edge stitch, 1 knit stitch, 2 knit stitches together, turning the fabric over; Row 10 (wrong side) – 1 edge, 1 purl, turn the fabric over; 11th row (face) – removing 1 edge, 2 knits together.
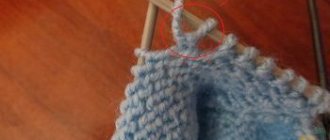
After knitting the first row of triangles, you can start knitting squares. They will be the basis of the entire sample. Beginners need to strictly control the location of free loops. Therefore, at this stage, the right knitting needle should have knitting needles from the side triangle, and the opposite knitting needle should have the rest of the loops. To continue knitting, you need to throw the edge loops over the left side of the triangle. Also, we must not forget about the direction of knitting. Yellow arrows indicate the direction in the figure.
After the edge loops are cast on, you can start knitting the squares themselves. But at the same time, the canvas must be turned over again. Row 1 (wrong side) – removing 1 edge stitch, 5 purl stitches, turning the fabric over; 2nd row (face) – 1 edge loop, 4 knit stitches, 2 knit stitches together, turn the fabric; 3rd row (wrong side) – removing 1 edge stitch, 5 purl stitches, turning the fabric over; 4th row (face) – 1 edge stitch, 4 knit stitches, 2 knit stitches together, turn the fabric; Row 5 (wrong side) – remove 1 edge stitch, 5 purl stitches, turn the fabric over; Row 6 (face) – 1 edge stitch, 4 knit stitches, 2 knit stitches together, turn the fabric over. Continue knitting according to this pattern until all the loops of the second triangle are knitted. In this case, when knitting two loops together, the triangle is connected to the square. The technology for knitting squares should be the same for the entire sample fabric.
The side triangles on the opposite side of the fabric require special attention, as they are knitted using added and edge loops.
To knit this side triangle (green), you need to cast on 6 edge loops and 6 additional ones. The principle of knitting this element of the fabric:
1 row (wrong side) – removing 1 edge loop without knitting, 11 purl loops, turning the fabric over;
Row 2 (face) – edge stitch, knit 4, knit 2 together, fabric turn;
3rd row (wrong side) – edge stitch, 3 purl loops, 2 purl stitches together, turn the fabric;
4th row (face) – edge stitch, 3 knit stitches, 2 knit stitches together, turn the fabric;
Row 5 (wrong side) – edge, purl 2, purl 2 together, turn the fabric over;
6th row (face) – edge stitch, 2 knit stitches, 2 knit stitches together, turn the fabric;
Row 7 (wrong side) – edge, purl, 2 together, turn the fabric; Row 8 (face) – edge, knit, 2 knits together, turn the fabric;
9 row (wrong side) – edge, 2 together, turn the fabric;
Row 10 (face) – edge, knit 2 together, turn the fabric over;
Row 11 (wrong side) – 3 together purl.
At the same time, you need to remember that the second row of squares will consist only of such elements; there should be no triangles here. But the direction of the squares will be the opposite. The fourth row of triangles and squares should be knitted according to the principle of the second row. Side triangles open and close the 4th row. The fifth row repeats the order of the third row, that is, it will contain only squares. In order for the edge of the canvas to be smooth, it must be covered with a series of triangles.
"Enterlac" crochet technique » Women's World
1:502 1:512 1:522
We present to your attention master classes on teaching the Enterlak knitting technique from Valentina Podolskaya.
1:725 1:735
Below are the words of the Author:
1:780 1:790
Dear participants, I bring to your attention my videos of crocheting using the enterlac technique.
1:977 1:987 2:1494 2:1504
This technique has always caused doubts and fear both in me and in many knitters. But right now I will show you that you should not be afraid of it. Unlike the same technique with knitting needles, it is easier to make with crochet, you can even knit a two-color pattern, which is very good for blankets for both children and adults. And, if you use your imagination...then the product will have no price.
2:680 2:690 3:1195 3:1205
4:1710
Shall we take a risk? Yes, there is nothing to risk here, the main thing is to choose two yarns of the same thickness and a hook a couple of sizes larger, because... It is knitted using Tunisian knitting.
4:288
Even loops to everyone!
4:333 4:343
Enterlak crochet - part 1
4:406 4:416
Enterlak crochet - part 2
4:480
4:488 4:498
Enterlak crochet - part 3
4:562 4:570 4:594
jenskiymir.com
Tips from needlewomen
When you decide to knit a hat using the enterlac technique, you should take into account the tips shared by experienced needlewomen:
- If the product is made of thread in several folds, then for the elastic you need to take a larger number of them than for the main pattern. When working with single-ply thread, the elastic is knitted with knitting needles 1 mm thinner than the main fabric.
- Beginner knitters, in order not to make a mistake or get confused where to start working, should use markers (thread of a contrasting color, a pin or a special pendant).
- For a hat where the pattern is made in several colors, the threads should be tied together when transitioning so that there is no sagging or constriction on the wrong side.
- To ensure that the headdress can be worn even in the most severe frosts, it is enough just to knit the lining for it with a simple stockinette stitch.
crochet technique for beginners, models with descriptions, video tutorials
This is a very interesting method of knitting products. It looks like a checkerboard pattern and is similar to canvases using the patchwork technique. Socks knitted using this technique look original, and knitting hats is also fun; they look very impressive. Today's material will be devoted to the topic of crocheting using the enterlac technique; for beginners, models with descriptions and step-by-step photos will be given.
So, let's begin.
We will knit in rows from the corner part diagonally from squares to create a neat product; this style can also be knitted in straight square rows with jagged sides.
You can make squares of different sizes, but large squares are made using a Tunisian crochet hook.
First, to knit one square, you need to cast on a chain consisting of 13 loops, that is, 6 + 6 + 1 corner loop. Now we go to the starting loop from the hook, pick up the thread as we work and bring the loop onto the hook. The resulting loop remains on the hook and we also pull a loop from the next loop of the initial chain.
This should be done seven times, resulting in eight loops. We pick up the thread as we work and make the initial couple of loops from the hook. Now we grab the thread at work and work through a couple of loops until the end of the row. The initial square row is made, it has perpendicular jumpers.
When making loops of the next row, we follow this thread in front of all the loops, pick up the thread as we work and pull the loop. We perform such maneuvers six times, pulling the 7th loop from the loop of the first chain. The execution of the next link is similar to the previous row. From 3-6 rows we make identical to the initial row, that is, first there are six loops in a row and one loop from the first chain, and then we knit a link in the opposite direction.
We knit the final seventh row of the square with connecting loops according to the principle: we direct the hook immediately behind the front jumper and half-loop, and then, picking up the thread, we knit the connecting column. We repeat these steps until we knit this entire link, then we simply fasten the thread and cut it.
All new diagonal links always start from the bottom corner on the right side and move up. We attach a thread for a new row to the bottom corner on the right side of the square and make a chain of seven chain loops.
We make six loops along all the loops of the chain, and take the 7th from the area on the side of the square, moving the tool behind the 2nd half loops. Next, we simply knit the loops that we cast on.
For the 2nd and 6th rows, similarly, we select six loops along the link and the 7th loop from the square-cut area and knit them in the opposite direction.
We knit connecting loops in the 7th link and, similarly to the original square and the final one, we make a connecting loop in the corner of the original square.
For the next square we perform a chain of seven air movements. loops and knit it in the same way as the previously knitted square. Having finished knitting, fasten and cut the thread. Now for the next square we combine the thread to the corner from the bottom right and make a hitch of seven loops, we knit the square in the same way as the previous row.
The next square is attached to both edges of the previously connected row of squares. For this reason, we pull the loop onto the hook first along the horizontal part of the six loops and the seventh loop along the vertical side, and then we knit the row in the opposite direction.
For the second row, we make six loops along the original link and the 7th loop from the side zone, then we knit a row.
Using this method, we knit up to the 6th link and perform the seventh with connecting loops. For the next square on the edge, we again make the original chain and, having knitted seven rows, fasten and cut the thread.
As you can see, the essence of knitting is that when a new square is found along a single part of the previously connected link, the initial chain should be made, but if the square is made between both zones, then the loops are made along the horizontal zone.
You can start knitting a link of squares from the corner from the inside and finish in the same way, forming a fabric of the required size and type.
You can also knit counterclockwise, with three squares per link, then part of the square will be formed with notches.
To do this, we make a chain for 3 squares at once (39 loops) and knit the same as the original - 3 squares. Then we attach the thread to the outermost square to the top right or to the side corner and knit the subsequent links.
As you can see, the technique is very simple, but at the same time it looks very attractive on the product.
Happy creativity!
Video on the topic of the article
webdiana.ru
Recommendations for Beginners
The entrlak technique has some features that greatly distinguish it from other knitting methods. Therefore, in order to get a hat in this style the first time, it is important to take into account the tips and recommendations of experienced craftswomen:
- The first row of figures knitted in this technique always consists of triangles, only after that they move on to squares, rhombuses or rectangles.
- The most common pattern in entrelac is a regular stockinette stitch, but after gaining initial experience, you can try more complex patterns like braids or strands.
- Any yarn can be used. Alternating plain threads of different colors enhances the braided effect.
Enterlak products made from melange yarn look very interesting
- It is much more convenient to knit entrlac, marking the knitting with markers.
- Be sure to take measurements - head circumference and depth of the product.
- When knitting a test piece of fabric, you should make a piece not 10x10, but at least 15x15 or even more. A small piece will not allow you to correctly calculate the size.
- It is important to take into account that the number of loops in the size range should be divided by the number of loops in 1 repeat.
If you follow these recommendations and carry out the steps clearly, as the detailed description states, you can easily avoid mistakes.
Creating a fragment will help you get used to the new knitting method.
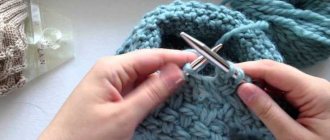
How to crochet entrelak
An incredibly beautiful and attractive technique is crocheted entrelak. It is suitable for both oven mitts and huge blankets - isn’t it a miracle!
Learning to knit using the entrelak technique is the dream of many of us. Today we have prepared for you a selection of lessons that will help you with this. So if you have been putting off the learning process for a long time, then there is a reason to start mastering entrelak today. Go under the cat and study useful information!
If you have never picked up knitting needles and a crochet hook, knitting may seem somewhat conservative. But in fact, this is not so. It is clear that the basic constants do not change over time; it is still the same yarn, hook, knitting needles and a certain list of basic and auxiliary techniques. They have been used by lovers of this type of needlework from time immemorial.
But even in the most established and familiar things there can be hidden something that can not only surprise, but also captivate. And also force us to make more and more new discoveries.
The knitting technique called entrelac is one of them.
What elements are used in the entrelac technique? As in patchwork, these are squares, triangles and rectangles. It is these details that suggest that entrelak is a kind of patchwork, only not sewn from scraps, but knitted from yarn. But in fact, this similarity is only external.
Patchwork involves the combination of individual elements in one product, and entrelak is a one-piece knitted fabric, the elements of which are knitted without tearing off the thread.
Entrelak can be used for both single-color and multi-color knitting, creating a variety of patterns from geometric shapes, most often squares, rectangles, triangles and stripes. In this case, there will be no broaches on the wrong side of the fabric, as, for example, in jacquard patterns.
The entrelak technique allows you to knit not only in the longitudinal and transverse directions, but also from the corner.
What can you knit using this technique? Almost anything: from clothing to home textiles and accessories. Fabrics made with entrelak can be crocheted either with regular or Tunisian crochet. Each of these options is good in its own way.
To start knitting, you need to decide on the size of each component of the fabric, that is, the sizes of squares, triangles and rectangles, as well as the size of the finished product. Also, it's best to prepare something like a sketch so you can have a clear idea of the final drawing. This will determine the direction in which you will need to move during the knitting process.
To understand how a fabric made using the entrelac technique using Tunisian knitting is formed, we suggest watching a selection of video tutorials.
Entrelak crochet. Video master classes
Entrelak Tunisian knitting:
Crochet tack using entrelak technique:
How to crochet a baby blanket using the entrelak technique:
Knitting entrelak with Tunisian crochet:
How to crochet enterlac:
Discussion of the article
You can rate the article, share your opinion, and subscribe to comments on the article.
What else to read on this topic on the Handicraft Runet:
www.darievna.ru
Enterlak crochet. We knit socks.
Such socks are knitted on the Internet with knitting needles. We crochet them. A detailed master class.
You will need yarn of different colors, a crochet hook and a rainbow mood to match the socks.
We collect a chain of 25 air loops. We put five loops on the hook, the edge loop does not count.
We go back, knitting the loops, and we knit the first two together.
And again forward we collect loops from the previous row. Let's take the fifth loop from the chain.
Back again and knit the first two together.
This is how we knit: forward, backward..., five rows, see the picture. The last row is like closing the loops, this is done in order to go to the chain without tying out the stitches.
We cast on five loops from the chain, the edge one does not count. Next we knit as the previous piece: forward, backward...
We knit the next square with blue threads. Knitted five columns. In the blue square, it is not necessary to close the loops when going back.
—
Let's move on to blue threads.
We finished knitting one square, we are knitting a second one.
We knit.
We tie a yellow thread. We knit.
.
For size 37 I need 6 squares. We continue to knit changing the color of the thread.
To the heel. When crocheting entrelak, the fabric is denser than when knitting, so for socks you will have to knit the heel. Using a marking thread, using knitting needles, you need to knit loops from three squares. And, as if nothing had happened, continue knitting the socks. We'll leave the heel for later.
The heel is probably the most difficult part of the product. We disassemble the marking thread.
We cast on loops from one of the sides, five loops. We need to knit a triangle. Therefore, we do not knit five loops all the time, but we go in decreasing order, four, three, two and one loop. The result is a triangle. Next we knit two squares.
And a triangle. We knit a square above the triangle with a blue thread, and also connect it to the right square.
After the marking thread unraveled, some of the squares became “shaggy”. Therefore, next to the protruding loop, you need to pull out another one from the edge... And knit them together. This will be much more accurate.
Now the blue quadrant needs to be connected to the red one. You can sew them, whatever is more convenient for you. I turned it inside out and knitted it to the edge.
Now we connect two red squares by tying a blue square. That's how we knit. By covering the space with squares, there should be fewer of them.
The last square is used to cover all sides.
These socks go well as a gift. Verified.
https://www.liveinternet.ru/users/4567578/post228845295#
Similar articles
feja-nitok.ru
Enterlak, entrelak, patchwork or intarsia?
Let's understand a few popular terms that are often confused when discussing original knitting and crochet techniques: entrelak, patchwork and intarsia.
What do they have in common and how do they differ from each other? In fact, everything is very simple: the main thing is to pay attention to how the fabric is formed during the knitting process.
Patchwork (patchwork) knitted and crocheted
We all know that patchwork is the same as patchwork, that is, the work is formed from separate pieces that are sewn together. The same applies to knitting. It doesn’t matter whether we knit or crochet a fabric using the patchwork technique, each knitted motif is worked separately with a thread break, and then the individual pieces are connected to each other in different ways.
We on the “Handicraft Runet” are gradually collecting a collection of patterns, master classes and models in this knitting technique, take a look at the page “Knitted patchwork. Freeform" to see our selection.
Intarsia crochet and knitting
Intarsia means “insert” in Italian. What clue can translation immediately give us? It turns out that, in fact, there are no separate motifs inside the knitted fabric; different colors of the pattern and, accordingly, balls of yarn are sequentially “intertwined” with each other without breaking the thread.
Intarsia is popular in both knitting and crocheting. Each new color is knitted from a new skein of yarn, the threads cross when changing colors, and in this way a whole large picture can be knitted on the canvas. Read more about this technique in our article “Intarsia - a multi-color knitting technique.”
Enterlak or entrelak?
On the Internet you can find both spellings, “enterlak” and “entrelak”. In fact, it is correct to say “entrelac”, because this word is a tracing paper from the French language (entrelacs, weave, woven pattern).
Enterlak knitting and crocheting is a single-color or colored knitting without broaches on the wrong side of the fabric. The pattern itself is made up of fairly clear geometric shapes (stripes, diamonds, corners), which looks very similar to patchwork, but there is no thread breakage, and all elements are made according to the principle of partial knitting.
You will find more information on the website WebPosidelki.ru in the article “Enterlak - Entrelak - Patchwork or Intarsia? What’s the difference…” and in our article “Knitting technique for entrelak (enterlac) for beginners.”
We on the “Handicraft Runet” are collecting our own collection of master classes and models with descriptions in this technique; you can view the selection using the keyword “entrelak”.
Well, we offer to your collection a video tutorial from Lyudmila Ten on knitting entrelak:
Happy creativity!
Discussion of the article
You can rate the article, share your opinion, and subscribe to comments on the article.
Features of knitting a hat in the enterlac style
Craftswomen know the technique of patchwork sewing. There is one in knitting too. It's called enterlac. Its peculiarity is that the flaps are knitted without tearing off the thread from the beginning to the end of the product.
To enhance the patchwork effect, knitters use section-dyed or multi-colored yarn (each row of knitted patches has a different shade).
Most often, rectangles are knitted using stockinette stitch, but experienced craftswomen can combine them with more complex patterns.