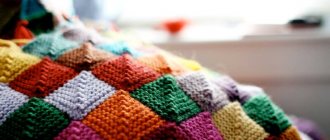
Knitting borders
In practice, needlewomen use different methods to decorate a tablecloth.
Finish options
There are several ways to crochet a tablecloth trim.
- border of individual elements;
- fillet pattern;
- single canvas.
The finishing elements can be connected with single motifs and then assembled into a single piece. A needlewoman can also use continuous knitting . In this method, the elements are knitted one after another, for example, as shown in the figure.
Sample continuous method
REFERENCE . In fillet knitting, a pattern is formed by knitting a mesh with hollow or filled cells.
Example of a fillet pattern
And the last method, the most common, is lace fabric, which is obtained using a combination of different patterns.
IMPORTANT! You can tie a tablecloth by tying the border as you work. But for inexperienced craftswomen it is worth knitting this element separately and then sewing it on.
Selection of yarn and hook
In achieving an excellent final result, the selection of the right material and tools plays an important role.
For tying the tablecloth, you should choose plastic yarn. Linen, cotton and silk are best suited.
It is also worth choosing the color of the threads carefully. If you want to create a product in one color scheme, choose a fiber for the border that is a tone darker than the main color.
A model made in a contrasting manner will also look original.
Attention! Before starting knitting, wipe the tool with a soft cloth.
The tool is selected according to the thickness of the thread. If you fold it in half, the thickness should be equal to the volume of the hook head.
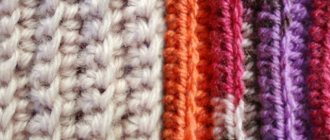
Knitting options
Separately, it should be mentioned that the strapping can be done without an angle and with this part.
The following decor options are available.
- Tying in a circle . In this case, you can use the last rows of the napkin pattern as a border.
Circular variation pattern
- Border with an angle . For tying a rectangular or square base, options with an angle are more often used.
Example of a border with an angle
- The figured version is more difficult to manufacture, but it is the most attractive and unusual.
Hexagon figure diagram
How to sew a border to a tablecloth
In order to attach the harness to the main part, two methods are used. We offer a description of each of them.
- The first is preliminary preparation of the canvas . To do this, the edge is stitched with thread (which you use to knit the binding) according to the pattern;
Example of edge preparation
- The second is to sew the finished part to the canvas . To do this, the edge of the fabric should be processed with a hidden seam or zigzag. Next, stitch the binding along the edge.
Important ! For sewing, use a thread of the same tone as the yarn from which the binding is knitted.
Handmade items can add originality and coziness to the interior of your home. They will also tell guests about the creative nature of your character.
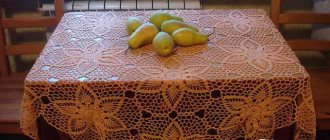
Wide border for crochet tablecloth
Hello, dear ladies. Today I am with the tablecloth. For me, a tablecloth is not only a decorative element, but also protection for the tabletop, so I prefer fabric options. The last time, the fabric turned out to be very wide, so much so that the dressmakers sewed me a full tablecloth and cut out a circle, a little larger than my tabletop, which I decided to tie with a border. Here's what happened in the end:
- Share
- Share
- Share
I have a sewn border, in case the tablecloth gets permanently stained.
So first I knitted a strip of lace.
- Share
And then she tied the border itself to this strip.
- Share
I took the edge diagram in the public domain, many thanks to the author!
And between them I knitted stitches with three crochets and three air loops without any pattern. As you can see, my border is a circle. I made the increments as follows: for every centimeter of diameter you need to add a little over three centimeters of length. If there are more, there will be coattails. I counted how many loops there were in three centimeters and divided them evenly along the entire length of the circumference. If the row is 0.5 cm, then increase in each row.
Threads - Italian cotton egipto16, 453 m in 50 g. Hook 0.7.
- Share
Thank you for your attention, peace, kindness, love.
Scalloped border
The cast-on edge with scallops can be made from a different number of loops; in our case, the repeat consists of 6 loops. Once the edge is formed, one scallop will have 3 loops. This means that you need to cast on twice as many loops. For example, the front of a cardigan is knitted from 50 stitches, which means 100 stitches are cast on for the scalloped border.
Knitting border with scallops - video:
Knitting pattern:
Pattern repeat: 6 loops; 2 rows. Please pay attention! From one scallop (6 loops) you get 3 loops.
The number of loops is a multiple of 6 + 2 edge loops.
- ROW 1: K1, which we return to the left knitting needle and throw 5 loops on top of it, then return this loop to the right knitting needle and pull up the thread.
- ROW 2: P1; 2 air loops.
The third row is knitted at your discretion. These can be facial loops or the beginning of the main pattern.
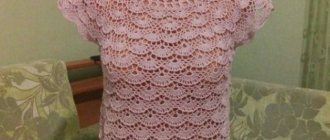
Beautiful lace border crocheted in bookmarks 77
A beautiful lace border can be used to make a festive tablecloth out of an ordinary tablecloth, or a wonderful gift out of a simple towel. From a dress or skirt that my daughter has already grown out of - a cute and unusual new thing.
The ability to crochet opens up opportunities for needlewomen to create sophisticated lace and intricate patterns.
This beautiful lace is easy to crochet. It is very convenient to use for frills - you can knit it to the length you need. In this selection of border knitting patterns
Crochet lace border.
Wide openwork crocheted border looks amazing, beautiful and elegant crocheted border patterns
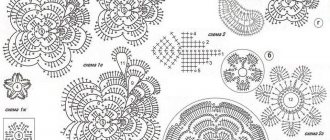
Diamond pattern
Pattern on the border with diamonds and “half fans”
Pattern on the border with rhombuses and “fans”
Pattern on the border with diamonds and corners
Pineapple pattern on fillet mesh
Openwork border
A spectacular, openwork border is knitted from the bottom up. Typically, such a border is used to knit the bottom of various products, giving them a more elegant look.
Openwork border with knitting needles - video:
Knitting pattern in rotary rows:
Pattern repeat: 8 loops; 4 rows.
The number of loops is a multiple of 8 + 1 for symmetry, edge loops are not needed. Rapport in the diagram is designated *____*.
- 1 ROW: the loop is removed; *7 persons; the loop is removed - the thread is AT work*; The last loop is removed unknitted.
- ROW 2: the loop is removed; *7 persons; the loop is removed - thread BEFORE work*; The last loop is removed unknitted.
- 3 ROW: the loop is removed; *7 persons. with double wrap; the loop is removed - the thread is AT work*. Last loop: turn the knitting needles over to the wrong side and knit a knit stitch, then turn the knitting needles again to the 3rd row and knit 3 knits from the loop. We unfold the knitting needles to the 4th row.
- ROW 4: row starts with 4 stitches on the right needle; *re-slip 7 loops, removing the twist (you get 7 long loops), throw them back onto the left knitting needle and knit everything with one purl. We unfold the knitting needles and knit 3 faces from the outer loop. Turn the needles over and knit 1 purl. We unfold the knitting needles again and knit 3 knits from the knitted loop.* The last loop is knitted inside out.
Crocheted tablecloth: 12 models with diagrams, descriptions and video MK
A tablecloth often determines the style of a home interior. Ready-made store-bought products can’t always make it look sophisticated and cozy. But a hand-crocheted openwork tablecloth will certainly decorate your home. For beginner knitters, it is better to choose simple patterns from motifs.
In this case, the work will go faster, and you won’t be afraid to make a mistake. After all, correcting a mistake on a fragment is much easier than retying the entire tablecloth. This article with a selection of different options with diagrams and descriptions will help you knit a beautiful tablecloth with your own hands.
Knitting technique
To create a crocheted fillet border, you just need to know how to crochet a chain loop and a double crochet. These elements form square cells, from which a fillet mesh is obtained.
It is necessary to tension the thread evenly when working, then the columns will be the same in height. This is the main condition for obtaining an even crocheted fillet border, the diagrams and description of which include filled cells (3 single crochets), as well as unfilled ones - 1 stitch and 2 chain stitches. The combination of these elements allows you to obtain a variety of patterns that fillet knitting is rich in: the crochet border is built from motifs in the form of flowers, fruits, stars, and any geometric shapes.
To ensure that the edge is even, it is tied with single crochet stitches: 5 stitches above every second cell.
Basics of fillet crochet - video:
This article contains descriptions of simple loin knitting patterns for beginners.
Knitted tablecloth “Two Hearts”
Size: 131.5 cm by 131.5 cm.
- thin cotton threads – 360g;
- hook No.1.
Description for beginners
To crochet this tablecloth, just study the attached patterns.
For beginner knitters, we provide additional explanations.
Main canvas
First we knit the required number of motifs. In recommended sizes it is 4 pcs.
For each of them, we dial 261 VP with our own hands and for 65 rubles. We knit a fillet pattern according to the image of the diagram. The motif is tied in a circular arch of 7 VP. At corner turns, we increase the number of VPs in the arch to 9 pieces.
Already knitting the 2nd motif, we connect it with the 1st. At the same time, as indicated in the diagram, we replace the middle VP with a connecting column in the central loop of the reciprocal arch.
For tying, a border of 12 circular rows is used. In every r. We knit the arches according to the pattern, and in the 4th, 6th, 8th, 10th and 12th rows of the binding we make fluffy stubs.
For the edge of the border (see diagram), we alternate a lush stem, an arch, a group of stems with a picot.
Tying the edge of the shawl with a long fringe
A fringe that is not just made from cut pieces of thread, but is made from knitted air loops will look beautiful.
Description of work:
Prepare the edge of the product if it is not smooth or has small flaws. To level the product, you need to tie an RLS around the entire perimeter of the product.
Next we knit according to the pattern, in the first loop we knit a sc and * cast on 15 VP in the 11th loop from the beginning of the cast-on chain, we knit a dc, we cast on 4 VP and with a connecting stitch we knit into a loop with a sc, we cast on 11 VP and a sc in the fifth loop from the beginning of knitting, we finish the rapport * we continue from* to* to the end of the row.
For variety, the length of the fringe can be changed by decreasing or adding air loops in each repeat.
It will look like this:
Video tutorial on creating fringe with knots at the ends:
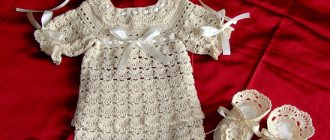
Motif tablecloth
This openwork hand-knitted tablecloth can also be used as a bedspread on a sofa. Dimensions of the tablecloth - bedspread: 91cm by 182cm (border not taken into account).
- threads, 100% cotton, 50g per 230m – 700g;
- hook No.2.
For the tablecloth/bedspread you need to knit 98 square motifs according to the image in diagram 1. The dimensions of each are 13cm by 13cm. When knitting the last row, we connect the fragments together - see Fig. 1. The connection points of the motifs are marked with red arrows in cx. Having finished working on the main fabric of the tablecloth - the bedspread, tie the edges in a circle. The border is performed according to diagram 2. Rapport from 1 rub. 8 rubles each repeat to the desired height.
At your request, the border of the bedspread can be knitted either as a separate piece and then sewn on, or knitted and joined to the tablecloth during the knitting process. We knit the corner wedges of the binding according to diagram 3, repeating the height of the border. Then the border is completely sewn together.
Knitted tablecloth from large motifs
The tablecloth has a hexagon shape, dimensions 134cm by 102cm.
The knitted tablecloth consists of 24 fragments, each of which measures 20cm by 22cm. We knit the fragments according to the instructions in the diagram with 1p. 16 rub.
For beginners, here is a breakdown of the notation.
We start knitting each fragment with a ring of 8 VP. Then we perform rapports. On сх. one of them is shown, in total you need to complete 8 rapports. Rows on сх. marked with numbers, the number of VPs in them is written under the arches. Knitting each r. We finish with a closing connecting column. Climbing to the new river We perform VP, replacing the column.
When knitting the last p. fragment we connect it with those already knitted. The connection points in the diagram are indicated by arrows. We assemble the main canvas according to the diagram.
Tie the edge in a circle. Border on сх. marked in brown - from 17th p.m. on the 22nd r. We knit picot from 7 VP.
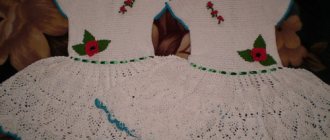
Thick tablecloth made of colored motifs
Dimensions: 76cm by 84cm.
- threads, 100% cotton, 50g per 85m, white – 300g;
- the same gray threads – 150g;
- the same pink threads – 100g;
- the same blue threads – 50g;
- hook No.6.
We knit the motifs with our own hands according to the pattern.
Density: the hexagon is 12 cm along the edges, 13 cm at the vertices.
When knitting fragments, consider how many elements you need to get with a blue center, and how many with a pink center. There should be 25 in total with a pink center, 12 with a blue center.
We start with a chain of %VP. We close it in the SST ring. Next, we perform circular knitting according to cx. Every r. we start with VP and complete the SST in the outermost initial VP or in the 1st paragraph of the circle. R.
We knit once with 1p. 5 rubles each, with the 1st and 2nd rows knitted in blue (pink), 3rd row. - gray yarn, 4th and 5th rows - white yarn. Connecting a new thread we make 1 connection. stlb.
We lay out the fragments with the wrong side up according to the pattern and sew them together with white threads. When sewing, insert the hook only behind the front walls of the edge loops.
Tablecloth made of melange yarn
Dimensions: 96 cm by 60 cm (border not included).
- melange yarn in pink colors – 500g;
- white yarn, 100% cotton, 100g per 565m – 200g;
- hook No. 1.5.
Density: large motif has Ø12cm, small motif has Ø2cm, border height 7cm.
Large fragments
We start the large element with a chain of 12 VPs. We close it in a ring, knit 3 VP lifts and then perform circular knitting according to cx. 1. Starting a row with 3 lifting VPs (replacing 1 Sts), we end it with Sts in the 3rd lifting VPs. And if the beginning of the row is performed with 1 VP of lifting (= 1 StBN), then its completion SST should be in this VP. The diagram shows all the rows; further knitting of fragments is carried out by analogy.
We connect the fragments to each other when knitting the edges, in the last row.
The connection points are indicated for beginners by arrows in cx. We knit 36 fragments with our own hands using melange threads and connect them to each other. Next, knit 28 fragments with your own hands using white threads. We place them in a circle, connecting them to each other and attaching them to the melange fragments.
Small fragments
There are 32 parts to complete. We start knitting with a chain of 12 VPs and close them into a ring. We knit 3 VP lifts and knit in the round according to diagram 2. Starting the row with 3 VP lifts (replacing 1 StSN), we end it with SS St in the 3rd VP lift. And if the beginning of the row is performed with 1 VP of lifting (= 1 StBN), then its completion SST should be in this VP. The diagram shows all the rows; further knitting of fragments is carried out by analogy.
When knitting the last r. We attach small fragments to large ones, placing them in the places indicated in cx. Connection points are indicated for beginners in cx. arrows.
We tie the edge of the product with our own hands according to cx. 3. We knit once with 1 p. 8 rubles each The finished tablecloth must be washed, laid out on a horizontal surface and dried. There is no need to iron the tablecloth.
Lilac tablecloth using fillet knitting technique: video master class
Crochet edging patterns
You can even come up with any design yourself by drawing it on checkered paper and coloring in the squares. The thinner the threads are, the more delicate the crocheted fillet border will turn out (diagrams and descriptions of the work are available on websites for needlewomen). For clarity, you can watch free photos and video master classes.
The edge of the fabric is knitted smooth or with teeth, which are created by decreasing and adding cells. The decrease is done at the beginning, skipping elements using connecting posts, or not knitting the row to the end.
If you need to add cells, cast on 6 loops: 3 for the base of the cell, another 3 instead of the first column. Then turn the workpiece over, continuing according to the scheme. When you need to add a cage at the end of a row, the hook is inserted through the base of the last column and additional elements are knitted.
Read
Master class for beginners: crochet dress for Barbie doll
Tying grape leaves: diagram and description
A border of grape leaves looks good when decorating a tablecloth or kitchen shelves; fillet knitting with repeating plant motifs can be complemented with bunches of grapes from lush columns.
The more air loops are collected, the wider the workpiece becomes. A large border of grape leaves (loin knitting) will be an excellent decoration for any room.
Edging for towels: diagrams
Since ancient times, our ancestors used fillet crochet in the border for towels - ancient embroidered towels. They are now used for wedding ceremonies, during baptisms, and as themed gifts. A border with diamonds is sewn along the edge; patterns for it contain crosses and hearts - depending on what event the towel is intended for. The row length in the description is the border height, which depends on the number of stitches cast on.
Schemes for edging towels:
Product tying
A wide crocheted fillet border, patterns for which are most often posted for free on the Internet, is suitable for curtains, sheets, and bedspreads. The finish will look good when decorating shelves in a country style. The transverse method used for knitting is convenient because you do not need to initially think about the length of the chain.
A narrow crocheted fillet border, the patterns of which consist of several rows in the longitudinal direction, is often used for tying clothes. The length of the row in this case will be determined by the size of the item. In this way you can turn old models into fashionable and elegant ones, decorate cardigans, skirts, capes. A narrow strip of openwork lace will give familiar items a romantic look.
Product strapping schemes:
You can decorate the edge of a square napkin using the fillet knitting technique. In this case, the border needs to start from the corner: tie the element that will be the base, and then tie one ribbon to it until the desired length is reached. After this, turn the workpiece counterclockwise 90 degrees and knit the next strip. In this way you can tie the other 2 sides of the square.
Read
Filet crochet: elegant summer blouses
Read more about the types of seams in openwork embroidery of napkins.
Sirloin border with roses
To create a vintage style in the interior, fillet crochet is perfect; if the patterns and description of the border include motifs with roses, this will add notes of sophistication and nobility. These can be large flowers or blooming buds. This pattern is suitable for a blanket, curtain, bed linen.
Border patterns with roses:
Any familiar things can be transformed by a crochet fillet border, the diagrams and descriptions of which are easy to understand even for novice craftswomen. Having mastered this handicraft, you can create beautiful things with your own hands, transforming your home and delighting your loved ones.