Crochet napkins are simple and beautiful
Delicate, openwork and weightless napkins, knitted from thin cotton threads of different colors, serve as decoration not only for furniture, but also, thanks to the imagination of designers, began to be used in the form of hanging decorations.
Crochet napkins are simple and beautiful, the patterns of which are presented here, and are not difficult to make. The main condition for beginning needlewomen is the ability to read diagrams and perform each loop indicated in it. By precisely following the arrangement of their combinations, without removing or adding anything, you will get an excellent, even product.
When connecting each subsequent row, you should adhere to the pattern, avoiding distortions and unnecessary voids.
A mandatory requirement after finishing work is to moisten the finished product in a starch solution. After which it must be secured with tailor’s pins for each subsequent element of the outermost row on a flat horizontal surface and left until completely dry.
This procedure will allow the napkin to retain its shape for a long time and look more delicate. The next model presented is a small round napkin for decorating a table or bedside table.
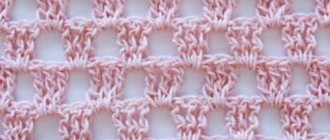
It is crocheted from thin cotton threads. Its number can vary from 0.5 to 1.5. The work density should not be too high, but, on the contrary, slightly loose. This will provide the napkin with lightness and original openwork.
The design of the pattern is not particularly difficult. There are no intricate variations or difficult elements in it. The main stitch used in this model is a double crochet stitch in various combinations. The second most commonly used is the air loop. Using actually 2 knitting techniques, you can get a very beautiful and delicate napkin.
At the beginning of knitting, it is recommended to calculate the number of knitted repeats of the pattern and compare them with the pattern in order to avoid their shortage or excess. If there is a discrepancy, several rows should be tied. Otherwise, the entire composition of the pattern will be disrupted, which will lead to its asymmetry.
After completing the work, treat the finished napkin with a starch solution and, having given shape, secure it with pins until dry.
How to Read Doily Crochet Patterns (Tips for Beginners)
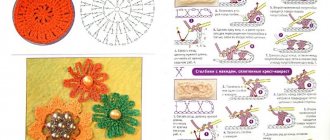
You can crochet a napkin using a detailed description or diagram. Schemes are an image of a future product , made using special icons. Symbols are attached to each diagram.
- to start reading the pattern, just like knitting, from the middle - from the central chain. Sometimes the number of air loops in it can be counted, or it is indicated by a number.
- The beginning of each row is indicated by a number - the number of this row . After the number there must be lifting loops.
- Sometimes the knitting direction is indicated by an arrow .
- If the badges are connected to each other at the bottom, they need to be knitted from one point (a chain loop, a column or an arch of the bottom row).
- The icons connected to each other in the diagram at the top indicate that they should have a common vertex .
- Each next row should have more loops than the previous one.
It is easier for beginning needlewomen to use a verbal description of the pattern.
A video about how to disassemble and understand crocheting patterns for napkins with a detailed description.
Square
Crochet napkins are simple and beautiful, the patterns of which are discussed below, and have a square shape. This does not spoil their appearance at all, but, on the contrary, gives the product a certain charm.
Depending on the location and intended function, you can choose the pattern of such a napkin:
- If it is the central element of the decor and nothing will stand on it, then it is better to use a floral pattern that focuses attention on the central part of the product.
- If it is destined to serve as a backing for a vase or other decorative item, then a pattern that frames the edges of the napkin around the perimeter will look more advantageous on it.
The next napkin model presented is made using the fillet technique, tied with openwork lace. It is this that serves as an attention-grabbing element. The fillet technique is also not difficult to operate. It is based on knitting a regular mesh, some cells of which are filled with additional single crochets according to the pattern.
According to experienced needlewomen, for a better outline and highlighting of the ornament, it is advisable to fill empty cells with not one, but two additional columns, but having one vertex. This technique will add contrast to the product and will not add extra loops to the pattern.
These models, like the round ones, are knitted in the round. But then, during their final processing, special importance should be given to the formation of a square. This is done by tightening the corner elements of the napkin using pins. It is recommended to tighten the loops between the corners less intensely.
Oval
Oval napkins look very beautiful and extravagant. They serve as decoration for chests of drawers, rectangular or oval tables.
They are also recommended to be made from thin cotton yarn, but variations are possible at the request of needlewomen. The presented model is knitted with a single piece of fabric. The difference between the start of work of such a napkin and a round one is that the first row of a round product is made in a ring of air loops, and an ellipsoid one is made on the basis of a straight chain.
Another feature of this form of napkins is the denser arrangement of loops at the ends of the initial chain. This is done so that the elongated sides of the products have a smooth surface and are not concave or convex.
Therefore, when knitting oval napkins, you must follow the pattern very carefully. There are also options for making these products based on a round shape and then supplementing it with another pattern on 2 opposite sides. The following are models of such napkins.
At its base there is a round pattern combination, which is made in a circle. After its completion, the corner ornaments are performed alternately, turning the work when knitting each subsequent row. The final finishing border should be made in one piece along the entire contour of the napkin.
While knitting circular rows, it is necessary to correctly connect the initial and outer loops. Avoid noticeable voids that spoil the overall design. If the models shown are not to the taste of some of the needlewomen, you can experiment yourself.
Having chosen the central part of the napkin you like, you can turn it into an oval one by tying it with a pattern you came up with yourself. Exclusivity in such a situation is guaranteed to the product. Also, after finishing work, you should not forget that the napkin must be starched, fixed and dried.
Round
Crochet napkins are simple and beautiful, the diagrams of which can be seen below, are larger-scale models. They contain several ornate patterns collected into one whole composition. In almost all round napkins, the basis of the composition is a floral design.
In terms of its implementation, it is not difficult, but difficulties may arise in drawing up a complete picture. Therefore, experienced needlewomen recommend following the pattern especially carefully at the initial stage of work, so as not to knit too much or miss some fragments of the pattern.
These models are knitted in the round with a single piece of fabric, connecting the first and outer loops in each row. The main thing in the knitting process is to correctly make several initial rows. Then the pattern itself will become a hint for further work. But this requires some experience.
To make napkins, you can use either special thin cotton yarn, presented by many domestic and foreign manufacturers, or regular sewing thread No. 10 and the corresponding hook number. It is advisable to choose high-quality yarn without sputtering and knots, so as not to spoil the openwork pattern of the product with such defects.
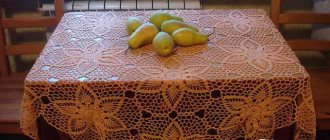
Colors may also vary depending on the application and surrounding interior. But white remains traditional. It is this that gives the napkins an exquisitely festive and elegant appearance. The next napkin model is of particular interest. It consists of combining individual motifs with further integral binding.
At the beginning of the work, the central element is performed, to which, in turn, in the process of knitting the outer row, the remaining 6 fragments are attached.
When performing them, you should carefully follow the pattern, since in the same row (outermost) half the diameter is knitted with one type of loop, and the other with the next one. This must also be taken into account when connecting motives.
Crochet napkins, an example of a round product.
Next, the composition of the elements is tied with a solid fabric, carefully monitoring the sequence and evenness of the knitted vertical stripes. After completing the work, be sure to starch the napkin and give it its final shape.
Original napkin made of floral motifs
This post, which was published earlier, was originally a photo of a floral napkin from a magazine found on the Internet. I included it in my video with a selection of napkins from our blog and the needlewomen from my channel encouraged me to create a video master class, everyone really liked the original napkin. So now here is a photo of my work called “Flower Meadow”. The napkin is for sale.
The design of the original napkin is quite clear; all the motifs here are very simple. The difficulty can only lie in connecting them. You can watch how to knit and connect motifs in my videos (4 parts).
Volumetric
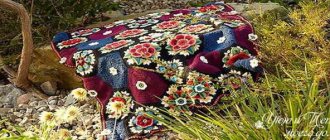
For many decades, voluminous napkins have never ceased to amaze with their beauty. The models presented below are just a drop in the ocean of the diversity of their implementation. The name “jellyfish” for these napkins is not accidental. They resemble their numerous and lacy tentacles.
Adding volume to such products is based on knitting additional loops or arcs of air loops between the so-called “tentacles”. They, in turn, are made in long chains, which are intercepted at small intervals depending on the pattern. Then they are tied in the next rows, shortening each subsequent one by several steps.
There are a lot of options for making the middle of such napkins. They can be either solid, in the form of one round motif, or represent a whole composition of smaller and different types of elements. The selection of the diameter of the central part of the napkin depends on its function.
If it is intended for a vase with a narrow bottom and small diameter, then using a small round fragment would be an acceptable option. If it is destined to serve as a table decoration, then you will have to work more carefully on the design of its middle.
A prerequisite after finishing work on such a napkin is to treat it with a highly concentrated starch solution to impart rigidity to the areas that add volume. During the drying procedure, it is recommended to periodically adjust them to create symmetry. The next representative of the volumetric type of napkins is a model that combines conventional technology with Irish technology.
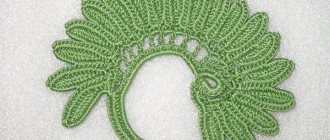
It consists of making a round central part, to which voluminous flowers and leaves are alternately attached. All these parts are knitted separately and only when the outer petals are completed do they adhere to the main part and to each other.
When making flowers and leaves, you should pay attention to some features in the work. When knitting each subsequent row of petal bases (arcs of air loops), place their connection with the base not in the loop of the row below, but in the girth of the column from the wrong side.
Thus, the next tier of petals will be lower than the previous one, and create the necessary volume. When knitting rows of leaves, the stitches of the bottom row should be grabbed not by 2 threads, but only by the back one. This will ensure that there are visible scars on the surface of the parts, simulating veins. These napkins can be starched as desired.
Colored
Crochet napkins are simple and beautiful, the diagrams of which are given below, and are not difficult to make. But, knitted from harmoniously selected colors, as well as using any additional decorations, they acquire a completely new and very beautiful appearance.
Depending on the application and design of surrounding objects, the color scheme of napkins can be completely different:
- Transitioning from a lighter tone of one color to a darker one and vice versa.
- Alternating several multi-colored rings.
- Using two or more sharply contrasting colors.
A variety of areas of napkins can be made in color: external, internal or finishing details. The next model presented is a direct decorative decoration.
It is based on two floral compositions of seven motifs each, which are entwined with a border of the usual pattern. Its edges on the outer sides are decorated side by side with thread of a different color.
So, first, according to the proposed scheme, it is necessary to make the base of the flower from green yarn with the number of petals equal to 6. This is exactly how many fragments will be attached to it. Then, one by one, knitting the remaining warps, in the process of work you should link them to the central part and to each other.
Next, continue making the lotus flowers themselves. They consist of 8 petals and have 2 tiers. After preparing 28 of them, you can start knitting the centers of the flowers in a darker color. The options for their manufacture are different.
Once all the parts are ready, proceed to assembling the flowers and attaching them to the bases. To do this, take two tiers of pink flowers and arrange them so that the petals of the upper tier are between the petals of the lower one and create volume. Place the center on top and use a bead to secure the finished flower in the center of the green base. Do the same with the rest of the details.
When starting to make the finishing border, that is, picking up the initial chain, at equal intervals make it link with the green petals of the bases of 4 colors. Moreover, connect the outer flowers with 2 petals, and with the inner ones – with 3. Decorate the edge of the border with a contrasting thread. Do the same with the 2nd composition. At the end of the work, connect both ends of the border in the form of a half-eight.
It is recommended to starch such a napkin with a solution of medium concentration. During the drying process, it is necessary to periodically straighten the flower petals and give them a beautiful shape.
Elegant options
Such napkins can be made in different ways: you can immediately make a whole napkin, or you can make a modular version - separately knit several parts (modules), and then combine them into one napkin.
The following figure shows a version of a simple rectangular napkin measuring 15x20 cm:
To work, you need to take cotton threads of medium thickness and a hook No. 1.5. If you finish the work at the second stage, you will get a square napkin. The length of the product can be increased by increasing the number of rows proportionally.
First you need to knit 64 air loops, then, according to the pattern, the main pattern of the fabric is performed, changing knitting directions is shown by arrows. If a modular napkin is made, then each module can be made separately.
The figure shows a fragment of the module:
You need to start knitting from a corner, and the direction of the rows changes. The finished square is tied around the perimeter with a border row; modules will then be attached to it into a single whole. The size of the product will depend on the number of fragments. After making the required number of modules, you can begin assembling the napkin. The connections are shown by arrows. For strength, it is better to tie the resulting napkin with three rows of trim around the entire perimeter.
Here's what an interesting model might end up being:
Related article: How to properly remove blinds?
Colored napkins are interesting in the interior.
This two-color napkin is easy to create even for a novice needlewoman.
The work plan is given below:
The result will be a thick napkin of two colors measuring 25 by 35 cm. This technique is called Tunisian knitting.
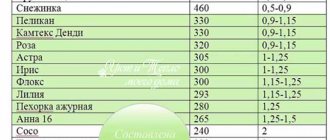
To knit such a napkin you need to have: white yarn “Snowflake” - 50 g, red yarn “Iris” - 10 g, hooks 2.5 (Tunisian) and 3 (regular).
Progress. The main work should be done with a Tunisian crochet hook No. 2.5. They need to knit 100 rows in Tunisian stitch. A regular hook number 3 is only useful for casting on a chain of 50 loops. Make the red diagonal trim of the napkin using a chain stitch. When working on white binding, end each row with a connecting post. At the end, you should tie a red thread around the napkin.
And a few more interesting options for knitted napkins:
The finished napkin will delight the needlewoman with its beauty and elegance, but do not forget about care. You can starch the napkin, then it will keep its shape for a long time. The finished product should be steamed or ironed. Before washing the napkin, shake off any accumulated dust. Then you can prepare a soap solution using liquid soap or shampoo, hold a napkin in it, then rinse gently in clean water.
Napkins must not be rubbed! This will damage the fabric and appearance. You can wring out the napkin by wrapping it in a terry towel. This must be done carefully and lightly. To dry, you can place a napkin under a terry towel and put something heavy on top, or run an iron over it with steam, this will be faster.
Japanese style
Japanese-style crocheted napkins are very beautiful and at the same time easy to knit. Their pattern designs are based on the fillet technique. Depending on the direction of work, they can take a wide variety of forms.
Below are models of a rectangular napkin with beveled corners and a round one. The difference between their knitting is that the first of them is made in straight and reverse rows with the work turning at each subsequent one, and the second is made in circular rows, with the subsequent connection of the initial and final loops.
The preferred pattern in this style is floral. Densely filled pattern cells on a thin regular grid look clear and organic. Using only 2 types of loops, a double crochet stitch and a chain stitch, you can create the most bizarre and complex patterns.
Experienced craftswomen, when knitting napkins using the fillet technique in straight and reverse rows, advise paying special attention to knitting the reverse rows. Since the pattern of the pattern is shown only on the front side, when performing purl rows, you should follow the direction of the pattern of the previous row. This only applies to asymmetrical compositions.
The next napkin model has a round shape and is made from the center. Needlewomen who often come across the fillet technique note one of the advantages of this method of knitting over the usual one. It allows you to make individual elements in a single piece, which in a simple method must be made separately from the main part and, breaking the working thread, proceed to the next motif.
The structure of napkins knitted using this technique has a more uniform surface, and makes it possible to use numerous variations of various compositions of any format.
In most cases, it is advisable to starch such products. To ensure that crocheting napkins, whether simple or complex, but definitely unusually beautiful, according to the patterns presented in this article, brings maximum pleasure and benefit, it is recommended not to neglect the advice of experienced craftsmen.
By listening and applying them in your work, you won’t have to use trial and error, but on the contrary, enjoy the excellent results of your creativity.
Knitting a Christmas tree
To make such a product yourself, you should buy Iris threads in two colors or others, if desired. You will also need a hook number 1.7. Number 1.5 is also suitable if you want to achieve a tighter knitting. You still need to stock up on beads.
First, make 8 air loops and form a ring from them. Knit down on the first and last chain stitch. Make three loops for lifting and knit 11 double crochets. At the same time, they alternate with air loops. Thus, 7 rows are knitted.
Take a regular hand needle and thread it. 108 pieces of beads are strung on it. It is allowed to use any quantity of it. You can move the beads down the ball until it is his turn. Connect threads of two colors. This must be done carefully and as discreetly as possible.
Each product in the form of a Christmas tree is made separately. Beads are also braided at the same time. We must not forget about him. It should only be present on one side. As soon as one tier is ready, several connecting loops are made to begin the next tier. It's better to do this on the back of the loop. Due to this, the Christmas tree will look more neat.