Traditional Norwegian jacquard patterns are very cozy, evoking thoughts of snow-covered valleys, cozy houses filled with the aroma of mulled wine. Having a centuries-old history, the patterns were initially created by craftswomen without diagrams or descriptions. And that is why each drawing was unique. The most common were and remain plant, animal and geometric patterns. A variety of Norwegian knitting patterns with patterns for knitting adult and children's clothing are presented in this article.
Norwegian star
The classic Scandinavian pattern is great for warm sweaters and jackets. An ornament of a bright stripe will give the product a finished and elegant look.
The number of loops should be a multiple of 16 + 2 edge loops.
Knitting is done using stockinette stitch according to the pattern.
The diagram shows the persons. and purl. rows.
We begin and end each row with edge loops, between them we repeat the pattern repeat (P) the required number of times.
Please note: we knit the 4th row (we have it on the wrong side) with knit stitches, 29th r. (we have it on the front side) we knit it with purl stitches. We knit in height from the 1st r. on the 31st r.
Description of the technique
Most needlewomen love Norwegian knitting because things made this way turn out very warm, beautiful and comfortable.
When working, the craftswoman uses threads of different shades, which are intertwined on the wrong side of the fabric and give it additional density.
Initially, jacquard patterns were used for knitting large items:
- dresses;
- coat;
- sweaters.
But modern craftswomen have perfectly adapted these patterns for small things. And today you can find many mittens, socks, and hats with interesting and varied motifs of Norwegian patterns.
Each of these patterns makes the item play in a new way, giving it special chic and tenderness. It is impossible not to fall in love with such products. Therefore, even beginner knitters should master this unique knitting technique in order to please themselves and their family members.
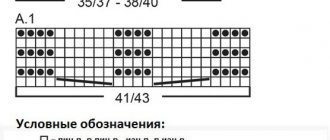
Snowflake for mittens
The initial number of stitches for the pattern on the outer side of the mittens should be a multiple of 23 + 2 cr.
We knit according to pattern 1, which shows all the rows. Vertically, the pattern is performed once from the 1st to the 29th row.
For the inside of the mittens, the number of stitches should be a multiple of 4 + 2 cr. We knit once from the 1st to the 5th row, then repeat from the 3rd to the 5th rows.
A few more interesting patterns with snowflakes and stars.
How to knit jacquard two-color patterns with knitting needles?
As mentioned above, almost all jacquard patterns are knitted with a thread of two colors. This is done in order to ensure that the fabric of the ornament is not too thick and does not stand out strongly against the background of the finished work.
Jacquard patterns with broach
To knit two-color jacquard patterns with knitting needles, use 2 methods of thread management. The essence of the first is that the loops are knitted in the color indicated in the pattern, and the unnecessary thread goes into the broach from the wrong side of the knitting.
The main difficulty in knitting jacquard patterns for beginners is the correct pulling of the thread behind the fabric. Too much tension will create wrinkles in the finished piece. If the thread is not tensioned well enough, then, on the contrary, gaps will appear.
When knitting jacquard patterns with broaches, you should take into account that the color of the main background should be darker than the pattern, otherwise the broaches may be visible from the front side of the work.
Jacquard patterns without broaches
The second method is the so-called jacquard patterns without broaches, when the threads are not pulled freely along the row, but are evenly woven into the work. In this case, no free broaches are formed on the wrong side, but a honeycomb is obtained from two interwoven threads: the broach and the working one.
Patterns and descriptions of such jacquard patterns with knitting needles are popular when knitting for children, since when putting them on, the fingers do not cling to the threads on the wrong side. In addition, broaches attached to hinges create a convex relief, which serves as an additional decoration.
Double-sided jacquard patterns
Another method that can be classified as jacquard patterns without broaches is double-sided knitting. With this method, the broaching threads are not pulled from the wrong side and are not woven into the fabric, but are involved in knitting the ornament on the reverse side of the product. As a result, the drawing will be displayed on both sides of the finished work. The only difference that will be between the front and back sides of the product is the inversion of color.
Jacquard knitting with thread on both sides is twice as dense as usual. That is why this method is most often used when knitting warm blankets, winter scarves and hats, children's jackets and vests.
Norwegian patterns with animals and plants, knitted with knitting needles with patterns
Mostly the scenes contain deer and Christmas trees, sometimes images of people are added.
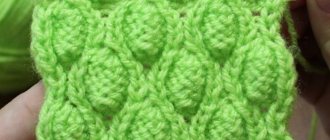
Solid Norwegian pattern
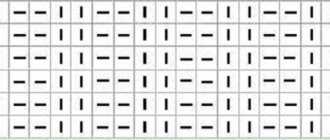
The pattern is drawn with purl loops. This is not a very common method, but it is great for women's pullovers.
We knit according to the pattern, which shows the front side of the pattern.
We knit all even rows on the wrong side with purl stitches. For beginner knitters, here is a detailed description of the pattern:
- 1st row: 22 purl;
- R3: k2, p2, k2, p2, k8, p2, k2, p2;
- 5p.: k3, p2, k2, p2, k6, p2, k2, p2, k1;
- 7p.: 4 knits, 2 purls, 2 knits, 2 purls, 4 knits, 2 purls, 2 knits, 2 purls, 2 knits;
- 9p.: 5 knits, 2 purls, 2 knits, 2 purls, 2 knits, 2 purls, 2 knits, 2 purls, 3 knits;
- 11p.: 6 knits, 2 purls, 2 knits, 4 purls, 2 knits, 2 purls, 4 knits;
- Row 13: knit 4, purl 16, knit 2;
- 15p.: (1 knit, 1 purl)x11;
- 17th rub.: like the 13th row;
- 19 rubles: like the 11th rubles;
- 21r.: like 9th r.;
- 23r.: like 7th r.;
- 25 rub.: as 5th rub.;
- 27 rub.: as 3rd rub.;
- 29 rub.: as 1st rub.;
- 31r.: 22 persons.
Basic principles of knitting
Norwegian drawings have several basic principles:
- Most often these are patterns of two contrasting colors. More common combinations of white, red, blue, gray and black colors.
- They are more often used for warm clothes, so they are knitted from wool or wool blend yarn.
- The pattern is knitted using garter stitch: the front rows are knitted with knit stitches, and the purl rows are knitted with purl stitches.
- These patterns have only northern and New Year's themes.
- The patterns of Scandinavian patterns are unusual and are made in the form of a grid indicating the desired colors.
Schemes of Scandinavian patterns are usually presented without description. But you shouldn’t be afraid of this, since it is very easy to read even for a novice master, because you can clearly see what should happen in the finished product. The checks imply one loop, and the horizontal lines imply rows. Rows of knit stitches are read from left to right, and purl rows are read from right to left. If the explanation of the pattern says that it needs to be knitted with circular knitting needles, then all rows will be performed only with facial loops. If you use the stocking knitting method for knitting, then the pattern must be read from top to bottom. Colored cells indicate the color scheme, and white cells indicate the background color.
Knitting such patterns is very simple. First of all, we knit the fabric with a thread of one color, then from the second ball we attach a thread of a different color. When you need to change the thread, we cross the two working threads and make broaches on the wrong side, as in the photo below.
Related article: Origami parrot: how to make it out of paper, assembly diagram with MK and video
You can change the color on any side of the canvas depending on the pattern. Please note that the broaches must pass exactly from one edge loop to the other. To do this, we knit the edge loop in the row with the same thread that was used to knit the last loop of this row. We fasten the broaches of the previous row at the beginning of the new one.
It happens that the broaches come out very long and it looks ugly. In this case, they can be secured by additionally crossing them with a working thread. To do this, before knitting a loop, we will throw a thread from a non-working ball onto the working thread, as in the image below.
In order for the product to look neat and not skewed, you need to remember the basic rules:
- The yarn should be the same thickness;
- During the creation process, it is necessary to constantly ensure that the thread tension is uniform.
Retro - variants of Norwegian patterns
The diagrams below are unique, they depict the Scandinavian theme in its classical sense.