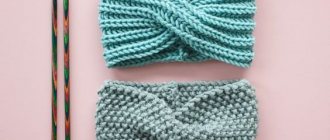
A wonderful knitted model for fashionistas is a knitted sweater with batwing sleeves. This year's fashionable knitted sweaters have a wide “flying” sleeve, a “kimono” sleeve, a flashlight sleeve, a cowl collar, a stand-up collar, and a golf neckline. That is, both wide and high knitted collars are in fashion. Oversized women's sweaters, ponchos, crop sweaters and pillowcase pullovers remain trendy.
In a word: among the leading models: hand knitting, volume, femininity, and most importantly - convenience and comfort. We offer 20 of the most interesting MKs with patterns for women, all models are laid out taking into account increasing complexity.
Sweater-poncho with dolman sleeve
Before you knit such a cozy sweater with a bat sleeve with knitting needles, let’s figure out the knitting method. This knitted sweater is knitted from the bottom up, and consists of 4 parts: a back and a front, and 2 more identical sleeves. Patterns: stockinette stitch, 2/2 rib and a fancy pattern in the middle of the front.
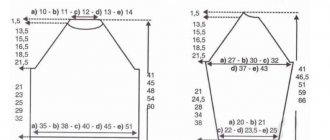
Product length – 50 cm. Mk for size 44-46, hip volume – 98-100 cm.
Abbreviations: loop - p., row - p., knit - knit., purl - p., edge - krom., knit stitch - knit. ch., fantasy pattern - phantom. pattern.
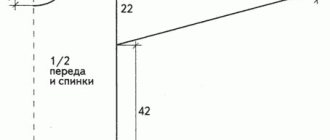
Knit 4 parts, then pick up the loops along the edges of the sleeves, then connect the sleeves to the front and back using raglan (42 + 8 and + 50 cm), then sew the edges of the sleeves (sew 20 + 20 cm). At the end, it remains to raise the neck section. This bat sleeve sweater will keep you warm and comfortable.
To work you will need:
- Yarn Merino De LUX YARNART (50% wool, 50% acrylic, 100 gr./280 m.). Approximately 6 skeins.
- Regular and circular knitting needles, 3.5 mm thick.
- Markers.
- Needle for stitching parts.
- Additional knitting needles.
Knitting density: 10/10 cm = 22 p./28 r. knitting needles 3.5 mm.
In our master class, the back and shelf are the same. Only the phantom differs. pattern on the front of the sweater. We start from the front, since this is where the fantasy is located. pattern.
Before
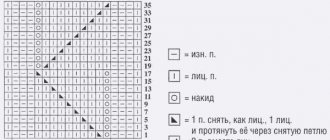
For regular or circular knitting needles 3.5 mm. cast on 116 p. (52 cm) and knit 22 r. (8 cm) ribbed knit 2/p 2. Next we will continue with persons. satin stitch with fancy knitting. pattern. We distribute stitches like this: 1 edge stitch, 40 knits. smooth stitch, 34 p. fantasy. pattern, 40 faces. satin stitch, 1 edge. We use a marker or colored thread to mark the beginning and end of the fantasy pattern. 1 repeat in height is 34 rows. Immediately after the elastic band, from the 23rd row, we begin to decrease stitches for raglan on both sides of the front. In total, we must knit 118 r. (42 cm) in height, plus 22 r. (8 cm) elastic bands. How to knit and decrease raglan:
Make decreases in every 6th row, decrease 2 stitches on each side. In order to get beautiful decreases, we tilt the stitch to the right and left. In total, decreases 19 times, 4 stitches each. We decrease in the front rows in this way: 1 krom., 1 knit, and 3 stitches along with a tilt to the right - then according to the pattern, at the end of the row - 3 knits. together with a tilt to the left (diagram below), 1 face, 1 edge.
Then, if it is difficult for you to make a cutout for the collar, then simply after 42 cm of raglan is knitted and 39 stitches remain - do not close the knitting, at the end of the work we will continue and make the collar with an elastic band.
If you want to make a neckline, then we reach 113 rubles, and 114 rubles. knit like this: 7 sts according to the pattern, close the central 15 sts, leave this part for extra. knitting needle, 7 sts according to pattern. 115th row: 5 sts according to the pattern, 2 sts together. 116th: no decreases. 117th: 4 sts according to the figure, 2 sts in. 118th: how the mating looks. Close all sts. Knit the second half with extra. knitting needles Close p. Knit the back. stitch, do not bind off the last 39 stitches.
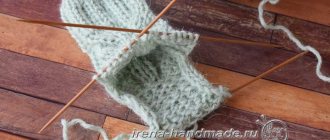
Sleeves
We cast on 3.5 mm knitting needles. 114 p. and we work persons. Ch. From 1st r. We start decreasing for raglan. We need to remove 60 stitches, that is, 30 stitches on each side of the sleeve. Decrease like this: 1st row: 1 edge, 2 stitches together, then knit. Ch. to the last three sts: 2 sts together, chrome. 2nd, 3rd, 4th, 5th - no decreases. 6th – like 1st.
And we repeat this until the end of the sleeve. Decreases every 4 rubles. Let's make 140 rubles. (50 cm), 53 p. (24 cm) should remain. Leave it on the knitting needle.
Raise the loops, stepping back from the edge by 20 cm (44 sts), raise 26 sts in the middle, 44 sts remain. On these 26 sts we will knit 2/2 sleeve elastic. The elastic band should be 16 cm (44 r.). Close all items
Assembly
Sew 16 cm of sleeve elastic, connect and sew 20 cm along the edges of the elastic. The bottom of the sleeves is ready. Sew the poncho from the wrong side along the raglan line. All that remains is to design the collar. We transfer all stitches along the neckline onto circular knitting needles. We knit a 2/2 collar with an elastic band. In total we have 184 stitches on our knitting needles (53 + 39 + 53 + 39). Collar height 16 cm. Close p.
Light pink sweater with dolman sleeves
For work we will need:
- pink yarn containing mohair (65% acrylic, 35% mohair, 50 grams per 190 meters) – 5 (6, 7, 8,
 skeins;
 - sp. No. 5;
- sp. No. 5.5;
- cr. sp. No. 5.
The knitting density is 18 p. x 22 r. = 10 x 10 cm.
The product can be knitted in the following sizes: S (M, L, XL).
Bat sweater: description
Back and front of the product
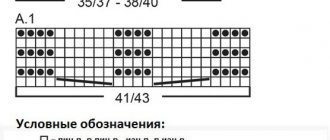
Using straight sp. No. 5, cast on 89 (93, 101, 105) sts and then continue working with a 2 x 2 elastic band to a height of 9 (9, 10, 10) cm. We continue working according to diagram 1:
Important! We knit the first row in the direction from left to right.
We knit 4 loops before rap., repeat. rap. according to cx. x 21 (22, 24, 25) times, finish 2 loops after rap. and we get 11 (116, 126, 131) p.
Repeat from 1 to 12 pp. according to the diagram.
Having knitted the 7th row, we begin to perform decreases according to scheme 2 (from 8 rows):
Decrease one stitch on both sides in every third row x 35 (37, 37, 40). We put the loops aside. The front of the sweater is knitted in the same way.
Bat sleeve
Straight sp. No. 5.5, cast on 89 (89, 93, 93) loops and knit further with a pattern according to cx. 1, starting from the seventh row: 3 sts to rap, repeat. rap. x 21 (21, 22, 22), finish 2 sts. = 110 (110, 115, 115) p.
We continue knitting 7-12 pp. according to diagram, while simultaneously performing decreases of the 8th row. according to cx. 2.
Rep. 1-12 pp. according to cx. 1, simultaneous ub. 1 stitch on each side in every third row x 35 (37, 37, 40). Set aside the loops.
Assembly
We make raglan seams. We remove all the loops on the common joints. and start knitting with a 1 x 1 rib, at the same time decreasing 5-4-5-4 sts above the loops of each sleeve. As a result, 10 should be cut (8, 10, p. We continue knitting with a 2.5 cm elastic band, after which we close the loops.
Crop sweater with dolman sleeves
In cold windy weather, a turtleneck sweater always saves us. Such sweaters are practical and comfortable. A model of classic English chic.
The sweater is decorated with a braid pattern. Sizes: 42/44 and 46/48. Sweater in a fashionable length, worn with high-waisted trousers, knitted from thick yarn - 100% Bingo Melange wool. It is knitted in two fabrics and stitched at the end.
To work you need:
- Yarn – Bingo Melange wool (80 m/50 g), or any thick yarn.
- The knitting needles are regular, 4.5 mm thick. and 5.5 mm. and circular ones of the same thickness, 60 cm in length.
- Markers, needle with a thick eye.
Patterns:
- Rib A: K2/P2
- Elastic band B: k2/p1
- Facial surface.
- Fantasy. pattern with braids A: knit according to the pattern (71 p. = 31 cm wide).
- Fantasy. pattern B for sleeves: knit according to the pattern (19 stitches = 8 cm wide). We knit rows 1-12 in height, then repeat the same thing.
- Fantasy. pattern C for sleeves: this is pattern B in a mirror image.
Knitting density: 10/10 cm faces. smooth = 16 p./22 r. knitting needles 4.5 mm. and 18 p./23 r. knitting needles 5.5 mm.
Back and half sleeves
Our task is to knit the back and half of the sleeves, then the front with half of the sleeves, finally sewing these parts together. The pattern runs along the back and along the shelf.
First you need to knit the bar: cast on 4.5 mm knitting needles. 78 (86) sts and knit 8 cm (19 r.). In this case, we start the elastic band like this:
1st row: edge, purl, k2, purl 2, and so on until the last 2 sts, the last k2. 2nd r: chrome, purl, k2, purl 2. and so on.
For further work, we need to add 19 (17) stitches, since our patterns are voluminous. We will type from a crossed broach. We dial every 4 (5) points like this:
We got 97 (103) sts. We switch to 5.5 mm circular needles. We put markers at the beginning of the fantasies. pattern A! 20th r: chrome. p., 12 (15) p. front g., 71 p. pattern A, 12 (15) p. knit. ch., chrome. P.
Next, we knit 18 (20) r., that is, 8 (9) cm after the bar and cast on 1 knit on the right and left for the sleeves. p. (98 and 104) p.
Next, in every 2nd row we collect 4 stitches from the broach (chrome, 2 at the beginning and 2 at the end of the row, chrome). We knit 46 r. Added 92 (92) p. It turned out 190 (196) p.
67th r: no increases. 68th r: chrome, knit 1. increase, knit to the end of the faces. Ch. and pattern A, at the end of knit 1. increase and chrome. 192 (198) p. 69th: starting the pattern on the sleeves. Chrome. p, 11 p. persons. satin stitch, 19 stitches of pattern with braids B for sleeves, before pattern A we knit faces. Ch. Next, we knit symmetrically to the beginning of the r., 19 sts. Pattern C for the sleeves. So we knit another 30 (33 rubles) - 14 (15) cm.
Then, at a height of 43 (45) cm from the elastic band, we begin to close all stitches straight. We find the central point and leave it on both sides for extra. knitting needles 12 cm long (22 stitches) for the collar. In total, 44 points were closed.
Front and half sleeves
We knit it in the same way as the back with half sleeves, but do not forget about the neckline. To do this, knit 36 (38) cm from the elastic, central 18 p. (9 on each side and then knit both sides separately. Close from the inside: in every 2nd p.: 2 times 4 p., 2 times 3 p, 2 times 2 p. After 7 cm (16 r.) from the point of the neckline, close all sts on one side and the other.
Assembly
We make seams on the sleeves and shoulders. For circular knitting needles 4.5 mm. pick up 50 (54) sts from the edge of the sleeve. Next, knit with rib B (k2, p1). Close the elastic after 11 cm. It is better, if possible, to try on the product to know what sleeve size is optimal for you. We do the same on the other sleeve. Next, we raise the item along the neckline. 44 sts on the back + 36 sts on the front part = 80 sts. Continue with elastic band A. Knit 12 (13) cm and switch to 5.5 mm knitting needles. We make a collar 25-26 cm high. 57 (60) rub. Close all items. The jacket is ready.
Dark blue oversized jumper with dolman sleeves - free description
Sizes : S – M (L – XL). Bust : about 108 (120) cm. Length : 56 (58) cm.
You will need:
- 350 (400) grams of blue (953.0010) LANGYARNS MOHAIR TREND yarn, consisting of superkid mohair and silk;
- knitting needles No. 4,5 and 5.
Pattern I , size 5 needles, semi-patent (odd number of stitches): Row 1 (right side): 1 edge, *1 purl, 1 knit*, repeat from * to *, finish with 1 purl, 1 edge. Rows 2 + 4 (wrong side): 1 edge, *1 knit, 1 purl*, repeat from * to *, finish with 1 knit, 1 edge. Row 3: 1 edge, *1 purl, 1 knit, insert the knitting needle 1 row below*, repeat from * to *, finish with 1 purl, 1 edge. Knit rows 1 – 4 once, then repeat rows 3 + 4. Knit the edge only at the end of the row; at the beginning of the row, remove the edge without knitting.
Knitting density : Pattern II, 15 loops by 26 rows = 10 cm by 10 cm.
For the right sleeve, cast on 17 (21) stitches and knit with Pattern I.
To bevel the shoulder along the right edge, add 16 times 1 loop in every 6th row and 14 times 1 loop alternately in every 4th + 6th row.
At the same time, along the left edge to round the sleeve, add 1 loop in 16 rows, 1 loop in 12 rows, 1 loop in every 8th row 3 times, 1 loop in every 4th row 4 times, in every 2nd row. m row 21 times 1 loop and cast on 4 times 2 loops = 85 (89) loops.
Include added loops in the main pattern.
Neckline
At a height of 64 (66) cm from the cast-on edge along the right edge, bind off in every 2nd row 1 time 2 and 2 times 1 loop.
At a height of 82 (86) cm from the cast-on edge along the right edge, cast on 1 loop 2 times and 2 loops 1 time in every 2nd row.
Then, to bevel the shoulder, cast off along the right edge alternately in every 4th + 6th row 14 times 1 loop and in every 6th row 16 times 1 loop.
At the same time, at a height of 101 (107) cm from the cast-on edge along the left edge, bind off 2 loops in every 2nd row 4 times and 1 loop 21 times, in every 4th row 4 times 1 loop, in every 8th row 3 times 1 loop, after 12 rows 1 time 1 loop and after 16 rows 1 time 1 loop.
At a height of 148 (154) cm from the cast-on edge, bind off the remaining 17 (21) loops.
the front and sleeves like the back.
Neckline
At a height of 64 (66) cm from the cast-on edge along the right edge, bind off in every 2nd row 2 times 2 loops, 4 times 1 loop and after 4 rows 1 more time 1 loop.
At a height of 79 (83) cm from the cast-on edge along the right edge, cast on 1 loop 1 time, after 4 rows 1 time 1 loop and in every 2nd row another 3 times 1 loop and 2 times 2 loops.
Finish like a backrest.
Return to content
Poncho with bat sleeve in large sizes
An interesting poncho with a large micron. The sizes indicate that since the top is voluminous, you need to orient yourself along the bottom edge (along the hips). In the finished product, the bottom edge is: 101, (112, 122, 134,143, 152) cm. Which corresponds to sizes 44/46, (48/50, 52/54, 58/60, 62/64, 66/68).
Keep in mind that the model is not clearly designed around the circumference of the hips, and has an error of 10', that is, 24 cm. That is, the lower edge should not be tight. Poncho height – 65.5 (66, 70, 71, 75, 77.5) cm. Berroco Ultra Wool yarn (100% wool 100 g/200 m. You will need 5 (6,6,7,8,9) skeins , color Rosemary.
Knitting density – 18 p./24 rows (rings) = 10/10 cm.
To work you will need:
- Circular knitting needles 4 mm thick.
- Circular knitting needles 5 mm. (length 40 cm or more) – 2 pcs.
- Regular knitting needles 4 mm.
- Markers.
- Needle.
A poncho with a bat sleeve is made from the neckline from top to bottom - in circles (rows).
Patterns : faces. satin stitch, garter stitch (1 r. - knit, 1 r. - purl), 3/3 elastic, fantasy “leaves” pattern (pattern attached) and a pattern of capes on the shoulders.
Pattern diagram for 19 loops:
Legend:
- (knit) facial
- (purl) • purl
- (Yarn over) O – yarn over
- (k2tog) / – 2 p. together with a tilt to the right
- (ssk) \ – 2 p. together with a tilt to the left
- (CDD) stretching - remove 1 stitch without knitting, leave it on the right needle, knit 2 together, and pull this received stitch through the removed stitch.
1st r. “leaves” pattern: 4 knits, 2 knits together with a bevel. right, p3, yo, k1, yo, p3, k2, inm. with tilt to the left, 4 persons.
2nd r: facial.
3rd r. pattern: 3 knits, 2 knits together. with switch right, p3, yo, k1, yo, k1, yo, k1, p3, k2. vm. with switch to the left.
4th: as 2nd.
And so on - according to the scheme.
Collar
On circular knitting needles 4 mm thick. cast on 102 p., connect the p. in a circle, mark the beginning of the p. with a marker. We knit 20 r. (8 cm) ribbed knit 3/p 3. If you want to make the collar higher, make 40 rubles. (16 cm).
Poncho top
Next, we move on to the knitting needles. 5 mm. size 40 cm and continue.
Round 1: K16. PM (place a marker), k16, PM, 19 p. knit the “leaves” pattern, PM, k16, PM, k16, PM, 19 p. “leaves” pattern, PM. Circle (row) 2: entire river. – facial. Round 3: (8 incs): *k13, yo, k1, yo, k2, rm (shoulder), k2, yo, k1, yo, k1, k13, rm, 19 sts with leaves pattern, k13, yarn over, k1, yarn over, k2, PM (shoulder) knit 2, yarn over, knit 1, yarn over, k1, k13, PM, 19 sts with leaves pattern. (in total 110 p).
The middle of the poncho falls in the middle of the “leaves” pattern.
Repeat the 3rd and 4th circles another 33 (35,37,39,41,43) times, ending with a circle without increments. The result is 374 (390,406,422,438,454) sts. Follow the “leaves” pattern. We stop at the odd row of the “leaves” pattern.
Next, we will divide the entire canvas into front and back. We switch to the regular (not circular) knitting method. To do this we will need another set of 5 mm knitting needles. We tie up 16 people. p. to the “shoulder”, marker, and turn the work in the opposite direction. We knit purl to the other “shoulder”. So we divided our work into front and back.
Back
We divided the work, and there were 187 (195, 203, 211, 219, 227) stitches left on one and the other needle.
In order to create holes for the arms, we must knit 11 (12, 12,13,13,13) cm without decreases or increases. (26, 29, 29, 31, 31, 31) r. Ideally, it is better to measure your arm just below the elbow, and divide the resulting number by 2.
Before
We do the same for the back and front. On the postponed stitches, without decreases or increases, knit 11 (12, 12, 13, 13, 13) cm. This is 26 (29, 29, 31, 31, 31) r.
Bottom part
Next, we again connect the back and front on a circular knitting needle. We again have 374 (390,406,422,438,454) stitches on our knitting needles. The next 2 r. knit without decreases. In order to achieve the correct fit, we need to knit another 50 rubles. (21 cm) and reduce in every 2nd r. stepping back from the marker (the point where we connected the back and front into one canvas)
Decrease row : *K1, CDD (broach, see legend), knit to the “leaves” pattern, 19 stitches of the pattern, knit. not reaching the next marker 4 p. – CDD broach, k1, marker* repeat from * to *. That is, we are in every 2nd r. Decrease 8 stitches all around, except for the last p. Total - decreases 24 times by 8 points.
Track. r : no decreases.
And so we continue for another 47 rows. 48th – no decrease. In total, we subtracted 192 p.
We will end up with: 182 (198, 214, 230, 246, 262) p.
Next, make another 12 rubles. garter stitch, then close in purl. R. All P.
Assembly
For cuffs on sleeves on 4 mm knitting needles. raise 42 (44, 44, 44, 48, 48, 48) knits along the edge of the sleeve. p., connect in a circle. We knit 12 rows in garter stitch and bind off all sts. R.
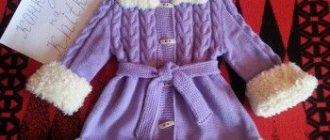
Lilac mouse
Laconicism, elegance and style are the main distinguishing features of the pullover, made in a soft lilac color. This model will look great with jeans, trousers, or a formal skirt. When choosing a different color, focus on solid shades so that the model does not lose its attractiveness. Another special feature is the way the work is done - the pullover is knitted crosswise. Let's look at how this happens below.
Prepare:
- yarn with a composition of 100% sheep wool, 150 m/50 g;
- knitting needles No. 3.5, No. 3;
Article on the topic: Quilling Christmas tree: master class of postcards with diagrams and photos
Basic moments:
- size 34/40 (42/46);
- knit an elastic band on smaller knitting needles, alternating knit and purl stitches one at a time;
- pullover pattern – stockinette stitch;
- a patent loop is used - purl loops are knitted on the front side, on the wrong side, insert the knitting needle a row below and knit one front loop;
- knit the fabric from sleeve to sleeve, that is, across;
- density 10 * 10 cm = 21 p. * 32 r.;
- As you work, don’t forget about the edge loops.
Back:
- Cast on 60 stitches and knit according to the pattern: (10 knit, 1 edge) * 4 rows, 14 knit.
- Having knitted 10 rows, in each 2nd row on the left side you need to add 1 stitch 20 times. Then - 26p. 1 time.
- Knit new loops with the main pattern.
- After 230 (250) rows from the beginning on the left side, cast off 26 loops, then in each 2nd row, decrease 1 stitch 20 times.
- Cast on 10 more rows. Remove the loops onto an additional knitting needle.
Front: knitted similarly to the back, only add loops and bind off on the right side.
Assembly:
- Slip stitches from additional back and front needles onto one needle. Knit the cuffs for the sleeves. In the first row, knit two front loops together. There will be 60 loops left.
- After 32 rows, finish the rib. Close the loops with a knitted seam.
- For the elastic at the waist, pick up 45 (50) stitches from the second row of back and front. Knit 6-8 cm. Close the loops in the same way as the sleeves.
Exquisite pullover is ready!
A few more examples:
Now you know how to knit a bat pullover and you can diversify your wardrobe with this model. A comfortable item must be in the wardrobe of every fashionista!
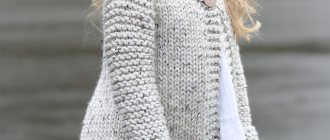
Warm cardigan with arans – MK
Beautiful cardigan with paisley pattern. Work of average complexity. This blouse is a must have in your wardrobe.
Dimensions: Bust circumference 76 (86, 96, 106, 117,127, 137) cm.
O.G. for the version with buttons 99 (108.5; 118.5; 131; 139.5; 149; 159.5) cm.
We need:
- Yarn: Quince & Co. Puffin [100% American wool; 102 meters/100 grams]: 11 (12, 13, 14, 15, 16, 17) skeins.
- The knitting needles are straight, 6.5 mm thick. and 5.5 mm.
- Circular sp. 5.5 mm long 80 cm (for sides and top).
- Markers.
- 5 buttons with a diameter of 25 mm.
Knitting density: 10/10 cm garter stitch = 13 p./18 r.
Patterns:
Rib 1/1 (k, p) Texture pattern (4-stitch panel; repeat 2 rows) Pattern Row 1 (IP) K1, P2, K1. Pattern Row 2 : purl. Rep. rows 1 and 2 to create a pattern. Braid A : Hexagonal "Paisley" center braid original version (see diagram). Braid B : Hexagonal "paisley" with half-length braid.
Abbreviations: IS – wrong side, approx. – increase, dec. - decrease.
Back
Using 5.5 mm needles, cast on 79 (85, 91, 99, 105, 111, 117) sts. Start rib 1/1, knit without approx. and ub. 7.5 cm, finishing purl. near.
Take 6.5 mm knitting needles. Knit 1 row of knits. st, making 1 stitch (decrease) in the center of the row - 78 (84, 90, 98, 104, 110, 116) stitches left.
Pattern Row 1 (IS) : P7. (10, 13, 17, 20, 23, 26), RM, knit texture pattern on 4 sts, knit braid A on 16 sts, knit texture pattern on 4 sts, knit braid B on 16 sts, knit texture pattern on 4 sts , knit braid A for 16 sts, knit a textured pattern for 4 sts, PM, knit purl. to end.
Pattern row 2 : knit. to the marker, cm, knit the pattern according to the description to the next. marker, SM, faces. to end. We knit without approx. and decreases, until the fabric reaches 19 cm from the beginning, finish purl. near.
Design of the side parts
Decrease Row (RS): K2, k2. knit, knit to last 4 sts, ss, knit 2 – decrease 2 sts.
Repeat the row with a decrease on the RS every 10 (10; 10; 11.5; 11.5; 11.5; 11.5) cm twice - 72 (78, 84, 92, 98, 104, 110) sts remain.
Knit without approx. and decrease until the fabric reaches 45.5 (45.5; 45.5; 47; 47; 47; 48.5) cm from the beginning, finish purl. near.
Armhole design
Continuing to knit the pattern as described, cast off 2 (3, 4, 5, 6, 7, sts at the beginning of the next 2 rows, then 2 sts at the beginning of the next 2 (2, 2, 4, 4, 6, 6) rows – 64 (68, 72, 74, 78, 78, 82) sts remain.
Decrease row (RS): , 2lvm, knit to last 3 sts, ss, K1 – decrease 2 sts.
Repeat the row, decreasing each time. Persons R. 3 (3, 3, 3, 4, 3, 4) times – 56 (60, 64, 66, 68, 70, 72) sts remain.
We knit without approx. and decrease until the armhole size becomes 20.5 (20.5; 21.5; 21.5; 23; 24; 25.5) cm, finish Purl. near.
Shoulder design
Cast off 5 (6, 6, 7, 7, 7, 7) sts at the beginning of the next stitch. Row 4, then 6 (6, 7, 6, 6, 7, 7) sts at the beginning of the next row. 2 rows. Let's move the remaining 24 (24, 26, 26, 28, 28, 30) sts, which are intended for the neckline, to the WHTC.
Left side of the shelf
Take 5.5 mm knitting needles and cast on 37 (41, 43, 47, 51, 53, 57) sts. Let's start with 1/1 elastic. We continue the elastic without approx. and ub. 7.5 cm, finishing Wrong next. We take 6.5 mm knitting needles. We knit Knit 1 row, dec. 0 (1, 0, 0, 1, 0, 1) sts – 37 (40, 43, 47, 50, 53, 56) sts remain.
Pattern Row 1 (WS): P6, PM, knit texture pattern for 4 sts, knit braid A for 16 sts, knit texture pattern for 4 sts, PM, knit P to end. Pattern 2: Knit to the marker, cm, knit the pattern according to the description to the next. mark., SM, Knit to the end.
Next, work without profit. and dec until the fabric grows to 19 cm from the beginning, finish the Purl row.
Side, neck and armhole
The design of the neckline, armhole and side part is knitted at the same time. The design of the neckline will be completed only after the design is completed. armholes. Side row. parts with ub. (LS): Continue the pattern as described, K2, 2lvm, knit to the end - decrease 1 st. Repeat side row. parts with ub. on the LS every 10 (10, 10, 11.5; 11.5; 11.5; 11.5) cm twice. At the same time, when the size of the canvas reaches 40.5 (40.5; 40.5; 42; 40.5; 40.5; 42) cm from the beginning, ending with the wrong side, decorate the neck as follows:
Neck row with ub. (RS) : If necessary, continuing the design of the side part, knit to the last 4 sts, sls, K2 - decrease 1 st. Repeat neck row from dec. [every 6 rows once, then every 4 rows once] 3 (3, 3, 3, 3, 4, 3) times, then every 4 rows 3 (3, 4, 4, 5, 3, 6) times. At the same time, when the size of the fabric reaches 45.5 (45.5; 45.5; 47; 47; 47; 48.5) cm from the beginning, ending with the wrong side, make a trace of the armhole. way:
Continuing to form the neckline, bind off 2 (3, 4, 5, 6, 7, stitches) at the edge of the armhole once, then 2 stitches 1 (1, 1, 2, 2, 3, 3) times.
Row of armholes with ub. (LS) : Continuing the design of the neckline, knit K1, 2lvm, knit to the end - decrease 1 p.
Repeat the row of armholes from dec. on each Knit row 3 (3, 3, 3, 4, 3, 4) times - 16 (18, 19, 20, 20, 21, 21) sts left after completion of design. Knit without approx. and dec until the armhole size is 20.5 (20.5; 21.5; 21.5; 23; 24; 25.5) cm, finish Purl side by side.
Making the shoulders: Cast off 5 (6, 6, 7, 7, 7, 7) sts at the edge of the armhole twice, then 6 (6, 7, 6, 6, 7, 7) sts once.
Right half of the shelf
On needles 5.5 cast on 37 (41, 43, 47, 51, 53, 57) sts. Start 1/1 rib without approx. and ub. 7.5 cm, finish Wr. Then, on 6.5 mm knitting needles, knit 1 row, decreasing 0 (1, 0, 0, 1, 0, 1) sts – 37 (40, 43, 47, 50, 53, 56) sts remain.
Pattern Row 1 (WS): Purl7 (10, 13, 17, 20, 23, 26), RM, knit texture pattern on 4 sts, knit braid A on 16 sts, knit text. pattern for 4 sts, PM, knit P to end.
Pattern Row 2: Knit to marker, CM, knit pattern as described to next. marker, CM, knit until the end. Continue without approx. and dec., until the canvas reaches 19 cm from the beginning, ending with the wrong side.
Sleeves
Cast on 39 (39, 39, 41, 41, 43, 43) sts on 5.5 mm needles. Start rib 1/1; work without profit and ub. 7.5 cm, finishing the Purl row.
We switch to 6.5 mm knitting needles. Knit 1 row, decreasing 1 st – 38 (38, 38, 40, 40, 42, 42) sts remain.
Pattern Row 1 (WS): P7 (7, 7, 8, 8, 9, 9), RM, knit texture pattern for 4 sts, braid B for 16 sts, texture pattern for 4 sts, RM, P to end.
Pattern row 2: K to marker, cm, pattern as described to next. marker, CM, perform K to the end. Work without profit. and ub. until the measurement reaches 12.5 cm, ending with a purl side by side.
Sleeve design
Next to arr. (LS): K2, 1BOB, knit to last 2 sts, 1BOB, K2 – increase 2 sts.
Repeat row from approx. every 10 (8, 6, 6, 4, 4, 4) rows 4 (4, 5, 9, 2, 5, 10) times, then every 12 (10, 8, 0, 6, 6, 6) rows 1 (2, 3, 0, 8, 6, 3) times, knitting new sts in stocking stitch - 50 (52, 56, 60, 62, 66, 70) sts. Continue without approx. and ub. until the canvas becomes 45.5 (45.5; 47; 47; 48.5; 48.5; 49.5) cm from the beginning.
Turn-down collar
Continue the pattern as described, cast off 2 sts at the beginning of the next 2 (2, 4, 6, 6, 8, 10) rows - 46 (48, 48, 48, 50, 50, 50) sts remain. Decrease row. (RS): K1,2lvm, to last 3 stitches, sls, K1 – decrease 2 stitches. Repeat row with decrease on each knit. R. 2 (2, 2, 3, 3, 3, 3) times, for every 4 rows 3 (3, 3, 3, 3, 3, 2) times, then on each knit. row 3 (4, 4, 2, 3, 3, 4) times – 28 (28, 28, 30, 30, 30, 30) stitches remain.
Cast off 2 sts at beginning of next. 2 rows, then 3 sts at the beginning of the next row. 2 rows. Bind off remaining 18 (18, 18, 20, 20, 20, 20) sts.
Assembly
The sides and collar must be decorated. Connect the shoulder seams. Take a circle of knitting needles 80 cm. Start from the bottom. We pick up the edges of the shelf and knit faces. 58 (58, 58, 60, 58, 58, 60) sts to the base of the neckline, PM, 43 (43, 45, 45, 49, 49, 51) sts on the shoulder seam, knit. across 24 (24, 26, 26, 28, 28, 30) sts of the back of the neck with WHTC, Faces. 43 (43, 45, 45, 49, 49, 51) sts to the base of the neckline, PM, then 58 (58, 58, 60, 58, 58, 60) sts to the bottom left edge of the front - 227 (227, 233, 237, 243, 243, 253) p.
Next r. (IS): Purl 1, *K1, Purl 1* – repeat from * to end.
Making a collar
Short row 1 (RS) : Work rib 1/1 to second marker, turn. Short row 2 (WS) : Yarn over, knit to marker, turn. Cor. Row 3 : Yarn over, knit up to 1 stitch before yarn over in previous K row, turn. Short river 4 : Yarn over, knit up to 1 st before yarn over in previous Purl row, turn. Short rivers 5–22 : Repeat. short rows 3 and 4 – 9 times. Short river 23 : Yarn over, knit to the end, knitting yarn overs. with adjacent paragraphs as follows: If the next. behind the yarn over p. – Knit, knit 2 lvm on the yarn over and next. P; if next behind the yarn over p - Purl, knit a ss purl over the yarn over and the next st. Row 24 : Knit to the end, making the remaining yarn overs together with the adjacent sts without inc. and ub. 2 rows. Row with buttonhole (RS) : Knit 3 sts, yo, 2lvm, [knit 11 sts, yo, knit 2 sts together (2lvm if second st is K, 2ivm if second st is P)] 4 times, continue to end. Continue without approx. and dec., until the length of the side becomes 4.5 cm from the row with the cast-on loops, beg. from the bottom edge. Cast off all stitches using a 6.5 mm knitting needle. Sew in the sleeve, join the side seam. parts and sleeves. Sew with a needle.