- 34781
- 13-10-2020
- Author: Mysekret Team
- 2
The Asian spikelet is a fashionable trend of recent years, which still impresses not only fashionistas and beginners in knitting, but also experienced needlewomen. Why does everyone love this type of large crochet braid so much? First of all, texture , that is, unusual volumes of pattern for knitted items, which make many models of simple things so special.
One has only to look at how knitted cardigans, sweaters, jackets, hats or scarves decorated with an Asian spikelet look, and any knitting fan will definitely want to try to create such a thing with her own hands.
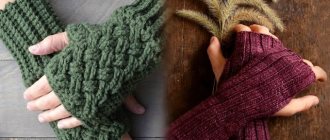
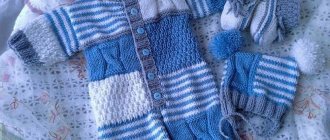
The use of Asian spikelets in different clothing models.
Variations in the use of Asian spikelets in the fashion industry.
In addition, the Asian spikelet has its own knitting characteristics, so the end result looks so unusual and original. Let's take a closer look at the method of knitting this popular pattern and apply its patterns on different models of clothing.
Knitting pattern for an Asian spikelet
A very popular cardigan, also called “Chinchilla”, made with knitting needles using the Asian spikelet technique.
A characteristic feature is the gradient color transition in the yarn. The airiness and volume of the Asian spikelet seem to be something transcendental at first glance. But if you delve into the essence of the method of knitting this pattern, it will become clear how this “magic” works: during knitting, the loops are cast along the length, and not along the width of the product . This is because this pattern is knitted along a vertical rather than a horizontal line. To make the knitting method clear even to inexperienced knitters, let’s look at a detailed description of the process of making an Asian spikelet.
See also...
✅ 6 reasons to learn to knit right now
✅ How to beautifully crochet edges: simple patterns
✅ How to crochet motifs: simple patterns with descriptions
✅ Knitting patterns and patterns: detailed description
Scheme for beginners
This simple master class on knitting an Asian spikelet will help even those who have little experience in working with knitting needles to understand the basics.
First you need to prepare yarn (one or more colors) and large knitting needles. It is better to use circular knitting needles for knitting an Asian spikelet.
Asian spikelet knitting - knitting pattern and description:
For rapport, a number of loops is selected in the cast-on row that corresponds to the length of the main fabric of the future product. The number of loops must be a multiple of six (this also includes edge loops).
- The first row consists of six knit stitches. Then the work stops and the knitting is turned over;
- The second row is made up of six purl stitches. Thus, knit only these 6 loops, inclusive of the tenth row;
- In the eleventh, these six loops are knitted plus three more knit stitches. After this, the “Asian Spikelet” knitting is turned again;
- The twelfth row consists of six purl loops, then the knitting is turned. After this, ten rows are knitted on these six loops. According to the pattern, knit ten rows on every six stitches. In this case, take three of those knitted in advance and three more from the subsequent ones, located on the knitting needle on the left side. Continue this way until the end of the row.
- Next come two more knit and purl stitches.
- At the final stage, the pattern of actions is repeated, taking into account the fact that it is necessary to start knitting on the wrong side of the fabric, using purl stitches. This is done in order to change direction.
Video lesson
This is what the process of knitting a classic Asian spikelet with characteristic holes in the fabric looks like. Knitting such a pattern with knitting needles is not boring, since manipulations with turning the knitting must be carried out regularly. Of course, at first it may seem very difficult to work with such an unusual ornament. However, the result is worth the effort - after all, the spikelet can become the highlight of your future item.
Video: Asian spikelet knitting
Jacket with a popular pattern “Asian spikelet”
Made in a classic style, the blouse-cape looks very unusual thanks to the “Asian spikelet” pattern.
Tools for knitting the “Asian Spikelet” cardigan:
- Cream Monte yarn - seven skeins;
- Knitting needles No. 5.
Knitting techniques used:
- Facial surface;
- Purl stitch.
Pattern for knitting a sweater with knitting needles using the popular “Asian spikelet” pattern and work progress:
- Cast on 85 stitches. Knit 14 rows, alternately knitting 2 rows with purl stitch and 2 rows with stockinette stitch.
- From the bottom edge of the fabric (hem), knit 60 stitches and turn the work.
- Work 12 rows of the first 4 stitches, constantly turning the work.
- Then knit 12 rows from the next group of stitches in the same way. Thus complete the row.
- Knit 4 rows of stockinette stitch from all 85 stitches (yoke: knitted from 25 top stitches. They should be knitted by alternately knitting 2 rows with purl stitch and 2 rows with stockinette stitch. To form a neckline, in every 3rd row you should not knit the last 5 stitches) .
- Knit, alternating the convex parts of the fabric with 4 rows of stockinette stitch (in the yoke part, alternate 2 rows of purl stitch and 2 rows of stockinette stitch).
- After completing 5 convex rows, set aside 44 loops. Cast on 52 stitches on another needle, connect with the remaining stitches and continue knitting with convex motifs.
- Having knitted 10 rows of convex motifs, bind off these 52 loops, return the set aside loops and continue knitting the back until 12 convex rows are formed.
- Set the stitches aside again, cast on additional stitches for the second sleeve and knit as described above.
- Having knitted the sleeve, continue knitting the second front front. After the required number of convex rows, knit 14 rows, alternately knitting 2 rows with the front stitch and 2 rows with the purl stitch (to form a neckline in every 3rd row, you should not finish the top 5 loops of the yoke). In the 10th row at the top of the yoke, make a hole for a button: knit the first 4 loops, make 1 yarn over and decrease 1 loop. Knit the next 9 stitches and make 1 more hole.
Headdress
Having learned how to make a fabric with an Asian braid, you can knit a simple hat. Depending on the placement of the pattern, you can make a hat with vertical or horizontal stripes. Assembling such a headdress is quite simple - sew a side seam, carefully hiding the tails of the braid. Gather the top of the fabric with a thread and pull it off. You can sew a stripe tied with an elastic band at the bottom. The simplest hat is ready!
You can make a hat with a double braid stripe and a sewn-in bottom. For this you will need a hook.
- First, knit the ribbing on circular needles. Its length should be equal to the circumference of the head. Sew it at the bottom of the fabric with braids.
- Using a hook, tie the bottom. It is performed in circular rows. In order not to make a mistake with the size, use the following formula: measure the circumference of your head and divide it by 3.14. The resulting number is the diameter of the circle you need to make.
- All that remains is to sew the bottom into place and decorate the hat to your liking. In this case, crocheted flowers were used.
Related article: DIY crocodile toy
The luxurious hat is ready!
How to knit a fashionable cardigan
A cardigan with knitting needles in an Asian spikelet pattern has been a real hit among fashionistas for several cool seasons in a row. Sometimes a cardigan made using this knitting technique is called “ Chinchilla ”, since visually the pattern resembles the waves on fur coats made from the wool of these animals. The effectiveness of a cardigan pattern is usually complemented by bright yarn of several colors, and a gradient transition in several shades is considered especially beautiful .
Such a bright and airy element of the wardrobe not only warms, but also lifts the mood, because it radically changes the appearance of its happy owner, adding to her image a touch of glamorous chic, which is not out of place on gray, cool days. Besides the fact that the result is a beautiful thing, the knitting process also has its own charm. After all, this beauty will be connected with your hands! Beginning needlewomen do not need to doubt their abilities; remember: nothing is impossible if you have a knitting pattern.
Tools for knitting the “Asian Spikelet” cardigan:
- Thick bulky yarn 1.5 - 2 kg (Angora Real, Gold or Ram are suitable);
- Knitting needles No. 5.5 or 6 (preferably circular, but straight ones are also possible).
Cardigan Pattern:
It is necessary to knit according to the pattern of the Asian spikelet pattern (see at the beginning of the article). The motif will consist of two “grains”: the first looks down, the second goes up. Between the grains, knit 4 rows in stockinette stitch. For small sizes, a spikelet of 6/12 is recommended (6 loops per 12 rows), for medium sizes: 8/14, for large sizes - 8/16. For spikelets 8/14(16), the set of loops is a multiple of 4; we pick up not 3, but 4 loops. We remove the first loop as an edge loop.
Pattern:
Knitting proceeds vertically: from the collar through the body to the second collar. In total, you will need to knit 9 full spikelets for the carcass, which can be knitted either as a whole fabric or in separate parts (after stitching, they will prevent the product from stretching down too much). Also 2 spikelets for the sleeves.
We knit a sample and calculate the number of loops to cast on. Average data: collar - 27 spikelets -112 loops (in our example - 28 - 122 loops) front/back - 24 spikelets - 100 loops (25 - 104 loops) armhole - 17 spikelets - 72 loops (18 - 76 loops) sleeve - outer - 20 spikelets - 84 loops, inner - 14 spikelets - 60 loops. The collar is sewn in half at the end. You can knit it separately from the carcass, then sew it on by folding it in half.
Gradient
For such a cardigan, the following set of loops is proposed: half the loops are cast on with the bottom color, the other half with the top color. A gradient of two shades of the same color looks good, then you can knit half (or slightly less/more) of the spikelets in one color, and the rest in another, without mixing the threads with each other. The easiest way to knit a gradient is to do it on the wrong side.
Without broaches, you can knit as follows: finish 14 rows of the spikelet (8/14) and instead of the last 8 loops, knit only 4 of them, then put the thread that is no longer needed and knit the remaining 4 loops with only two threads (can be done in 3 folds). Then pick up 4 more loops for the new spikelet, while picking up the thread from the previous row (set aside earlier). There are 3 threads in use again, and a transition has been made.
When all the spikelets are knitted, you can stitch the “bent” center of the spikelets along the shoulder and sleeve lines with stockinette stitch. Then all that remains is to sew the side and shoulder seams, sew in the sleeve and the cardigan is ready.
Important: it is not always possible to correctly determine the number of loops from the sample (since the fabric stretches down under its own weight and it is difficult to calculate this stretch).
Step by step diagram
For this example it was required: bobbin yarn in 9 folds (1600/100); knitting needles No. 6.
The knitting of the spikelet begins at the top, so we knit in the top color (for those with a gradient). Having reached the end, we knit 4 rows of stockinette stitch, then knitting goes from bottom to top (on the wrong side).
The finished carcass has stretched out greatly: from 62 cm to 90 cm. Consequently, the volume of the braids is lost, which means that the spikelets need to be tightened with additional thread. The weight of the carcass was 700 g.
After this, the shoulder seams are sewn together, the middle of the collar, and the collar is sewn to the back. Then the loops for the sleeves are picked up and knitted further according to the calculations.
Share with your friends!
- 314
- 16
- 13
- 343
Shared
Subscribe to our Yandex.Zen channel or Yandex.Messenger
Knitting a Chinchilla cardigan
The “Chinchilla” cardigan knitted with knitting needles looks very cozy. Knitting it is quite simple, following the description and pattern. You will need thick, bulky yarn. You can take plush yarn, then the product will look more interesting. Also, to knit a cardigan you will need knitting needles number five or six.
You should knit quite tightly without stretching the loops. A tighter knit will eliminate gaps at the intersection of sections and create a uniform, warm knit. You can remove holes in knitting in the following way: you need to thread a loop into the center of the side of the knitting section from the main knitting needle in the transition rows. The product will not be openwork, but more dense.
You must first knit individual parts, then crochet them together.
- You should start knitting from the collar. To do this, you need to cast on one hundred and twelve loops, and then knit on knitting needles according to the pattern for up to twenty-seven spikelets.
- The back and shelf will require one hundred loops. Twenty-four spikelets need to be knitted.
- For the sleeves, twenty spikelets of eighty-four loops should be knitted.
- For the armhole, knit seventeen spikelets from seventy-two loops.
Before you start sewing the parts of the future cardigan, you should remember that the connected parts of the product cannot be washed or steamed. This can cause shrinkage and deformation of knitted parts. You should start sewing the parts from the shoulder seams, then sew the sides of the collar. Sew the collar to the neck. Lastly, attach the sleeves.
Knitting with such a spectacular pattern is becoming more and more popular every day. The simplicity of knitting makes knitting a pattern accessible to both beginners and experienced knitters. Products made from textured volumetric spikelets look original, beautiful and elegant.
Airy openwork scarves, capes and shawls knitted with the Asian spikelet pattern will decorate any wardrobe. And warm winter cardigans, sweaters and hats will create coziness and comfort for their owners.
https://youtu.be/hQN2gf4u7wUhttps://youtu.be/aQ8wpsSckXQ
_