Butterfly made from a toilet paper roll
To make this craft we will need:
- Sleeve;
- Landscape sheet;
- Paints and brush;
- Scissors;
- Glue;
- Shifty eyes.
Draw wings on a landscape sheet. Cut out, color. Draw various patterns on the wings. Paint a toilet paper roll. Dry. Connect the wings and body with glue. Glue on the eyes, draw, cut and glue the antennae.
The butterfly is ready.
Butterfly made from plate and spoon
To make this craft we will need:
- Paper plate;
- Plastic spoon;
- Black marker;
- Paints and brush;
- Scissors;
- Glue;
- Yarn of different colors;
- Fork.
Fold the plate in half, draw butterfly wings and cut out. Glue a spoon to the fold. Draw the eyes, mouth and antennae of the butterfly on the spoon.
Color the wings in different colors. Dry everything thoroughly.
We recommend reading:
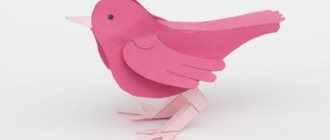
Craft bullfinch: detailed description of how to make a bird with your own hands (115 photos)Crafts from vegetables: 100 photos of the best crafts for children and a review of recipes for adults
- Craft ship: 120 photos, templates, drawings and step-by-step instructions on how to make a boat
Wind yarn around a fork. You can experiment and wind different colors of yarn, mixing and alternating them with each other. Tie a piece of thread in the middle of the winding. Remove from the fork and cut the ends of the threads.
You should get a fluffy pompom with a diameter of no more than 2 cm. Make 7 such pompoms and stick them on the handle of a spoon. This is how we get a furry body.
The butterfly is ready.
DIY butterfly made from waste material
Master class “Beauty Butterfly”
Do-it-yourself craft from waste material
Author: Tatyana Vitalievna Levchenko, teacher at MB preschool kindergarten No. 15 “Rainbow”, Taganrog, Rostov region. Purpose: this work can serve as decoration for the interior of a group or home, or can be a gift for family and friends. Purpose: making interior decorations, do-it-yourself gifts. Objectives: - learn to use waste material for useful things; — continue getting acquainted with the application; - develop a sense of beauty, creative talent; - cultivate attention and care for family and friends; - to arouse interest in making crafts from waste material. This master class is designed for children 7-8 years old with the help of parents and educators. The work will be of interest to everyone who likes to make crafts with their own hands and bring joy to the arrangement of their interior.
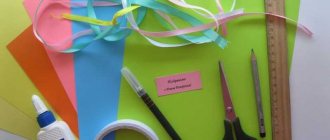
Required material for production: - A cylindrical can of chips; — Self-adhesive paper in three colors - blue, yellow, pink; — Sheets of cardboard - 2 pieces; — Decorative paper ribbon of golden color; — Hot glue gun; — Wooden skewers - 4 pieces; — Glass pebbles - 2 pieces; — Floral wire - 2 pieces; — Eyes - 1 pair; — Marker; - Scissors; - Shiloh.
Templates:
Step-by-step process for making a craft: 1. Take a landscape sheet of paper, a marker and draw a butterfly wing. The shape may vary. Since the wing is symmetrical, we will use 1 template.
2.Cut carefully along the contour with scissors - the template is ready.
3. We take cardboard - it can be white, it can be plain, I had a folder from cardboard. We trace both wings according to the template on cardboard and cut them out.
4.Unfold the blue self-adhesive paper, partially curl the paper and place both wings of the butterfly on the adhesive surface.
5. Cut out both wings; on one side they are already covered with blue paper.
6. We do the same operation with the back side of the wings and cut it out with scissors.
7. It turned out to be two wings glued on both sides of the wing with blue self-adhesive paper.
8.Now we need to paste over the cylinder; to paste it over we will need yellow self-adhesive paper. Let’s unfold it and mark on it which piece we will need for gluing the jar. Cut the marked sheet. Remove the lid from the jar. Remove the paper from the self-adhesive and, smoothing the paper, evenly cover the jar.
9.Now you're done. We put on the lid.
10.Measure one piece of tape, cut the required number of tapes along its length and glue it around the cylinder at the same distance from each other.
11. We take skewers, measure what length is needed, cut it with scissors (in general, it’s better to prepare it in advance if we use an already prepared paper template; a knife with teeth can easily be cut). Glue it evenly and on the edge, two on one side, two on the the other so that you can then glue both sticks to the jar along the edges. Ready.
12. Now we spread glue along the edge of the wing, or vertically along the jar, apply it and press it against the jar for one minute. The glue quickly sets materials.
13. Remove the lid and pierce two holes in it with an awl, insert the floral wire and twist it into a spiral at the end. Glue the twisted wire to the bottom of the lid with glue, hold for a minute and it’s done. Now we take two pebbles - these will be antennae and drip glue into the middle of the pebble, put a wire in the glue, hold it for a minute. You can now put the lid on the jar.
14. Take a larger circle template - we will use it to decorate the wings of the butterfly. We outline them on yellow self-adhesive paper and cut them out with scissors.
15. Turn the right wing and start gluing the circles. We glue it in such a way that there is an even distance from the edge at the bottom of the wing and at the top too. Glue two circles. We do the same with the left wing.
16. Take a smaller circle template - we will also use them to make a decoration for the butterfly wings. We outline them on pink self-adhesive paper and cut them out with scissors.
17. Turn the right wing and start gluing the pink circles inside the yellow ones. Glue it in such a way that the lower pink circle is pulled to the bottom of the wing, and the upper circle is pulled to the top of the wing. Glue two circles. We do the same with the left wing.
18.Glue the eyes to the butterfly and use pink paper sponges. They can be seen in the next photo.
19.The interior decoration is ready!
Thanks everyone for your attention!
We recommend watching:
Do-it-yourself burlap panel “Inspiration” Do-it-yourself spring panel. Master class with step-by-step photos DIY spring tree. Master class with step-by-step photos Do-it-yourself spring panel “Flying butterflies”
Similar articles:
Quilling. Parrot
Crafts on the theme of Spring. DIY flower meadow
DIY sheep
Violets made from waste material. Master Class
DIY panorama frame for photos
Postcard 3D butterfly on palms
To make this craft we will need:
- Colored paper;
- Landscape sheet;
- Scissors;
- Glue;
- pencil;
- Markers.
Fold the album sheet in half to form a postcard. Use a pencil to trace the child’s palm so that they join together to form a card.
Draw and cut out 3 butterflies of different sizes from colored paper. Fold them in half and glue them together at the fold.
Open your palms, decorate them and glue butterflies to the fold.
The 3D postcard is ready.
How to make outline butterflies from paper
Let's start with the simplest, but most effective - contour butterflies. You will need colored paper or magazine pages, outline maps, etc. You can use old postcards or colored cardboard. You will also need regular cardboard to cut out the template.
These are contour butterflies for decoration - they are easy to make and look great
Preparing the template
We take a piece of cardboard - any kind, you can even use some kind of packaging (tea, breakfast cereals, cereals, etc.) the main thing is that the cardboard is dense and not porous. Find a butterfly silhouette that you like, transfer it to cardboard and cut it out. There are several silhouettes in the photo gallery. They can be printed, then cut out and transferred to cardboard.
Moth on the wall - it would be nice in color
If you are good with scissors, you can try this outline
The more bends, the more difficult it is to cut
Swallowtail is attractive with its “tail”, but the paper consumption is greater and the work requires more accuracy
This one looks more like a night moth, but it looks good too
You can draw decorative butterflies yourself, you can find an image in any book
Paper butterfly templates for interior decoration are made in half. The second is obtained “automatically” after unfolding a piece of paper folded in half
Another version of the swallowtail for cutting out of paper
Some tips for working with templates. Many butterfly contours are given with two wings, but it is better to cut off one wing - you will definitely get it symmetrically.
Decorations made from winged insects of different sizes look good. Therefore, the same contour can be enlarged or reduced using the simplest functions of graphic editors - the same Paint, which is available on any computer. Since in this case only the outline is important, the quality of the drawing is not so important, so feel free to experiment with sizes. We cut out the printed template, apply it to cardboard and trace it. We cut it out and get a hard working template with which you can make dozens of identical elements.
Cut and attach
How to make an outline butterfly from paper
Take a sheet of paper, fold it in half, attach a template, and trace it. Cut along the drawn line. Next, we bend the wings away from the “body” and get a workpiece. Having cut out a certain number of butterflies, we attach them to the chosen place - on the wall, a piece of cardboard, etc.
You can attach it with regular glue (PVA is usually the best option), or small strips of double-sided glue. You can use wallpaper glue, etc. If you are in doubt about the result, stock up on sewing pins. They can be mounted on the wall several times without much risk of damaging the surface. When you have placed all the butterflies and you are satisfied with the result, you can glue or use tape.
Children's craft butterfly from candy wrappers
To make this craft we will need:
- 2 candy wrappers (you will need bright, colorful ones, one larger than the other);
- 2 cocktail straws;
- Scissors;
- Shifty eyes;
- Glue;
- Threads.
Straighten the candy wrappers and connect them at the wide edges with two fingers, giving the shape of wings. Connect 2 pieces to each other and fasten with threads.
Take 2 cocktail tubes, bend the ends at the bends and glue them together so that the antennae point in different directions. Glue the wings to the body, trim off the excess.
Glue on the eyes. The butterfly is ready. This craft will teach your child to create unusual and wonderful things from the most ordinary materials.
Craft a butterfly from a plastic bottle
To make this craft we will need:
- 1 plastic bottle;
- Felt pen;
- Scissors;
- Stained glass paints;
- Printing the template on paper.
Cut off the bottom and top of a plastic bottle. Cut the remaining part lengthwise and arrange. Trace the template with a felt-tip pen.
Cut out the workpiece. Use black paint to outline the template along all the patterns. Dry. Paint with stained glass paints.
If you glue a skewer on the back side, you can use these butterflies as decoration for flowers. They can decorate any gift box. Make a garland out of butterflies.
Openwork product
To cut out an openwork butterfly, you will need a stencil. It is made according to the same principle as a snowflake. The leaf is folded and part of the butterfly is cut out.
Related article: Christmas star made of straw. Master Class
For an openwork butterfly you should prepare materials:
- Sheets of colored paper;
- Used postcards;
- Photos from old magazines;
- Scissors;
- Pencils;
- Sheet of cardboard;
- Scotch.
Print out the template for the butterfly.
Cut from a sheet of cardboard or old postcards. The cutting technique depends on the structure of the paper.
Draw a butterfly, place the drawing on cardboard and secure with tape. Carefully cut out a picture of a butterfly around the office. Cut the outer contours of the product with scissors, and the inner lines with a knife.
Craft butterfly from plastic caps
To make this craft we will need:
- 2 screw-on yogurt lids;
- 2 mineral water caps;
- Plasticine.
We roll a sausage out of plasticine. We attach the lids to the sausage using plasticine.
There should be larger lids on the bottom and smaller ones on top. Attach antennae from plasticine to the resulting butterfly.
Fabric butterfly craft
To make this craft we will need:
- 3 pieces of fabric 6x6 cm;
- Wooden clothespin;
- Felt pen;
- Scissors and glue;
- Needle and thread.
Fold into a butterfly shape, connecting the 2 sides. Sew the junction. Pin the clothespin to the workpiece and spread the wings.
Glue everything together. Draw eyes and a mouth on the clothespin. The butterfly is ready.
Origami butterfly
A beautiful butterfly craft in origami style can be simply folded from paper. To do this, you will need a square sheet of paper (you can use regular or special origami paper).
Manufacturing stages:
- The paper must be folded diagonally.
- Then the sheet of paper should be turned clockwise and folded diagonally again.
- The workpiece must be unrolled again.
- As a result, the square paper should have creases diagonally from one side to the other.
- The top of the paper should be lowered to the bottom, aligning the corners evenly.
- The workpiece should be unfolded again, and, turning the sheet of paper, do the same actions.
- The flat edges of the workpiece should be inserted into the middle.
- Use scissors to twist the two bottom corners.
- The top rounded corners should be folded towards the middle.
- The craft should be turned upside down, and then the lower triangle should be bent back. The result should be a small triangle at the top of the butterfly.
- The butterfly's wings need to be folded together.
Photo of crafts butterfly
0