Beadwork has recently become especially popular among many needlewomen. With the help of beads they create unique jewelry, embroider clothes, and paint unique pictures. Meanwhile, beads, as a decorative material, are considered one of the oldest in the history of applied art.
Thus, glass beads that adorned the clothes of ancient Egyptian jewelry were worth their weight in gold, and the secrets of the work of the craftswomen themselves were considered sacred sacraments. Fortunately, many secrets have become available to lovers of beauty.
It is not at all necessary to study all types of techniques to create an exclusive piece of jewelry.
Square strands of beads can be considered a complex technique, but to master it, it is enough to take a specialized specialized master class.
List of tools
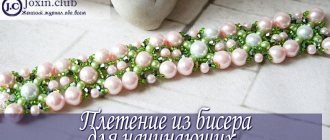
Square bead strands are actively used as bases for necklaces, bracelets and other jewelry. This decoration looks original and exclusive, and is also considered trendy for the summer season.
The necklace is made using the square rope technique
Harness at the base of the necklace
Harness at the base of the necklace
The necklace is made using the square rope technique
Harness at the base of the necklace
Bracelets using the square rope technique
To master this technique, it is enough to have a basic set of materials:
- beads;
- monofilament for beading;
- needle.
It is recommended to select the color of the thread to match the beads, then the product will look neater. You should also purchase special needles with a thin eye, through which a bead of any size can easily pass.
Choice of materials and colors
Square strands in beadwork are a complex applied technique, because the first steps in learning can be quite difficult. However, a detailed master class and good working materials will allow you to weave a square strand of beads with pleasure.
The choice of material should be given special attention, since the beauty of the finished product will depend on its quality.
On good beads, the pattern and the next step are better visible, which means that the learning process with high-quality materials will go faster.
Today, the most common bead producers are the following countries: China, Czech Republic, Japan. Chinese beads have a wide color palette, but the quality in a packaged bag leaves much to be desired.
But such material will be cheaper. Czech beads are of good quality with a color palette of more than 1,500 shades, and Japanese beads are deservedly considered the highest quality, but the material is the most expensive.
It is also worth paying attention to the shape of the material - there are beads round, square, faceted, matte, glossy, .... Each manufacturer has its own classification of bead shape and size. As a rule, the lower the material number in the sizing chart, the larger the diameter of the bead.
Patterns for weaving square beads
As already noted, a square strand of beads can be an excellent basis for a necklace or bracelet. In this case, the main colors of the beads correspond to the overall palette of the decoration, and the strand itself is monochrome. If a beaded rope should become the leading accessory, then you can use different color combinations of beads, weaving original patterns.
I will attach the weaving diagram below. The figure shows the beginning of weaving; arrows indicate the further direction of the thread. A circle of one color or another on the diagram, as a rule, indicates a bead. a rectangle can indicate cutting, cylindrical beads. The more detailed the diagram is, the more accurate the decoration will be, and the pattern will be conveyed with particular precision.
However, you need to understand that no matter how good the diagram is, it only helps to create complex weaves of the rope and give ideas for the formation of unusual knots and angles.
Square bead weaving in the technique of creating the rope itself corresponds to the classic one. Please note that you will also need to learn how to start and finish the job correctly.
In order to master the techniques, it would be a good idea to take several beading lessons.
Weaving a classic square braid: master class
It is recommended to study square beading using video or photo lessons. A square cord in its classic design can be imagined as cubes piled one on top of the other, each of which has its own base and shape.
The step-by-step instructions for creating such a cord are simple:
- We create the base of the rope - take 4 beads on a thread and connect them into a flat cross.
- We begin to knit the wall and ceiling of the cube - three beads are strung on a thread. The needle is pulled through the two foundation beads, thus forming one wall, the needle comes out on a free bead for the next step.
- The “wall” and “roof” beads are put on the thread, the needle is threaded through the beads of the adjacent “wall” and “foundation”. This way, all four “walls” of the cube are closed.
In the picture, the foundation is depicted with black beads, gold beads represent the walls, and bronze beads represent the roof of the cube.
- After the walls of the cube are completed, we secure the “roof” beads by drawing a weaving thread in a circle. The first square bundle cube is ready, but the master class does not end there.
- The bronze beads of the first cube become the foundation for the next step: repeating steps 2-4, we create the second cube.
If you need to make a turn to create a complex outline of the decoration, move the thread to one of the faces of the outermost cube.
Video master class
Author's lessons on the topic
1. Bracelet “Dewdrop”.
- Read the full master class on this decoration here
- 2. Bracelet “Snake”
- Read the full master class on this decoration here
3. Necklace “Ethno”.
Our recommendations
Experienced craftswomen choose high-quality beads for their work: the square strand technique requires careful adjustment of the beads to each other. This rule is also recommended for beginning needlewomen, because if the first decoration turns out beautiful and neat, it can inspire the creation of subsequent masterpieces.
It is best to start your creative journey with Czech beads.
The material is available in almost every handicraft store, and although its cost is slightly higher than that of Chinese beads, the first work will look much neater.
You can also buy Chinese beads, but be prepared for the constant selection of unsuitable beads; in one bag you may find square, round or even chopped beads, and even of different sizes.
SOURCES: https://www.livemaster.ru/topic/1198257-master-klass-sozdanie-kole-glaz-drakona-kvadratnyj-zhgut-i-pryamoj-ugol
Premium WordPress Themes DownloadDownload Best WordPress Themes Free DownloadFree Download WordPress ThemesDownload Premium WordPress Themes FreeDownload NULLed WordPress Themesudemy course download free
Source: https://masterbisera.com/zhguty/kvadratnyj-zhgut/
Bead strands???? square braiding, weaving with a needle
Handmade jewelry is distinguished by unusual solutions and natural beauty, which does not contain cliches. One of the types of crafts that can be used as jewelry is a rope or braided cord made of beads.
Beading has long been popular for people who love different types of jewelry. There are many different options for weaving it, so patterns and finished products may not be repeated, being the embodiment of the master’s imagination.
Handmade jewelry is distinguished by unusual solutions, natural beauty, which does not contain cliches
The simplest and most fashionable bead harness: a master class for beginners
A simple bead strand is the main element that a needlewoman needs to learn in order to master all the options for weaving with beads. The scheme according to which the work is carried out is easy to reproduce.
Tip: to simplify weaving, it is recommended to choose beads of 2 different (preferably contrasting) colors, so that you can easily follow the basic pattern.
To work you will need:
- beads (1-2 colors, 1 bag each) of different types;
- fishing line (medium thickness, light);
- scissors.
Weaving stages:
- Measure the fishing line to the required length (at the discretion of the needlewoman);
- Determine and remember the beads (beads) that will be the final one;
- String a large bead onto a fishing line, secure it at the end, then 5-6 smaller beads;
- Then you will need to string 8 more smaller pieces;
- After this, you need to roll them up, giving the workpiece the shape of a circle;
- Next, thread the fishing line through the first and all subsequent beads, and pull tightly;
- Repeat steps 3-6 again;
- Then you will need to stretch the fishing line into the second bead, go through beads 2-5, pull them together;
- After this, all steps are repeated again: a large bead is strung, then 10 small ones. You need to stretch the fishing line into the third bead and pass it through beads 4-6, pulling them together.
These steps are repeated until the craftswoman reaches the required length of the strand. The master class is not strict; if desired, it is possible to reduce or increase the number of beads in the weave, choose several colors and shades.
Gallery: strand of beads (25 photos)
Dense strand of beads for beginners (video)
MK how to weave a Turkish strand of beads
Before you start weaving a Turkish rope, you will need to purchase beads of different colors and sizes, glass beads, stones or beads - this is the main difference between the finished item for decoration or decoration. Such weaving may seem difficult for beginners, but after repeating the work several times, all difficulties will disappear.
To work you will need:
- beads (contrasting colors);
- fishing line; scissors;
- hook.
Before you start weaving a Turkish rope, you will need to purchase beads of different colors and sizes.
The work flow diagram is as follows:
- Measure the fishing line to the required length;
- String 3 beads of the same color on it, then 3 beads of a different color;
- Make 2 air loops, for this you will need to pass the fishing line through the beads, but do not tighten it tightly - the first tier of the Turkish rope is completed;
- Then 6 more beads are collected (3 different colors each);
- The hook is inserted into the first air loop between the beads and knitted;
- After this, the action is repeated, but without beads (the loop is fixed);
- Then the process is repeated, but the hook is inserted into the second loop, carefully knitted and secured - the second tier of the harness is completed.
The steps are repeated until the required length is obtained. In order to finish the work, you need to knit two loops without catching the beads. At the end, the fishing line should be tied in a knot (like sewing thread). Crochet should be done very carefully. Using a similar technique, bracelets, necklaces and even rings of various sizes are made.
We weave a rope of beads with a needle
Weaving of plaits is carried out using a thin needle.
Also for work you will need:
- beads (3 different colors are used);
- fishing line or thin silk thread;
- scissors.
Weaving of plaits is carried out using a thin needle
Work order:
- String 6 beads of different colors on a fishing line (thread) in random order;
- Pull the needle and fishing line (thread) through the first bead, then move up to the very last one;
- Form a ring, tighten the thread (tighter);
- Next, the second row of the rope is formed - for this purpose it is necessary to string 6 beads, pull the fishing line or thread tightly to the first row;
- Pass a thin needle through the first bead, then through the remaining 5;
- The third row is woven using the same technology, but the needle is inserted through the second bead.
Rows are made until the required length of the rope is reached. At the end, a knot is tightened on the fishing line or thread.
Tip: to get a pattern along the lines, you need to pass the needle through beads of the same color.
Crochet bead harness: simple pattern
To weave this way you will need beads (you can decorate the rope with bugles). The main process is carried out not with hands or a needle, but with a hook.
The working process is as follows:
- Beads are strung on a fishing line using a hook;
- Then a knot is made, followed by a bead;
- The fishing line is grabbed by the hook, pulled through - an air loop is obtained;
- The process is repeated until the required number of such loops is collected;
- After this, you should knit a row with a single crochet;
- Subsequent rows repeat the steps.
The main process is carried out not with hands or a needle, but with a hook
The general rule for such weaving is to follow the sequence of 1 bead, a crocheted loop, after which all steps are repeated.
DIY square strand of beads
Square or tetrahedral weaving is used to create beautiful and stylish bracelets. Such flagella are the basis for beads and necklaces.
The weaving process looks like this:
- Place 4 beads on a fishing line and make a cross;
- Then collect 3 more beads;
- Pass the fishing line from left to right through the first bead;
- Repeat the action, passing the line through 2, then 3 and further;
- After this, the process is repeated in the opposite direction;
- Then you should string 1 bead and pass the fishing line through the top bead;
- The next step is to pass a fishing line of three beads from top left to bottom;
- Next, 1 bead is collected and passed into the same 3 beads from top to bottom;
- Next you need to tighten the line;
- Pass the needle in the following sequence: tip - side bead - tip - side bead and tip again;
- Then steps 3 to 10 are repeated.
Square or tetrahedral weaving is used to create beautiful and stylish bracelets or earrings
For the first time weaving according to this pattern, it is recommended to use large beads or beads.
Types of harnesses: various options
There are dozens of types of bead strands. The complexity of their weaving varies. The options that can be offered to the craftswoman range from the simplest to the most difficult to work with, requiring a lot of concentration, attention and experience. The following popular types are distinguished:
- openwork;
- American;
- mosaic;
- twisted.
Video tutorials on beading flat and spiral American rope
By weaving jewelry using the American flat rope technique, you will be convinced that it will look impressive and exclusive. And the most important thing is that weaving according to such a pattern is not at all difficult, but on the contrary, it is very interesting and fast. Even beginners can cope with this task. Let's look at a detailed master class with photos and make beautiful jewelry with your own hands.
Step-by-step photo master class on weaving a beaded bracelet
At first glance, it may seem that this plait is woven quite difficult. The thing is that in the photo the product looks voluminous and unusual. Only when you come across the weaving technique closely will you be able to understand that this is not at all true. So, prepare all the necessary materials, which will be described below:
- blue beads and gray pearl beads;
- fishing line with a needle;
- scissors and a special lock.
You can choose other colors of beads for yourself. But in this master class we will weave a bracelet from gray and blue beads using the American flat rope technique. As a result, the product should be massive, and from the outside it will look like factory-made jewelry.
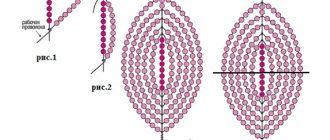
This master class will be presented as much as possible thanks to a detailed description of the scheme and step-by-step photos. First, cut an extended piece of thread or fishing line. Pick up two large beads. Then five beads and one small glass.
Finish the bottom with five beads. Maintain a distance of approximately five centimeters from the sides. Once this braiding mechanism is complete, take the two ends of the base material and make a few knots. Trim off the excess.
Pass the needle through the large beads and repeat the last step described. Pass the needle through the same pieces of glass again, as was done earlier.
After this, pick up 1 large bead and repeat the strip of beads and small beads. With your hands, carefully spread the formed arcs and thread the needle from below into the second large piece of glass.
And immediately pull through the second one, which begins the next strip.
Make an arc again and repeat the previous manipulations. Once again, run the base material through the same elements as before. Weave the arc in the same way as you did before.
It is necessary to weave an American flat plait until the desired length is achieved. Using protectors, secure the two sides of the harness with special locks.
In the photo you can see the entire step-by-step work process.
The master class is completely completed. Using this weaving technique, you can create not only amazingly beautiful bracelets, but also neck jewelry. For this you will only need to weave this strand longer than for the bracelet. You can also make everyday jewelry such as earrings. They are even faster to weave, since the workpiece should be no more than one centimeter.
Popular articles Bathroom in a wooden house: from planning to finishing
The ring will also look great in the form of a flat American braid. This means that you can even make a whole set of exclusive jewelry with your own hands. Experienced craftswomen managed to weave a belt in this style. This means that you can experiment in this direction.
Mk square harness
Friends, in this MK we will learn such a terrible beast as a square harness / cord.
Why scary? Because when you try to figure it out, it seems that it is something very complicated, but you just need to understand the principle and repeat the steps from MK with large beads or beads of two or three colors, and immediately everything will line up in an even row in your head, or rather, a cube :) Materials and tools
:
So, let's begin!
All photos can be enlarged by clicking.
As usual, I weave on a double thread, this is convenient not only for starting to braid stones and crystals, so as not to leave tails, but in this case too.
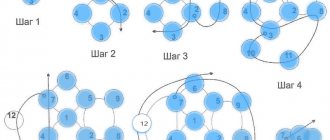
1.
We thread both ends of the thread into the needle and tie knots at each end, leaving them next to the eye of the needle. The opposite end of the thread looks like a loop.
2.
We collect 4 beads (I have Swarovski pearls of size 3 mm), thread the needle into the loop.
3.
We tighten, we get this cross:
4.
We collect three pearls and enter with a needle from the other side of the same pearl from which we came out. Black pearls are the foundation (floor) of our cube, which we will form. Golden pearls are the walls, and bronze pearls are the ceiling. Color will help you quickly understand the pictures.
5.
We tighten the cross with the first wall and the beginning of the ceiling and pass the needle and thread into the next black pearl of the foundation.
6.
We collect gold (wall) and bronze (ceiling) pearls. We pass the needle through the previous wall and foundation.
7.
We get this view: the walls currently lie in the plane of the foundation.
8.
We tighten the thread: the walls begin to rise, forming the edges of the cube. We pass the thread into the next black pearl of the foundation.
9.
We form another face: we collect gold and bronze pearls and draw a thread through the previous wall and the floor pearl.
10
. We pass the thread into the last black pearl of the foundation. Again, a view of the laid out walls in the plane of the floor:
And this is what it looks like when the thread is tightened everywhere and three walls have already been “built”:
11.
We pass the thread into the golden pearl of the adjacent wall.
12.
We collect the last bronze pearl of the ceiling and draw the needle through the previous wall:
13
. Now we need to get to the top; for any movement around the cube, we need to follow the nearest path in the crosses that form the edges. So - we go through the nearest black pearl:
14
. Then through the golden one:
15
. After which - into any nearest bronze pearl of the ceiling. Along the ceiling you need to go through all the pearls with a thread, and through the one with which you started - twice. That is, they started with it and will end with it. So, the first square strand cube is ready.
16
. We will complete the second floor using the same principle. Now our new floor is the former ceiling made of bronze pearls. We collect three pearls for the first face. The Black Pearl will be the new ceiling.
17
. We tighten it, pass the thread through the next bronze pearl of the floor and attach the second face:
18
. Third face:
19
. When we get to the fourth face - walls made of golden pearls are already there, we only need to add a ceiling made of one black pearl:
20
. We bring the thread up and fasten the black pearls of the new ceiling by passing the thread through them, and through the initial pearl twice.
21
. The principle has been mastered, then all that remains is to weave the rope to the desired length or until it turns. We will look at the turn on a flagellum made of beads of size 11/0: a cross made of black beads is one of the faces of the last woven cube:
22
. It is this black cross that becomes the new foundation for the next cube so that we can get a turn. We will weave in the direction of the arrow:
23
. And we get this result:
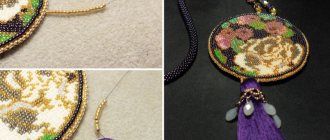
We learned how to weave a rope, now we use the acquired skill on a specific decoration with Miyuki beads size 15/0:
24.
We start with a rope path, which in the future will be attached to the Swarovski Rivoli.
25.
We form a right angle (see paragraphs 22-23):
26.
We connect both sides of the future “dragon eye” with a second angle:
Please note that this is not an acute angle, but the most common straight line, which was discussed above. Why does it look sharp? Physics, and no magic :)
27.
We braid rivoli in Volcano color (MK “Weave Swarovski Rivoli”). We attach it to the tourniquet. A small nuance: all the tails of the threads that remained when weaving the rope can now be safely and securely hidden in the mosaic weaving of the Rivoli.
28.
In the following stages of forming the intended drawing, for clarity, we use the following hint:
29.
Weave the part highlighted in red:
30.
From it we weave a piece of the rope of the right element (highlighted in yellow in step 28). We connect it to the eye using the right angle technique:
31.
We add a left symmetrical element:
32.
We weave the next part of the necklace also from a rope (upper blue in the diagram in paragraph 28)
32.
We add a symmetrical left part. All angles are straight during weaving, but when the necklace is used for its intended purpose, they become wider and add a geometric element to the overall idea.
We match the remaining part of the beads to match the color with pearls, beads or large beads - the necklace is ready!
A couple of tips on the square braid: a lot depends on the thread used.
- It is important to choose the right thread color.
- Stiffness: for soft strands, from which you can easily knit sea knots, a regular thread is suitable; for strands that must hold a given shape, as in the photo, you can use Fireline, monofilament or fishing line. I'm not a fan of the last two, but it all depends on the quality.
- The thickness of the thread and needles used must be selected depending on the size of the beads or seed beads; moreover, if it is desirable to make the rope as rigid as possible and hold its shape, then it is better to take a thicker thread or in a double fold, if the hole of the beads or beads allows.
- Double folding: it will be convenient for almost all sizes of beads and beads, only in bead size 15/0 you need to choose a thinner thread, or, for example, Fireline 1 or 2lb, and from size 4lb it is better to weave with a single thread.
Friends, I will be glad if everything is clear, or I will answer any questions! The rest of my master classes are here. Japanese beads, Swarovski crystals and much more can be found in our family-owned Lumi-art materials store. Happy creativity, my dears!
We knit a rope of beads in a column. Master Class
Let's look at the principle of knitting a string of beads in a column. In this technique, it is better to knit thick flagella, at least 12-14 beads in a circle. First of all, let’s remember how to crochet fabric in a column (without beads). We found a video tutorial and a photo tutorial on this topic.
Let's decide on the threads that we will use when knitting the rope. It is better to learn on threads of medium thickness. We recommend Canarias threads.
Now let's move on to knitting the rope.
We will need: Round Czech beads PRECIOSA 10/0 or Japanese MIYUKI or TOHO 11/0; Hook of a suitable size. Each master chooses it for himself independently, during the knitting process.
We recommend that you start with the most common size No. 0.8; Thread on which you can string beads. We recommend Canarias; A small silicone hose to fill the harness.
The tourniquet can also be filled in a different way; Caps/ends for the tourniquet;
String the beads onto the selected thread. Alternating the colors of the beads at this moment is very important, since you cannot swap the beads, and the pattern depends precisely on their alternation.
For a training rope, it is better to collect beads of two contrasting colors, alternating them through one (white, black, white, black, etc.).
Then, for the second strand, you can use different colors to create a complex geometric pattern.
After you place the required amount of beads on the thread, you can begin working. We form the first loop for the hook, and move the first bead. We hook the thread after the bead and pull it through the resulting loop. We tighten it, securing the bead in the work, and move the next bead closer. We do the same with her.
Depending on the thickness of the strand, the number of beads will be different. The author used 18 beads to form the first row of the rope. We connect the resulting strip into a circle using a connecting loop.
If you are working according to a ready-made pattern, then in the first row you need to collect the number of beads indicated in the pattern! Otherwise you won't get the drawing!
Move the next bead closer to the hook, insert the hook into the thread of the first row, pick up the thread behind the bead, and pull through the loop. Next, we again pick up the thread behind the bead and pull it through two loops. This way we secure the bead in the second row. We do this for each bead until all 18 beads are secured in the work.
- We move in this way until the tourniquet reaches the length you need.
To finish the product, form several rows with single crochets (and without beads), and secure the thread. A silicone hollow tube is inserted inside the tourniquet, which will maintain the volume of the tourniquet. We attach the end pieces to each end of the strand, hiding from view the end of the work without beads. Here we talked about the types of limit switches and methods of attaching each of them.
- Result:
- Even loops for you!
- Source
Source: https://salon-bisera.ru/patterns/vyazhem-zhgut-iz-bisera-stolbikom-master-klass
American technology
A unique technique allows you to create a truly original accessory - an American harness. By experimenting with colors, shapes and sizes of beads, you can create a luxurious designer collection in a similar way.
To weave an American rope, you need a needle, No. 10 beads, you can use several colors. For the base, take monofilament or fishing line.
The operating procedure is as follows:
- We fasten one bead, it will be a stopper in the weave. If you are using beads of two shades, string six beads of each color. When creating a custom American braid, we will use beige and brown beads.
- Using a needle, carefully draw the fishing line through six beige beads and tighten. This is the first loop.
- We collect one beige bead and six brown ones, draw the line again through six beige ones, but starting from the second. It turned out to be two loops of the tourniquet.
- We make the third loop. We string again one beige bead and six brown ones, draw the line through six beads, now starting with the third. We repeat the weaving principle until the end.
As you can see, the American strand is simple and easy to use; you can show your imagination by playing with the number of beads in a row, the shape and size of the beads.
American tourniquet 1 part
American tourniquet part 2
Square and triangular strands of beads
The square strand has long occupied its niche in the fashionable world of beads and beyond. It is used both as an independent decoration and as a component of grandiose necklaces, bags, and bracelets. There are a lot of opportunities to decorate a finished square strand, but first you need to thoroughly master the technique of weaving it. There are two ways to weave such a rope, let's consider one of them.
This method is the simplest, but still requires special care and attention.
To work, we take beads, a needle and thread for beading and scissors.
Basically, we need to weave a strip of three rows into a cross. That is, it will already be monastic weaving. First we make one chain in a cross of the required length.
- We bring the ends of the thread through the side bead and weave the next row.
- At the end, we make the same turn and perform another row in a cross.
We got three rows of crosses, three edges of the future rope. We need to weave the fourth side. To do this, we collect one bead from above, insert the needle into the side bead of the first cross in the very first row, and pass both ends of the thread through another collected bead.
- Thus, by passing the threads through the sides of the crosses of the first and third faces and closing the cross by passing the ends of the thread into a new bead, we complete the fourth face.
A triangular strand is woven using the same principle, that is, its cross-section will not be a square, but a triangle. We simply make two rows of crosses and make the third edge in the same way as in a square strand.
For each handicraft feat, you need to reward yourself, for example, with treats. On the website here https://www.nyami.com.ua/ you can order delicious Chinese dishes to your home, office, in general, anywhere. The main thing is to make a choice from the extensive menu. And don't forget about dessert! Various delicacies not only lift your spirits, national cuisine creates a special atmosphere for the meal.
Perhaps such a lunch will inspire you to new creative discoveries)
Source: https://bestbiser.com/tehniki-biseropleteniya/kvadratnyiy-i-tryohgrannyiy-zhgutyi-iz-bisera
Extravagant crochet bracelet
How to knit a bracelet that will highlight your individuality and attract the attention of others?
Quite easy and simple.
To do this you need to prepare:
- 30g Alpina “Zlato” yarn (70% viscose, 30% lurex)
- hook No. 3.5
- mold about 5 cm wide
- foam rubber
Knitting will take place with a thread in 3 additions. We collect a chain of 39 air loops and close it into a ring with a connecting post. We start the first row with 1 lifting chain stitch, and then knit 38 half-stitches into the resulting ring. We finish the row with a connecting column.
Popular articles Christmas tree decorations and toys for the New Year
We also start the next 14 rows with 1 lifting loop, and then knit 39 half-columns into 39 half-columns. previous row. We end all rows with a connecting column.
Let's move on to assembly and finishing. Glue foam rubber to the outside of the mold. Cover the resulting product with knitted fabric and then hem it on the inside.