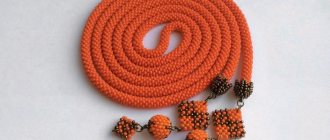
Crocheted beaded rope
Using this technique, you can make a one-color decoration or a product with a pattern. In the process, double crochets and single crochets are used. The diameter of the finished rope can vary from 6 to 30 beads, and the smaller the number, the easier it is to knit.
Materials and tools
To weave a rope of 12 beads, you will need:
- threads (thin knitting threads such as “Iris”, monofilament, denim or thick sewing threads are suitable);
- beading needle;
- hook No. 1;
- 2 bags of beads of different colors 30 g;
- 2 15 gram sachets;
- rug.
Reading the schematic
A strand of beads is crocheted according to a pattern, and at first glance it may seem that it is quite difficult to understand the pattern. However, if you once understand the principle of reading a diagram, this process will not cause difficulties in the future.
To obtain a design, beads are strung on a thread in a certain sequence. The diagram will help with this.
The information on the first line is the number of beads in the row. Here the strand consists of 12 beads.
The next line is the number of beads in the pattern. This parameter determines whether the tourniquet will be thin or thick.
Color schemes:
- draft – the position of the beads during the weaving process;
- corrected – reversal of the tourniquet;
- simulation – a type of finished decoration.
The squares on the right - information about how many beads in what sequence need to be placed on the thread to get the desired pattern. The beginning of the set is the left column, from top to bottom.
Calculation of beads for the product
How to decide on the number of beads that need to be strung on a thread before starting knitting? For example, a bracelet made of beads will be much shorter than a necklace, and therefore less material will be required.
To calculate, use a simple formula:
A*B = C, where A is the desired length in cm, B is the number of beads in the bundle, and C is the length of the thread in cm on which the beads are strung.
So, to get a strand 45 cm long, you need to fill a section of thread 540 cm long (45*12=540) with beads.
Knitting
This type of harness is knitted using air loops.
Important! In order for the product to keep its shape and the fabric to be even, it is necessary to knit tightly.
A small section (15 cm) is left from the free end of the thread, then the initial loop is knitted. The beads are not captured in it: they will be needed to connect the row into a ring. All subsequent 12 loops are knitted with beads.
The connecting column closes the chain into a ring.
Having pulled up the free bead from the right section of the thread, pull the hook into the first loop of the first row, pick up the thread, and pull it through 2 loops on the hook.
Each row is knitted in a similar way.
When a few cm of the bundle is ready, a pattern will begin to emerge, and it will be easier to control the correctness of the work.
When the beads are finished and the product reaches the desired length, knit several more rows with the same threads, shortening the loops with each circle.
A string of beads for beginners is ready.
Beaded rope: snake
Once you learn to read diagrams, you can create a wide variety of jewelry. It’s easy to use them to weave a product in a fashionable snakeskin color.
Among the variety of colors you can choose the appropriate range.
All products using such patterns, including python bead strands, are crocheted using the technique discussed above.
Application of bead strands
A string of beads is used for:
- pendant earrings and tassel earrings;
- thin and thick bracelets;
- short and long necklaces;
- souars with stones;
- lariats and other decorations that only the imagination of the needlewoman can create.
Square strand of beads: master class
To make this type of rope, it is recommended to use high-quality beads of the same diameter, since the final appearance of the product depends on the evenness of the elements.
Materials and tools
To work you will need:
- beads of the same or different colors;
- fishing line or strong thread;
- bead needle;
- scissors.
Sequencing
Using a needle, string 4 beads onto the thread. Insert the needle into the first one to form the initial row.
Having strung the next 3 beads, pull the needle through the 3rd bead of the 1st row. 3 beads are collected again and the needle is inserted into the initial bead of the first row.
The thread is pulled through the hole of the first bead of the second row, 1 bead is picked up, and the thread is pulled through the 3 beads of the second row.
They pick up the bead again and pull it through the second bead of the first row.
Pull the thread so that the weaving elements fit tightly to each other.
The product begins to take a clear shape.
The remaining rows are woven in the same pattern until the square strand of beads reaches the desired length.
Openwork plait
This technique is usually used if it is necessary to create a thick tourniquet. Unlike square, openwork can be woven from both an odd and even number of beads.
Materials and tools
To create a decoration you need to prepare:
- fishing line or thread;
- beads (1 or several colors, depending on the weaving pattern);
- bead needle;
- scissors;
- rug.
Operating procedure
The patterns of bead strands for making an openwork cord are quite simple. All products of this type are woven according to the same principle.
14 beads are collected on the thread. The needle is inserted into the first one and the thread is pulled through. Complete the first row this way.
String 3 beads and pull the thread through the fifth element of the first row. Collect 3 more beads and insert the needle into the ninth bead. Having strung 3 more, pull the thread through hole 13 of the beads.
The third row begins by putting 3 beads on a thread and pulling the needle through the second bead of the second row. Further work is simple: there is no need to calculate the numbers of beads. Having threaded three new ones onto the needle, the thread is pulled through the central bead of an element consisting of 3 beads.
Continue weaving until the simple openwork strand of beads becomes long enough. Afterwards all that remains is to secure the ends of the threads and secure the fittings to the ends.
Video on how to make an openwork plait
Simple mosaic harness
This pattern is one of the simplest; even novice needlewomen can easily cope with weaving.
The main secret of mosaic weaving of beaded strands is the use of an odd number of beads. There can be 5, 7, 9 or more. The fewer beads, the neater the decoration. It is important to try to ensure that the product is dense, but remains plastic. Beginners should learn to weave with the same thread tension along the entire length.
For a clear example, a diagram will help. The operating algorithm is as follows:
- We string an odd number of beads onto the fishing line, for example, the lucky number 7. We close them with a ring, and pull one end of the thread through the first bead. At the base, you need to leave a free end of the fishing line 15 centimeters long to secure the flagellum.
- We weave the second row according to the mosaic principle. After stringing a new bead, we pass the fishing line through one bead in the first row, the third, then the fifth and seventh.
- We weave the third row by analogy with the second, connecting it with beads in the second row, but using each bead. We continue working until we get the cord of the required length
- At the end we secure the work; if you used fishing line for the base, you can melt the ends with fire.
We cover the “ugly” places with fittings with a fastener. An elegant rope with a dense texture is ready.
Mosaic weaving
Harness in American technology
This product has a simple technique, so even a beginner can weave such a rope.
Materials and tools
You will need:
- beads;
- beads;
- strong thread or fishing line;
- bead needle.
Operating procedure
Using a similar technique, you can make a rope of beads and beads or a multi-color necklace from beads of the same size. Most often, a two-color cord is woven.
1 bead is strung on a thread. To secure it to the thread, thread the needle through it a second time. This is the basic element; 4 beads are added to it on a thread.
String 3 beads, pull the thread through the holes of the last 4 beads.
String 1 bead and 3 beads again.
The first one is moved close to the woven element, the needle is inserted into holes 3 to 6 of the beads.
Further steps are to attach 4 elements to this base: 1 bead, 3 beads.
Important! When weaving, the needle is passed through the main beads, otherwise the product will have distortions.
Using this technique, the decoration blank is increased to the required length.
All that remains is to securely fasten the thread, install the accessories, and the American bead strand is ready.
Light flagellum
The second option for weaving strands. Beads also need to be put on a thread or fishing line. Only this is assembled not with a needle, but with a crochet hook.
- The first thing that needs to be done is a knot so that the work holds tightly. Next comes the bead, grab the thread with a crochet hook and then pull it into the resulting loop - this turns out to be an air loop.
- When you have made the required number of loops, tie them into a circle. Next comes the next stage - knitting single crochets. For an air loop, you need to have one loop, and then make another one from the adjacent air loop, and then pull the working thread through both of these loops. And continue the same actions.
Related article: DIY summer bag with round bamboo handles
The main thing in this weaving is to string the beads evenly.
Simply put, do not collect all the beads in one area and do not knit with only one thread.
1 bead, 1 crochet loop, 1 seed bead, etc. And then you will have a wonderful crochet tourniquet.
Turkish tourniquet
The main difference between a product made using Turkish technology and other types is the use of not only beads, but also other elements: bugles, beads.
Need to stock up:
- beads;
- bugles;
- crochet hook 1 mm;
- synthetic thread.
Bugles and beads are placed on the fishing line in the order shown in the photo. The initial element should be bugles, and the final element should be beads.
At the end of the fishing line, make an air loop, pull the first element, consisting of 3 beads and bugles, to it, enclose them all in a single crochet loop.
When the thread is tightened, the knitted elements are folded in half.
The element of beads and glass beads is pulled up again and knitted. Make 3 such loops.
The knitted part is turned 180° so that the beginning of the work is at the top.
The hook is pulled through the starting loop; it should be between the beads and the bugles.
By pulling up the glass beads and 3 beads, make a single crochet loop.
The remaining loops are knitted in the same way. The result is a spiral bundle.
The Turkish bead strand is ready.
Video: how to make a Turkish tourniquet
Various weaving techniques and patterns
Weaving a rope of beads is performed in several variations, for which different weaving techniques or patterns are used. It can be a lace with a cavity inside, or it can be square or mosaic.
Simple mosaic harness
The mosaic strand is distinguished by its simplicity of execution. It uses beads taken in odd numbers.
The weaving pattern is simple.
First, 7 beads are placed on the thread, the weaving continues in a circle, passing the grip to the beads of the previous row, taken one after another. After receiving the rope of the stated length, weaving can be completed. Leave a thread margin of 15-20 cm at both ends. With its help, the tourniquet is secured using a double knot, and the tip must be burned. For a bracelet, the ends are fastened together. For decoration with a clasp, the remaining thread is used to strengthen the cord and the clasp element. You can use beads of any color, or 2-3, alternating them in several rows, as in the photo.
American technology
The American weaving technique or simple American braiding is considered a simple way to create costume jewelry. Use either beads and beads of different sizes of the same color, or beads of two colors.
Detailed method:
- fasten the first stop bead on the thread;
- add 4 beads of the same color and size (hereinafter referred to as beads);
- string three beads of a different shape or size (hereinafter referred to as beads), twist the thread and pull it through the holes of beads 2, 3, 4;
- add 1 bead and 3 seed beads to the thread;
- connect the bead with the previous ones, and roll the beads again and stretch them through the beads starting from 3;
- repeat the steps, pulling the rolled beads through the 4th bead and all subsequent ones.
For more convenient use of the product, a clasp from ready-made fittings will be installed.
We crochet a tourniquet
A hook in skillful hands allows you to carry out work faster and more gracefully. For the smallest beads use hook No. 1.
When weaving a pattern, the greatest difficulty is caused by the first three rows. To obtain a strand of 7 cm, you will need 49 cm of stringed beads. It is more convenient to measure the length of the base and string the beads 7 beads of the same color at a time, alternating the color scheme at your own discretion.
The knitting process begins with a chain loop, and then 7 loops, catching the first 7 beads, closing in a ring. When forming a ring, be sure to straighten the beads outward and the loops inward of the circle. In the second circle, beads of the first color are connected with beads of the second color using a double loop, one is placed next to the other, laid on its side. In this way, the tourniquet is completely knitted.
Square weave
To make a rope in square weave, you will need to complete 7 steps according to the diagram.
Before you start you will need:
- Cut the thread to the required length.
- Thread it through a needle, tying the ends near the eye, and carefully straighten the remaining part on the surface in the form of a loop.
- Thread 4 beads of the same color onto a needle and tighten the loop.
Then continue weaving according to the indicated pattern. You can use beads of one color or several.
Beaded rope: snake
The harness, which looks like a small snake, looks original and beautiful.
It is best to crochet it according to the pattern.
Two knitting techniques are used:
- column;
- half-column.
In the first case, the drawing will have a slope and seem more realistic.
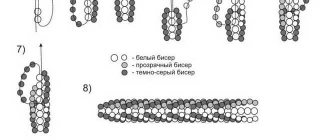
Openwork plait
A thick flagellum is easy to make using the openwork technique. It is presented schematically like this.
After the first three rows are formed, each new three beads on the thread are pulled through the central element of the composition, consisting of 3 beads in the previous row.
The length of the harness can be different, as well as the color scheme of the material.
Turkish tourniquet
For Turkish rope, not only beads are used, but also other materials, such as glass beads. According to the diagram, a spiral strand is formed from a combination of glass beads and beads connected into a pattern.
It is better to use glass beads and beads of similar or compatible colors. A hook is used for this work. The number of beads is determined by the length of the glass beads - they must occupy the same length of thread.
Flat harness
Many interesting decorations can be created using a flat rope.
Materials and tools
You will need:
- bead needle;
- strong thread;
- beads of one or several colors, depending on the desired pattern and the chosen pattern;
- thin hook No. 0.75;
- rubber.
Weaving order
A flat rope of beads is woven quite wide, consisting of 20 or more beads.
Having chosen a suitable pattern, beads are strung on the fishing line in the required sequence.
The procedure for knitting is the same as when making a regular crochet rope, but a wide elastic band is used for the base.
When the bead necklace reaches the desired length, the ends are trimmed: the elastic is trimmed, several more rows of thread are knitted without beads, reducing the number of loops. Having firmly secured the thread, it is trimmed, and then the fittings for the harness are installed.
Bead strand: pattern diagrams
Having mastered the most popular weaving techniques and learned to read patterns, you can try to create your own unique decoration.
The most interesting patterns for inspiration: