How to make a ballerina out of paper
First of all, you will need to choose the silhouette of a beautiful ballerina to cut out.
The Internet is full of options. To make the figure voluminous, the skirt (tutu) is made separately. What you will need:
- ready-made templates;
- sheets of paper (white, colored);
- scissors;
- pencil, eraser (circle);
- felt-tip pens, pencils or paints (to color the paper silhouette);
- rope or ribbon (if the craft is for a Christmas tree).
Manufacturing process
The step-by-step master class will begin with choosing a suitable picture. There are several options. The first is that you need an ordinary white silhouette, a colored ballerina or a real person. The last option is used when a person’s face cut out from a photograph is glued onto a finished paper craft. The craft is placed inside a holiday card or made into a Christmas tree toy. An original New Year's gift.
For a colored ballerina, you can either choose a picture of a dancer and print it out and cut it out. Or take a regular white outline and then color it using markers or paints. It is not necessary to carefully draw the details; light strokes are enough, especially if the author is not a very skilled artist. You can put such a ballerina on a postcard with your own hands. All that remains is to fill out the wishes inside.
To make the image two-dimensional and viewed equally on both sides, print two identical, but mirrored pictures. Then glue them together with the wrong side. Then the figure will be double-sided. Excellent Christmas tree toy.
Pack. The dress looks more impressive. The easiest way is to cut out a paper snowflake for the pack. Carefully make a small hole in the center or cut to the center to attach the snowflake skirt to the ballerina silhouette. Then glue the cut out part. This tutu looks beautiful and gives the dancer’s image a special charm.
White silhouette or black? If you want to make a garland of several silhouettes of ballerinas, you don’t have to make them white. Take sheets of colored paper and choose colors that match each other. Two or three for contrast. For example, white-black-blue or green-red-gold. By the way, if the garland will be a festive decoration, it is better to take classic colors.
Then the craft will convey the spirit of the event. Carefully attach the cut out ballerinas to a thread and hang them together on one ribbon or strip. Or tie it to one long thread. Then it will seem that the dancers are floating weightlessly.
Rhinestones and beads
Not every master will have them. But, if you regularly do handicrafts, this accessories will be useful for many products. They can complement an angel's dress, or decorate the bottom of a tutu.
You can depict a girl standing on one leg, or flying in a weightless jump. Outstretched arms will add grace. There are a lot of ideas on how to make a ballerina snowflake. The main thing is the desire to create.
Simple principles for preparing ballerina templates
You can make a contour template - a stylized template that summarizes the dance movement, transferring the drawing onto an A4 sheet (the one on which all documents are printed) or a detailed one (down to drawing the face and hairstyle) - with realistic shapes. You choose which version of the ballerina to make from paper, but in any case you need to prepare: • a picture/template you like; • writing paper (both white, for printing and transferring the trafater, and colored, if you plan to make the ballerinas multi-colored) and cardboard or thick album sheets; • scissors; • a simple pencil and an eraser; • paper clips or clips. If your choice is a picture from a magazine or newspaper, make a blank from it: • cutting out along the outer contour (if you don’t mind spoiling the magazine); • attaching the illustration to the window glass (during the day), placing a thin white sheet of paper on top of it and drawing the silhouette with a simple pencil (preferably soft - it has a “bold” lead that clearly shows the line). This will be the basis for future decor. It needs to be placed on top of a sheet of the selected color, outlined with a pencil (here it is better to use a hard one - with a thin and barely noticeable core) and cut out.
Important! If you want to make several silhouettes at once, hold together several sheets of the selected color with clips/paper clips (here, of course, it is better to take double-sided colored paper), a stencil or stationery sheet with a translated design on top, and cut everything out at once. But first, check how thick the folded paper your scissors can cut through so that the silhouettes don’t come out clumsy and untidy.
The easiest way to prepare a ballerina for cutting is by printing stencils. If you have a printer at home, print several versions of the figures you like at once. There is no equipment for printing - throw the ballerina templates for cutting out of paper onto a flash drive. In both cases, the ballerinas are saved for cutting (if the “Print” command is not immediately available on the site). The sequence is as follows: 1. Create a folder, calling it, for example, “Ballerinas for the New Year” or “Silhouettes of Ballerinas” on the desktop - by right-clicking on an empty screen and building the “Create” command. Then, moving the mouse “Folder” when it is already on the screen, point it at it and name it as you see fit in the “New Folder” rectangle. 2. Move the cursor over the ballerina figure (contour) to cut out, use the right key again and select the “Save image as” command from the proposed options (they float immediately below the cursor). It will bring you to a window with commands and icon options, among them on the desktop, select your folder and drop it there with the “Save” command. If this is difficult, then simply dump everything onto the desktop, and then drag it into a folder using the left key. 3. Turn on the printer, double-click on the folder with the left button (or right-click through the “Open” command) and start “Print”, turning the brightness (saturation) of the paint to a minimum (so that there is no thick black stripe along the outline). The wisdom is small. But in any case, when sending a figurine for printing, think about how to economically make a ballerina out of paper - you don’t need to send 10-15 templates for printing, wasting paper and paint. Make them one at a time and then simply multiply them by cutting them out.
Ballerina templates for cutting out to print
Each image can be printed in the desired size. Choose. Right-click on the desired ballerina - select “save picture as...” - specify the path (desktop or desired folder) - save.
And here we placed several silhouettes on A4 sheets. This is convenient if you require stencils of the same size. There is no need to customize or select any more - just print and cut out.
You can print on regular white office paper. Possible for colored ones. They also transfer it to cardboard so that there is a denser base. Sometimes faces with various emotions are added, but most often they are left as is.
If you need ideas on what to share with all this, you can look at an example of our craft - girls made from autumn leaves - September, October, November. We are also planning to make openwork garlands for the New Year and decorate the Christmas tree. Kids will love the mobile in black and white colors. In general, there are a lot of options.
Create and develop with us. See you again!
Dolls with a snowflake tutu
Many people don’t see the point in messing around and creating decorations with their own hands. After all, the stores now have everything. Moreover, this is a painstaking task that requires enough free time and effort. And cleaning, after the creative process, will increase significantly.
But despite this, every adult remembers his childhood. A magical atmosphere of miracle comes. One of the most spectacular decorations is ballerina snowflakes. Cutting templates are available on the Internet. To make such a craft, you do not need a lot of money and expenses. All work is divided into several stages:
First, print out the stencils.
It should already have a small skirt. Carefully cut out with a stationery knife. Tip: it is better to use a special silicone mat. This will help to clearly highlight small parts and avoid scratching the table. The silhouette is ready. All that remains is to make a ballet tutu. This will be a regular hexagonal snowflake.
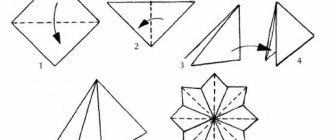
Fold the square sheet diagonally
We find the center on the fold. We divide the entire side into three parts, marking them with dots. From the central winding we lay down the rays through the control marks. Fold the rectangle along the drawn lines. Then again. Use scissors to trim the straight edge. The base of the future skirt is finished.
Now you need to apply a pattern to the pack blank and carve it
To do this, sketch out a picture with a pencil. Schemes can be viewed on the websites. Place the finished snowflake under pressure to give it an even shape. Recommendation: the more complex the pattern, the airier the skirt will be.
Measuring a girl's waist
We put the resulting segment in the center of the future skirt and cut it. Carefully put on the skirt, slightly bending the figure in wide places.
By experimenting with silhouettes and tutus, you can get very unusual effects. The craft will perfectly decorate a chandelier or doorway. Paper ballerinas will be an elegant addition to the New Year tree. You just need to attach a thin thread or fishing line and hang the dancer in her assigned place.
Garland - dancing dolls
An interesting decoration is obtained if two, three, or more figures of dancers are hung on each thread. Make different heights. Between the figures add snowflakes, butterflies, clouds, flowers and other additional elements.
It all depends on your imagination. The whole thread can be decorated with beads only. It will fit perfectly into the overall composition. To prevent the thread from tearing the ballerina pattern, use tape at the place where the body is attached.
The size of the girls themselves may vary. Usually made in A4 format. It is convenient and looks good in the space of the room. Having drawing skills, you don’t have to use ready-made templates.
Note!
What can be made from a box at home for kindergarten: the best craft ideas + video master class
How to make flowers from napkins quickly and easily: 15 ways to create bouquets of roses, carnations, peonies
How to make flowers from corrugated paper with your own hands: step-by-step instructions for creating voluminous bouquets
Draw the craft yourself. Fairies and cartoon characters have become popular now. New Year's compositions look especially beautiful, in the form of huts with smoke from a chimney, and various heroes of children's fairy tales.
If a separate dancing figure seems boring to you, print out a ballet pair. Such images are also suitable for other holidays, including Valentine's Day, the Eighth of March.
Wire ballet dancer
Very beautiful and fragile paper ballerina
- Take a piece of wire and bend it to fit the person. After wrapping the wire with paper, give it time to dry.
- Soak toilet paper in glue and wrap the wire around the shape, this way the wire will accumulate a lot of “muscle” and take on a human shape. The paper lends itself very easily to gluing wire
- Cut a long strip of corrugated paper and, choosing the size, assemble it into a lush, beautiful bell.
- The stylish dress for the ballerina is ready. We recommend taking several layers of paper for pomp.
- Place on the blank and decorate with ribbon!
The beautiful ballerina is ready!
Ballerina made of napkins and wire
If you have wire in the house, you can make a figurine of a dancing ballerina out of it, and create a dress from napkins.
You will need: thin wire; napkins; threads; glue.
Watch the manufacturing process in the video:
Snowflake ballerinas made of wire and napkins
Patterns of such products are an interesting way to decorate a room. To do this you need wire, paper napkins of various colors, including white, and PVA glue.
- We make a frame of a man with limbs and a head from wire folded in two rows.
- Disassemble all napkins into layers and tear them into thin strips.
- You need to deceive tightly. Don't leave any gaps. Periodically coat the structure with PVA.
- From a whole napkin, bent into a triangle, we cut out a snowflake for the skirt.
- Let's put it all together.
The main advantage of such a souvenir is that it can be given different shapes. Bend your arms and legs in any position. You also don’t need to look for where to print a ballerina stencil for cutting, it’s simply not needed here.
Openwork dancers - vytynanka and snowflakes
If you prefer a dancing girl with a skirt, consider yourself to have hit the jackpot. From one stencil you can create an infinite number of different ballerinas, just by transforming the tutu into a patterned veil or the finest openwork lace. Decoration using the quilting technique. On a test sample, make an ornament with a simple pencil (with the Russian marking T or Latin N - hard) - Christmas trees, snowflakes, just an interlacing of geometric shapes, eights, ovals, and add wavy or straight lines on the chest (neckline area or where you imagine the top corset cups) and belt, and also in the area of pointe shoes (strings) and sleeve armholes. Then, using a stationery knife, or better yet a poster knife (or a construction knife as an option) (if the workpiece is not thin office paper, but watercolor or cardboard), cut out the main lines of the pattern, turning the paper, not the tool. Large or semicircular design elements can be trimmed with thin, long-bladed nail scissors. If you like this dancer, transfer the ornament to the next sheet or come up with a new variation of the pattern.
Important! You need to cut/pull out either on a pile of old newspapers, a kitchen wooden or glass board - not on the table. Otherwise, you will irrevocably ruin the tabletop with a knife. The second way to give graceful dancers airiness and lightness is snowflakes on tutus. Simply cut out a snowflake from thin paper according to a given drawing, sample, diagram or randomly patterned snowflake. Make a circle in the core and put it on the figurine. In this case, the pack can either be slightly trimmed along the edges or left as is. If the cape is bristling, fix it with tape in the desired position.
Variable decoration
Silhouette dancers in tights are an excellent modification of the template for fantasy decor. Here you can come up with fluffy, long and short, asymmetrical and flounced skirts, capes, coats, boas, shirts, necklaces. Variations of jewelry are limited only by the flight of imagination and the materials at hand. Using tape or glue (PVA, stationery, hot and pencil are good) in the waist or shoulder area, fix: • cut out in a circle with a round hole in the middle, scraps of brocade, organza, lace, barège, veil, guipure, canvas; • lurex knitting threads, monochrome or multi-colored; • thin tinsel (rain) and fluffy; • threads or the same rain with glued sequins; • feathers; • edging truncal or various types of truncal; • braid; • satin or taffeta ribbons. Single-color or contrasting sequins, small and large rhinestones (it’s even appropriate to add them to a dancer’s hairstyle), sparkles (both cosmetic and professional - for crafts), glitter, neon gel glitter, gel glitter pens (an interesting option) are suitable as additional decoration - with smell).
Fixation - methods to choose from
All that remains is to hang or secure the graceful figures where you want to see them: on window glass, a Christmas tree, a chandelier, a cornice or curtains. Whether in an ensemble or individually, they will look equally elegant. Hanging them in the air, you can use a thread, fishing line or shiny Christmas tree rain, threading it through a hole made with a needle in your closed hands raised up or in your hair. If you need to glue the figurine to the glass, use: • soap, slightly moistening the paper; • pencil glue; • scotch. Another interesting decor option is the corps de ballet. For this, cut out homogeneous or varied figures at once so that they hold hands (apply the templates side by side on one sheet and trace them, and then cut them out). With this ensemble you can decorate both a window and a wall. The twirling dancers will look beautiful even when they hang not in one row, but in different tiers - one higher, the other lower. Fantasize. Paper in your hands can turn into an elegant, atmospheric decoration. Dress up your room and it will be transformed beyond recognition, making the New Year holidays especially cozy and fabulously magical.
Origami - ballerina
Folding origami is a complex matter, requiring care and a step-by-step diagram. You need to follow the pictures arranged in a certain order.
The only material is a sheet of paper. A regular A4 will also do. Fold carefully, clearly forming all fold lines. The finished figurine can be used as a Christmas tree decoration or attached to the ceiling. The result will be a voluminous craft.
How to make snowflakes
Snowflakes need to be made in advance. They can be cut out of paper thinner than a ballerina figurine. You can use special tissue paper, tracing paper, and multi-colored napkins. When the silhouettes of the girls are ready, then put skirts on them, combining them by color, pattern, and size.
For work you will need: paper, pencil, scissors, sketches of patterns for cutting, protractor.
Instructions:
- Take a square sheet or cut a square from a rectangle by cutting off a strip of excess paper. Fold the square into a triangle, connecting the opposite corners. Fold the resulting triangle again. Remember: you need to fold it very carefully, accurately, fixing the fold lines, otherwise the cut out snowflake will be crooked and ugly, which will negatively affect the entire craft.
- Place the resulting triangle in front of you with the rectangular vertex facing up. Approximately divide this figure into three parts. Fold the opposite corners towards the middle so that the resulting parts of the triangle are equal in area. To avoid making mistakes in markings, use a protractor.
- Cut off the lower uneven teeth. Cut off a small tip at the top, this will be a hole in the snowflake to put on your waist. Choose a pattern, draw it yourself, or copy it onto folded paper. First, cut along the main outline, then use sharp scissors to cut out the pattern. Unfold, you should get a lacy hexagon with a tiny hole in the center.
- Continue cutting out as many different sizes and patterns as you need. Cut out snowflakes will be useful for making skirts for dancers, for garlands and pendants on the Christmas tree, and for decorating rooms.
Snowflake - ballerina
A spectacular decoration, especially for the New Year, when you need to prepare your apartment or office for the holiday. Why cut out regular snowflakes? It is better to make beautiful skirts out of them for little dancers. They will complement any interior.
What you will need:
- sheets of paper (for ballerinas and snowflakes);
- scissors;
- ready-made templates (separate figures of dancers, separately snowflakes);
- pencil;
- glue.
Manufacturing process:
- To begin, select and print graceful silhouettes of dancing ballerinas. Transfer them to sheets of white paper, then carefully cut them out. The beauty of the finished craft will largely depend on the actions with scissors (rough strokes are clearly visible).
- Snowflake. It is not necessary to take templates of complex snowflakes; it is enough to understand the manufacturing scheme. Many people made these as children, carefully cutting out intricate patterns from white or colored paper. Only for a skirt a snowflake with sharp patterned edges looks better. The size should be determined by the paper figure of the dancer. It is not necessary to make a snowflake skirt short, the main thing is that it does not exceed the length of your legs.
- Figurine assembly. Carefully cut out the middle of the finished snowflake. Then, if the ballerina figurine has folded arms, you can thread it through the hole, securing a beautiful skirt at the waist. If not, you will need to cut the snowflake to the middle, thread it onto the ballerina figure and glue the edge.
INTERESTING: Papier-mâché technique for dummies
White faceless figures will look better. They look the same on both sides, in addition, real snowflakes are white. However, you can leave them white and cut out ballerina figures from sheets of multi-colored paper.
That’s it, the finished craft can be hung through a thread from the ceiling, attached with tape to glass or on a Christmas tree.
New Year's garland
Necessary materials:
- Colored and white paper.
- Scissors.
- Rain or tinsel.
- Glitter.
Stages of work:
- Cut out several identical ballerinas. To prevent the garland from looking monotonous, you need to cut them out of multi-colored paper. On a sheet of paper folded in half, draw half of a simplified silhouette with arms raised up and closed. Cut out the required amount.
- Make snowflakes from multi-colored paper to match the ballerinas. Try to use a variety of patterns so that the skirts are not the same and the garland is not boring.
- Put on skirts, sprinkle with glitter, and hang the finished ballerinas on tinsel, rain or shiny wire.
- We decorate windows, walls or a Christmas tree with a garland.
Store shelves are filled with Christmas decorations and toys. But don’t rush to buy them at New Year’s fairs and kiosks. Making New Year's crafts with your own hands will unite the whole family, fill the house with a festive mood and anticipation of magical events. It doesn’t matter if the openwork craft is far from perfect, the little man who worked intently on making it will enthusiastically admire it throughout the holiday.
How to beautifully design fake ballerinas?
The small figurine of the dancer looks beautiful even when alone. But you can make several figures and hang them on a homemade mobile. Its frame is made from thin sticks or wire, tying the first one in the middle. 2 threads are suspended from its ends, each carrying its own yoke. If necessary, you can increase the number of tiers.
After hanging the frame of the mobile, start attaching the ballerinas to it:
- on the free ends of the crossbars;
- to the centers of those carrying the next tiers.
You can make crafts with ballerinas in another way.
Ballerina - DIY postcard
Why buy ready-made cards, choosing a suitable design and “adequate” congratulation text, when you can make them at home? The graceful silhouette of a ballerina will be an excellent decoration.
What you will need:
- a sheet of thick paper (the base of the postcard);
- colored paper (for ballerina);
- finished stencil;
- scissors;
- thin marker;
- beads or sequins;
- glue;
- bow (for a skirt);
- a pen and a good idea (for congratulations).
Manufacturing process:
- First you need to prepare the basis for the future postcard. Fold a sheet of thick paper in half, trim the edges so that they are the same. Imagine where the ballerina will be - outside, inside or on both sides. The last option will require 2 stencils (so that the ballerinas are different or one, but in different poses).
- Print the selected stencil with a silhouette and press it firmly onto the paper. Use a thin marker to carefully trace the stencil, drawing the figure of a ballerina. For beginners, it’s better to try your hand at pencil, because with a marker you can’t erase irregular lines. However, it is easier to trace a stencil than a regular template, because the silhouette is there from the inside.
- When finished, remove the stencil and color the ballerina with a thick marker. A dark color looks more impressive: black, blue or dark purple.
- Skirt. It can be made from a piece of a colored bow or other beautiful fabric. The edge of the material needs to be pulled together by sewing or gluing it to make the skirt airy and voluminous. Carefully glue the finished skirt to the ballerina’s silhouette using PVA glue or stationery glue. Press tightly and hold the material for a couple of minutes until the glue “takes.”
- Decorate your head. Ballerinas often decorate their hair with shiny hairpins or wreaths. To do this you will need several beads, beads or sequins of the desired color. Carefully glue them to the ballerina's head, forming a shiny wreath.
That's it, the ballerina is ready. You need to wait until the glue is completely dry and fill the card. If you need two dancers, then it is better to make the second one, inside the card, not voluminous. Draw a skirt or glue a paper one.
All that remains is to write your congratulations beautifully and wait for a reason to give a card!
Wall panel
An unusual three-dimensional applique will add some zest to the interior of a little princess’s room. Tenderness, lightness, sweetness – this is what this work is associated with. To make it you will need: black ballerina templates.
For the snowflake skirt we will use fabric - organza or satin ribbon. Black self-adhesive film. It is better to use thick cardboard as a base. In our case, the composition will consist of three separate parts.
First you need to paint the base in the chosen color. Pastel shades are better. Goes well with black - pink tint. All the girls especially like him.
We select samples of torsos. They should have three different poses. Different positions of the arms and legs will create a single picture.
The skirt is a bright accent of the entire panel. Having chosen the appropriate fabric, cut the piece to size. On one side we quilt the assembly.
In order for it to keep its shape, it can be starched first. You can increase the number of layers.
Glue the ballet dress to the body. Decorate with beads and rhinestones. You can add a flower to your hair bun. You can put a ribbon in your wrist, like a rhythmic gymnast.
We connect the body with the base. A dancing woman is a miniature character; you should not make the silhouette of a ballerina too large. Refined lines are suitable for cutting.
Thin wrists and neck will show all the lightness of the dancer. By beautifully arranging the entire composition, you can bring royal chic to the children's room.What else creates a New Year's atmosphere, no matter how decorated the Christmas tree, homemade creations floating in the air. With a slight movement of the hands, even the drab interior turns into a fairyland.
How pleasing to the eye are the magical motifs on the windows. They can be plain, multi-colored, and even voluminous. A single masterpiece made from several small components looks especially beautiful.
At such moments, you feel the approach of a Christmas miracle. It is better to hang them in a spacious room. A paper ballerina will spin smoothly.
Cutting templates can be easily found on any website. The creative process is a good way to relax and enjoy time with your loved ones. Belief in magic lives in every person.


