Jewelry made by yourself is remarkable precisely because you can adjust it to your taste and choose materials that will match a particular color of the item in your wardrobe. Simply put, it will be what you want. Therefore, thanks to beadwork, it became possible to create truly original jewelry with your own hands, including rings. Continuing the theme of weaving accessories, we would like to offer you small master classes with patterns for weaving rings.
Benefits of a homemade ring
Handmade jewelry has always been valued more than factory work due to a number of advantages:
- Relatively low cost of materials for work.
- A large range of products available for independent work.
- A huge variety of beads and bugles.
- Accessories available to craftsmen: cuts, mesh, metal and fluffy wire.
Beautiful rings made of beads can be presented as a birthday gift, and the birthday girl will appreciate the rich and original gift.
Step-by-step master class
So, let's learn the basics of beading by creating a beaded ring for beginners.
Step 1: Make 1 row
Cut about 1 meter of beading thread and thread it through the eye of a beading needle.
Add the required number of beads to the thread. After this, skip one bead and pull the thread back through the holes of all the added beads, forming a loop to secure the bead fabric and prevent it from moving. To build the first row of both the ring and earrings you need to add 10 beads to the needle.
Step 2: Form 2nd row
To form the second row, add the 11th bead to the thread and immediately after that, pass the needle into the 9th cylinder.
Pull the needle out of the 9th bead, add the 12th bead to the thread and pass the needle into the 7th cylinder. Repeat this process until you reach the 1st bead.
Continue weaving until you have formed a beaded fabric with clearly marked 5 near and 5 distant beads. Now it's time to form the triangle.
Step 3: Make a Triangle
Make a triangle with 6 cylinders at the base of the ring, for which you alternately add and subtract beads of a contrasting shade to the weave.
Continue weaving until you have 17 rows or the length you want for your ring.
Step 4: Finish the Ring
Connect the two ends of the beading by moving the needle and thread between the first and second edges alternately. Having finished weaving, hide the threads by drawing them diagonally through the center of the beads in different directions.
Materials for work
To create an original decoration you need to prepare the following materials:
- Beads.
- Durable glue.
- Threads, needles.
- Copper wire.
- Decorative stones (carnelian).
- Cuts to shape the ring.
For wicker versions, these materials are sufficient, but for the manufacture of large rings with a real metal base, auxiliary fittings (a ring-rim, you can also use an old ring without decorations) are also useful.
Bead weaving methods
Today there are a huge number of patterns for weaving rings available to needlewomen on any web resource for practical needlework.
Using such schemes is not difficult, you just need to understand the basic principles:
- Accounting for size range.
- Direction of bead weaving.
- Formation of the ornament.
We recommend reading:
- DIY polymer clay jewelry: review of the best master class with step-by-step instructions for beginners (150 photos of original ideas)
- DIY polymer clay flowers (120 photos of the best ideas) - simple instructions with full description + master class and video tutorials
Quilling for beginners (200 photos) - step-by-step instructions with description. The best master class on creating quilling crafts with your own hands
Before starting work, you should download and print the weaving diagram of the selected model in order to work on it. The most famous weaving options today:
- Checkerboard weaving.
- Drawing "Wave".
- Using double cones.
Beginning craftsmen also have access to a variety of original designs for beautiful beaded rings.
Preparing for work
To create a chic beaded ring as a birthday gift, you will need the following working materials:
- Sixteen bicones of the desired color, size - four millimeters.
- Golden Czech beads, size ten.
- Line with a diameter of 0.2 millimeters.
- Scissors.
- Bead needle.
- Lighter.
We present to your attention a video tutorial on how to create a diamond-shaped ring from beads.
Video MK weaving rings from beads
Having thoroughly prepared for the exciting creative process, you can begin to create.
Master class on creating a ring
Weaving a ring is done using a simple technique, so any novice needlewoman can weave a decoration. To make it easier for beginners to cope with the work, I suggest that you familiarize yourself with the step-by-step master class.
Weaving rings
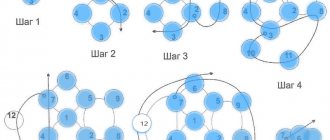
- We begin the process of weaving a ring by cutting a fishing line, one and a half meters long, which we thread into a needle. We use a bright yellow bead as a plug so as not to get confused in the process. We lower it down, leaving the end of the thread five centimeters.
2. We pass through the bead from the bottom up again and carefully tighten it.
3. String twenty-nine golden-colored beads.
4. We count ten elements and insert a needle into the eleventh fragment from top to bottom, as shown in the illustration.
5. We tighten the fishing line, forming a ring of ten elements.
6. We string five beads of the main shade and insert a needle into the sixth bead after the element from which the fishing line comes out (see the photo below). We tighten the line well and get another ring.
7. Based on the weaving principle described above, we form two more rings. As a result of weaving, we obtain a chain of four identical rings.
8. Let's move on to creating the second row. Insert the needle from bottom to top into three beads at once, as shown in the photo illustration.
9. We collect 5 beads, insert the needle into the third (middle) glass. (See bottom photo).
10. We repeat the above steps two more times.
11. We continue to weave the next tier. We insert the needle into three pieces of glass from top to bottom. When the fishing line has taken the right place, string 5 beads and insert a needle into the middle element of the next arc, tightening the thread well.
12. We form the next arc in the same way and move on to weaving the next row, in which one beaded arch is woven.
13. As a result of painstaking work, we got half a rhombus, in which bicones will be placed in each cell. We will weave the next half of the rhombus later.
We have just woven a rhombus from beads with our own hands and are starting to weave bicones.
Step-by-step weaving of bicone rings
- We go through the last added glass from top to bottom. Next, insert the needle from bottom to top into the sixth bead (see photo).
2. We string the bicone and insert the tool into the glass opposite and the next two beads. Carefully tighten the line.
3. Next, insert the needle from top to bottom, string the bicone and thread the needle through the opposite bead.
4. Thus, we weave all the other bicones into the empty cells.
5. Remove the plug, it will no longer be needed, and tie both ends of the thread with several knots.
6. Cut the short end of the fishing line and set it on fire with a lighter.
7. We continue to weave the second half of the diamond. To do this, insert a needle into the first three elements, string five pieces of beads, and form an arch. You should get three beaded arcs.
8. Using the same principle, we weave a rhombus to the end.
9. Having finished weaving the diamond shape, we thread the needle through five pieces of glass from bottom to top, then into the next element from top to bottom, as in the photo.
10. We collect a bicone and pass the needle through the opposite bead and the next two beads. Next we braid the free cells with bicones, just as we have already done with the first half of the rhombus.
11. It turns out to be a beautiful and neat diamond.
12. At the next stage of weaving, we bring the tool through the beads, as shown in the photo below.
13. We collect one golden bead and insert the needle into the element from which the fishing line comes out from the bottom up. Pull the thread well.
14. We insert the needle into the collected bead towards ourselves, collect the bead and pass into the second element from the rhombus away from us.
15. Then we insert the tool towards ourselves into the element we just typed.
16. We string one piece of glass and insert the needle away from us into the third fragment of the diamond and into the bead we just collected towards ourselves.
17. Next we weave according to the same principle. We finish weaving the ring by connecting the last element with the rhombus.
18. To secure the ring, we sew the created strap and the diamond fragments again.
19. Having finished stitching the ring, cut off the fishing line and burn it with a lighter.
As a result of painstaking work, the result was a chic ring that will be the best birthday gift for a loved one. The birthday girl will be delighted with such a gift - after all, the homemade product contains so much positive and kind energy left by the needlewoman. A ring created with your own hands is unique, inimitable and in a single copy, since the colors and elements can be changed at your discretion.
You can learn how to weave a more delicate ring from beads and beads, which will not leave indifferent those who like to do their own handicrafts by watching the following video. Good luck in your endeavor!
Tips for beginners
The following tips will help beginning needlewomen in creating an original ring:
- Always start weaving only with a training fabric.
- For the first jewelry models, it is better to opt for simple flat options.
- It is better not to use expensive types of beads and auxiliary accessories in the initial stages of work.
By following a number of practical tips, you can achieve good results and create the most beautiful and original jewelry as a fashion accessory.
We weave a ring with a stone with our own hands
This original ring will be decorated with a beautiful cube-shaped crystal. And it will be weaved using a woven technique in three stripes and from as many small rows as will support the crystal itself. You will need a very small list of materials for work:
- one cubic crystal;
- beads according to the color of the crystal at your discretion;
- thread with a needle and scissors.
Take a piece of thread 184 cm long and collect four pieces of beads. Pass the thread through all the elements and take it out of the fourth bead. There is no need to tie a knot. Hold the glass pieces vertically relative to the square. Now you can begin to perform the weaving technique. Re-assemble two beads and stretch the thread, directing it down through two pieces of glass to the left and weaving up through three pieces to the right, as shown in diagram No. 2.
Do not stretch the base material too much. Then repeat the previous steps until the length of the strip is sufficient to cover your finger in its thickest part. Also perform the third row using the weaving technique along the entire strip. Then pass the hardware through the outer beaded tier, getting halfway through. Form a center for the crystal by weaving five beads with a weaving technique on each side of the ornament at the very center of the crystal. Bring the thread from the last element along the outer edge of the row of 5 pieces. Next, string three more pieces, then a crystal and three more pieces. Pass the base material back and then forward through four pieces.
Read
Weaving gerdan from beads on a machine and examples of patterns
Take the thread out of the main bead and add 2 more pieces, passing through the five beads in the center. Take two elements again and pass the fittings through all the main pieces of glass. Take the thread out again and add three beads, passing it 4 times through five pieces, as shown in diagram No. 4. Thread 1 bead so that you can close the hole that should appear. Pull the fittings through the strip to the opposite edge, then connect the rows so that you form a ring line. Secure the thread and cut it right next to the decoration itself.
Types of beads for weaving
Needlewomen have access to a wide variety of types of beads, differing in shape, size, color and number of edges on the surface:
Round material models. They are classic options and allow you to create beautiful original jewelry on any basis (simple weaving, fastening to a metal base).
We recommend reading:
DIY paper orchid - a review of the best ideas and tips from craftswomen. Step-by-step instructions + master class (photo + video lessons)- DIY paper hyacinth: the best master class for beginners with step-by-step instructions and diagrams from A to Z (130 photos)
Paper stars - instructions on how to quickly and easily learn how to make beautiful stars with your own hands (100 photos of finished works)
Beads in the shape of a barrel.
Cylindrical bead options. In such material models, the center of gravity and the hole are shifted to one edge, which allows you to create the most unusual ring models.
Multifaceted bead patterns. The presence of many edges allows the light to shimmer in an original way on the surface of the finished product.
There are also various types of glass beads, differing in color and texture. On store shelves, customers have access to both matte and bright glossy materials for weaving rings.
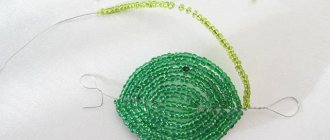
Complicated weaving option
This option allows you to use materials that differ in size and shape. For example, you can take beads of gray color and round shape, and complement it with some unusual color of polyhedron beads.
The first thing to do is thread any of the beads onto the fishing line, placing it in the center. On both sides you need to thread beads of the same shape. In the photo of the beaded ring you can see the future decoration.
Next, you need to thread the ends of the fishing line from different sides through one of the elements. It is advisable to alternate them in shape or color. Continuing to close the edges and tighten the fishing line through one hole, bring the product to the desired length.
If the completion of the work is a regular hoop, it is enough to thread the extra ends through the first element. It is necessary to carefully ensure that the nodes securely fasten the entire structure. Otherwise, the entire product will fall apart. Trusted nodes are shown in future examples.
Master classes on weaving rings
First of all, you should start by weaving the simplest ring patterns. The best option would be to practice weaving on a separate fabric before applying patterns or ornaments in the weaving.
We recommend reading:
A paper crown is a simple instruction for creating original jewelry with your own hands. Templates, diagrams, master class, exclusive design (110 photos)Weaving from newspaper tubes for beginners: the best free master class, with step-by-step instructions. Photos, diagrams, unusual ideas, videos
- Paper rose - how to make it yourself? Step-by-step instructions, original ideas, photos, videos, master class
Weaving a simple ring
To work, you only need a few copper wires, small rounded beads, and scissors. Before you start weaving, you should measure the circumference of your finger to determine the size indicators.
Instructions on how to make a ring from beads:
- Place beads on the copper wire one by one.
- Guide the wire in rows, bringing the rows close to each other.
- Use intermediate fastenings between the main rows.
Some craftsmen use strong glue to create an original ring.
Weaving patterns
Using weaving patterns, you can weave a wonderful ring. But despite the fact that the pattern may be the same, the choice of color and type of beads determines how the ring will turn out in the end. And that's the beauty of beading. This is not only a fun activity, but also a way to express your individuality and show your imagination.
Related article: Crochet outfits for Barbie - knitting patterns
If you choose your favorite ring design and weave it from bright and shiny stones and beads, the ring will be shimmering and catchy. And if, using the same scheme, you make a ring from matte light beads and mother-of-pearl beads, then such a decoration will be delicate and elegant.
You also need to consider the size of the ring.
Don't forget to try it on during the manufacturing process. Although the advantage of such rings is that, as a rule, the standard designs are universal and the jewelry fits tightly, does not fall off or press, but it is better to be safe.
It is also worth paying attention to the base for the ring. Weave with thin wire or fishing line. Wire makes stronger jewelry that holds its shape well, but choose this material carefully. If the ring is made of light-colored beads, then it is better to use silver or gold wire. If you use dark wire, it will spoil the appearance of the ring.
Creation of a decorative model “Butterfly”
This decoration model is quite complex in execution, however, it will delight the owner with beautiful decor and an original look. To work, you need to prepare the following materials:
- Beads of different sizes and colors.
- Large stone (for example, carnelian).
- Copper wire.
- Auxiliary fittings (base for ring).
Next, the master must follow step-by-step instructions:
- The ring is a decorative piece of beaded jewelry on a durable metal frame.
- Creating jewelry involves sequentially stringing beads onto copper wire.
- Next, a large stone is glued onto the base ring, which acts as the body of the butterfly.
- The wings must be formed from wire with stringed beads.
The butterfly can be additionally decorated with a scattering of small stones and rhinestones.
Original ideas for beginners
The most unusual ideas and options for beginning craftsmen are available on every practical handicraft web resource.
The most creative ideas are:
- Weaving with a chess pattern.
- Volumetric rings with ball-shaped decoration.
- ½ finger ring with fine beadwork.
The most interesting options are available for practical implementation. Beginners will benefit from step-by-step instructions and master classes with a detailed description of the work.
Simple and fast
A master class with step-by-step photos will help you weave beautiful rings.
Creating a beautiful ring is very simple. The decoration is very elegant and neat. You can take beads and beads in the colors that you like best. Or you can even make many different rings in this way and wear them under different things that match the color scheme of the decoration.
We will prepare everything you need. We will weave with thin wire. Let's take an imitation turquoise bead with a diameter of 1 cm. You will also need four turquoise beads with a diameter of 0.4 cm. Two dark beads with a diameter of 0.6 cm. And silver beads.
We make two wire cuts of 25 cm each. We string eleven beads onto the first wire. We thread both ends into the bead and tighten. Then we do the same with the second wire.
Related article: Spring flowers made of corrugated paper
On each of the two ends of the wire we string two beads, and then another turquoise bead. We pass both ends through a dark bead and tighten them. We do the same with the other two ends of the wire.
Now we string four beads onto the ends on one side, and thread both ends into the fifth and tighten them. Next we string seven more beads. We do the same with the other two ends.
Now you need to try on the ring and, if necessary, add beads. Twist the ends of the wire tightly and cut off the tails. Then we bend the twisted wire and thread it through the bead so that it is not visible. The result is a delicate, beautiful ring:
Photos of beaded rings
Did you like the article?
0