Interesting ideas for unusual crafts
We present to your attention master classes in which we will tell you in detail how to make a water lily, a Christmas tree, a mirror frame, a flower vase, a candlestick and a ladybug from disposable spoons.
Features of crafts made from spoons
Disposable plastic spoons are a good craft material from which you can assemble various designs. Spoons of any size are useful - tea, dessert, table spoons.
Unusual crafts become decorations for walls, apartment interiors, and decor for gardens and cottages. The best samples can be presented at a school exhibition or taken to kindergarten.
When making such crafts, it is recommended to use other simple materials - paper, cardboard, plywood, plant branches, etc.
The plastic is easily painted with acrylic paint and joined with PVA glue. When working, you will need simple tools - a sharp knife, scissors, an awl, pliers, a brush for paint and glue. For complex crafts, a jigsaw and a hacksaw are useful.
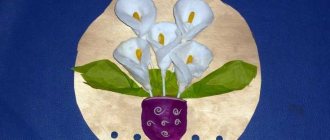
Water lily
What is needed: spoons (twelve pieces), green and transparent plastic bottles, yellow paint, brush, glue, scissors.
How to do:
- cut off the handles of the spoons;
- glue three cut spoons together;
- glue four cut spoons together;
- Glue three glued spoons to four;
- glue five spoons together and glue the previously glued spoons to them;
- from a transparent plastic bottle, cut out a long strip about 2 cm wide, paint it with yellow paint, let it dry, cut the fringe on one side;
- we fold the resulting fringed strip into several circles and secure it with glue, glue what we got into the middle of the previously made water lily;
- cut out a leaf from a green bottle (you can use a transparent bottle painted with green paint);
- glue the water lily to the leaf.
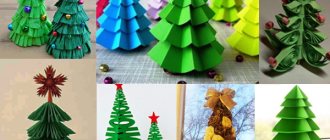
Christmas tree
This is especially true during the New Year holidays, when you want to decorate your home in an original and tasteful way.
What you need: approximately 100 plastic spoons, paper, glue, scissors, paint (it is better to use spray).
How to do:
- We make a cone out of paper (the size depends on how large the Christmas tree you want to get);
- take spoons and cut off their handles;
- glue the cut part of the spoons to the cone with the concave side up (it’s better to start from the bottom of the cone);
- We glue each next row with an overlap and in a checkerboard pattern;
- We paint the resulting Christmas tree with spray paint.
Decorative panel for the kitchen “Broom”
A child can make such a craft as a gift for his grandmother. A beautiful, unusual and lovingly made panel will decorate any kitchen.
@maistrinya, stranamasterov.ru
To work you will need:
- nine disposable forks;
- thick cardboard;
- satin ribbon;
- artificial flower (lush);
- thick decorative thread;
- glue gun
The work is carried out as follows:
- A broom-shaped blank is cut out of cardboard.
- Forks are glued to the wide part of the workpiece at a distance of 1-1.5 cm from each other.
- Then a ribbon is threaded between the teeth. Its edges are also fixed with glue.
- The “handle” of the whisk must be wrapped with decorative thread. To prevent it from moving off the base, it is treated with glue.
Next, a flower is glued onto the wide part of the corolla, and a loop is made on the handle on the wrong side. This way you can not only put up the craft, but also hang it on the wall.
Mirror frame
What you need: round mirror, plywood, 200 plastic spoons, spray paint, pencil, glue, saw.
How to do:
- draw a circle on the plywood (its diameter should be twice the diameter of the mirror);
- carefully cut out the resulting circle with a saw;
- cut off the handles of the spoons;
- glue the spoons to the plywood with the concave side up (glue should be from the edge, overlapping and in a checkerboard pattern);
- we paint spoons with spray paint;
- Glue a mirror to the center of the circle.
You can also cut a hole in a circle slightly smaller than the mirror and glue the circle to the mirror.
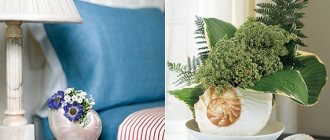
Flower vase
What you need: tin can, plastic spoons, paint, glue, scissors.
How to do:
- paint the jar (choose what color yourself);
- cut off the handles of the spoons;
- paint them (only the rounded parts can be painted). The color can be either the same or different - depending on what kind of vase you want;
- glue the spoons onto the jar in even rows.
Flower buds from plastic spoons
The spoons look like oval flower petals, which is why they make beautiful and natural plastic flower buds.
There are a lot of different ideas, but the general technology for making flowers is to glue the petals together.
Snowdrops
- The flower petals will be cut off spoon heads, glued together in 3-4 pieces on each side. At the same time, it is beautiful to connect them not only end-to-end, but also overlapping one another.
- Cover the base of the snowdrops with green plasticine.
- Curved tubes are suitable as stems.
- Place the finished flowers in a pot or secure them on a stand in the form of grass, snow, etc.
Tulips
- For one bud you will need 5 spoons, corrugated paper and a piece of green adhesive tape.
- Wrap each spoon in a square of colored paper, such as red, yellow, pink.
- Glue the spoons together in the shape of a bud, wrapping their handles with green tape.
- Cut the leaves out of green paper and tie them to the base of the stem.
- Arrange the flowers in the form of a bouquet and place them in a vase or pot.
Such flowers should only be created by adults, subject to safety precautions, because... the curved petals are created by melting plastic over an open fire.
- Melt the ends of the spoons over a fire source - candles or lighters. Create bends with the tip of a metal knitting needle.
- Use a glue gun to connect the petals and place them on the stems.
- You can also make jewelry, hairpins, brooches, etc. from roses.
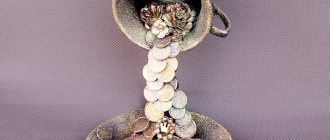
Candlestick
What you need: candle, plastic spoons, glue.
How to do:
- cut off the handles of plastic spoons;
- glue the spoons together so that you get something like a chamomile;
- Glue a candle to the center.
We recommend watching
How to make a bird craft - 110 photos and videos, master class on making birds from scrap materials
Ideas on how to make crafts from candies - 125 photos of the best ideas and a step-by-step description of how to create them yourself
Ideas on how to make crafts from cans: a step-by-step master class on making beautiful interior decorations (95 photos)
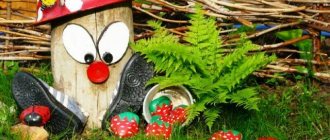
You can also make interesting crafts for children from plastic spoons or involve them in this activity. For example, together with your child you can make a ladybug.
Ladybug
What is needed: plastic spoons (3 pieces per ladybug), paints (white, black, red), plastic bottle caps (1 piece per craft), glue, scissors.
How to do:
- We paint the spoons (everything except the handles): one with black paint, two with red. Apply black dots to the red spoons:
- cut off the handles;
- we paint the bottle cap with black paint and draw eyes on it;
- Glue the wings onto a black spoon - red spoons, and glue the head - a prepared bottle cap - to the resulting structure.
As you can see, you can make many different beautiful crafts from the most ordinary disposable spoons. Take time for this activity and give free rein to your imagination - and your interior will noticeably transform.
Doll made from disposable forks and cups
This craft will decorate a schoolchild’s desk, a window sill with flowers, or a shelf with books. It looks original and fun. However, besides forks, the main character here is an ordinary plastic glass.
@evroshik.ru
To work you will need:
- disposable forks (10–15 pieces) and a glass;
- glue (it’s better if it’s “Moment”);
- scissors;
- decorative eyes, mouth and nose bead.
By the way! It is important that the toy is stable. Therefore, it is better to use dishes made of thick plastic. A paper coffee cup will also work.
The work consists of several steps:
- The bottom of the glass is cut off (carefully, since it is to this part of it that the forks will be glued in the future).
- To make the structure stable, the base of the glass can be strengthened. To do this, you need to stick a thin strip of cardboard (no more than 1 cm wide) on the inside of it.
- The handles are cut off completely from two forks, and half from the rest.
- The narrow part of the glass is the conventional “head” of the doll. Forks, the handles of which are cut in half, are glued along the entire circumference of the glass. This is the doll's “hair”. It is better if they are of different “lengths”. They can also be decorated with sparkles and colored threads.
- You need to make small slits on the sides of the glass. Handles from forks are inserted into them as carefully as possible. The slots should be small so that the glass does not break and the doll’s “hands” do not fall off.
Then glue on the eyes, mouth and nose. If desired, the doll can be painted with acrylic paints.