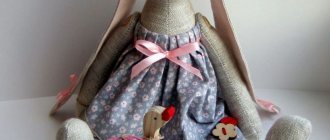
We study available patterns for creating a hare using the Teddy technique
Draw hare patterns on paper with a pencil.
First, you will need to decide on the size of your future animal. Therefore, think carefully before you start making a pattern.
- Two parts for the body are made. It is enough to cut out one detail on paper, which will later be transferred to the fabric. Next, draw the paws of your future bunny, which will be the legs, draw the handle, heel, and palm. Long ears of your future bunny.
- Transfer patterns to fabric.
- Cut out the resulting silhouettes of the future Teddy bunny.
- Sew each piece together, placing them right sides up. Leave a small hole in the body in order to fill it with padding polyester. Also, leave it in the legs, head, arms.
- Turn your future bunny right side out.
- Stuff future products with padding polyester.
- Sew the resulting parts together.
- Sew on the eyes - buttons, and use threads to make the nose and mouth of the future bunny.
- Finish the product by decorating with the necessary accessories.
Your Teddy bunny is ready. You can give such a nice toy even to a child, he will be very happy.
Such a bunny can be a decoration for your home and will serve as decor in any interior. It will be a wonderful gift for any adult and child. You can make your own craft, both large and small.
In the video lesson you can find all the necessary information.
Hare Tilda
To sew a hare, transfer the pattern to the base fabric (see below). We cut out all the details, not forgetting about the extra space of half a centimeter for processing the seams.
Some types of fabric fray heavily; in order to prevent this, it is recommended to treat the edges with a special solution .
To do this, you need to mix simple PVA glue and clean cold water in a one to one ratio. Moreover, traces of the composition will not be visible, and the fabric will become harder.
To make your own Tilda bunny we will need:
- body fabric - linen;
- choose the fabric for clothing yourself based on your taste preferences;
- sewing supplies;
- simple pencil;
- scissors;
- printed pattern of a soft toy;
- padding polyester
Manufacturing stages:
- Finished parts need to be sewn with a machine seam, trimming a little excess fabric by 2 millimeters. Remember to leave some room for turning and stuffing parts.
- Using a pencil, carefully turn it inside out and straighten the seams with your own hands. We iron it and fill it with filler, doing it tightly so that there are no voids left. That's all, the components of the hare are ready.
- At the body of the toy, slightly bend the remaining fabric and sew it with your own hands using a basting stitch. Then we carefully insert the legs and sew them together with the body, removing the excess threads. The main thing is that the hare's limbs are the same.
- The paws must be sewn on by hand, and the seam must be hidden. We sew the ears with the same seam, and only then attach them to the head of the soft hare.
- The soft toy is almost ready, just a little remains - sew the nose, make the eyes and mouth. For a more expressive look, it is recommended to give the animal rosy cheeks. Let's use a simple blush and a large brush.
- Now you need to sew clothes for the finished soft bunny. If your toy is large, then we measure it and make a pattern for pants and a blouse. If it’s small, then in this case you can use the Internet and download the finished pattern.
Bunny pants
The finished Tilda bunny will certainly delight any child
We sew a Bunny from felt
I am sharing with you the author’s pattern and master class for a bunny that can be placed on a mobile phone, a garland, or left as a toy.
- felt (white, orange, green, pink);
- threads in the color of felt;
— filler (holofiber, padding polyester, padding polyester);
— safe eyes for toys (can be replaced with a sewn-on part);
- threads for embroidering the muzzle.
The pattern is full size, just print it in A4 format.
Sharp scissors will help you cut the parts evenly.
You can glue all the pattern elements with tape or circle them with a special fabric marker.
Sew the muzzle with a buttonhole stitch. Sew the nose on top.
The process of embroidering the mouth and muzzle will be facilitated by a special fabric marker.
Teddy Rabbit
To make a toy with your own hands you need to take:
- beige short pile faux fur;
- a little of the same white fur;
- filler;
- sewing tool, thread.
Description
We print or redraw the Teddy Bunny pattern in life-size.
We cut out the necessary details.
The head consists of five parts: side parts (2 pcs.), white cheeks (2 pcs.), wedge (1 pc.).
First of all, we sew up all the darts on the sides of the head and the wedge.
Next we sew in the cheeks. To do this, combine the marks on the cheeks with the marks on the sides of the head.
All seams are made using a “back needle” stitch. The seams should be small enough (1.5-2 mm) and not loose, otherwise when stuffing, especially the head, all the seams may come apart.
Please note that you need to start sewing from the top red dot to the bottom, moving clockwise. After completing the seam, sew the other side of the head in the same way.
Then we fold both parts with the pile inward and stitch along the chin line, starting from the upper corner of the cheek.
Then comes the most crucial moment - sewing in the wedge. The main thing here is accuracy and precision, otherwise you will end up with a skewed nose.
Next, we align the central mesh on the wedge with the extreme point of the nose, then we combine all the other marks.
We start sewing from the central mark on the wedge to the right, moving from mark to mark. Having reached the end of the wedge, fasten and cut off the thread. We sew the left side in the same way (from the center mark to the left). It is advisable to first chop or sweep away the parts.
After sewing the entire head, turn it inside out. Using a brush, comb out the lint from the seams.
Stitching the torso
The body consists of 4 parts plus a valve.
We start stitching from the tummy. We fold both parts with the pile inward and stitch along the line marked with red dots. Then we fold both parts of the back, stitch first from the red to the blue point, and then from the blue to the red. Leave the space for stuffing open.
After this, we connect the tummy to the back, matching all the marks. We sew, leaving a hole for the flap (we do not sew up the neck).
Sewing arms and legs
We fold the upper paws in pairs. We sew, not forgetting to leave room for stuffing. Then we turn the paws inside out and comb out the lint from the seams.
We fold the leg parts in pairs with the pile inward, stitch them, leaving the space for sewing in the heels unsewn.
Then, aligning the marks on the heel and foot, we sew.
Having finished sewing, turn it inside out and comb out the lint from the seams.
Stitching ears
Fill the parts (except for the ears) with filler and sew up the remaining holes. We connect the parts and design the face.
Master class on patterning hares with your own hands
The hare is an animal that is associated with kindness and warmth. Handmade toys in the shape of this cute animal always look special. Patterning a hare is an interesting job that even a beginner can do. Such a toy will decorate the interior of a child’s room, and it will also be a pleasure to receive it as a gift not only for a child, but also for an adult.
Bunny Mi is a toy that is very easy to make yourself, without having any experience in such work. The size of the toy can be any, but most often the pattern used is a life-size hare with long ears.
Design, color and fabric can be chosen at your own discretion.
To work you will need:
- printed pattern of the Mi bunny with long ears;
- plain fabric;
- padding polyester or fluff;
- sewing supplies;
- buttons;
- scissors;
- decorative elements.
Parts that should be obtained (the quantity is indicated in brackets):
- torso (2);
- tail (1);
- half head (2);
- paws (8);
- long ears (4).
Progress:
- It is necessary to attach each of the parts to the fabric, trace it, then cut it out. To process seams, leave 5 mm at the edges.
- Fold the pieces in pairs so that the front side is on the inside.
- When sewing parts, you should leave a small distance so that there is room for the filler.
- If the bunny is large, you can do the stuffing by hand. For a small toy you will need a pencil or a small plastic stick. It is important to distribute the filler evenly: the accuracy of the toy will depend on this.
- Sew up the places used for stuffing with a hidden seam.
- Connect the parts. Attach the arms and legs using buttons. They can also be used for the eyes.
- Remove excess threads. Tie a ribbon around the bunny's neck and decorate it with decorative elements.
Teddy Hare
A teddy toy usually consists of a very soft material, which is why small children really like this kind of teddy. A bunny in this style should look thoughtful.
To work you will need:
- plush or any fluffy fabric;
- printed rabbit pattern;
- sewing supplies;
- scissors;
- padding polyester or fluff;
- buttons;
- decorative elements.
Progress:
- Carefully cut out the pattern of the parts of the future bunny.
- Attach the details to the fabric, trace and cut out. To prevent the toy from being smaller than expected, leave a little space for processing the seams.
- Sew the pieces in pairs so that the right sides are at the top. It is worth paying attention to the fact that noticeable seams and slight carelessness of the toy are its distinctive features, which emphasize handmade work.
- Turn all parts of the hare inside out and stuff them tightly with stuffing, then sew up the remaining holes.
- Carefully connect the resulting parts.
- The toy is almost ready. All that remains is to make the muzzle using threads and special materials and decorate the hare with various elements.
Knowing how to sew a hare with your own hands, you can give your child a toy that will become his best friend and create an atmosphere of warmth and comfort in the house.
Fleece bunny: sewing an eared friend
I would like to offer to sew you a cute Bunny - a toy that can become a constant companion (friend) of a child or an adult: in games, while traveling, while sleeping. This is the kind of Mila we should get 
We will need:
- milky fleece (you can take white, beige and other colors);
- companion fabric for the ears (I have 100% white cotton with stars), fabric for the overalls;
- filler (holofiber or synthetic fluff);
- ribbon, buttons and thin elastic band;
- floss for embroidering a nose, two beads for eyes;
We start with the pattern. The pattern is given for printing on A4 sheet. My Bunny turns out to be 35 cm tall.
We print the pattern (you can copy it directly from the screen, enlarging it to the required size), cut out the parts.
Fold the fleece in half, right side inward, and trace out the pattern details (I didn’t have a very straight piece of fleece, yours will be more beautiful :))
Then we cut out the parts (seam allowance 3-5 mm), and they will need to be sewn in pairs. We sew the body parts along the middle seam and sew up the darts. This is what you should get:
Turn out the paws and ears. We sew the ears at a distance of 5 mm from the edge.
We fill the upper and lower paws with holofiber, filling the paws not completely, about 3/4 (I have these places marked with pins, there is no filler above the pins).
We take one of the halves of the body and pin it to the front part, and then sew on the ears as shown in the photo (the edge of the ear is 1.5 cm from the middle seam to the left and right)
The ears are sewn on, now we pin and sew on the upper legs (immediately after the neck).
We pin and sew the lower legs at a distance of 0.5 cm from the middle seam.
This is what we have at this stage.
We take the second part of the body, fold them right sides inward, chop and stitch them, leaving the bottom cut open (where the lower legs are sewn). Please note that the ears and upper legs must be inside our “sandwich”.
We turn our Bunny inside out through the open cut.
We fill the toy with holofiber, forming a beautiful round head and an equally beautiful body), we don’t skimp on the filler!
Our toy is stuffed, we need to sew up the hole. We do this with a hidden seam, combining the seams and darts.
The carcass is ready. We design the face. First we outline and embroider the nose. I embroider floss using three threads. I'm starting from the top.
We finish with the nose, outline and sew on the eyes. The expression of our toy’s face greatly depends on the location of the nose and the size of the eyes.
In principle, our bunny is ready.
You can stop at this stage, but we move on and sew the overalls.
Taking measurements from our bunny:
Based on the measurements, for the overalls I will need two pieces of cotton, measuring 18x22 cm. We fold our pieces in half, facing inward! (In the photo the face is on top, I did this so that the markings could be seen). We draw the armhole and crotch seam (as in the second photo).
We cut out the details, from the armhole mark we cut the jumpsuit to the neck (taking it 1 cm). Place the pieces facing inward and sew the side seams up to the armholes (the place where the pins are inserted).
Smooth out the side seams. We process all open sections with a zigzag seam and sew a crotch seam.
We measure the elastic for the top of the overalls. At a distance of 3 cm from the top edge, we adjust the elastic in a circle, pulling it tight. A gather forms at the neck. We get a jumpsuit that can be decorated.
I selected and sewed on wooden buttons and satin ribbon. It is enough to sew the ribbon pointwise (in one place on the neckline.
We dress our Bunny in overalls, I couldn’t resist and made another bow on my head
Thus, we got a wonderful Bunny in a removable jumpsuit. You can play with Bunny, sleep, make friends, sew clothes for her. And, importantly, the toy can be washed carefully.
Thank you for your attention! If you have any questions, I will try to answer them.
Sincerely. Natalia