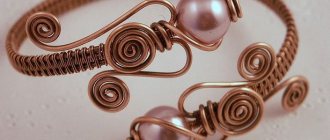
Metal look
Required tools and materials:
- leather 4 mm thick;
- holster button;
- heat gun;
- brush;
- sponge;
- acrylic paint black and gold;
- acrylic lacquer.
Step-by-step instruction:
- Cut a rectangle of the desired size from the leather. When measuring the length, you should take into account the overlap for the fastener.
- Punch holes on both sides for the holster button.
- Use a knife to cut off the corners.
- Without touching the fastener area, apply hot glue to the underside of the leather in a chaotic manner.
- Wait for it to harden and cut off any frozen glue threads that have formed. Cover the surface with black paint and let it dry.
- Apply gold paint using a sponge. After the first layer has dried, coat the bracelet with the second and then secure with acrylic varnish.
- Insert a button into the product.
Video: DIY leather bracelet
Weaving leather bracelets
Weaving patterns for bracelets
Now we can look at an example of how to weave a leather bracelet:
Bracelet with carabiner
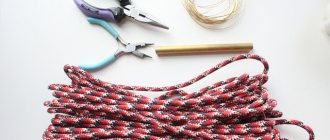
We will need:
- Leather or suede tape
- Scissors
- Pliers
- Tool for clamping (not only a specialized one, but a simple clothespin will also work)
- 2 clamps
- 2 rings
- Carbine
How to do:
1) Cut a piece of tape so that you can wrap your wrist 3-4 times (we cut it 4 times)
2) Cut 2 more pieces of the same length
3) Lay out the laces in a straight line, put on the clip and secure with pliers
4) Using a clamping tool, fix the laces and braid the braid (how to braid is up to you, everyone has their own method. You can see the basic diagrams just above)
5) We wrap our unfinished bracelet around the wrist, you should get 2 turns. We cut off the excess, leaving 1-1.5 cm
6) We put on the clip, as in point 3
7) Using our pliers, we put on the rings. We close one, leave the other ajar
 We put on the carabiner and close the ring
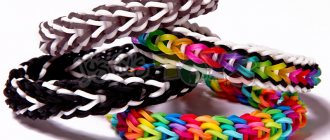
If you did everything correctly, you will end up with a woven leather bracelet like this.
True, we already have 2 of these on hand :)
Don't be afraid to experiment: make a longer bracelet or make several of them, change the color of the leather or weave.
Perforated
Required tools and materials:
Recent Entries
How to clean a frying pan from carbon deposits in 10 minutes Don’t throw away yogurt cups: 3 cool craft ideas for kids Decorating for pennies: 6 ideas for crafts made from plastic spoons
- thick skin;
- beads;
- shoe thread;
- awl;
- button - 2 pcs.;
- thin leather for the reverse side;
- knife;
- metal ruler;
- glue.
Step-by-step instruction:
- Cut a pattern out of leather in the shape of a rectangle with a width of 4 cm, leaving an overlap of 2.5 cm for the fastener.
- Cut a rectangle from checkered paper 1 cm narrower than the bracelet and 2 cm shorter and attach it to the workpiece. Using an awl or gel pen, mark each cell along the long sides of the leaf.
- Using a metal ruler, make parallel cuts along the marked points, without reaching the edges of the part.
- Draw a line along the bracelet, dividing it in half, with an awl.
- If the skin is thick and difficult to pierce with a needle, make holes with an awl along the marked line.
- Sew the part in the center, turning the internal elements over.
- Sew decor along the bracelet.
- Cut a rectangle out of leather for the lining the same size as the bracelet. Coat both parts with glue around the perimeter.
- Connect the parts, trim the edge with scissors. Then make 2 holes for fasteners and insert buttons.
Video: Wide leather bracelet with through perforation
Interesting options
Craftsmen divide types of bracelets into categories. They vary in design.
- Thin and thick accessories:
- Accessory with buttons, fasteners:
- With patterns or rhinestones:
- With a few turns around the wrist:
In addition to regular weaving, there is circular weaving. In addition to thin leather, you will need a rope. It is this that the cords braid.
Related article: Crochet tablecloths with patterns and videos for beginners
Progress:
- Take four birch cords about 2 cm. We prepare a rope of the same length. Pay attention to the diameter - from 3 to 5 mm.
- Using glue (preferably “Moment”) we connect the ends in a circle (15-20 mm in length). Secure the gluing area with thread.
- We divide the cords into two parts. Remember the left and right parts by mentally numbering them. We take the left ones in the left hand, and the right ones in the right.
- Let's use the diagram.
- When the length is about 130-140 mm, we secure the end with thread.
- Lubricate the unbraided ends with glue. Leave to dry.
- Flatten the ends of the tubes. Make a place for the fixer, install.
Here is the result, which looks like a whip:
Leather bracelets do not last forever because they are made of delicate material. You don’t always find high-quality products in stores, so when purchasing, check its strength and the presence of excess threads. Of course, the leather belt also needs to be checked. Often they can become worn, worn out and lose their shape. It is dangerous to buy products in online stores; there is no way to check the quality and verify the authenticity of the brand. Try making your own accessory. It's easy to enjoy the work. But it’s even nicer to wear something you made yourself.
Wicker
Required tools and materials:
- soft skin;
- tip clasp;
- scissors;
- glue.
Step-by-step instruction:
- Cut 4 strips of leather 26 cm long and 1.8 cm wide.
- Apply glue to the wrong side of the part and glue it end to end. Repeat with remaining elements.
- Apply glue to the ends of the strips and connect them together.
- After the glue has dried, you can begin weaving a rope of 4 parts.
- At the end, make an even cut with scissors and glue the strips together.
- Pour plenty of glue into the fastener and insert a tourniquet there.
- The braided bracelet is ready.
For beauty
It’s easy to make bracelets with your own hands, which are becoming more and more popular. Such products look elegant and beautiful. It all depends on the weave. You need to purchase pieces of leather that will become the base and cut them into strips. Manufacturing requires few materials and a lot of attention.
Related article: Floral crochet bag
So, let's begin. Let's consider several weaving options that are suitable even for men. The first option is a bracelet bracelet.
It is thin, delicate and looks beautiful on the hand. This accessory is multifunctional because it can be worn at any time of the year.
We will need a leather blank. If there is no such thing, then cut a wide strip of leather and put buttons at the ends, as the diagram shows.
Depending on the fittings, the style of decoration changes.
The second option is “Women’s Secrets.” The accessory is suitable for bright summer outfits. You can choose the color yourself, depending on your ideas. The technique is simple, even a child can handle it.
Take three colors of thread, a strip of leather, some chains, a plug with a clasp, scissors and glue.
- Cut the thread into 9 parts (20 cm, two pieces each). We lay them out in threes, having previously secured the edges.
- Let's start weaving. Watch every movement so that the product is smooth and beautiful.
- Finally, pay attention to the clasp. Secure the bracelet before trimming the ends. Apply glue to the ends of the bracelet and clasp. The accessory is ready!
To make sure it works correctly, look at the photo:
The third option is an unusual braid.
- To get a wicker product, we take three identical leather ribbons.
- Remember the numbering of the stripes: 1-left, 2-middle, 3-right.
- Let's start weaving. We pass the edge of the product through No. 2 and No. 3, and lower it down. The stripes are twisted.
- We pass the edge between No. 1 and 2, lowering it down.
- We repeat the previous movements until the end of work on the product. Straighten it.
Noble turquoise
Leather products look incredibly beautiful in combination with natural stones. We suggest you make a bracelet from leather cords and beads. We will use luxurious turquoise beads.
To make a bracelet, take:
- brown leather cord - 2 pieces of 80 cm each;
- turquoise beads;
- thin thread made of leather;
- needle;
- decorative button;
- scissors;
- glue "Moment Crystal".
Related article: How to sew a bag for toys: pattern and sewing master class
The manufacturing process consists of entwining a pair of laces with leather thread. In this case, beads made of natural turquoise are inserted one by one.
Having reached the desired length of the product, lubricate the back of the laces with glue. This will help prevent the thread from moving when worn.
Form a loop on one side and sew a button to the lace on the other.
The decoration is ready!
Multi-row decoration
Creating a unique accessory with a connector is fun and simple. The connector is a small insert for jewelry.
At both ends of the part there are rings into which you can thread a cord and secure it with a simple knot.
But it also happens that the connector eye is very small. In this case, connecting rings or spring clips are used.
To create a leather bracelet with a connector you will need:
First, attach the spring clip to the connector eye.
Related article: Crochet star pattern: patterns with descriptions and video tutorials
Cut 20 cm of red leather cord and thread it into the connector as shown in the photo. Repeat on the other side.
Cut three gray laces twice as long as your wrist. Fasten their ends with glue and secure with a clamp.
Braid the same length as the red lace. Remove the loop from the spring and place it at the end of the weave.
Twist the ends arbitrarily and, retreating a distance equal to the width of the connector, strengthen the second spring. Continue braiding. Secure its ends with glue. Make exactly the same part.
For multi-row bracelets, wide end clamps are used; a ribbon clamp will do. Using connecting rings, install a fastener at its ends.
After careful fitting, remove excess cord tails. Coat the ends with glue and install a wide end. Make sure the laces are straight.
A magnificent decoration made of leather cords with an insert is ready!