Beautiful unusual beaded earrings complete the look and therefore deserve special attention. To get an inexpensive, exclusive piece of jewelry, you need to make it yourself. Weaving earrings is very simple, and they look great. Step-by-step master classes will help you independently cope with the work of making original products: openwork, Faberge, in the form of tassels, snowflakes, flowers.
What you need for work
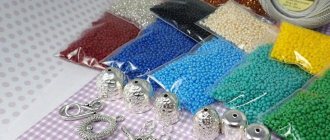
The main materials for making beaded earrings with your own hands are: various beads and beads, ear hooks, as well as fishing line or a special thread. All other materials (additional) will be needed when choosing the shape of the decoration.
Bead selection
To make the product look presentable, you need to choose high-quality material. The best beads are produced in Japan and the Czech Republic. In rare cases, but still there is such a possibility, Chinese beads are of good quality.
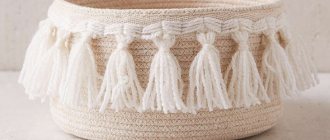
Earrings - tassels
Surely you have already met fashionistas with incredible earrings more than once. This new fashion item appeared about six months ago and charmed many. Any needlewoman can make such tassel earrings from threads with her own hands.
To make earrings you will need:
- Silk threads and floss in your favorite color
- Cardboard
- Necessary accessories
- Wire
- Beads
- Elements for decoration
To start, take some cardboard and shape it into a rectangle. Its length should be equal to the desired length of your earrings.
Then wind many layers of silk threads. The more of them, the more magnificent the earrings will be.Now remove the roll from the cardboard. At one end securely fasten with floss threads, and at the other carefully cut. This created the basis for the future earring.
Read here - DIY lambrequins - manufacturing instructions with patterns. Types of lambrequins, choice of variety. Preparation of material and tools. Step-by-step manufacturing guide
However, you can do it differently. Cut many threads of approximately the same length and also fasten at one end. All irregularities can eventually be smoothed out.
Then, from the end where the threads are fastened together, wrap them about a few centimeters with floss. You can decorate this place as you wish, for example, with beads or rhinestones. There are many options.
The final stage in making earrings is installing the fittings. The distance between the earring and the earring itself can be supplemented with a large, bright bead.
DIY fantasy spider web earrings
Elegant and sexy, hoop earrings almost never go out of style. And if they leave the fashionable Olympus for some time, it is only in order to return even more spectacularly. Large hoop earrings, called congo, apparently got their name from the country of the same name, whose residents obviously love to decorate themselves with these colorful accessories. And they do it right! Hoop earrings are a universal accessory that will suit any face shape and any hairstyle, be it playful curls, glamorous curls, a strict bun on top or a ponytail. Either way it will be very sexy.
If you approach the matter creatively, ordinary ring-shaped earrings can be decorated in a very unusual way. One of the most beautiful ways is to crochet openwork webs on rings. To make original spider web earrings with your own hands, you don’t have to be an experienced knitter. It is enough to have basic crocheting skills.
To work, we will need a round base for earrings or familiar old ring-shaped earrings that could use a creative upgrade, iris or Maxi threads, and a 0.5-0.75 hook. For glamorous decor, beads and beads can be useful.
We tie the base for the earrings with a single crochet. We knit the second row in the same way with a single crochet. Well, then everything depends solely on your imagination and desire. You can knit a neat openwork mesh (1st/n, 2 in/p), or deliberately rough large-format holes ((1st/n, 5 in/p). Don’t forget to reduce each subsequent row by 1-2 arches. We finish knitting connecting posts. We cut off the end of the thread and hide it in the knitting. In general, get creative! Vary the color of the threads and ornaments, and you will always look original and stylish!
Inspired by: knitly, creative-handmade, biser.info
Making a simple earring - It took less than 3 minutes to make one earring. 1. Earrings - 2 pcs. 2. Pins-studs - 2 pcs. 3 Beads. 4. Round nose pliers and wire cutters.
another simple earrings Earrings made of wire Wire - https://greenbird.ru/ Wire - Artistic Wire 1.02 mm 2 bases for earrings (sewing wires)
there are a lot of tutorials on making jewelry here - https://www.youtube.com/user/BeadAnimation/videos
Look at this beauty -
How to quickly make earrings at home: step-by-step instructions
From all the variety, fashionistas choose tassel earrings, which add charm and uniqueness to the image. Therefore, our master class is about making such jewelry. The basis of the earrings is the so-called hook (a hook inserted into the earlobe) and a pendant is attached to it.
Typically, earrings consist of tassels made of beads, rhinestones, as well as threads, leather, stones, decorative elements and ear mounts. For barely weighty options, stud clasps are used, and for expensive jewelry, a strong English clasp is used. A luxurious bunch of threads, a composition of several tassels or beaded threads - this is the design of such earrings.
The size of the brush can vary - from classic to below shoulder length. Such jewelry helps to lengthen the neckline and correct the shape of the face.
Tools and materials
There are several options for creating earrings and tassels. We will try to make it in the classic way from silk threads.
To achieve the result, we will need: round nose pliers, wire cutters, pliers, scissors, earring fittings, beads, cardboard, 7 centimeters wide (take a little more than the desired length of the decoration), cotton threads, viscose, fishing line or monofilament, blade and needles.
Master Class
So let's get started!
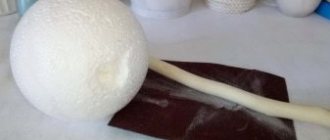
1. Draw lines on cardboard. We will tie the threads on one side and cut them on the other side.
2. We begin to wind the threads onto the cardboard. We make approximately 100 revolutions. At the same time, make sure that the threads fit as evenly and tightly as possible to each other.
For convenience in further work, the winding width should not exceed 1.5 cm.
3. We insert a cotton thread into a needle and thread it under the threads, tying them very tightly in the middle. Turn the cardboard over. Along the marking line, cut all the threads with a blade or scissors.
4. We hold the brushes over the steam for several minutes, periodically smoothing and stretching them with our hands. Then trim the tassels with sharp scissors.
Don’t be upset if it doesn’t turn out quite smooth; you can give the decoration the desired look at the very end.
5. We separate the ring of the pin and insert it through the loop formed at the hand. We connect the ring using round nose pliers. Then we string end caps onto the pins, bend the pin 90 degrees, cut it off with wire cutters, leaving about 8-10 mm, and create a ring. We carry out the same manipulations with the bead. Then we connect. If the ends of the brushes are uneven or too long, trim them again with scissors.
6. Our product is ready!
Shell earrings
Surely each of you has seafood lying around, brought from vacation as souvenirs, why not find a worthy use for them?
Earrings with shells are an original and attractive accessory for the warm season. Seashells will add lightness, airiness and summer weightlessness to the look.
There are several ways to make these earrings.
The simplest decoration is done like this: pick two identical shells of a bizarre shape. Make small holes in them using a sharp needle and thread the fasteners in the form of a hook bent in different directions. The marine accessory is ready.
These earrings can help you out if you don’t know how to complement your look, for example, in a nautical style.
In addition, this is the best option for making earrings for beginners with your own hands, since it does not require any special skills or tools.
If such a simple option is not for you, then we suggest that you familiarize yourself with the master class on creating earrings with your own hands from shells with beads. You will need:
- Two shells are the same in size, shape and color.
- Fastenings.
- Two pearls or beads similar to them.
- Thick needle.
- Durable glue.
- Clear varnish.
Progress:
Note!
Kinusaiga technique for beginners: what is it, a description of creating paintings from threads
How to weave a figurine from rubber bands: how to learn to weave animals, toys and what you can make from rubber bands on a slingshot
How to make flowers with your own hands from paper, fabric and scrap materials. We create bouquets of homemade artificial flowers
- Make holes in the shells for fastening. This must be done with extreme caution so as not to damage the material.
- Insert the fasteners into the holes and secure them.
- Glue pearls to the inside of the shell.
- Coat the pieces with acrylic varnish to give it a nice, glossy shine.
Unusual solution
To prove that earrings can be made from any available material, they are made from pieces of leather. To make them, you do not need to use additional recommendations. After all, it is enough to cut out the desired shape of the craft from this material and attach it to the hook. Below are some types of such accessories, but the photo does not show how to make earrings. Because they are already quite easy to make.
Leather jewelry can be combined with various outfits, you just need to skillfully compose the look. Such original leather earrings can be complemented with various beads and chains, the main thing is to know when to stop, since this material itself has a finished look.
How to make earrings from natural stones with your own hands?
DIY jewelry earrings made from natural stones are not only an exciting activity, but also an opportunity to have a special, exquisite piece of jewelry. Natural stones are sold in the form of beads with holes - they are just suitable for our craft. Choose the stone that attracts you most: for example, agate, amber or even pearls.
Let's prepare:
- pliers;
- ear wires;
- accessories for earrings;
- cloves (thin wire) – 6 pcs.;
- beads from the stone you chose.
The fittings (connector) are the basis of the future decoration. We will attach fasteners and decorative elements to it. For our decoration we need one so that there are three holes or hooks at the bottom of the base and one at the top for a fastener (hooks).
Stylish DIY earrings
Sequencing:
- We start by dividing all the elements into two parts. We take the first nail and put two beads on it, preferably of different sizes. If you use wire, you will need to secure the end so that the beads do not fall off.
- We put three beads on the second nail.
- On the third - two again.
- Now you need to attach the “hangers” to the fittings: we thread each part into a ring and fasten it, use pliers or tweezers for convenience. Carefully cut off the remaining part of the wire or nails.
- We do the same with the rest of the details. Let's make the second earring.
- Now you need to attach the earrings (clasp): bend the ring at the bottom of the clasp and attach the earrings to the top of the connector, close the fastening behind the earring so that it is not visible. We do the same with the second earring.
Everything turned out quickly and beautifully!
The decoration looks stylish and elegant, even older women can wear it
What do we need
To start making beaded earrings with your own hands, you need to prepare wire cutters, scissors, wire, pliers, beads, beads, natural stones, earring hooks or earring hooks. Threads, ribbons and other auxiliary materials may be needed. The tools you will need are a glue gun.
In order not to lose a single bead, you will have to lay a special tablecloth. It should not spring, otherwise the beads will bounce onto the floor. A smooth surface is also not recommended for small parts. The most suitable material would be matting, linen or fleecy cloth. If you don’t have such materials in your home, you can use a plain wool blanket, but the pile on it should be small so that you don’t lose small beads in it.
How to choose beads for weaving
If you first decided to master this section of needlework, when you come to a store with goods for beading, you will be amazed at the assortment of the main material. Large and small, matte, shiny, long and short, similar to pebbles and pearls, of different colors and with unusual coating - the choice of beads can take several hours. Advice from professionals and knowledge of the classifications used by craftswomen in their work will help simplify the task. Beads are divided into:
- beads – classic round;
- bugles - long tubes;
- cutting - short faceted tubes;
- Charlotte - round with one flat side, which refracts the rays falling on it.
A few recommendations for choosing beads for earrings:
- If you don't exercise and want a piece of jewelry that will last a long time, buy Czech/Japanese material. Firstly, it is durable, the thread can pass through it several times. Secondly, the defect rate is minimal.
- For earrings, it is recommended to take the smallest beads - for Czech products these are numbers 24-20/0, the beads barely reach a millimeter in diameter. It is more convenient for beginners to work with numbers 15-12/0. The largest elements in diameter are 6.5 mm and this is number 1/0.
- Select the beads before you start weaving earrings - remove the defective elements, otherwise they will spoil your jewelry with its appearance.
Beaded tassel earrings
Earrings made of beads in the form of long tassels are an original decoration that can complement almost any look . After all, such handmade earrings will look good with both a long evening dress and a short everyday one.
To weave tassel earrings, we will need:
- silver beads;
- peach colored beads:
- waxed thread;
- thin wire;
- pliers;
- 2 oblong bead caps;
- ear wires;
- scissors.
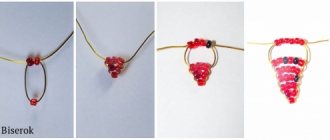
We follow the instructions:
- We measure 16 pieces of waxed thread, 16 cm each.
- At the end of each segment we tie a knot so that a small tail remains.
- We string beads onto each piece of cord in this order: 2 silver, 6 peach, 2 silver - and also tie a knot at the end.
- Now we bend the workpiece in half and divide the beads into equal parts. This way you will get 2 silver beads and 6 peach beads at each end.
- We carry out the action of the previous paragraph with all the blanks.
- We fix the pieces of thread with wire, as shown in the diagram.
- In total, you should get two bundles of 8 threads, folded in half.
- To hide the bend, we string a bead cap and a bead onto the wire. We make two copies.
- We form a small loop of wire. Pliers will help us with this.
- We fasten the earrings.
Even beginner needlewomen can weave such earrings from beads. If you make the tassel thicker and longer, you can get an original beaded keychain that can be used to decorate a bag or backpack.