Needlework
05.23.2018 Anastasia Prozheva
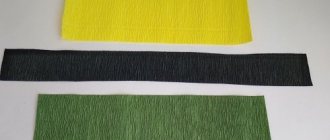
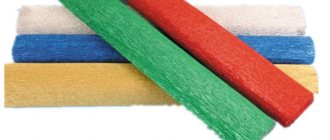
There is all kinds of paper - white, colored, watercolor, pastel, corrugated, cardstock, cardboard, scrap paper... The list can be endless. It varies in texture, density, and area of application. The same product made from different materials looks different. In some places, corrugated paper is suitable, but in others it is better to use colored coated paper. There are also many techniques for performing work from it. And for each technique certain types of paper are suitable. For example, we will make a sunflower from different types of paper with our own hands.
Simple application
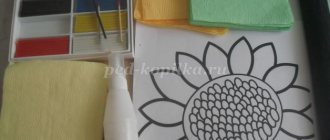
For this craft, it is better to take regular colored paper. Single-sided or double-sided, coated or velvet, or maybe you need to add corrugated - it all depends on the specific idea and the desired result.
For an applique with an element of weaving technique, we will use simple single-sided colored paper. In addition to this, we will need cardboard, glue, scissors, a pencil and a ruler.
First, cut out templates from cardboard, as in the photo:
They are very convenient to use when working with children, and also when many identical elements are required.
Having cut out these parts from colored paper, we prepare strips for weaving the core. It is advisable to use 2 colors. For a sunflower, you can take shades of black, brown, gray, or you can experiment with colors. The length of each strip is slightly longer than the middle, and the width is approximately 0.5 cm.
We glue the strips to the round blank from the inside. There should be no glue between the front side and the workpiece, otherwise weaving will not work.
Carefully weave, inserting a strip of a different color through one. It should look like this:
We also bend the ends of these strips back and glue them to the inside of the workpiece.
From yellow and green paper we cut out the remaining parts according to the templates.
Article on the topic: Crochet zigzag pattern: master class with diagrams and description of the model
Glue the parts together. The work is very simple, for kids. Teach them to distinguish color, shape, arrangement of parts. This craft can be attached to the refrigerator with a magnet or made into a postcard.
The core could have been made a little differently. First, make a weave from the stripes, and then cut it out and glue it. Do what is most convenient and easier for the baby.
Several options for this application in the photo:
Master class on making a garden sunflower for a foamiran rim
In this master class you will learn how to make the sunniest flower, which fascinates with its dense, but at the same time airy petals - a sunflower.
Materials and tools:
- - black, green and light yellow foamiran;
- - floral wire;
- — second glue (Moment);
- - scissors;
- - a sheet of paper for a pattern;
- - acrylic yellow paint;
- — pastel red, yellow and several shades of green;
- — mold with a longitudinal pattern;
- - sponge;
- - toothpick;
- - iron.
From black foamiran we cut one strip of 1x17 cm and another strip of 1.5x27 cm. We cut both into thin fringes. Cut off about 10 cm of wire and make a small hook at the end.
We fix the end of a narrow strip to the wire and twist it, lubricating it with glue.
Using a heated iron, thin out the middle, leaning it at a right angle. Lightly fluff with your fingers to create a natural look. We process a strip of 1x27 cm with an iron - we lean only the fringe itself so that it takes on a curved appearance.
Glue the strip, making 5 turns (5 rows). Pay attention to where the fringe “looks” (visible in the photo).
We make a template of a sunflower petal from paper. Since we are making this flower as a hair decoration, the petals, like the sunflower itself, should not be large. The petal measures 3.5 cm in length and 1.7 cm in width.
Transfer the petals to the foamiran using a toothpick. Cut out 26 petals.
We tint with red pastels. We print the petal on the mold, after heating it with an iron.
Glue the tip of the tinted petal. We make 12 blanks.
Glue the glued petals across the distance to the middle.
Add all the remaining 14 petals.
Let's see, if it seems to you that a petal is missing somewhere, then we make it and add it.
On paper we draw a 5-petalled sepal with a diameter of 7 cm. Cut it out and transfer it to foamiran. We make 2 similar sepals. We tint them with pastels of green, yellow and red. We make notches on the leaves. Place one leaf at a time on the heated iron, fold it into an accordion, and roll it with your fingers. You can speed up the process by folding the workpiece several times and scrolling through all the leaves at once with your fingers.
Since the sunflower’s “butt” is too flat, we raise the height with three circles of foamiran. The parts must be glued together.
We plant and glue the first sepal.
We apply the second one in a checkerboard pattern.
Using yellow paint we imitate pollen in the middle of the flower.
This sunflower can be glued to a hair elastic, but then the wire needs to be cut off. If you fix the flower to a comb, hairpin or wreath, it will serve as a connecting link.
A more complicated option
Let's make a more complex application. To do this, we will make a sunflower using the quilling technique. The material here is special quilling paper, which has a certain density. It comes in all sorts of colors, matte, shiny, metallic, etc. Choose the color scheme to suit your taste. The main thing is that the density is suitable.
Detailed master class on the “Sunflowers” applique using the quilling technique.
To work you will need:
- yellow and black quilling paper;
- pattern with circles;
- quilling tool;
- pins;
- cardboard;
- colored paper;
- PVA glue;
- green floral tape;
- wire;
- base paper;
- picture frame optional.
First let's make the petals. Here we use about 15 pcs. in every row. Rows of 2 per flower.
Roll a strip of yellow quilling paper, 60 cm long, onto the tool in the form of a roll. Unfold it in a template with circles up to 3 cm. Fasten the roll with glue, shape it into a drop, holding one side between your fingers and moving the other in the opposite direction.
Place a drop of glue in the middle of the roll and secure with pins until dry. Sharpen the edge so that the workpiece looks like a petal. Make enough of these petals for all flowers.
Let's start making the middle. Cut a circle with a diameter of 2-3 cm from black paper. Make each “seed” as follows. Make a tight roll out of black colored paper, gluing the edge. Using a tool, push the center up a little, giving it a pyramid shape. Drop some glue inside.
Article on the topic: New ideas for a do-it-yourself garden. Photo
Cover the entire circle with “seeds” without empty spaces.
For each stem, take a wire about 20 cm long and wrap it with floral tape. The latter can be replaced with paper of a suitable color.
Flower assembly. Cut a circle with a diameter of 3-4 cm and cut it along the radius. Glue in the form of a funnel. Attach the stem. Glue one row of petals to the edges of the funnel, then the middle and the second row of petals. On the other side of the funnel, glue a sepal made of green paper.
Leaves are cut out of green colored paper in a symmetrical, round shape. You can draw veins. For the picture you need 5-6 leaves of slightly different sizes. Glue them to the stem.
Having glued all the details to the background, you can frame it.
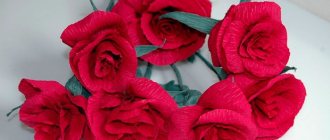
Sunflower made of corrugated ribbons
Materials:
- satin ribbons 2.5 cm wide, yellow and green,
- felt circle with a diameter of 4 cm,
- orange threads,
- padding polyester,
- tools: candle, mild knife, heat gun, scissors.
We make yellow pieces measuring 2.5x5 cm - 21 pieces, and green pieces measuring 2.5x6 cm - 12 pieces. To corrugate the tape, you need to heat a knife (it should not be sharp) over a fire, for example, on a candle for about 3 - 4 minutes. Then wipe it off from soot and draw a central vein on the front side of the tape, then draw one vein on the left and right. Turning the piece over, run a knife (you may need to heat it again) between the existing veins.
If you do not have the skill to create veins in this way, then you should practice on a piece of tape to understand how much you can heat the knife so that the veins are clearly expressed, but do not melt the tape. And also adjust the level of pressure on the tape.
Cut the top edge of the tape, melt it and stretch it slightly. At the base, fold the edges of the ribbon towards the center and melt it over the candle. Now let's bend the petals slightly, to do this we hold the edge of the petal over a candle so that it warms up a little, but does not melt, and bend it down with our fingers.
At the first level we will glue the leaves - 12 pieces. Next, two levels of yellow parts, the first 11 pieces, the second 10. From a felt circle we will make the center for the sunflower. Let's embroider a mesh with threads.
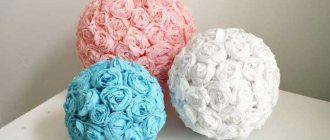
To make the center convex, glue a piece of padding polyester to the center of the flower, and glue felt onto it. From this sunflower I made a small topiary.
In the next master class we will make a sunflower using the kanzashi technique from inverted sharp petals.
A piece of summer
Beautiful works are made from crepe paper. The materials are easily accessible, do not require special tools, the complexity of the work varies, both a beginner and an experienced craftsman can find an interesting idea that is more complex.
Watch the video for master classes on creating a sunflower from corrugated paper: