Sometimes needlewomen are faced with a problem when a large number of small balls of thread or yarn remain, from which it is no longer possible to make anything worthwhile.
They often put all these skeins in a basket or bag, leaving them for the period when they finally figure out what to do with these small balls.
We confidently declare: after reading our article, you will no longer have to rack your brains over this issue, because we will provide you with several interesting ideas for using threads and yarn to decorate the interior of your own home with crafts made from woolen knitting threads and ordinary fine yarn.
An interesting hobby made from threads
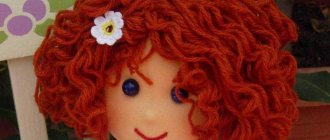
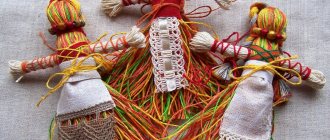
This hobby was invented a long time ago and quickly spread throughout the world due to its practicality, because it is impossible to calculate a skein of thread in such a way as to use it down to the centimeter. In addition, in ancient times, threads were the only way to make and give a doll to a child.
Now there is no such problem. The modern market offers a bunch of toys that can amaze your baby with their originality and uniqueness, but how can at least one of them compare with the one you made with your own hands, and into which you have invested a piece of your soul and boundless motherly love.
Well, if you make this masterpiece of handicraft together with your baby, then the process of making crafts from threads with your own hands will forever remain in his memory as one of the warmest moments in life.
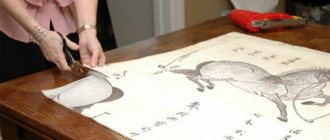
- From threads you can make not only thread crafts for children in the form of various dolls, cute animal figures, but also paintings, vases or decorations for lamps.
- Let's look at a few master classes that will make you a real master in this field.
Yarn paintings
If you don’t know how to use many small pieces of thread that are no longer enough for pompoms and kititsa, then make a picture from them. You don't need a large amount of materials for this. All you need is scissors, cardboard and glue, and don’t forget about the threads themselves.
Follow the algorithm of our lesson, and you are guaranteed an excellent result:
- On the cardboard, trace the contours of the pattern that will be created with threads. If you have printed the finished picture, then stick it on top of the cardboard.
- Now you have a long job ahead of you. It is necessary to cut all the threads into small, small pieces. Entrust this task to your child or do it with him. This will amuse him and at the same time force him to work a little. All pieces need to be sorted by color.
- Now start creating the painting. To do this, step by step, lay out threads of the same color on a heavily glued area of the design.
- This must be continued until there is not a single empty space left in the picture.
- Let the masterpiece dry and you can safely hang it on the wall!
Yarn flowers
If you have some floss or iris threads left, you can use them to create crafts from a ball or paper and threads in the shape of flowers of incredible beauty.
- To do this, you will only need threads, glue, a piece of newspaper, which we will use as a blank, scissors and wire.
If you want to make the flowers something original, grab ribbons and beads. Let's start our master class on crafts made from threads.
Manufacturing instructions
- Create blanks for flowers. This is quite simple to do: you just need to crumple a large piece of paper or newspaper and make a ball out of it.
- We will wind a thread soaked in glue around this homemade ball. We decided to create a composition of delicate white bells, so we needed a skein of white threads or floss threads with blue and white inserts. This combination will look very interesting and gentle.
- Once the ball reaches a large enough size and there are no gaps or “bald” areas on it, you should let it dry.
- After a few hours, you can return to working on your craft. Now you need to carefully cut off the excess from the ball, giving it the shape of a flower, in our case, a bell.
- Carefully thread the wire through these buds and secure each bell to it, decorating the fastening area with beads.
- To hide our wire stem, we again soak the thread with glue, this time we take a green thread and wind it around the wire.
Below you can see photos of crafts made from threads. We hope that, inspired by one of them, you will be able to create your own masterpiece.
Photos of crafts made from threads
Source: https://sdelajrukami.ru/podelki-iz-nitok/
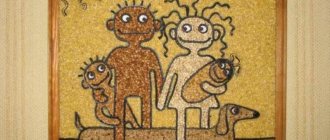
Combining different techniques on one craft
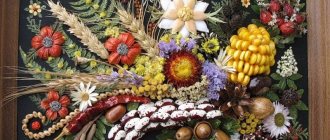
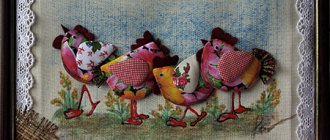
You can combine several techniques on one craft and create a real masterpiece that will delight you with its attractiveness. To work, you will need two pieces of cardboard, green and yellow wool threads, PVA glue and a brush, a prepared template with a pattern of several dandelions:
- pompoms are formed from orange or bright yellow woolen threads; to make the composition more realistic, you can make 1-2 white balls;
- the silhouette of curly dandelion leaves is transferred to a separate piece of cardboard, covered first with glue, and then with cut green threads;
- the castings are cut out, their contours can be outlined with a dark green felt-tip pen, which will give the applique expressiveness, and they are glued to the general template;
- even sections of flower stems are covered with sequentially glued green threads; you can use sections or lay them in parallel;
- Instead of buds of blooming dandelion buds, yellow and white pom-poms made of woolen threads are glued onto a pre-prepared template.
By combining several techniques for making appliqués from threads, you can create designs with different themes, violets and peonies. Children's toys and pictures with naturalistic motifs (seashore and setting sun, forest clearing or fungus in the grass) turn out great on appliques.
A simple and easy master class is perfect for creating crafts using wool or embroidery threads. A source of inspiration can be various photos that are already completed and realized crafts, and even for a novice craftsman or child they are not difficult to repeat. Thanks to the technique of thread appliqué, you can make not only interesting crafts with your own hands, but also beautiful decorations for your home and interior transformation.
What can you make from knitting threads with your own hands?
Hello everyone, friends!
Continuing the topic of using leftover threads, I want to offer you some interesting ideas on what you can make from threads for knitting with your own hands. We have already talked about what to knit, but what if you don’t want to knit or there aren’t enough threads? In addition, they can be very short, it’s still a shame to just throw them away.
What to make from thick wool threads for knitting
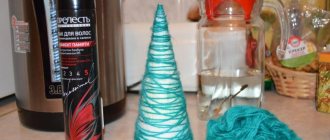
- The simplest thing that can be done from woolen threads is to decorate a variety of things with threads that are simply wrapped around the object.
- This includes the decor of flower pots, and jars for candlesticks, and bottles for vases, and photo frames, and bracelets, and small decorative Christmas trees that can be made on a cardboard cone, and large letters for various decorations and anniversary celebrations.
- I have already shown how to make a candlestick from a jar.
- Let me remind you once again how to make this kind of decor.
To decorate a bottle, for example, you will need thread, glue and scissors. It is better to take a more reliable glue, for example “Moment”.
How to do:
- First, coat the bottle with glue in the upper part around the neck.
- Apply the thread from the ball to this place, press it and begin to wrap the entire bottle around, tightly fitting the threads to each other so that there are no gaps.
- When they reach the bottom, they again coat the bottle in the lower part with glue.
- Having made the last turn, the thread is cut.
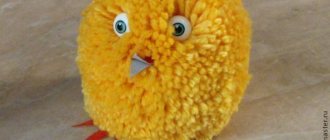
Craftsmen make various animals, birds, and dolls from thick threads. Those who are interested, I think, will easily be able to find the desired master class. You can see how to make a titmouse here, for example: https://www.diyideas.ru/pages/9859.html
It is convenient to make different feathers from short threads.
Several short threads are placed crosswise on the wire, pressed against each other, the ends are tied and straightened. To make the threads hold their shape better, they are dipped in a gelatin solution or PVA glue diluted with water.
Then the resulting workpiece is straightened and left to dry.
If necessary, trim to the desired shape.
If you have a lot of old colored threads, from which it is no longer possible to knit something, you can make wonderful fluffy pillows and rugs, we have a detailed description and drawing diagrams.
Well, pompoms, of course, can be made from knitting threads and crafts made from them.
Coziness from pompoms. How to make pompoms from yarn. Pom pom crafts
DIY mandala woven from threads
- Mandalas, which have become fashionable today, can be woven from threads.
- To do this you will need some kind of bamboo sticks and threads of different colors.
- The sticks are glued in pairs crosswise and threads are wound around them from the middle. To make everything clear and visual, watch this video:
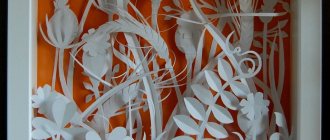
Panel made of threads and nails using string art technique
Not a new idea, but simply wonderful. Such stylish panels, paintings, and pendants can be made from simple thin threads using the string art technique.
- For the panel you will need a base - cardboard, plywood, polystyrene foam and other materials are suitable, a lot of small (in my opinion, decorative ones with beautiful hats are better, but not necessary) nails and thread.
- How to do:
- On the base, draw the outline of the future image with a pencil; you can use some template, find a picture on the Internet, print it and cut it out.
- Along the contour of the pattern, nails are driven in at an equal short distance from each other.
- And then they wrap threads around the nails, as if painting over part of the design with them.
Moreover, you can “paint over” a specific “hero” or do the opposite - wrap the space around him with threads. It also looks interesting and unusual.
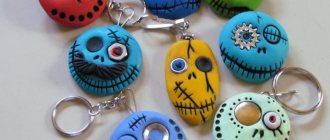
Openwork balls of thread
A type of creativity that has become popular is openwork balls made of thread and glue. Such balls are an excellent element of room decor, both large and many small ones in a single composition.
And here the fantasies are limitless. Using this technique, you can create chandeliers and vases; you can make Christmas tree decorations, snowmen, and even Easter eggs from thread balls.
How to make a ball of thread:
In addition to threads and PVA glue, you will also need a regular round balloon. It needs to be inflated to the desired size and tied.
- Thin threads are passed through a plastic bottle with glue using a needle and begin to wrap around the ball in a chaotic manner.
- After drying, the dried threads must be separated from the ball with a blunt object, being careful so that the ball does not burst.
- And then they pierce the ball, release the air from it and take it out through the strings.
Learn to draw
For this technique of creating panels, you need to very finely cut the threads that will be used in the work. It should be remembered that the smaller the pieces of thread, the more beautiful and uniform the result will be. The creation principle is the same as described above. A drawing is applied to the cardboard, the main contours are made in contrasting colors, and the rest of the space, using threads and glue, is filled with pieces of threads. Of course, creating a panel will require patience and perseverance, but the result will be very similar to the real picture.
To create, you can attract little helpers; children will happily help adults and be proud of the results of their labors. A fluffy picture framed will be a good decorative element for a child's room.
Related article: Knitted cat hat: description and diagrams in a step-by-step master class with video
Nitography for beginners, non-traditional drawing techniques, iso-thread paintings and diagrams
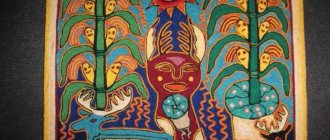
Nitcography in our country is popular, first of all, because of its low cost. It got its origins in Mexico.
Experienced craftsmen create entire paintings from woolen threads that amaze with their subjects. They can not only embroider and knit, but also draw.
You can use a small scrap of thread that is left over, for example, after knitting a scarf, to create a real masterpiece.
Recommendations for Beginners
Each type of needlework has its own secrets, and drawing in thread printing also has its own tricks that will help inexperienced craftsmen create their first masterpiece. It's best to start with small, simple designs that don't have intricate spirals or patterns. When you learn how to form coils and bend the working threads properly, you can move on to plot images.
In this work you need to use thick glue; more liquid options will be absorbed into the base and, ultimately, will not adhere well.
If you are using old ones that were the base of a sweater, for example, they need to be straightened, otherwise they will not lie flat on the cardboard.
Remember that the thicker you choose the main working material, the more voluminous your picture will be. You can push them closer to each other using a knitting needle or a regular toothpick.
After each application, press them with your hand or a handkerchief to help them adhere better. If you glued the thread incorrectly, you can tear it off before it sets or glue it with the same toothpick with glue applied. Round patterns are made in a spiral, and long ones - from right to left. By following simple recommendations, you can get spectacular prints without significant effort and time.
Embroidery materials
To complete the painting you will only need:
- wool threads
- glue
- base (cardboard, fiberboard, velvet paper)
- paints
Thread graphic drawings are completed very quickly; even schoolchildren can cope with this task. You need to decide on a design in advance and apply it to cardboard or velvet paper. Next, use a brush to apply glue to the composition and make contours using threads. It is best to take woolen ones, they are denser.
After this, they begin to fill the middle of the figure; they can be placed either gradually or chaotically, the main thing is that there are no white spaces between them. They should fit snugly against each other. After the image is filled in, the design is ironed through a thin cloth or gauze.
This is where the work actually ends, all you have to do is frame it and give it to a loved one or decorate your interior.
Isothread
It would seem that the drawing technique in nitkografiya cannot be any different, but there are several more nitkografiya techniques - isothread and drawing with threads.
Isothread - involves drawings with threads without using an adhesive base. They are pre-placed in the right places and secured to the cardboard with special nails or pulled through holes in the base.
For the first time they started talking about it in England, craftsmen applied weaving to boards with pre-filled nails.
Over time, it found widespread use and thick cardboard began to be used instead of the boards that had been used before.
Tips for this type of needlework
Using the above technique, you can embroider large panels, landscapes, portraits of people, book covers and individual ornaments. It’s very easy to master, you just need to carefully follow the recommendations and evenly pull the strings.
To explain it in more understandable language, you need to put certain designs on the cardboard - this could be, for example, an acute angle. On both sides of the angle, numbers from 1 to 6 are applied in different directions. The angle itself is designated by point 0.
Next, pierce the base with a needle and connect identical points.
In round figures, dots are applied like a dial. On the wrong side you need to tie a knot and pull the needle onto the face of the picture at point 1, then stick it into the opposite number and stick it from the wrong side to point 2, do this in a circle.
It is important to apply them with a marker, which disappears, or with a pencil, which can later be erased. By filling the round figure on the front side, you will get a pattern that resembles a star, and on the back, the thread simply follows the contours of the figure.
That is why you can control the correctness of the creation of the work.
There are a huge variety of patterns for isothread needlework; you can copy them on the Internet or invent them yourself. The main thing to remember is that the number of points in one figure should not exceed 12, otherwise you will simply get confused with opposites.
Scheme:
Drawing with thread
This will be very interesting for working with preschool children. All you need to do is soak the wool thread in the dye. Before starting work, it is better to fluff it up; it will give the composition an impressive effect. You can draw on a regular A4 piece of paper. Place it dipped in paint on a sheet and cover with a second sheet.
How to make a panel of nails and threads in the form of a tree: master class
Today, the creation of such unconventional masterpieces from the most ordinary materials is welcomed. The technique of creating panels requires care and patience. The end result of such an interesting work is impressive in its originality.
We recommend that you familiarize yourself with the creation of volumetric panels on this page:
To work you need:
- Paper tree template and pencil;
- Fiberboard;
- Plain or multi-colored threads;
- Small nails and a hammer;
- Paint and brush;
Several trees can serve as a template for the panel, but then the weaving will be a little more complicated. Then the trees must be connected very carefully to each other so that the visual density of the background does not differ from the general space. Let's look at creating a panel using an example with one silhouette.
The process of creating a panel:
- First of all, you need to prepare a sheet of fiberboard;
- We attach the template to the fiberboard and carefully trace it with a non-greasy pencil;
- We mark the silhouette of the tree with nails at a distance of one centimeter;
- We make markings along the edges of the fiberboard in the same step, driving in nails to an equal depth (1/3 of the nail height) and at the same distance using pliers;
- We tie a thread around the nail and carefully tie an inconspicuous knot under the head.
- We begin to wrap the nails one by one, connecting the perimeter with those that highlight the silhouette of the tree.
The main task is to fill the space around the tree. The threads should not intersect the design inside. There are a significantly larger number of nails around the perimeter, so those that highlight the silhouette can be used several times. To do this, it is worth lowering each turn below the cap. At the end of the panel, you should make a small knot and hide it under the nail head.
You need to select nails of the appropriate size so that when driven in they do not peek out from the back of the base.
New works using the Isothread technique
“ Thread graphics (isothread, thread image, thread design) is a graphic image made in a special way with threads on cardboard or other solid base. Thread graphics are also sometimes called isographics or embroidery on cardboard. You can also use velvet (velvet paper) or thick paper as a base. The threads can be ordinary sewing, wool, floss or others. You can also use colored silk threads.” (Material from Wikipedia)
At the same time, all variations of the name are “walking” - most often embroidery on cardboard is called isothread Since no one wrote a dissertation and no one tried to clearly define the name, any name will lead to the same technique and will practically mean the same thing. The same technique, but performed on tightly stretched fabric, became known as the “chord stitch” - the author patented her name and technique.
In the English-speaking “West” they use the name “ embroidery on paper ” - embroidery on paper.
Sometimes the name “ paper embroidery ” is found, less often “ Form-A-Lines ” - forms made from lines. The same thing, but in French “ broderie sur papier ”. In German-speaking countries, “ pickpoints ” are dotted patterns.
You can see examples of crafts using this technique in our gallery.
| ????String art????Home decor for the New Year????... Anna Kokhan Painting, panel, drawing 2 2 | Snowman and Angel Aarinka Painting, panel, drawing | Painting - night light made of threads Olga Karpunova Video, Painting, panel, drawing, Master class 1 | Transparent earrings with embroidery Yanochkina Marina Video, Master class, Decoration 2 |
| The Sun and the Moon are two miracles in this world... hobby66 Painting, panel, drawing 1 8 | Preparation of a cosmetic bag Yulichka Malova Craft, product, Project | Witch's book Yulichka Malova Decor of objects 1 | Moonlight Sonata Yulichka Malova Painting, panel, figure 3 |
| Anubis Yulichka Malova Painting, panel, drawing | Pagada Yulichka Malova Painting, panel, drawing | Mandala Yulichka Malova Painting, panel, figure 1 | Monad Yulichka Malova Painting, panel, figure 1 |
| Fantasies from Kharusin threads Painting, panel, figure 8 | Spring Festival. Morozova Irina Painting, panel, figure 1 | Isothread Irina Yufereva Craft, product, Congratulations 1 | Art - project “Bird of Happiness” Lor@ Craft, product 4 |
| gift, decor, embroidery. ermiv Painting, panel, figure 2 | Art project “Bird of Happiness” by LiLeKa Craft, item 38 | Postcard for March 8. Isothread and… karina Video, Postcard 1 | Flower for mom for March 8 GalinaVik Crafts, product 3 12 |
| Isographics. Irina Sheveleva Painting, panel, drawing, Team work, Photo report 4 | Leather earrings with embroidery Yanochkina Marina Video, Master class, Decoration 3 | ATS Flowers and threads. Sunflower CLOSED Inquisitive ATS card 3 90 | Spring is coming!! KINDERGARTEN Crafts, product 9 6 |
- 1
- 2
- 3
- 4
- 5
- 6
- 7
- 8
- 9
- …
- 100
- →
Source: https://stranamasterov.ru/taxonomy/term/452
DIY string art - master class
So, you have bought everything you need and are ready to start string art. Where to start? To begin with, you should master simple patterns, or better yet, use ready-made master classes or repeat the ideas of experienced needlewomen. Today you will learn how to make various crafts from nails and threads, learn about the basic principles of decorative weaving and creating incredibly beautiful patterns.
Heart
You should start getting acquainted with a new type of art with the simplest images, for example, making a heart out of threads and nails with your own hands. Even children can do this craft if adults help drive in carnations. In addition, such string art can be a great gift or just decorate a wall in your bedroom. This step-by-step master class will make your task easier:
- On a blank sheet of paper, draw a neat heart with a pencil.
- Place points where you are going to nail. It is important to make marks at the same distance; the appearance will depend on this.
- Place the paper against the plywood. Drive the nails into the places that you previously marked with a pencil.
- Remove the paper template from the nails. Use tweezers to remove any remaining clean sheet from the plywood.
- Make a neat knot on the central top nail and pull the tip of the thread diagonally.
- Continue wrapping the rope around the nails so that each new wrap creates a sharp angle.
- Once all the studs are tied, secure the end of the thread and carefully trim the tail.
- Potato cookie cake - recipes with photos. How to make homemade potato cake, like in childhood
- Cooking eggplant caviar in a slow cooker
- Adrenogenital syndrome: a disease in newborns
Flower using isothread technique
Having learned how to embroider a circle or corner using the string art technique, you can easily move on to creating simple flower arrangements. The next step-by-step master class will teach you how to create flowers using the string art technique using the simplest example - dandelions. To work, you only need a sheet of paper, a pencil, an awl and thread of two colors: white and green. Step by step floral embroidery iso-thread looks like this:
- Starting at the top of the sheet, draw three circles in random order, each 5-6 centimeters in diameter.
- To get many dandelion inflorescences inside the circles, draw another small circle, from which draw 5 connecting lines upward.
- Make the stems and draw the leaves of the future flower. Make the necessary punctures.
- Embroider dandelion inflorescences with white threads in a circular pattern, starting your work from the very center. Remember that each part of the large circle is a separate inflorescence.
- To make the leaves voluminous, divide them into several triangles and embroider them with green threads according to the principle of the corner.
- At the very end, use small stitches to connect the base to the buds.
Portrait made of nails and threads
Having mastered simple pictures of a heart and flowers, you can proceed to more complex compositions and weave a portrait using the string art technique. You can take a ready-made photo of your pet, try to bring it to life, or depict the figures of movie characters with threads. As an example, take the monochrome portrait of lovers from the following master class on string art:
- Drive nails around the entire perimeter of the plywood sheet.
- Cut out a couple in love so that they represent a single whole.
- Place the image in the center of the panel and make marks for the nails with a pencil.
- Remove the paper and drive the nails in at equal distances.
- Start filling the picture according to the principle of creating sharp corners, but not from the central part, but by drawing only the general background with white thread.
Deer
Do you want to decorate your apartment in Scandinavian style? To do this, you only need an aged flat piece of wood, white threads, decorative nails with a small head, a hammer and a few hours of free time. Using the string art technique, the deer from the next step-by-step lesson will look almost like a real one. The creation principle is as follows:
- Clean the surface from excess chips and cover with a layer of varnish. If desired, the board can be painted any color.
- Print out a large stencil of a deer's head and cut out the design along the outline.
- Place a piece of paper in the center of the wooden sheet. Make marks for driving in at a distance of 5-7 mm. This step will be easier if you use graph paper.
- Carefully drive in the nails and start creating a masterpiece from the very bottom of the picture.
- Fasten the tip of the thread to a nail and make a general outline, drawing the yarn like a snake around each nail.
- The further process is a matter of taste. You can use straight geometric lines or distribute the thread randomly inside the outline.
String art tree
A DIY thread tree will look very symbolic on the wall. Coping with its creation is as simple as weaving a heart from isothreads. All you need for this picture is: a piece of smooth plywood, a hammer, chalk, green thread and nails with a beautiful head. Then just follow the step-by-step instructions:
- Draw a sketch of the tree in chalk on a wooden board, trying not to create too many small details, but rather working out the outline.
- Then drive the nails in at a distance of about 1 centimeter from each other and erase the chalk outline with a damp cloth.
- At the base of the tree, tie the tip of the thread and start by creating an outline using the same principle as in the previous master class.
- Having completed this stage, run the thread in a chaotic manner, first at the roots of the tree, then on the trunk and branches.
- Make as many straight lines as you wish.
Ship
This type of needlework is good because even small children can be taught it. On one of your free evenings, try making a craft out of thread and cardboard with your child. Such works are popular in preschool institutions and even take first place in handmade exhibitions. Let the boat become your first joint craft. The principle of its implementation is as follows:
- On the back side of the thick cardboard, draw a right angle with a vertical line 10 centimeters long and a horizontal line 5 cm long.
- Step back 2-3 mm to the left and repeat the size of the image in mirror image.
- Draw a semicircle below. Using an awl, make holes in the cardboard that are equal in length.
- Start embroidering with blue thread from the right corner. Pass the needle through the bottom outer hole from the wrong side.
- Draw a straight line to the top, turn the work over and thread the needle into the adjacent hole.
- So make 9 parallel lines and start working on another sail.
- To do this, change the thread to a different color and embroider the sail according to the classic principle of filling the corner.
- Use diagonal lines to fill the bottom semicircle with contrasting thread.
Owl in isothread technique
Birds are a symbol of flight, lightness and freedom. However, not every type of bird has such a clear and simple symbolic meaning. For example, the owl is considered a symbol of chastity, insight and the ability to foresee the future. This bird is depicted in all types of needlework; in the string art technique, the owl was no exception:
- On a blank sheet of paper, draw a general outline of an owl, make two large eyes, outline the wings and tail.
- Transfer the sketch to a piece of plywood and secure with nails, being careful not to leave large gaps between them.
- Select a thick brown thread and outline all the contours.
- Arrange the lines in a random direction so that each stud is involved in the work.
- Additionally, take a white thread. Shade the chest area and wings by making a few diagonal stitches.
- Finish the work by tying the end of the thread in a tight knot.
Panel made of threads and nails
String Art is a technique of creating an image using threads and nails. At the moment, it is gaining momentum in popularity, because the unusual always arouses interest. In this article we will look at how to make a panel from threads and nails using the String Art technique with your own hands.
Creative panel
You will need: plywood, white acrylic paint, brush, hammer, nails, thread, pencil, ruler, adhesive tape, 6 white A4 sheets.
Master Class
- Paint the plywood with white paint, then leave to dry.
- Print the template from this link.
- Glue 6 sheets together as shown in the image.
- Place the template on the plywood and secure with tape.
- Drive nails at the marked points at the same depth.
- Remove the paper template.
- Braid the letters OK, then fill the main background with threads, following the photo instructions.
- Weave threads through the middle of the letter O.
A creative panel made of threads and nails is ready!
Deer
You will need: a wooden board 20x30cm, nails, black cotton threads, black and white acrylic paints, brushes, hammer.
Master Class
- Paint the board with white acrylic paint, then wait until it dries.
- Print out the outline deer template.
- Place the template on the board, fix it so that it does not move.
- Take one nail and a hammer, then make light nail holes and remove the template.
- Drive the nails into the designated points to the same depth.
- Wrap the black thread around the outline of the deer and its antlers as shown in the image.
- Wrap the black thread around the inner outline of the deer, following clear geometric lines.
- Wrap the nose and horns with an additional layer of thread.
- Paint the nail heads with black acrylic paint using a thin, stiff brush.
The geometric panel “Deer” made of threads and nails is ready! I recommend watching this video!
Number
You will need: a board or foam board, colored paper, stationery pins or nails, thick threads, scissors, glue, number template.
Master Class
- Print and cut out the number.
- Place paper on the board.
- Place the number template on the board and insert the nails along the outline.
- Remove the template.
- Wind the threads around the nails in a chaotic manner.
The figure using the String Art technique is ready!
Heart
You will need: white cotton threads, nails, hammer, sheet of paper, pencil, scissors, black satin ribbon.
Master Class
- Fold a piece of paper in half and draw half a heart.
- Cut it out and unfold it.
- Draw serifs along the contour of the heart at the same distance.
- Attach the paper heart to the board and drive the nails along the contour of the template in parallel at the same depth.
- Remove the heart template.
- Wrap the thread around the bottom stud, then wrap around the outline of the heart.
- Make vertical parallel winding, then horizontal, following the photo instructions, this heart is filled with winding threads in 4 different directions.
- Tie a ribbon bow, then attach it by decorating the heart.
The heart using the String Art technique is ready! I recommend watching this video!
Scheme
There are various schemes for winding threads on nails. The most popular is the chaotic scheme. In it you can wind the threads as you want. This method is used not only by beginners, but also by talented craftsmen. You can familiarize yourself with the rest of the schemes by viewing the photo gallery.
Templates
Panel balloon
The finished product using the string art technique will be an excellent gift. This master class describes the creation of a panel made of nails and threads in the form of a multi-colored balloon:
Upon completion of the work, paint the heads of the nails in the color of the threads along the contour of the design - then the craft will look neater.
Painting using nails and thread
We will need:
- plywood; - wood stain; - gloves; - yacht varnish and brush; - newspapers; - scissors; - nails (it is better to choose carpentry or furniture nails, we used - “Blister carpenter’s nail copper-plated”); – hammer; – threads .
Stages of work1. First of all, you need to prepare plywood of the required size. If your plywood is too large, you can use a saw to cut it down to the size you need. The thickness of the plywood should be at least 4-5 mm, otherwise difficulties may arise with driving in nails.
2. To give the wood a beautiful color, use stain. Wood stain can be purchased at a hardware store or you can make it yourself, as we did. The recipe for making it at home. You will need 1 cup vinegar, 1/3 cup ground coffee or tea (we used black tea) and steel wool. Place all ingredients in a jar, close the lid and leave for 2-3 days in a dark, cool place (for example, under a closet or bed).
This stain has a very specific smell, so you should work outdoors. Wear heavy gloves and use steel wool to apply the stain in a circular motion.
Don't be alarmed that the stain appears transparent and doesn't color the wood at all. Apply several layers and leave to dry overnight outdoors or in a very well ventilated area. If you decide not to experiment and purchased stain in a store, then apply it to the wood in several layers and leave until completely dry.
Popular articles Funny set with butterflies for fashionistas
3. When the surface of the painting is dry, proceed to varnishing. It is better to apply varnish in 2 layers. The varnish coating will protect your creation from dust and fading.
4. Using newspaper, make a template for the future painting. This will greatly simplify the work and make it clear what the painting will look like at the final stage.
Mark the places on the newspaper where the nails will be driven in to determine the number of nails needed.5. Drive the nails slightly above the newspaper line or into the edge of the newspaper, evenly spaced apart. The nails should be driven in very lightly. They should fit snugly and steadily on the board, but not stick out from the back wall.
6. Maintaining a distance between the nails, drive them along the entire perimeter of the template.
7. Carefully remove the newspaper template
If small pieces of newspaper remain near the carnations, they can be carefully removed using tweezers or a large needle.
8. Tie the edge of the thread tightly to one of the nails.
Next, tie the thread diagonally around the nail.
Continue tying threads around the carnations. Sharp angles should form between the threads.
9. Continue drawing until almost all the carnations are tied. Tie the thread tightly and trim the remaining tail.
Next, you can add threads of some contrasting color and add brightness to the picture. Tie a new thread to a loose stud and continue in the same manner. A new thread can be pulled not only over the first color, but also under the first threads and between them. This way you will achieve the volume of the drawing.
How to make a thread painting with your own hands
Here are simple step-by-step algorithms for creating a picture from threads.
Nitography:
- Place your chosen design under glass (if you used it as a basis) or transfer the contours of the image onto the base.
- The first step is to glue the outline with threads. Do not apply glue to the entire contour at once - work in small fragments. Press the threads firmly against the adhesive base and, if necessary, correct the outline with a stick.
- The second step is to fill the space between the laid contours with threads. The threads can be laid in a spiral or in strips. Try to pack them tighter.
- We fill in the background at the very end. The finished painting can be framed.
To create paintings from threads you need to prepare very few materials and tools.
String-art:
- Transfer the outlines of the drawing onto the base with a simple pencil
- Carefully hammer in the nails along the entire contour in small increments (about 10 mm or more often if the design requires it).
- Select a starting point and secure the thread to the nail. Wind the stretched thread around the hammered nails to create a pattern.
- When finished, secure the tip. If necessary, the nails can be driven deeper.
Such paintings are now in great demand.
Flocking:
- Transfer the image onto the base.
- Prepare the “paints” - finely chop the threads of the desired colors and place them in containers (plastic containers, cups or saucers).
- Coat the selected fragment of the pattern with glue and glue the thread crumbs. Move through the colors - move on to another color after you have done all the pieces of the first color. The background in this technique is done last.
Flocking is a method of applying very short (2-6 mm) fibers, called flocks, onto some kind of substrate such as fiberboard. fabric, cardboard, paper.
Philumica:
- In this technique, you do not need to transfer the drawing to the base; you can simply put an inspiring picture in front of your eyes or create directly “on the canvas”.
- Let's disassemble the selected frame and glue the fabric background onto the base (back wall of the frame).
- We lay out the prepared threads and shreds according to plan. The advantage of this technique is that you can experiment directly from the base without fear of ruining something. The best option will be the one you like.
- Cover the finished picture with glass and place it in a frame.
Scraps of various fabrics, threads, ribbons, lace, in general, everything that is necessary in sewing are used.