Mosaic strand of beads: master class and weaving pattern
Today we will tell you how to weave a mosaic strand of beads using a master class and a detailed weaving pattern.
There are many techniques and types of weaving that can be used to weave an endless variety of necklaces and bracelets. Today we will try to learn how to bead a dense or mosaic strand. Using this weaving method you can create beautiful jewelry.
Tools and materials Time: 2 hours • Difficulty: 3/10
- beads of any color;
- beading needle;
- fishing line
Hobbies are wonderful, but at the same time, every person, especially the fair sex, should remember about their appearance and everyday issues, we invite you to familiarize yourself with one interesting online store https://bonprixss.ru with free delivery and other interesting bonuses!
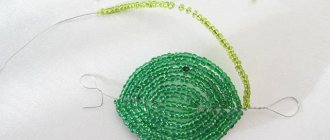
This mosaic strand of beads is woven very simply. Below is a diagram that does not need much explanation.
Weaving pattern
Click to enlarge
- First, we perform three rows of the pattern, then repeat the last row to the required length. We finish the work by following the diagram in reverse order. That is, we reduce the number of beads in each row to the initial number.
- We attach fasteners to the ends of the harness. The product is ready, now you can start trying on.
- A long necklace without clasps will look great. In this case, the tourniquet is pulled into a knot at chest level.
Weaving a dense (mosaic) strand of beads is one of the classic lessons in beading technology.
This decoration will be a wonderful addition to any outfit, the main thing is to choose the right color. Or you can use the same weaving pattern and master class to make an original necklace (bracelet) for special occasions, using beads of various colors. A set of such jewelry is an excellent gift idea for your mother or close friend.
Similar materials
pleteniebiserom.ru
Patterns for weaving square beads
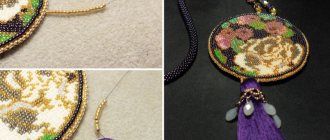
As already noted, a square strand of beads can be an excellent basis for a necklace or bracelet. In this case, the main colors of the beads correspond to the overall palette of the decoration, and the strand itself is monochrome. If a beaded rope should become the leading accessory, then you can use different color combinations of beads, weaving original patterns.
I will attach the weaving diagram below. The figure shows the beginning of weaving; arrows indicate the further direction of the thread. A circle of one color or another on the diagram, as a rule, indicates a bead. a rectangle can indicate cutting, cylindrical beads. The more detailed the diagram is, the more accurate the decoration will be, and the pattern will be conveyed with particular precision.
However, you need to understand that no matter how good the diagram is, it only helps to create complex weaves of the rope and give ideas for the formation of unusual knots and angles. Square bead weaving in the technique of creating the rope itself corresponds to the classic one. Please note that you will also need to learn how to start and finish the job correctly. In order to master the techniques, it would be a good idea to take several beading lessons.
Mosaic strand of beads
Share the news
A simple weaving pattern and an original look make this type of braid very popular among beginning craftswomen.
The number of beads in a row should be odd, and the smaller the number, the more elegant the finished decoration looks.
When weaving a rope of beads with a needle, do not forget about the tension of the thread - it should be the same along the entire length of the product.
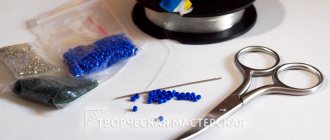
Materials and tools
You will need:
- beads of various colors;
- beading needle;
- fishing line or thread.
Operating procedure
The required number of beads are placed on the thread. The needle is inserted into the first bead and the thread is pulled through. Leave about 15–20 cm of thread from this end - it will be needed for fastening.
They begin to weave the second row: having strung one bead, the thread is pulled through the element of the 1st row in a checkerboard pattern (3, 5, and so on).
The third row is woven in the same way, capturing the beads of the second row with the thread.
When the product reaches the required length, the first 3 rows are unwoven. In this area, the weaving is not dense and even enough, and it is redone.
The initial row is connected to the final row or, if a necklace is being woven, accessories for jewelry are installed.
Decorating the ends of the product
Bead strand ends are made according to the following scheme:
- The free end of the thread 15 cm in front of the first row of the tourniquet is threaded into a needle and pulled through 3-5 beads.
- The thread is secured between the elements, forming a loop knot.
- Pull the thread through the adjacent bead and secure it again with a knot.
- Repeat several more times.
- Pull the needle through 3 beads, cut the thread with scissors, leaving a 5 mm tip.
- Using a match, the thread is carefully and quickly melted.
Important! If the rope consists of light-colored beads, it will turn yellow from contact with fire. To secure the thread in such a product, a larger number of knots are placed, the thread is simply cut.
Video tutorials on weaving a mosaic strand of beads
needlewoman.org
Dense mosaic plait
Starting work, we list the necessary materials and tools that we will need:
- Large black beads;
- White fishing line size 0.2 mm;
- Beading needle;
- Lock details if you are making a necklace or bracelet.
In the process of work, we must necessarily imagine the meaning of the scheme that guides us.
I would like to note that such mosaic strands of beads are very flexible and ductile. You can easily change their shape, but then they always return to their original position. Let us also add an important detail that it is possible to make such a decoration even if there is no diagram. You need to have sufficient experience and use your own intuition. In general, the weaving technique is the pattern we need. When you get close to the fastener, you need to gradually reduce the amount of material to narrow the diameter of the cord and secure the fastener. We begin beading the rope and collect seven beads on the needle. After this, you need to make a ring out of them, for which we move the needle in reverse to the very last part and tighten the thread. To secure it, let's pass a needle through several beads. Mosaic weaving of the rope is done in a circle. By passing the needle through each hole of the beads, beads are gradually added. To be more precise, beads are added one at a time. One part is simply pierced with a needle, and the other is doubled by stringing a bead. This is the weaving pattern that we must follow. This is how we continue our mosaic weaving, passing one bead, doubling the second, and so on in a circle through one piece.
To better master this technique, you can watch step-by-step photos or a video lesson. We can weave any length of rope, depending on what product we want to get. At the end of manufacturing the selected length, you need to strengthen the fastener.
Read
Master class on weaving scarlet carnations from beads
How to weave a bracelet from beads: mosaic strand
Continuing the theme of bead strands, it is worth giving a description of how to weave a bead bracelet using the mosaic technique. This is perhaps the second most popular principle of braiding after the American one.
Features of the mosaic harness
— Flexibility – average. It bends, but not roundly, but with kinks.
- Hollow inside.
- Weaving - with a needle and fishing line (thread), sequentially, in a circle.
— A pattern can be woven by drawing a pattern and following it while weaving. You can take a pattern for a beaded rope as a basis and adjust it while weaving; fortunately, it’s not difficult to redo a couple of rows.
— There is no need to collect beads in advance.
— The evenness of the beads is medium.
— Application: beads, bracelets.
Mosaic strand weaving pattern
So, to weave a mosaic rope you need a thin needle and beading threads. You can take monofilament or thin fishing line, it is easier to weave with them and they hold their shape better, but over time the fishing line stretches, deforms, breaks, and the knots on the fishing line are not as strong as those on threads. We put metal caps on the ends of the harness and attach a lock using a pin. You can connect the ends of the harness and sew them end-to-end with the same fishing line or thread.
The mosaic strand is woven in a spiral, one bead at a time; the inside of the strand is usually empty; to give it a shape, you can place memory wire inside, for example.
The rope (cord) of mosaic weaving can be made narrow or wide, it depends on the number of initial beads in the first row. We put an odd number of beads - five, seven or more - on a thread, close them in a ring, and then, following the pattern, sew along the beads until we reach the desired length. The process is slow, so mosaic strands themselves are not as common as crocheted ones. The strands discussed in this article are not so flexible, but weaving them with a pattern is easier, because the mistake is easy to correct.
And it’s even more easy to weave with the desired pattern if you make a mosaic strand according to the principle of stitching a mosaic fabric with a tube. For this - the second - method of weaving a mosaic strand, a mosaic fabric is woven in several rows, and then sewn into a hollow tube at the joint. And it’s not difficult to calculate the selection of beads and draw up a diagram for the mosaic canvas. There will be a separate article about the principle of mosaic weaving.
What is a mosaic tourniquet?
So, what can you do with a mosaic rope? A harness with a pattern, a bracelet, a lariat (the principle is the same as a lariat made from an American or knitted harness). In fact, it is so similar to a crocheted rope that the methods of using them are similar.
author unknown
Here, for example, are mosaic bracelets embroidered on one side with beads and beads on memory wire.
Author: Jeannette
There is an option to embroider the rope with beads and stone chips or weave them in as the rope is created, replacing every second or third bead in the pattern.
Author: Natalina and Lorca
An interesting solution was proposed in an American magazine. It is easier to weave such short cords with a mosaic than to knit them. The intricacy of the strands is clearly shown in the illustrations, and the principle of thickening the strands on one side is clear from the diagram, although thickening may not be necessary to create such a bracelet or necklace.
Of course, the most interesting version of the mosaic strand is the wave effect that is formed if you take beads of different sizes.
Weaving pattern with wave effect.
You need at least three different sizes of beads. This is not an easy task - collecting so many sizes of beads of suitable colors, but the result is worth it. Perhaps, due to difficulties in acquiring beads, there are few Russian craftsmen who would thoroughly experiment with the colors of wavy mosaic strands. Foreign craftswomen offer more diverse options. The degree of waviness depends on the number of sizes of beads used.
author unknown
author unknown
The weaving speed of such a rope is 2 cm per hour. Not for the faint of heart))) The result is a rather massive bracelet (or necklace), hollow inside. Over time (after a year), if the rope is braided on a fishing line, it loses its shape a little.
author unknown
Weaving a bracelet from beads using the mosaic technique is akin to a feat, but it is an interesting option for those who want to diversify their jewelry collection.
Author: Tanushkin_biser
pletenie-biserom.ru
Bead strand - weaving pattern
Bead strand
Contents of the article:
Weaving a rope of beads is another type of beading technique. Such strands are often used in the manufacture of necklaces, bracelets, belts, bag handles and other similar jewelry. One of the several positive qualities of bead strands is their plasticity; in addition, you can safely experiment with colors and patterns, creating a new, unique strand each time. Today we will tell you how to weave a strand of beads, what types of strands there are, and clearly demonstrate this on video.
Bead strand weaving pattern
Bead strands are quite painstaking work that requires attention and patience. A strand of beads, the weaving pattern can be of several types - mosaic, openwork, square, twisted and American. In general, they are all similar, but there are still certain differences. We offer an example of weaving a strand of beads in a video to watch the implementation of these strands:
Mosaic harness:
Openwork tourniquet:
Square harness:
Twisted tourniquet:
American:
Bead braiding for beginners
Weaving strands with beads for beginners should be started after you already know the basics of beading. Choosing rope as the first beadwork you want to make will not be a good decision. It’s better to start by practicing on simpler jobs, and having learned a little, start weaving strands. An excellent help for you in this matter will be weaving a rope with beads in a master class from experienced needlewomen. Using these videos as an example, you can study in detail all the features of the style. We bring to your attention several training videos:
Crocheting a rope of beads
Crocheting a rope of beads is often called bead crocheting. Since the work uses a crochet hook and threads, and the technique of making it is really very similar to knitting. If you have not done knitting before, then the best way to master crocheting a beaded rope is to watch the video:
American rope weaving
Another interesting type of rope is weaving an American rope from beads. His scheme is not complicated enough, and it will be easy to repeat it. There is no need for a hook; ordinary tools - beads and fishing line - are enough. But the finished products turn out to be voluminous and very beautiful. You can verify this by watching the video lesson of the American version of weaving a beaded rope:
Having mastered weaving a rope of beads, you will be able to add unique necklaces and bracelets to your jewelry collection. You definitely won’t be able to buy one like this in any store, and you can be completely sure that you won’t see it on anyone else, it’s one of a kind. By the way, this is also a great gift option for a friend. By the way, such strands can act as a handle for an evening bag, especially if it is also made of beads or has beaded elements. So, feel free to dare and start creating!
prostochek.ru
Bead strand - master class for beginners
This article will talk about:
Beads
Threads for Beads
Clamps and Limits
Beaded jewelry is always trendy. The art of beading appeared in ancient times, and since then materials have changed, techniques have been improved and expanded. But beadwork has not gone out of fashion. Today you can buy the most beautiful jewelry, including from famous brands. Or you can learn how to make them yourself - you can handle it, because every woman is a craftswoman at heart. We invite you to dedicate today to a master class on bead braiding.
So, what is a tourniquet and where can it be used?
A strand of beads is an original decoration in the form of a cord. It is voluminous and convex. The beads create a cord, but inside there is an empty celebration. The rope can be used to make a beautiful bracelet, lariat or necklace.
What will you need?
The list of necessities is small - you just need to stock up on thin but strong fishing line, a needle and, of course, beads. Callots (these are clips, special accessories for beading) will help hide the ends of the threads. If you decide to make a bracelet or necklace, you will also need a clasp - you will need to fasten the jewelry on your neck or arm.
Choosing beads
We take beads in several shades - you can choose a combination of colors to your liking. It is advisable not to use small beads (the optimal size is 10-11). And, of course, the beads must be the same size and shape (so you should not buy the cheapest material, take Czech).
What to weave with?
You can weave either crocheted or without a hook using a needle. Both methods are simple - just choose whichever is more convenient for you to work with. You will also need fishing line or strong thread (for example, silk).
Reading the diagram: basic designations
The following conventions are used in bead weaving patterns:
Corrected - a mosaic pattern of a woven pattern;
Draft – drawing of a plait in a spread;
Simulation is what the future finished product will look like.
Study them to easily become familiar with new patterns.
The most popular weaving patterns
To start weaving, you should stock up on materials, choose a weaving pattern and study it. There are many well-known patterns: simple mosaic rope, shaggy, Turkish, square, American, crochet... Let's look at the most popular of them.
Simple mosaic harness
Even beginners who have never woven beads before can handle a simple mosaic strand - the technique is very simple.
When weaving a mosaic strand, an unpaired number of beads is used. For the diagram, we will take a strand of 7 beads, but there can be 5 or 9 of them.
Mosaic strand weaving pattern:
1. String 7 beads onto a fishing line.
2. Connect them into a ring by pulling the end of the fishing line through the first bead.
3. Leave a free line at the base, which you will use to secure the tourniquet. 15 centimeters will be enough.
4. To weave the second row we use the mosaic principle. String a bead - pass it through the first bead, the next through the third, then through the fifth, through the seventh.
5. We make the third row according to the same principle, but now we attach new beads to each one in the previous row (we already missed paired beads there, and we already have the basis for the mosaic).
6. We continue working according to the same scheme until we obtain the length of the harness you need.
7. At the end, secure the work. You can carefully melt the line to do this.
Scheme of weaving a harness using American technology
American technology is quite simple, but allows you to create unique products. To work, you will need size 10 beads, a needle and thread (or fishing line).
Scheme of work:
1. Fasten the first bead - it will become a stop bead.
2. String 12 beads. If you use two colors, then the number of beads for each of them should be the same - 6.
3. Use a needle to place 6 beads of the first color onto the fishing line and tighten. You have made the first loop.
4. We collect 1 bead of the first color and 6 of the second, draw the line again through 6 beads of the first color, but now start with the second. You already have two loops.
5. Then take 1 bead of the first color and 6 of the second, and remove it through 6 starting from the third. This is the third loop. And you work according to this principle until the end.
Crochet bead strand – what’s special?
Some craftswomen prefer crocheting. The scheme of work is as follows:
1. At the end of the thread, tie a knot that will secure the product;
2. Take a bead, hook the thread, and then pull one bead through the loop. The concept of weaving is very similar to knitting simple air loops;
3. Once you have cast on enough stitches, join them into a circle. And then knit a single crochet stitch, stringing the beads evenly.
Shaggy tourniquet
This is one of the most difficult types of weaving, however, if you do everything consistently according to the pattern, you can handle it. Plus, this is an incredibly beautiful harness.
You will need a lot of beads, a needle and thread. With this weaving, the thread is visible, so choose it to match the beads.
The weaving pattern is as follows:
1. String a lot of beads on a thread and make a loop - like when crocheting;
2. Pull 5-7 beads to the loop (look at the size of the beads and the width of the strand you want to get). Knit another loop;
3. And follow the same principle until you get a tourniquet of the length you need.
Square weave
This is also quite a complicated method. To make the product neat and beautiful, choose beads of the same size and follow the pattern exactly. The work steps are as follows:
1. Weaving the first cube. 4 beads are strung on a fishing line or thread, they are combined into a square.
2. Cast on three more beads and pass the needle into the third bead - one through the first from the beginning of the row.
3. String three beads again, but now the needle is in the second bead. In shape, you get a product consisting of two sides of a cube.
4. At the next stage, we raise the walls. Pass the thread through the fifth bead, string another bead and pass the needle through the center of one side of the cube.
5. Then repeat the process - string the bead and pass it through the center, but this time of the second part of the cube. You have a single cube
6. Then work according to a similar principle until the tourniquet is the desired length.
Turkish tourniquet
When weaving a Turkish rope, you can use not only ordinary beads, but also beads and bugles.
Scheme of work:
1. String beads onto the fishing line in this order: 1 glass bead, 3 regular beads.
2. Make an air loop at the end of the thread. Then pull up the first element (3 beads and glass beads) and secure with a loop;
3. When you tighten the thread, the two elements will be folded in half.
4. Pull up the three beads and glass beads again and tighten. Do this three times.
5. Then rotate the product 180 degrees and you will be back to where you started. Pull the hook through the first loop - it will be between the glass beads and the bead.
6. Pull up the glass beads and beads and make a loop.
7. Knit the remaining loops in the same way, and the harness is ready!
Flat harness
Another interesting technique. The flat strand is made very wide - at least twenty beads. Choose the pattern you like and string the beads onto the fishing line in the correct sequence.
The order of steps is the same as when knitting a regular rope using a hook. The only difference is the wide elastic band as the base.
Bugle bead rope
The bugle bead harness looks very original. Beginners should choose small or medium glass beads, but experienced craftswomen can try using long pieces.
Scheme of work:
1. Thread glass beads onto a thread (odd number);
2. Pull the thread tightly;
3. Close the thread into a ring;
4. Pass the end through the glass beads, the first one;
5. String one glass bead and pass the thread through the first, third, fifth and then all the odd ones. The first row is ready;
6. Continue following the same pattern, but now pass the thread through all the beads in the row.
Thus, we hope that our material helped you to make sure that weaving a strand of beads is not at all difficult. If you have diligence and desire and just follow simple patterns, you will manage and will be able to make wonderful jewelry for yourself and gifts for loved ones and friends.
“Mosaic” tourniquet
argaiv1933
The “mosaic” plait is based on the technique of dense weaving. Like all harnesses, it is a hollow cord. The number of beads in the “ring” of the first cast-on row determines its thickness when weaving strands. For this type of strand, weaving with seven beads in a row is optimal. However, you can use another, but always odd, number of beads when making the first row of a mosaic strand: five, nine, eleven, thirteen, fifteen, etc. beads It all depends on the desired thickness of the finished bundle.
You can create patterns on the rope by alternating beads of different colors, or braid the finished rope with a bead mesh. In general, do as your imagination dictates.
Let's look at the order of weaving a mosaic strand using the example of a strand with seven beads in the “ring” of the first row. To weave a mosaic strand, one bead needle is enough.
The sequence of weaving a mosaic strand is as follows.
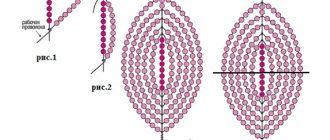
1. On a long thread (approximately 120 - 150 cm) with a needle at the end, you need to collect seven beads of the same color (these beads are marked in green in the diagram), and close them into a ring, passing the needle through the first collected bead. By tightening the resulting “ring” tightly, we get the first row of weaving.
Tip: the second free end of the thread should be at least 10 - 15 cm, so that it can be easily repaired later.
2. For the second row, you need to put one bead on the needle (in the diagram it is a blue bead number 8), and pass the needle through the third bead of the first row (as shown in the diagram).
Advice: you must carefully ensure that the needle passes through the hole of the bead without touching the thread located there. This is especially important on the initial rows of weaving, otherwise it will be impossible to unravel the strand of beads in this place.
3. Next, you should put another bead on the needle (bead 9 is blue in the diagram), and pass the needle through the 5th bead of the first row. Re-assemble one bead (in the diagram it is bead 10), and thread the needle and thread through bead 7 of the first row. It is necessary to tighten the thread well each time, trying to keep its tension even.
4. The third row should be woven in the same way: picking up one bead at a time and, stepping through one bead, thread a thread and a needle through the beads of the previous row, protruding above the rest (in the diagram, the beads of the third row are shown in green and marked with numbers 11 - 14; pass necessary through beads 8 - 10 of the second row of blue).
5. All subsequent rows of the mosaic strand are woven in the same way.
Advice: do not forget to constantly pull the thread while weaving the rope. The tension should be strong enough, but the braided rope should not be very rigid, it should bend easily.
When the strand has reached the required length, it is advisable to weave an additional 3–4 rows, and unravel 3–4 rows of beads from the beginning of weaving, so that the strand is of the same density (at the beginning of weaving, it usually turns out to be more “loose.” The strand is ready and can be sealed threads
irinahollay.ru
Mosaic harness
The mosaic harness is one of the most common, since its implementation scheme is quite simple. It is woven from an odd number of beads. There can be 5, 7, 9 or even more, but it is better to take a smaller number, so the decoration will turn out more neat.
Advice:
During weaving (whatever types of bead strands it may be), you need to ensure that the product is dense and at the same time plastic. To do this, you need to learn how to weave with the same thread tension along the entire length of the decoration.
Weaving pattern.
As we already said, there is nothing complicated about it.
1.
It all starts with stringing the required number of beads onto a fishing line, say 7. Then they are closed into a ring (the free end of the fishing line is pulled through the first bead). In this case, at the base of the product you need to leave 15 centimeters of free fishing line, which will be needed later to secure the harness. The first row is ready.
2.
The second row is woven in a mosaic pattern. That is, now after stringing each new bead, a fishing line or thread is passed through one bead of the first row. First it will be 3rd, then 5th and 7th.
3.
And the third row is made in such a way that the fishing line is pulled through each bead of the second row. That is, its needle must be inserted through the 1st, 2nd, 3rd and so on beads until the current row ends. Then everything else works the same way. The fourth row is a mosaic, the fifth is continuous weaving.
4.
When the rope is of the required length, its ends are secured. They are either woven together, or a fastener is made using special fittings.
The result of such weaving should be a decoration with a fairly dense structure.
Weaving a rope of beads for beginners according to the diagram
Beaded jewelry is always in fashion. Ancient art originated in ancient times, and the first products were made from animal bones and earthenware. Modern craftswomen are constantly searching for new forms and design solutions for their collections.
A strand of beads is a very fashionable and versatile accessory that will gracefully highlight a stylish look. You can make such a decoration with your own hands, knowing simple secrets.
We invite you to plunge into the creative process by learning how to weave a rope of beads for beginners.
Contents of the material
Secrets of experienced craftswomen
To create a stylish beaded accessory, you will need a weaving pattern. Having learned to read schematic drawings, new horizons of beadwork open up for the craftswoman, any creative fantasies come true, the product can be given an interesting shape of a square, spiral, or outer braid. Turkish, mosaic, openwork, “shaggy” and plaited designs are also popular. This accessory can be worn as a separate piece of jewelry or complemented with pendants, various decor, pendants, and chains.
To realize any pattern, it is important to correctly read the diagram, the basic concepts that you can find in the description of the drawing:
- Circumference - the term indicates the width of the rope, and the number indicates the number of beads.
- Repeatofcolors - rapport, or pattern that is repeated from row to row.
- Draft - designation of a weaving pattern in unfolded form.
- Corrected is a mosaic type of weave pattern.
- Simulation - the final form of the product.
The set of any harness always starts from the first row; in the diagram we focus on the first column of the picture. For convenience, nearby columns show the order of stringing the beads, determining the order and number of beads for each element. Beginners should hone their skills in the art of beading using ready-made patterns. When your skill reaches the desired level, you can independently draw weaving patterns on a notebook sheet of checkered paper.
Where to start weaving a beautiful rope? First you need to prepare materials and tools. For the simplest manufacturing method, you will need a needle for stringing beads, knitting threads for lace, and a No. 1 hook. To ensure that the product is smooth, complete, bright and does not lose color, you should choose high-quality beads - Czech or Japanese.
Creativity ideas
The harness is a hollow cord inside; weaving can be done using an openwork or dense technique. Initially, such jewelry was made in the most primitive way: first, they made a wide flat ribbon of beads, then rolled it up and sewed it together. Over time, this technique has undergone significant changes; resourceful needlewomen have found a way to weave a complete product, although in some patterns elements of stitching remain. We invite beginners to learn the basics of a refined art in lessons, to weave a mosaic rope, learn to crochet an accessory, learn the square technique, and make a beautiful American rope with their own hands.
Simple mosaic harness
This pattern is one of the simplest; even novice needlewomen can easily cope with weaving.
The main secret of mosaic weaving of beaded strands is the use of an odd number of beads. There can be 5, 7, 9 or more. The fewer beads, the neater the decoration. It is important to try to ensure that the product is dense, but remains plastic. Beginners should learn to weave with the same thread tension along the entire length.
For a clear example, a diagram will help. The operating algorithm is as follows:
- We string an odd number of beads onto the fishing line, for example, the lucky number 7. We close them with a ring, and pull one end of the thread through the first bead. At the base, you need to leave a free end of the fishing line 15 centimeters long to secure the flagellum.
- We weave the second row according to the mosaic principle. After stringing a new bead, we pass the fishing line through one bead in the first row, the third, then the fifth and seventh.
- We weave the third row by analogy with the second, connecting it with beads in the second row, but using each bead. We continue working until we get the cord of the required length
- At the end we secure the work; if you used fishing line for the base, you can melt the ends with fire.
We cover the “ugly” places with fittings with a fastener. An elegant rope with a dense texture is ready.
Mosaic weaving
American technology
A unique technique allows you to create a truly original accessory - an American harness. By experimenting with colors, shapes and sizes of beads, you can create a luxurious designer collection in a similar way.
To weave an American rope, you need a needle, No. 10 beads, you can use several colors. For the base, take monofilament or fishing line.
The operating procedure is as follows:
- We fasten one bead, it will be a stopper in the weave. If you are using beads of two shades, string six beads of each color. When creating a custom American braid, we will use beige and brown beads.
- Using a needle, carefully draw the fishing line through six beige beads and tighten. This is the first loop.
- We collect one beige bead and six brown ones, draw the line again through six beige ones, but starting from the second. It turned out to be two loops of the tourniquet.
- We make the third loop. We string again one beige bead and six brown ones, draw the line through six beads, now starting with the third. We repeat the weaving principle until the end.
As you can see, the American strand is simple and easy to use; you can show your imagination by playing with the number of beads in a row, the shape and size of the beads.
American tourniquet 1 part
American tourniquet part 2
We crochet a tourniquet
Many craftswomen find it more convenient to weave strands not with a needle, but with a crochet hook.
The principle of this work is as follows:
- Let's prepare threads for knitting lace, a hook, and beads for work.
Advice!
Experience shows that it is more convenient to perform filigree knitting of an elegant accessory with the thinnest hook No.1.
- Let's get to work. First, tie a knot at the end of the thread so that the product holds tightly. Next we take the bead, grab the thread with a hook, pulling it into the loop. The principle is very similar to knitting simple chain stitches.
- When you have collected a sufficient number of loops, tie them into a circle. Next we knit according to the principle of single crochets. The main thing is to remember to string the beads evenly.
The method of crocheting a rope will appeal to all knitting lovers. A sparkling and bright flagellum can become a fashionable accent to a dress or suit, stole or cardigan, knitted by yourself.
We knit a thick rope
Square weave
The technique of weaving a square strand has a more complex pattern. To make the decoration dense and beautiful, it is important to use beads of the same shape and size, and you can experiment with color combinations or patterns.
Let's get started:
- Let's form the first cube. Four beads are strung on a thread and fastened into a square.
- Next, three more beads are collected, and the needle is threaded through one bead from the beginning of the row, that is, into the third.
- Three beads are collected again, and the needle is removed through the second one from the thread. The shape resembles two walls of a cube.
- To raise the walls, the thread is passed into the fifth bead, one bead is strung, and the needle is passed through the central one on one side of the cube.
- The final touch of the element: string one bead and pull the thread through the central bead on the opposite side of the cube.
Harness for 4 beads
The difficulty lies only in weaving the first element, and then the work is repeated by analogy. Advice for beginners: to create a beautiful square strand, use the diagram. It will help you understand the order and algorithm of steps.
An original, beautiful and stylish DIY bead strand is not a dream, but a reality. Undoubtedly, the creative process requires preparation, perseverance and attentiveness, but the result will certainly pleasantly surprise the beginning craftswoman.
Square harness
ethnoboho.ru
Master class for beginners
The next master class is intended for beginners to learn the art of weaving strands of beads.
Now we will talk about those harnesses that are made using a hook and the “column” or “half-column” technique. This lesson will tell you about the main points of the “half column” technique. For work we will prepare large black beads and threads, as well as a hook. The weaving pattern will be visible as you work. Our lesson contains step-by-step photos that should make the process of learning the material easier. Grasping the thread when working with beads is no different from regular crochet, which you can hold the way you like and feel comfortable. To make the initial loop, place the hook on the left under the working thread, then turn it counterclockwise. After this, we pick up the working thread, pull it through the loop, and our air loop is ready. The first loop must be knitted without beads. The second step is that we must pull the bead close to the knitting, and pick up the thread from the back of it. Let's pass this thread through the loop and pull it out. Our first loop is already ready, and the first bead is knitted.
We will knit with our own hands such a rope of beads, the base ring of which consists of six beads. This is why our base has six beads and six chain stitches, because there is one chain stitch behind each bead piece. To loop the base, you need to pull the working thread through the first air loop, which was knitted without a bead. Based on this ring, the work will continue in a spiral. This type of knitting, where there are no lifting loops, is called “semi-stitch”. Next, our work flow will look like this:
- Place the hook at the bottom of the bead from the first row, and move this bead to the right. At the same time, we throw the working thread over it;
- Let's move the next bead closer to the work, pick up the thread from behind it, and knit a half-column. This will be the first bead detail of the second row that we knit. Using this technique, we will continue knitting a rope, looking at all the step-by-step photos that are available in our master class as we go. We knit a small rope just for example. The most important thing is that all the beads are placed in the knitting with the hole facing up, and the threads are neatly arranged and do not stick out.
Having finished the training material, we move on to knitting a real bracelet from beads in the form of a rope with our own hands. Let's choose beads of two colors, gold and beige, and a thread of a suitable color. Leave the thread on the skein and string beads onto it using a bead needle. To determine the amount of beads required, multiply the length of the finished strand by the number of beads in the main circle. Our base will have eight parts, and we need a bracelet 17 cm long. This means we string 136 centimeters of beads. To get a pattern on a rope, we collect beads in the following sequence: 5 beige beads, 1 golden, 1 beige and again 1 gold bead. This tutorial also contains step-by-step photos that are a must-see. Only then will you perform all the operations correctly and be able to make the perfect bead strand.
We make five initial rows of the harness, and then hide the end of the thread inside the work. After this, insert a pin inside the tourniquet. We need a pin to secure the fastener. We securely fasten the pin inside the harness, as shown in the step-by-step photo. After this operation it will be easy to install the metal ends for the fastener. The same operation will need to be performed five rows before the end of the weaving. We knit the last row without beads, using only half-columns. Now the beading of the bracelet is completed, and we need to complete its clasp. If you wish, you can choose the decor you like for the bracelet and secure it. Our master class has come to an end, the bracelet is tied and decorated.
Read
Fascinating weaving of chrysanthemums from beads in detailed master classes
Mosaic cord with cavities / Necklaces, beads, necklaces / Biserok.org
This unusual and very beautiful plait is woven using the mosaic weaving technique, unlike ordinary weaving, this plait has a trick that gives the plait such an unusual shape. Below I will describe in detail the principle of weaving such a rope with visual diagrams.
Necessary materials and tools for weaving:
— Round beads No. 10 color A— Round beads No. 10 color B— Round beads No. 10 color C— Round beads No. 6— Cylindrical beads, can be chopped 1.5 mm— Nylon thread for beads— Needle No. 12— 2 beads 6- 8 mm in diameter— Jewelry pin (pin) 2 pcs— Clasp— Caps